

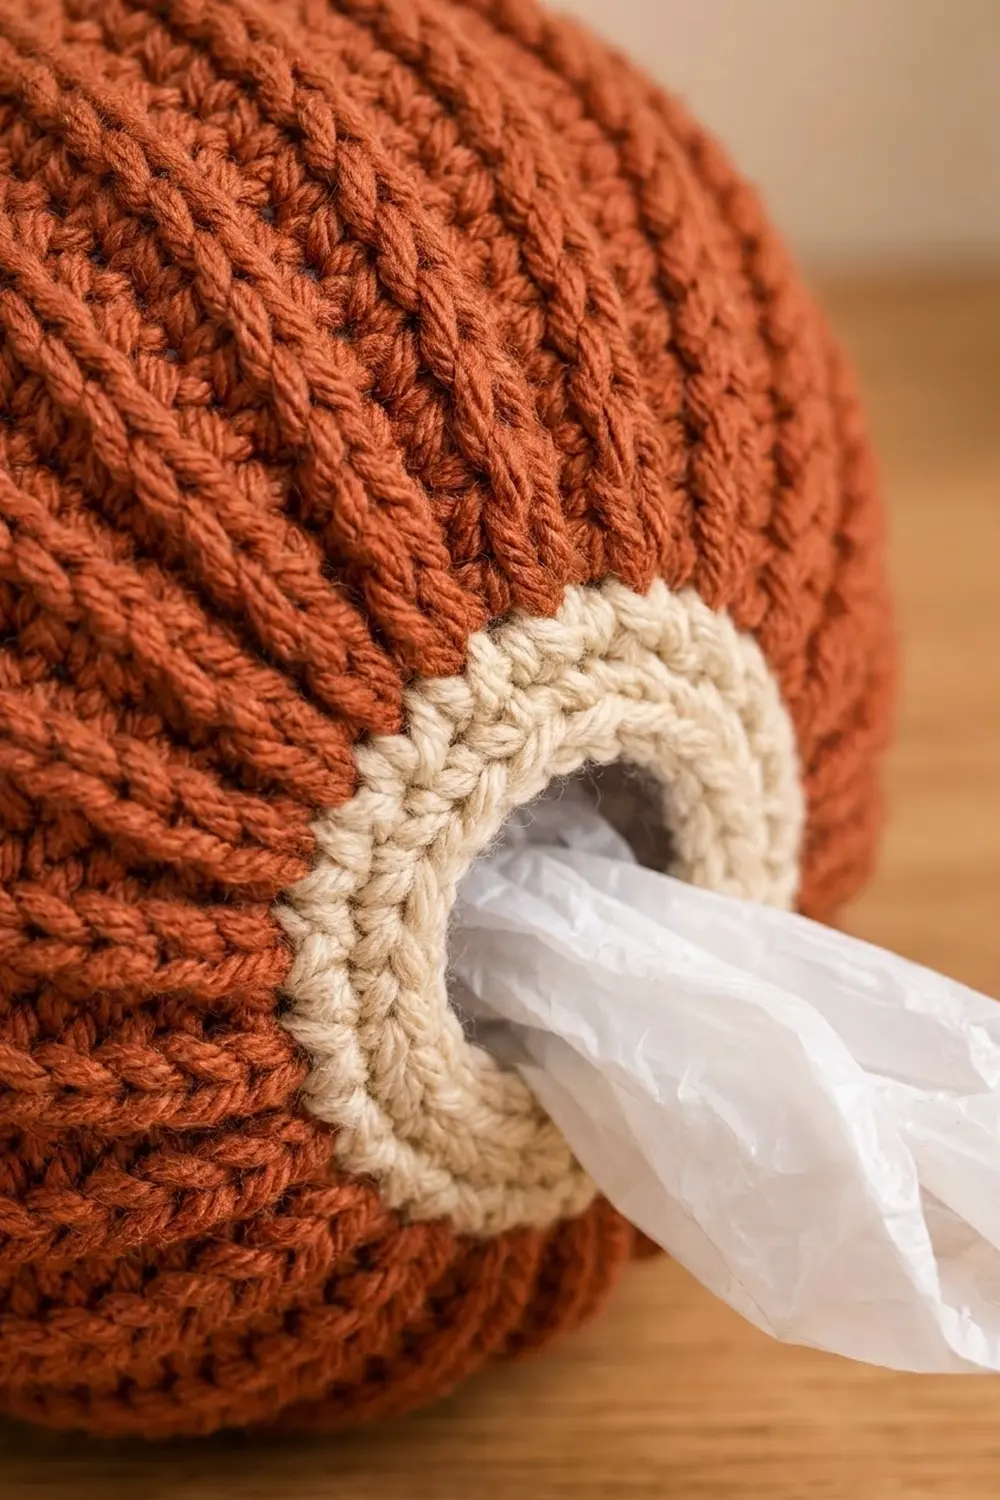
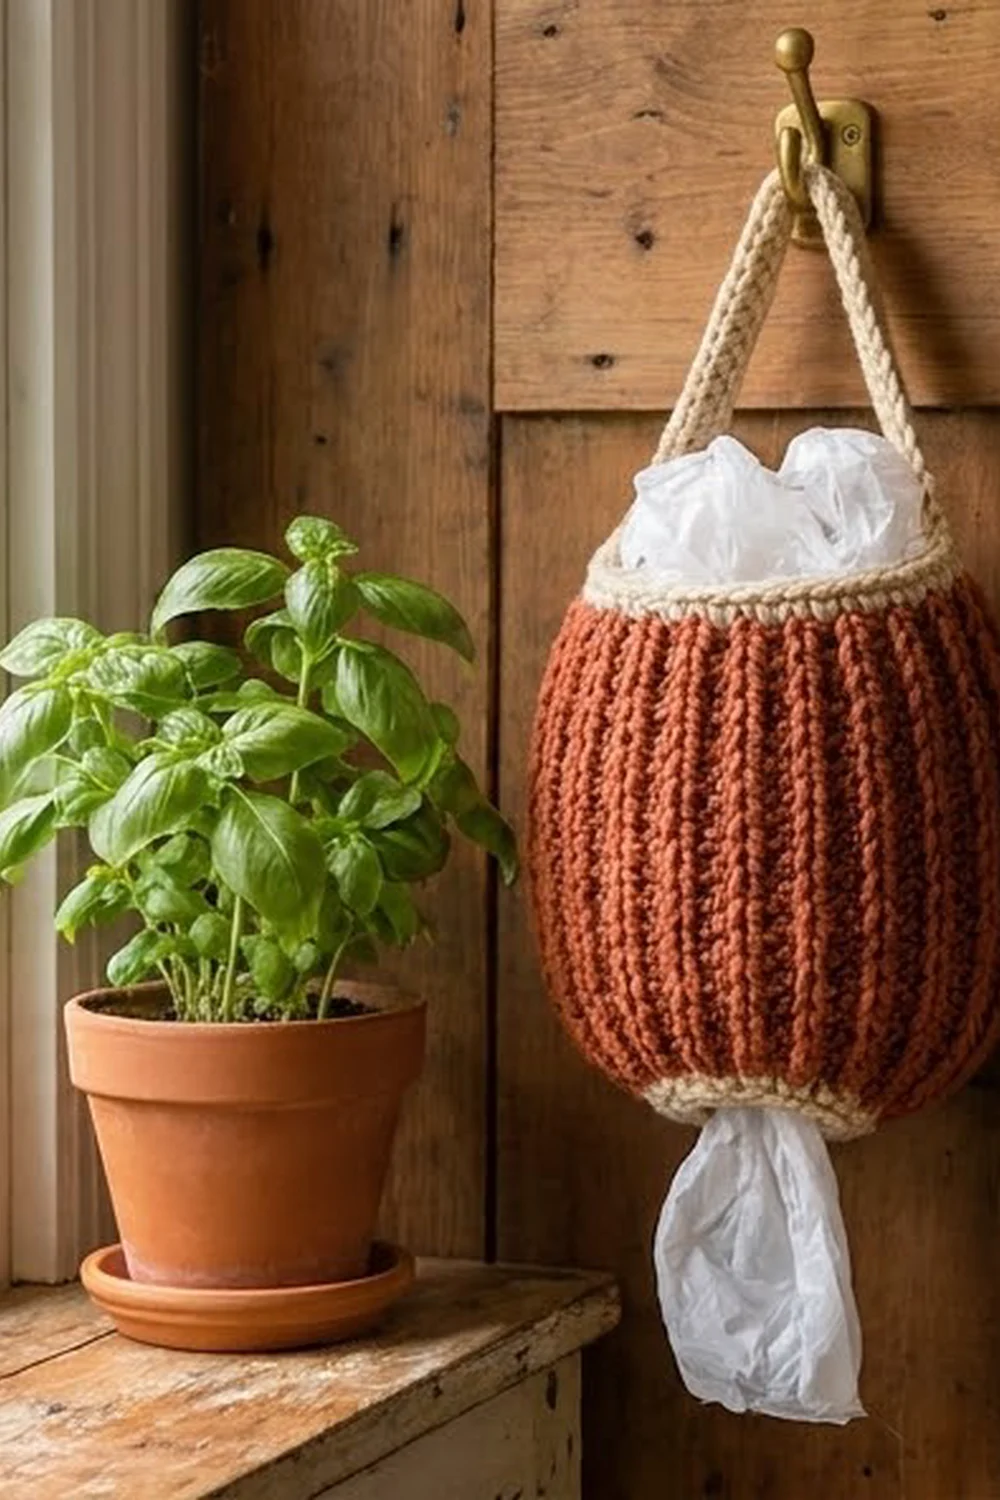
Plastic bags tend to multiply in a cupboard. This bag holder keeps them in one place, hangs neatly on a hook and gives you one bag at a time from the bottom. You push bags in at the top and pull them out through a snug cream ring at the base.
The body is a warm rust or terracotta, with deep vertical ribs that make the shape look like a little pumpkin or lantern. Cream trims finish the top rim, the bottom ring and the hanging strap. The look is cozy and simple, and it suits a kitchen, a pantry door or a laundry corner. It also works well in denim blue or sage green.
This pattern uses US crochet terms. The finished holder measures about 9 in (22.9 cm) wide at its widest point and about 12 in (30.5 cm) tall without the strap. The strap loop adds about 5 in (12.7 cm) above the rim.
The body is worked flat and sideways in back-loop-only rows. Each row mixes single, half double and double crochet, so the piece bulges in the middle and narrows at both ends. You then slip stitch it into a tube, add the top rim and the bottom ring in rounds, and work the strap straight up from the rim.
Finished Size and Construction
- Finished size: about 9 in (22.9 cm) wide x 12 in (30.5 cm) tall, plus a strap loop about 5 in (12.7 cm) high
- Skill level: Easy / Advanced Beginner
- Terminology: US crochet terms
- Yarn weight: Worsted (#4), cotton or cotton blend
- Hook: 5.0 mm (H-8)
- Number of pieces: 1 (the strap and trims are worked onto the body)
- Layout: a single tube, seamed at one side
- Piece size (body, flat, before seaming): 10 in (25.4 cm) long x 18 in (45.7 cm) wide at the center
- Size before border: a 10 in (25.4 cm) tall tube, 18 in (45.7 cm) around the middle and about 9 in (22.9 cm) around each end
- Border depth: top rim 0.75 in (1.9 cm); bottom ring about 1 in (2.5 cm), drawn inward
Materials
Choose a smooth worsted-weight cotton or cotton blend. Cotton holds its shape when the holder is full, and it shows the ribs clearly. Avoid fuzzy or very stretchy acrylics, because the bottom ring may sag.
- Rust / terracotta (main color, MC): 110 g, about 190 m
- Cream (contrast color, CC): 30 g, about 55 m
These amounts include a safety margin of about 15 percent.
Tools:
- 5.0 mm (H-8) crochet hook
- Tapestry needle
- 2 locking stitch markers
- Measuring tape
- Scissors
- Blocking mat and pins, plus a spray bottle
Abbreviations (US Terms)
- ch – chain
- sl st – slip stitch
- sc – single crochet
- hdc – half double crochet
- dc – double crochet
- sc2tog – single crochet 2 together
- BLO – back loop only
- st(s) – stitch(es)
- rnd – round
- ( ) x N – repeat the steps in brackets N times
Special stitch – BLO ribbing: From Row 2 onward, work every stitch into the back loop only. The unused front loops pile up into a raised ridge every 2 rows. When the body is turned into a tube, those ridges become the vertical ribs.
Gauge and Checkpoints
Gauge: 14 sts and 8 rows of dc in BLO = 4 in (10.2 cm) square, using a 5.0 mm hook.
To swatch, ch 15, then work 14 dc and 8 rows of BLO dc. Measure the center of the swatch, not the edges.
Every stitch is the same width, so 14 sts = 4 in (10.2 cm) along the row whether it is sc, hdc or dc. Row height is what changes:
- One dc row is about 0.5 in (1.3 cm) tall
- One hdc row is about 0.4 in (1.0 cm) tall
- One sc row is about 0.25 in (0.6 cm) tall
That difference creates the barrel shape.
Test the body first. The body is the only piece, so treat the first 10 rows as your gauge test.
Checkpoints:
- After Row 1: the row measures 10 in (25.4 cm) long.
- After Row 10: the dc section is about 5 in (12.7 cm) wide, and the sc ends are about 2.5 in (6.4 cm) wide.
- After Row 36: the dc center is 18 in (45.7 cm) wide, and each sc end is about 9 in (22.9 cm).
- After the top rim: the opening measures about 9.1 in (23.1 cm) around.
- After the bottom ring: the hole measures about 6.9 in (17.5 cm) around, which is about 2.2 in (5.6 cm) across.
If your piece is too big, go down one hook size. If it is too small, go up one hook size. Don’t change the stitch counts, because the trim math depends on them.
Body (Main Color)
The body is worked sideways. Each row runs from the top edge of the holder to the bottom edge. The first and last 5 sts of each row are the narrow ends, and the 15 dc in the middle form the widest part.
Foundation: With MC, ch 36.
Row 1: Work into the back bump of each chain. Sc in the 2nd ch from the hook and in the next 4 ch. Hdc in the next 5 ch, dc in the next 15 ch, hdc in the next 5 ch, then sc in the last 5 ch. Turn. (35 sts: 5 sc, 5 hdc, 15 dc, 5 hdc, 5 sc)
Row 2: Ch 1 (does not count as a st). Working in BLO: sc in the first 5 sts, hdc in the next 5 sts, dc in the next 15 sts, hdc in the next 5 sts, sc in the last 5 sts. Turn. (35 sts)
The row is symmetrical, so every row starts and ends with sc, no matter which direction you are working. That keeps a short ch 1 turn on every row.
Rows 3–36: Repeat Row 2. (35 sts in each row; 36 rows total)
Checkpoint: Lay the piece flat. It should be 10 in (25.4 cm) long. It should measure about 18 in (45.7 cm) across the dc center, about 14 in (35.6 cm) across the hdc bands and about 9 in (22.9 cm) across each sc end. Count 18 ridges on the right side.
Seam: Fold the piece so Row 36 lies against the foundation chain, with the right side inside. Ch 1, then sl st through both layers across all 35 sts. Each sl st goes through 1 st of Row 36 and the matching foundation chain. (35 sl sts)
Fasten off and turn the tube right side out. The seam sits in a valley between ribs and almost disappears.
Checkpoint: The tube is 18 in (45.7 cm) around the middle and about 9 in (22.9 cm) around each end. The sc ends gently curl inward.
Top Rim, Bottom Ring and Strap (Border)
All trims use CC. Count each row end of the body as one stitch space, so each end of the tube has 36 row ends.
Border gauge: 14 sc = 4 in (10.2 cm) around, and 4 sc rounds = about 1 in (2.5 cm) deep. If you fold the tube flat, half of each round’s stitches sit on the front and half on the back. The “per side” numbers below use that.
Top Rim
Choose the end you want as the top. Both ends are the same.
Rnd 1: Join CC with a sl st in the row end at the seam. Ch 1, then work 1 sc in each row end around. Sl st to the first sc. (36 sc; 18 per side)
Rnd 2: Ch 1, then (sc in the next 7 sts, sc2tog) x 4. Sl st to the first sc. (32 sts: 28 sc + 4 sc2tog; 16 per side)
Rnd 3: Ch 1, sc in each st around. Sl st to the first sc. (32 sc; 16 per side) Do not fasten off.
Why the math works: The sc rows are short, so 36 row ends spread across about 9 in (22.9 cm). That is slightly less room than 36 sc need, which is 10.3 in (26.2 cm). Rnd 1 therefore relaxes a little, and Rnd 2 removes 4 sts to bring the rim to 32 sc. At 14 sts per 4 in, 32 sc = 9.1 in (23.1 cm), which matches the end of the body and gives a firm, flat rim. The rim is 3 sc rounds deep, or 0.75 in (1.9 cm).
Marking for the strap: Place a marker in st 1 and another in st 17 of Rnd 3. They sit exactly 16 sts apart, on opposite sides of the rim. Sts 1–4 and sts 17–20 will hold the two ends of the strap.
Strap
Row 1: Continue from Rnd 3. Ch 1, then sc in sts 1–4 of the rim. Turn. (4 sc)
Rows 2–48: Ch 1, sc in each st across. Turn. (4 sc in each row)
Checkpoint: The strap is about 12 in (30.5 cm) long and about 1.1 in (2.8 cm) wide.
Attach: Bring the strap across the opening without twisting it. Line up Row 48 with rim sts 17–20, then sl st through both layers to join. (4 sl sts)
Strap edging: Sl st evenly down one long edge of the strap, working 1 sl st in each row end. (48 sl sts) Fasten off.
Join CC at the other long edge and repeat. (48 sl sts) This firms the edges and gives the strap its neat, braided-cord look. Fasten off.
Bottom Ring
Rnd 1: Join CC with a sl st in the row end at the seam on the bottom end. Ch 1, then work 1 sc in each row end around. Sl st to the first sc. (36 sc; 18 per side)
Rnd 2: Ch 1, then (sc in the next 4 sts, sc2tog) x 6. Sl st to the first sc. (30 sts: 24 sc + 6 sc2tog; 15 per side)
Rnd 3: Ch 1, then (sc in the next 3 sts, sc2tog) x 6. Sl st to the first sc. (24 sts: 18 sc + 6 sc2tog; 12 per side)
Rnd 4: Ch 1, sc in each st around. Sl st to the first sc. (24 sc; 12 per side)
Rnd 5: Working in BLO, sl st in each st around. (24 sl sts; 12 per side) Fasten off.
Why the math works: Rnds 2 and 3 each remove 6 sts, so the ring turns inward like the bottom of a bowl. The final 24 sts = 6.9 in (17.5 cm) around, which is an opening about 2.2 in (5.6 cm) across. That is tight enough to hold a full load of bags and wide enough for one bag to slide out. The sl st round in Rnd 5 stops the edge from stretching over time. The ring is about 1 in (2.5 cm) deep.
Final Blocking
- Weave in all ends along the seam or inside the CC rounds, where they won’t show.
- Spray the holder evenly until it is damp, not dripping.
- Stuff the holder firmly with plastic bags or a rolled towel to give it its egg shape.
- Push the ribs gently into straight vertical lines from top to bottom.
- Pin the strap flat in a gentle arch, then check that it is 1.1 in (2.8 cm) wide along its whole length.
- Shape the rim into an even circle about 9.1 in (23.1 cm) around.
- Leave it to dry completely, which takes about 24 hours, then remove the stuffing.
Final Quality-Control Checklist
- 36 rows in the body, with 18 visible ribs
- 35 sts in every body row: 5 sc, 5 hdc, 15 dc, 5 hdc and 5 sc
- The seam is flat and sits between ribs
- The top rim has 32 sc and measures about 9.1 in (23.1 cm) around
- The strap has 48 rows of 4 sc, is joined to sts 1–4 and 17–20, and is not twisted
- The bottom ring has 24 sts and a hole about 2.2 in (5.6 cm) across
- The holder is about 9 in (22.9 cm) wide and 12 in (30.5 cm) tall without the strap
- All ends are woven in securely
Troubleshooting
The ribs look flat. Check that you are working into the back loop only on every row from Row 2 onward. Working through both loops removes the ridges.
The body is a straight tube, not a barrel. Count your stitch heights in each row. Every row needs the full 15 dc in the center.
The rim ruffles. You may have skipped the decreases in Rnd 2. Rnd 3 should have 32 sts, not 36.
The rim pulls in or puckers. Work Rnd 1 more loosely, or use a hook 0.5 mm larger for the rim rounds only.
Bags fall out of the bottom. The hole is too loose. Work Rnd 5 more firmly, or add one more round of (sc 2, sc2tog) x 6 to bring it to 18 sts.
Bags are hard to pull out. Skip Rnd 5, or work it more loosely.
The strap twists or stretches. Make sure it was flat when you attached it, and keep the sl st edging firm along both sides.
The seam shows. Sl st through both loops of each stitch, and keep your tension even with the body rows.
Care
Hand wash in cool water with a mild soap, then reshape and lay flat to dry. Cotton holds up to a gentle machine wash in a laundry bag, but always reshape it while damp.
Final Notes
The measurement chain is simple:
- 35 sts at 14 sts per 4 in give a body 10 in (25.4 cm) tall.
- 36 rows give 18 ribs and a circumference of 18 in (45.7 cm) at the middle, narrowing to about 9 in (22.9 cm) at each end.
- The top rim settles at 32 sts, which is 9.1 in (23.1 cm) around.
- The bottom ring settles at 24 sts, which is 6.9 in (17.5 cm) around.
- The strap’s 48 rows give a 12 in (30.5 cm) handle.
If each checkpoint matches, your holder will hang neatly and give you one bag at a time.
Happy crocheting!