

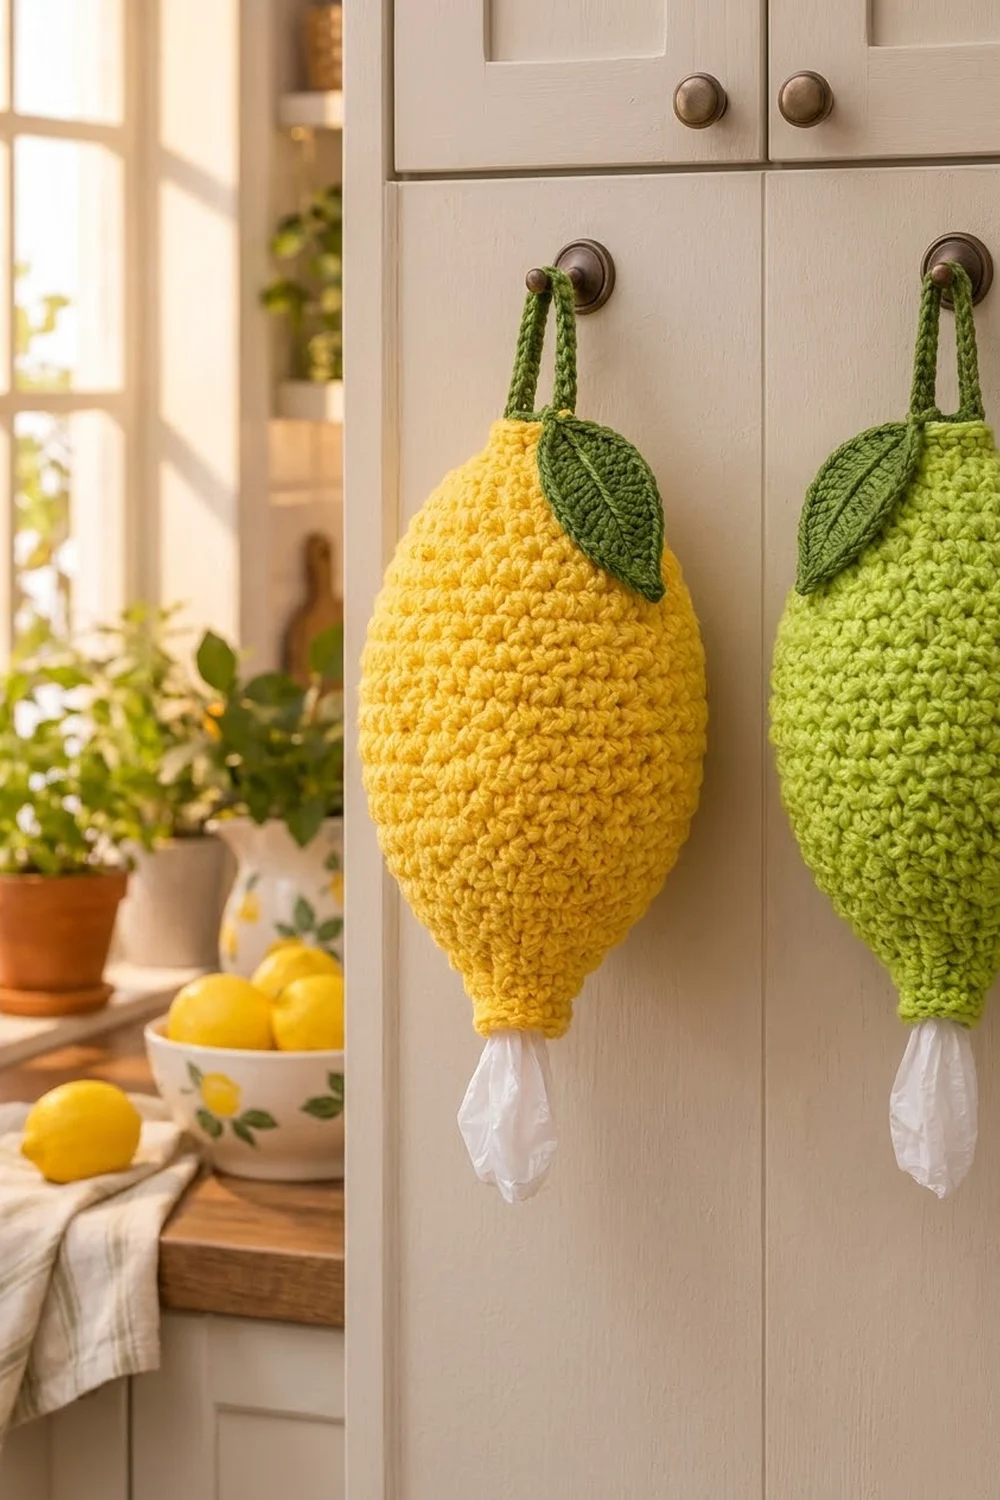
This cheerful lemon keeps loose grocery bags tidy and brightens up a kitchen door. You stuff bags in through the top opening and pull them out one at a time through the small cuffed opening at the bottom tip. A green leaf and a hanging loop finish the fruit look.
The body is sunny yellow, and the leaf and loop are forest green. Dense single crochet gives a firm, pebbly texture like real citrus peel, and it holds its oval shape even when the holder is only half full. For a lime version, swap the yellow for a bright lime green and keep the same green accents.
The pattern uses US crochet terms. The holder measures 11.5 in (29.2 cm) tall and 6.9 in (17.5 cm) wide at its widest point, not counting the hanging loop. With the loop it hangs about 14.5 in (36.8 cm) long.
Construction is simple. You start at the bottom with a chain ring, increase gently to shape the lower tip, and work straight through the middle. Then you decrease toward the top opening. After that, you add a ribbed cuff to the bottom opening and a crab-stitch edge to the top. Finally, you make the leaf and the loop and sew them on.
Finished Size and Construction
- Finished size: 11.5 in (29.2 cm) tall x 6.9 in (17.5 cm) wide, laid flat
- Skill level: Easy
- Terminology: US crochet terms
- Yarn weight: Worsted (#4)
- Hook: 4.5 mm (US 7)
- Number of pieces: 1 body, plus 1 leaf and 1 hanging loop sewn on
- Layout: a single vertical tube, open at both ends
- Body size before border: 10.5 in (26.7 cm) tall x 6.9 in (17.5 cm) wide
- Border depth: bottom cuff 0.75 in (1.9 cm); top edge 0.25 in (0.6 cm)
- Bottom opening: 2.3 in (5.8 cm) wide, laid flat
- Top opening: 3.4 in (8.6 cm) wide, laid flat
Materials
Yarn: Use a smooth worsted-weight cotton or acrylic. Cotton gives the crispest stitch texture and holds its shape well. Acrylic is lighter and a little softer. Avoid fuzzy or very splitty yarns, because they hide the pebbly texture and snag on plastic bags.
- Yellow (body): 50 g / 90 m
- Forest green (leaf and loop): 10 g / 18 m
These quantities include a safety margin of about 25%. For a lime version, replace the yellow with the same amount of lime green.
Tools:
- 4.5 mm (US 7) crochet hook
- Locking stitch markers (at least 2)
- Tapestry needle
- Scissors
- Measuring tape
- Pins for placing the leaf and loop
Abbreviations (US Terms)
- ch – chain
- sl st – slip stitch
- sc – single crochet
- hdc – half double crochet
- dc – double crochet
- inc – 2 sc in the same stitch
- sc2tog – single crochet 2 together (a decrease)
- blo – back loop only
- rnd(s) – round(s)
- sp – space
Special stitch: reverse sc (crab stitch). Working from left to right (if you are right-handed), insert the hook into the next stitch to the right. Yarn over, pull up a loop, yarn over, and draw through both loops on the hook. This makes a firm, corded edge.
Gauge and Checkpoints
Gauge: 14 sc and 16 rnds = 4 in (10.2 cm) in sc worked in joined rounds. That works out to 3.5 stitches and 4 rounds per inch.
Treat the first 9 rounds of the body as your gauge test, because they show both your stitch width and your round height.
Checkpoints:
- After Rnd 9: the piece is 2.25 in (5.7 cm) tall and 6.9 in (17.5 cm) wide laid flat. The full circumference is 13.7 in (34.8 cm).
- After Rnd 33: the piece is 8.25 in (21.0 cm) tall.
- After Rnd 42: the piece is 10.5 in (26.7 cm) tall and the top opening lies 3.4 in (8.6 cm) wide.
- After the border: the piece is 11.5 in (29.2 cm) tall.
If your piece is too big (more than 7.2 in / 18.3 cm wide after Rnd 9), switch to a 4.0 mm (US G-6) hook and start again.
If your piece is too small (less than 6.6 in / 16.8 cm wide), switch to a 5.0 mm (US H-8) hook.
A difference in height of up to 0.25 in (0.6 cm) is fine. You can correct it by adding or removing one straight round between Rnds 10 and 33.
Body
The body is worked in joined rounds from the bottom up, with the right side facing you throughout. Each round begins with a ch 1, which does not count as a stitch, and ends with a sl st to the first sc. Keep the joins lined up, because they will be at the back of the holder.
Foundation: With yellow, ch 16. Join with a sl st to the first ch to form a ring, taking care not to twist the chain.
Lower Tip (Increase Section)
Rnd 1: Ch 1, sc in each ch around, join. (16 sts)
Rnd 2: Ch 1, sc in each st around, join. (16 sts)
Rnd 3: Ch 1, sc in next st, inc in next st; repeat from * 8 times, join. (24 sts)
Rnd 4: Ch 1, sc in each st around, join. (24 sts)
Rnd 5: Ch 1, sc in next 2 sts, inc in next st; repeat from * 8 times, join. (32 sts)
Rnd 6: Ch 1, sc in each st around, join. (32 sts)
Rnd 7: Ch 1, sc in next 3 sts, inc in next st; repeat from * 8 times, join. (40 sts)
Rnd 8: Ch 1, sc in each st around, join. (40 sts)
Rnd 9: Ch 1, sc in next 4 sts, inc in next st; repeat from * 8 times, join. (48 sts)
Increasing on every other round tapers the tip gently, so it looks like a lemon rather than a blunt cup. Check your gauge now.
Middle (Straight Section)
Rnds 10–33: Ch 1, sc in each st around, join. (48 sts in each round; 24 rounds total)
Measure the height after Rnd 33. It should be 8.25 in (21.0 cm).
Upper Taper (Decrease Section)
Rnd 34: Ch 1, sc in next 4 sts, sc2tog; repeat from * 8 times, join. (40 sts)
Rnds 35–36: Ch 1, sc in each st around, join. (40 sts)
Rnd 37: Ch 1, sc in next 3 sts, sc2tog; repeat from * 8 times, join. (32 sts)
Rnds 38–39: Ch 1, sc in each st around, join. (32 sts)
Rnd 40: Ch 1, sc in next 2 sts, sc2tog; repeat from * 8 times, join. (24 sts)
Rnds 41–42: Ch 1, sc in each st around, join. (24 sts)
Don’t fasten off. Keep the working loop on a stitch marker for the top edge.
The upper taper decreases more slowly than the lower tip increased, with two straight rounds between each decrease round. This gives the softer, rounder shoulder of a real lemon. At 24 stitches, the top opening is still wide enough to push a handful of bags through.
Leaf
With forest green, ch 11.
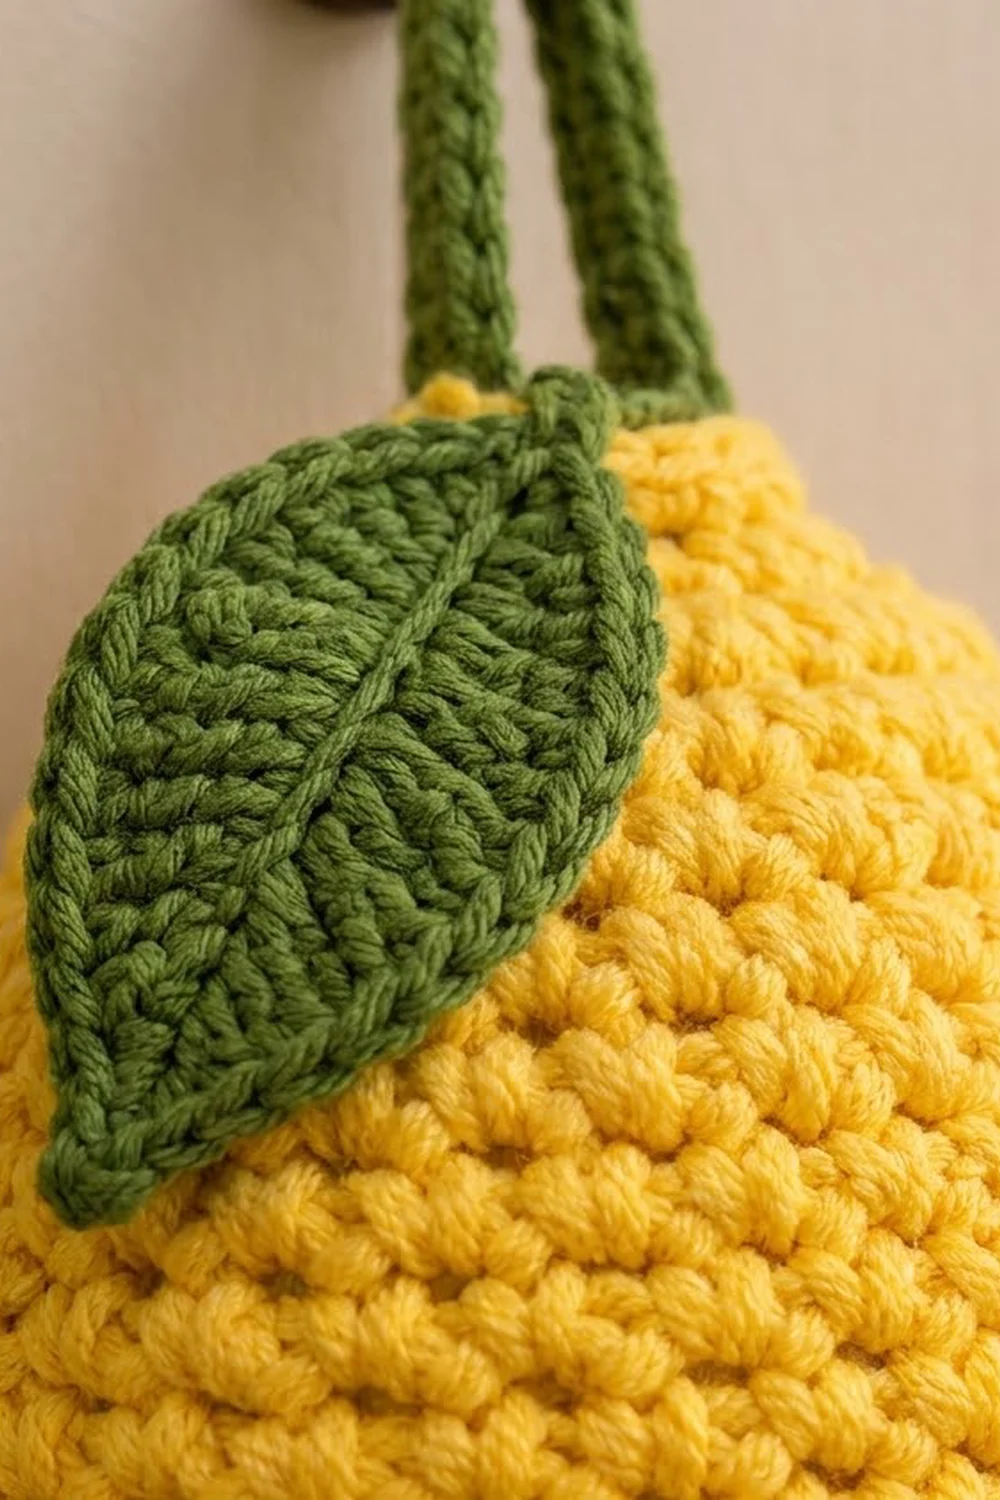
Side 1: Starting in the 2nd ch from the hook, work 1 stitch in each ch as follows: sl st, sc, hdc, dc, dc, dc, hdc, hdc, sc. That is 9 sts, and you are now at the last ch.
Tip: In the last ch, work (sc, ch 2, sc).
Side 2: Rotate the piece and work into the free loops on the other side of the foundation chain: sc, hdc, hdc, dc, dc, dc, hdc, sc, sl st. That is 9 sts.
Join with a sl st to the first sl st. Fasten off and leave a 12 in (30.5 cm) tail for sewing.
Total: 22 sc, hdc and dc stitches, 2 sl sts, and one ch-2 point.
Because the sides mirror each other, the dc stitches meet at the middle to make the widest part of the leaf. The sl sts at the base and the ch-2 at the tip make points at both ends. The foundation chain runs down the middle and forms the center ridge.
Leaf size: about 3 in (7.6 cm) long and 1.5 in (3.8 cm) wide.
Hanging Loop
With forest green, ch 26.
Row 1: Sc in the 2nd ch from the hook and in each ch across. (25 sts)
Row 2: Ch 1, turn, sl st in each st across. (25 sts)
Fasten off and leave a 12 in (30.5 cm) tail.
The strip measures 7.1 in (18.0 cm). The row of sl sts firms up the strip so it doesn’t stretch when the holder is full.
Border
The border is worked at the same gauge as the body: 3.5 sts and 4 rnds per inch. Both the bottom cuff and the top edge are trim rounds, so you work exactly 1 stitch into each existing stitch or chain and add none.
Top Edge
Pick up the held loop at the top of Rnd 42.
Rnd 1: Ch 1, reverse sc in each st around, join. (24 + 0 added = 24 sts)
Fasten off. Depth: 0.25 in (0.6 cm).
Bottom Cuff
Turn the body upside down. Join yellow at the back join, working into the free loops of the foundation chain.
Rnd 1: Ch 1, sc in each free loop of the foundation chain, join. (16 + 0 added = 16 sts)
Rnds 2–3: Ch 1, sc blo in each st around, join. (16 + 0 added = 16 sts)
Fasten off. Depth: 0.75 in (1.9 cm).
Why the math works:
- The foundation ring has 16 chains, so the cuff starts with 16 sts and stays at 16. The bottom opening stays 2.3 in (5.8 cm) wide, so it grips the bags gently without flaring.
- Working into the back loop only leaves ridges that look like ribbing.
- The top edge works 1 stitch into each of the 24 stitches in Rnd 42, so the opening stays 3.4 in (8.6 cm) wide.
- Total height: 10.5 in (26.7 cm) body + 0.75 in (1.9 cm) cuff + 0.25 in (0.6 cm) top edge = 11.5 in (29.2 cm).
Final Blocking
- Weave in all the yellow tails, working them along the back join line.
- Stuff the body firmly with plastic bags or a rolled towel so it takes on its full oval shape.
- Mist it lightly with water, or hover a steam iron 1 in (2.5 cm) above acrylic yarn. Never press the iron onto the fabric.
- Smooth the stitches with your hands. Check that the piece is 6.9 in (17.5 cm) wide and 11.5 in (29.2 cm) tall.
- Pin the leaf flat, mist it, and let it dry completely.
- Let the body dry fully, still stuffed, before you attach anything.
Attaching the loop: Fold the strip into a U. Pin the ends side by side, about 1 in (2.5 cm) apart, on the inside of the back wall at the center top. Overlap each end 0.5 in (1.3 cm) below the top edge, which leaves a loop about 3 in (7.6 cm) tall. Whipstitch both ends securely, going through all the layers twice.
Attaching the leaf: Place the base of the leaf just below the top edge on the front, a little to the left of center, and angle the tip down toward the left. Sew around the whole outline with small stitches so the leaf can’t curl or snag.
Final Quality-Control Checklist
- Each round count matches: 16, 24, 32, 40, 48, then 40, 32, 24.
- The body is 10.5 in (26.7 cm) tall before the border and 11.5 in (29.2 cm) after.
- The widest point lies 6.9 in (17.5 cm) wide.
- The bottom opening is 2.3 in (5.8 cm) wide and the cuff ridges look even.
- The crab-stitch top edge lies flat without waving.
- The leaf has two sharp points and a straight center ridge.
- The loop is centered and sewn through all layers.
- All the joins line up at the back.
- No yarn tails are visible from the front.
Troubleshooting
The joins drift to one side: Make sure the first sc of each round goes into the same stitch as the joining sl st, not the next stitch over.
The bottom tip looks blunt: You may have worked the increases on consecutive rounds. Check that Rnds 2, 4, 6 and 8 are plain sc rounds.
The top opening is ruffled: You may have added stitches in the reverse sc round. Count to 24 and redo the round if needed.
Bags fall out of the bottom: Work the cuff with a 4.0 mm hook, or add a 4th round of sc blo (16 sts).
The leaf curls: Block it flat and pinned, then sew around the full outline instead of tacking it only at the base.
The fabric is see-through: Your tension is too loose. Go down a hook size and check the Rnd 9 checkpoint again.
Care
Hand wash in cool water with a mild soap, press out the water in a towel, and reshape while damp. Dry flat, stuffed with a towel so it keeps the lemon shape.
Final Notes
The measurement chain runs like this:
- Gauge is 3.5 sts and 4 rnds per inch.
- Rnd 9 gives 48 sts and a width of 6.9 in (17.5 cm).
- Rnd 33 brings the height to 8.25 in (21.0 cm).
- Rnd 42 gives 24 sts and a height of 10.5 in (26.7 cm).
- The cuff adds 0.75 in (1.9 cm) and the top edge adds 0.25 in (0.6 cm), for a finished height of 11.5 in (29.2 cm).
If you check those numbers as you go, your lemon will come out the right size and shape. Make a lime to go with it and your kitchen door will have a matching pair.
Happy crocheting!