

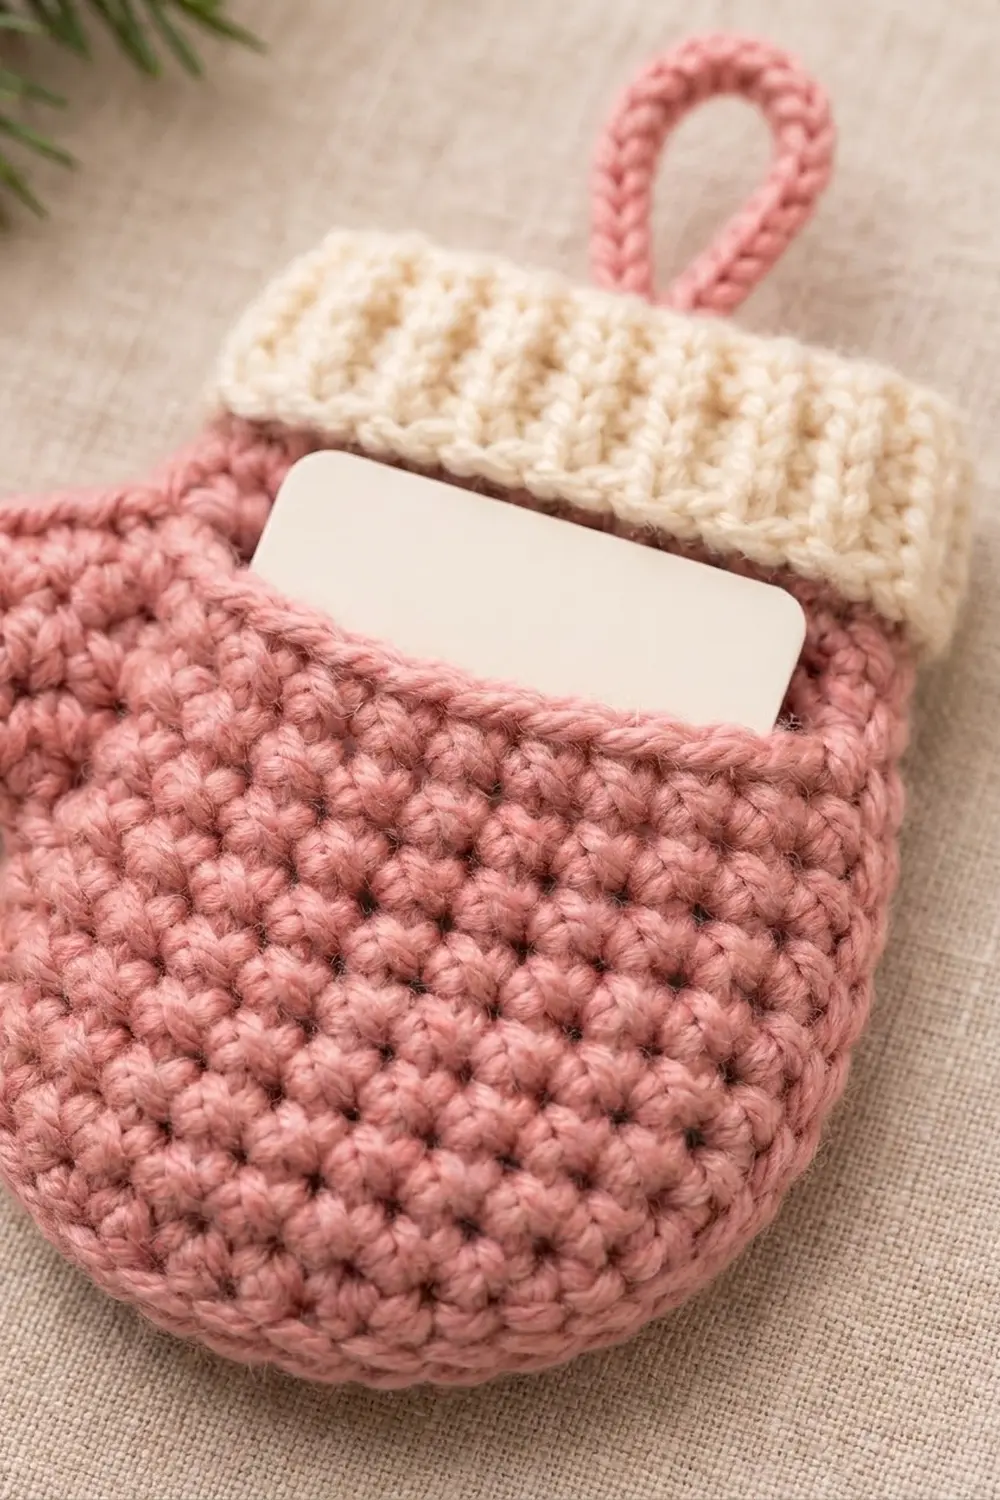
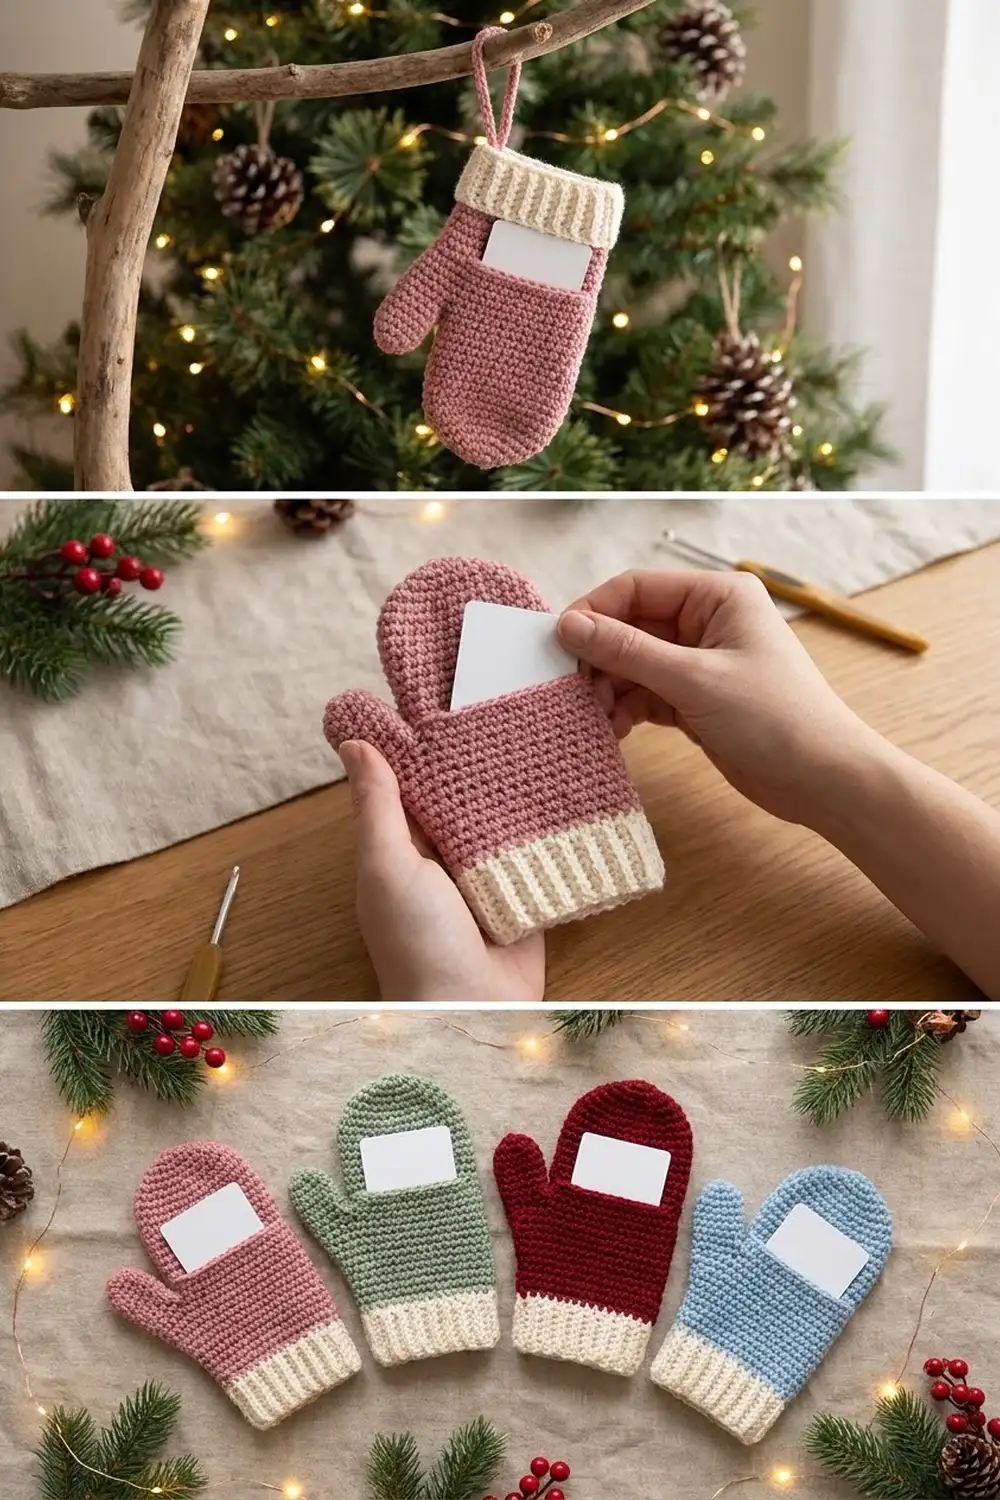
This little mitten turns a gift card into a present you can hang on the tree. The body is dusty rose pink with a soft cream ribbed cuff. A pocket on the front holds a standard gift card, and the top of the card tucks neatly under the cuff.
The fabric is dense single crochet, so the shape stays crisp and the card stays put. The style is cozy and slightly vintage. It looks just as good in sage green, deep red, or light blue with the same cream cuff.
This pattern uses US crochet terms. The mitten body is 4.5 in (11.4 cm) wide and 4.5 in (11.4 cm) tall. It is 5.5 in (14.0 cm) wide with the thumb and 6 in (15.2 cm) tall with the hanging loop.
The construction is simple. You crochet a back panel and a shorter pocket panel that start with the same rounded bottom. One border round joins them and outlines the mitten. Then you add a small oval thumb, a ribbed cuff worked in the back loop only, and a hanging loop.
Finished Size and Construction
- Finished size: body 4.5 in × 4.5 in (11.4 cm × 11.4 cm); 5.5 in (14.0 cm) wide with thumb; 6 in (15.2 cm) tall with loop
- Skill level: Easy
- Terminology: US
- Yarn weight: Worsted (#4)
- Hook: 4.0 mm (G-6)
- Number of pieces: 1 finished ornament made from 5 parts (back panel, pocket, thumb, cuff, loop)
- Layout: pocket over the lower front, cuff across the top front, thumb on the left side, loop at center top
- Back panel before border: 4 in × 4 in (10.2 cm × 10.2 cm)
- Pocket before border: 4 in wide × 2 in tall (10.2 cm × 5.1 cm)
- Border depth: 0.25 in (0.6 cm) on each edge
- Holds: a standard card, 2.125 in × 3.375 in (5.4 cm × 8.6 cm), standing upright
Materials
Choose a smooth worsted weight cotton or cotton blend. Smooth yarn shows each stitch clearly and makes a firm fabric. Very fuzzy yarn hides the texture and makes the pocket harder to use.
- Color A, dusty rose pink: 16 g / 32 m (35 yd)
- Color B, cream: 4 g / 8 m (9 yd)
These amounts include about 20 percent extra for your gauge test and for weaving in ends.
Tools:
- 4.0 mm (G-6) crochet hook
- Tapestry needle
- Scissors
- 4 locking stitch markers
- Sewing pins
- A gift card, or a piece of cardstock cut to 2.125 in × 3.375 in (5.4 cm × 8.6 cm), for test fitting
Abbreviations (US Terms)
- ch – chain
- sc – single crochet
- sl st – slip stitch
- st(s) – stitch(es)
- inc – 2 sc in the same stitch
- BLO – back loop only
- rnd – round
Special stitch – sc BLO: Put your hook into the back loop only of the stitch. Yarn over and pull up a loop, then yarn over and pull through both loops. When you work it in rows, each row leaves a ridge, and the ridges line up into vertical ribs on the cuff.
Gauge and Checkpoints
Gauge: 16 sc and 18 rows = 4 in (10.2 cm) in sc worked in rows. That is 4 sts and 4.5 rows per 1 in (2.5 cm).
Make the back panel first and use it as your gauge test. Every other part depends on it.
Checkpoints:
- After Row 6 of the back panel, the piece is 4 in (10.2 cm) wide.
- After Row 18 of the back panel, the piece is 4 in (10.2 cm) tall.
- After Row 9 of the pocket, the pocket is 2 in (5.1 cm) tall.
- After the border, the body is 4.5 in × 4.5 in (11.4 cm × 11.4 cm).
If your panel is too big, switch to a 3.75 mm hook. If it is too small, switch to a 4.5 mm hook. Being off by 0.25 in (0.6 cm) is fine as long as the card still slides in easily. The pocket only needs to be wider than 2.125 in (5.4 cm), so there is plenty of room.
Back Panel
Use Color A. Work in rows, starting at the rounded bottom, and turn at the end of every row. The ch 1 at the start of a row never counts as a stitch.
Row 1: Ch 9. Sc in the 2nd ch from the hook and in each ch across. (8 sc)
Row 2: Ch 1, inc in the first st, sc in the next 6 sts, inc in the last st. (10 sc)
Row 3: Ch 1, inc, sc in the next 8 sts, inc. (12 sc)
Row 4: Ch 1, inc, sc in the next 10 sts, inc. (14 sc)
Row 5: Ch 1, sc in each st across. (14 sc)
Row 6: Ch 1, inc, sc in the next 12 sts, inc. (16 sc)
Rows 1–6 form the rounded bottom. Row 5 has no increases, and that straight row keeps the curve smooth instead of pointed.
Rows 7–18: Ch 1, sc in each st across. (16 sc in each row)
Fasten off and weave in the ends. The panel is 4 in × 4 in (10.2 cm × 10.2 cm), with a rounded bottom and a flat top.
Use Color A. Rows 1–9 of the pocket match the back panel row for row, so the edges line up exactly when you join them.
Rows 1–6: Work the same as Rows 1–6 of the back panel. (16 sc at the end of Row 6)
Rows 7–9: Ch 1, sc in each st across. (16 sc in each row)
Row 10 (trim row): Ch 1, sl st loosely in each st across. (16 sl sts: 1 in each of the 16 existing sts + 0 added)
The slip stitches make the firm ridge along the top of the pocket and keep the opening from stretching. Fasten off and leave a 6 in (15.2 cm) tail.
Checkpoint: the pocket is 4 in (10.2 cm) wide and 2 in (5.1 cm) tall.
Thumb
Use Color A. Work in a spiral without joining, and mark the first stitch of each rnd.
Rnd 1: Ch 5. Sc in the 2nd ch from the hook and in the next 2 ch. Work 3 sc in the last ch. Turn the piece so you can work along the other side of the chain, and sc in the next 2 ch. Work 2 sc in the last ch, which is the same ch that holds the first sc. (10 sc: 3 + 3 + 2 + 2)
Rnd 2: Sc in the next 3 sts, inc in each of the next 3 sts, sc in the next 2 sts, inc in each of the next 2 sts. (15 sc: 3 + 6 + 2 + 4)
Sl st in the next st and fasten off, leaving a 10 in (25.4 cm) tail for sewing. The thumb is a flat oval about 1.5 in × 1 in (3.8 cm × 2.5 cm).
Cuff
Use Color B. You work the cuff sideways, so the ribs run up and down once it is sewn on.
Row 1: Ch 6. Sc in the 2nd ch from the hook and in each ch across. (5 sc)
Rows 2–20: Ch 1, sc BLO in each st across. (5 sc in each row)
Fasten off and leave a 20 in (50.8 cm) tail. The cuff is 1.25 in (3.2 cm) tall and about 4.5 in (11.4 cm) long. Each long edge has 20 row-ends.
Hanging Loop
Use Color A.
Row 1: Ch 17. Sc in the 2nd ch from the hook and in each ch across. (16 sc)
Fasten off and leave an 8 in (20.3 cm) tail. The strip is 4 in (10.2 cm) long.
Border
On Rows 1–9 the border joins the pocket to the back panel. All the way around, it makes the clean outline that frames the mitten.
Border gauge: Work 1 sc in each stitch along the top, 1 sc in each row-end along the sides, and 1 sc in each foundation chain along the bottom. This keeps a sc edge flat. The border adds 0.25 in (0.6 cm) to every edge.
Setup: Lay the back panel right side up. Place the pocket on top, also right side up, with the foundation chains lined up. Pocket Row 9 sits exactly over back Row 9. Pin the side edges together.
Border Rnd 1: Join Color A in the last st of back Row 18, at the top right corner.
- Top edge: Ch 1, 3 sc in the first st, sc in the next 14 sts, 3 sc in the last st. (20 sc)
- Left side: Work 1 sc in each row-end of back Rows 17–10, through the back panel only. (8 sc) Then work 1 sc in each row-end of Rows 9–1, through both the pocket and the back panel. (9 sc) Side total: 17 sc.
- Bottom edge: Working through both foundation chains together, inc in the first ch, sc in the next 6 ch, inc in the last ch. (10 sc)
- Right side: Work 1 sc in each row-end of Rows 1–9 through both layers (9 sc), then Rows 10–17 through the back panel only (8 sc). Side total: 17 sc.
- Sl st to the first sc and fasten off.
Total: 20 + 17 + 10 + 17 = 64 sc.
Why the math works: The top row has 16 sts. Working 3 sc in each corner stitch adds 2 sts per corner, so the top has 16 + 4 = 20. Those corner groups also cover the row-ends of Row 18, so each side only counts Rows 17–1, which is 17 row-ends. The bottom has 8 chains, and the 2 increases make 10, which rounds the curve. Pocket Rows 1–9 are identical to back Rows 1–9, so each stitch on the joined section goes through exactly one row-end from each layer. Nothing is added or skipped at the seam.
Checkpoint: the body is 4.5 in × 4.5 in (11.4 cm × 11.4 cm). The pocket opening runs straight across about 2.25 in (5.7 cm) above the bottom edge.
Attach the Thumb
Turn the mitten over. Angle the thumb slightly upward and set 0.5 in (1.3 cm) of it behind the left border, across Rows 7–11. Using the thumb tail, whipstitch it to the back of the panel through back loops only, so the stitches don’t show on the front. About 1 in (2.5 cm) of thumb sticks out past the border.
Attach the Cuff
Lay the cuff across the top front with the ribs running up and down, and line up one long edge with the top border. Using the Color B tail, whipstitch the 20 cuff row-ends to the 20 top border stitches, one to one. Tack each short end of the cuff to the side border, only along the top 1.25 in (3.2 cm).
Leave the lower long edge free. It sits about 3.25 in (8.3 cm) above the bottom of the mitten, and the top of the card slips behind it.
Attach the Loop
Fold the strip in half. Overlap the two ends by 0.5 in (1.3 cm) at the center top on the back of the mitten, and sew them firmly through the back panel only. The loop rises 1.5 in (3.8 cm) above the cuff.
Final Blocking
- Mist the mitten with water until it is damp but not wet.
- Slide the test card into the pocket so the pocket keeps its shape.
- Pin the mitten flat to 4.5 in × 4.5 in (11.4 cm × 11.4 cm), with the thumb lying flat.
- Use your fingers to round the bottom curve evenly.
- Straighten the cuff ribs so they run straight up and down.
- Let it dry completely, then take out the card.
Final Quality-Control Checklist
- The back panel has 16 sts in each of Rows 6–18.
- The pocket has 16 sts in each of Rows 6–9, plus a 16-stitch slip-stitch top edge.
- The border has 64 sc (20 + 17 + 10 + 17).
- The body measures 4.5 in × 4.5 in (11.4 cm × 11.4 cm).
- A 2.125 in × 3.375 in (5.4 cm × 8.6 cm) card slides in easily, and its top tucks under the cuff.
- The cuff ribs run vertically, and all 20 row-ends are sewn down.
- The loop is centered, secure, and holds the weight of the card.
- All ends are woven in on the back.
Troubleshooting
The bottom is pointed: You may have skipped Row 5. That straight row softens the curve.
The card won’t fit: Your stitches are too tight. Remake the pocket and back panel with a larger hook. The pocket needs to be wider than 2.125 in (5.4 cm).
The sides ripple: You worked more than 1 sc into some row-ends. Keep it to 1 per row.
The corners flare: Make sure each corner gets exactly 3 sc, not more.
The cuff is longer than the top: Your BLO rows are looser than your regular rows. Ease the cuff in evenly as you sew, or remove 1 row.
The card falls out: The cuff edge sits too high. Re-sew the cuff so its lower edge overlaps the card by 0.25 in (0.6 cm).
Care
Take out the card first. Spot clean with mild soap and cool water, and lay flat to dry.
Final Notes
The whole mitten follows one measurement chain. A gauge of 16 sc = 4 in (10.2 cm) gives a back panel of 4 in × 4 in (10.2 cm × 10.2 cm). A border of 0.25 in (0.6 cm) on each edge brings the body to 4.5 in × 4.5 in (11.4 cm × 11.4 cm). The 20 top border stitches match the 20 cuff row-ends, and the 9 pocket rows match back Rows 1–9 exactly. If your gauge is right, everything else will line up. Fill it with a card, hang it on a branch, and enjoy giving it.
Happy crocheting!