

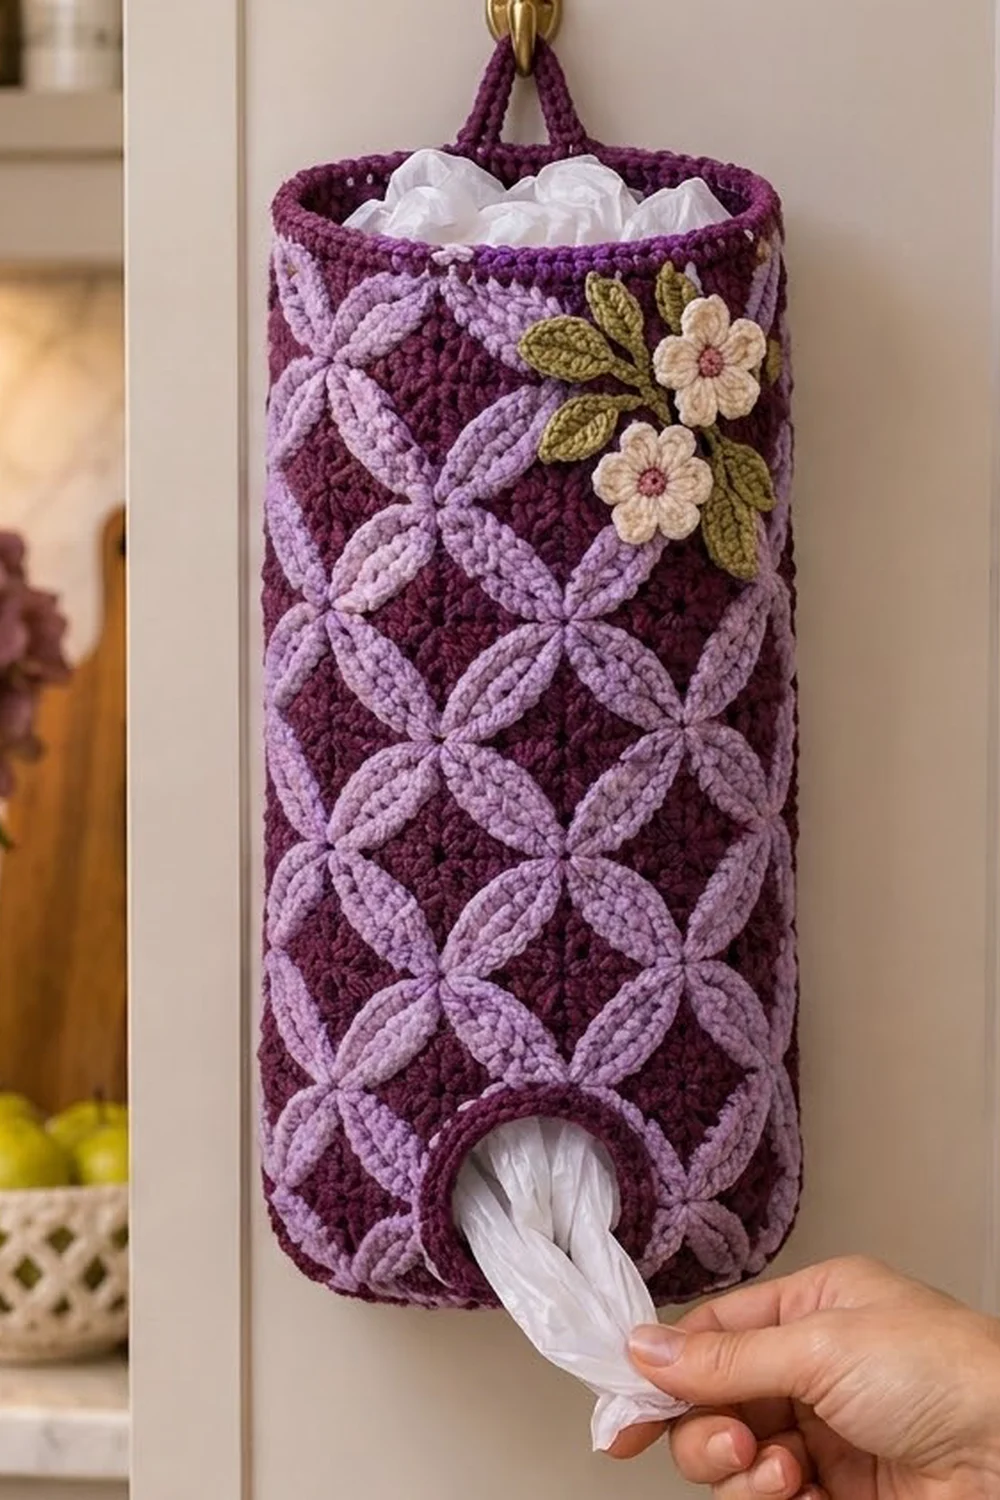
This holder keeps grocery bags tidy and looks good doing it. The body is covered in interlocking lavender circles on deep plum. A small cluster of cream flowers and olive leaves sits near the top, which softens the bold geometric pattern.
You stuff bags in through the open top and pull them out one at a time through a round opening near the bottom of the front. A plum hanging loop on the back fits over a cabinet knob or wall hook.
The pattern uses US crochet terms. The finished holder is 7.5 in (19.1 cm) wide when laid flat, 15 in (38.1 cm) around, and 16.5 in (41.9 cm) tall, not counting the loop.
Construction is simple. You start with a flat double-crochet circle for the base, then work the tube upward in continuous joined rounds of tapestry single crochet. You leave a chain gap for the dispensing opening on the way up. A plum rim with a built-in loop finishes the top, and the opening gets an edging before the appliqués are sewn on.
Finished Size and Construction
- Finished size: 7.5 in (19.1 cm) wide flat × 16.5 in (41.9 cm) tall
- Skill level: Intermediate (tapestry crochet)
- Terminology: US
- Yarn weight: Worsted (#4)
- Hook: 4.5 mm (US 7)
- Number of pieces: 1 body (base and tube in one), plus 2 flowers and 4 leaves
- Layout: Single tube, opening at front center, loop at back center
- Base diameter: 4.75 in (12.1 cm)
- Size before border: 15.25 in (38.7 cm) tall (base turning round plus body)
- Border (rim) depth: 1.25 in (3.2 cm)
Materials
Use a smooth worsted yarn in cotton or a cotton-acrylic blend. Cotton keeps its shape well and doesn’t stretch out as bags are pulled through. The quantities below assume about 200 m per 100 g.
- Plum (A): 150 g / 300 m
- Lavender (B): 100 g / 200 m
- Cream (C): 10 g / 20 m
- Dusty rose (D): 3 g / 6 m
- Olive green (E): 8 g / 16 m
These quantities include a safety margin of roughly 15 percent.
Tools:
– 4.5 mm (US 7) hook
– Tapestry needle
– 2 locking stitch markers
– Scissors
– Tape measure
– Rust-proof pins and a spray bottle for blocking
Abbreviations (US Terms)
- ch – chain
- sl st – slip stitch
- sc – single crochet
- hdc – half double crochet
- dc – double crochet
- BLO – back loop only
- st(s) – stitch(es)
- rnd(s) – round(s)
- A / B – plum / lavender
Tapestry sc: Work a sc in the active color while laying the unused color along the tops of the stitches and enclosing it inside each sc. To change color, work the last sc before the change until 2 loops are on the hook, then yarn over with the new color and pull through. Keep the carried strand on the inside of the tube.
Gauge and Checkpoints
Gauge: 16 sts and 16 rnds = 4 in (10.2 cm) in tapestry sc worked in rounds.
One color repeat is 12 sts × 12 rnds, which measures 3 in × 3 in (7.6 cm × 7.6 cm).
Before you commit, test the gauge with a flat swatch. Chain 25, then work 12 rows of the color sequence over 24 sts. Ignore the outer stitch at each side and measure across one repeat. It should be 3 in (7.6 cm).
Checkpoints:
- Base after Rnd 5: 4.75 in (12.1 cm) across
- Body circumference: 15 in (38.1 cm), or 7.5 in (19.1 cm) flat
- Body height after Rnd 12: 3 in (7.6 cm)
- After Rnd 24: 6 in (15.2 cm)
- After Rnd 36: 9 in (22.9 cm)
- After Rnd 48: 12 in (30.5 cm)
- After Rnd 60: 15 in (38.1 cm)
If your swatch comes out too big, go down half a hook size. If it’s too small, go up half a size. Don’t add or remove stitches: the 60-st count is what makes 5 repeats fit around the tube exactly.

Base
The base is worked in A.
Rnd 1: Make a magic ring. Ch 2 (doesn’t count as a st), then work 12 dc in the ring. Join with a sl st to the first dc. (12 sts)
Rnd 2: Ch 2, 2 dc in each st around, join. (24 sts)
Rnd 3: Ch 2, dc in next st, 2 dc in next st, repeat 12 times, join. (36 sts)
Rnd 4: Ch 2, dc in next 2 sts, 2 dc in next st, repeat 12 times, join. (48 sts)
Rnd 5: Ch 2, dc in next 3 sts, 2 dc in next st, repeat 12 times, join. (60 sts)
The base should measure 4.75 in (12.1 cm) across and lie flat.
Rnd 6 (turning round): Ch 1, sc in BLO of each st around, join. (60 sts)
This round is worked 1 st into each existing st with nothing added. The unused front loops form a neat ridge, and the work starts to turn upward. Place a marker in the first st. This spot is the back center of the holder.
Body
From here on, join B at the start of Rnd 1 and carry whichever color you aren’t using.
Each round has 60 sts and works the 12-st color sequence 5 times. Every round starts at the back-center marker. Ch 1, work the round, then join with a sl st to the first sc. Always work the color sequence from right to left.
Color sequence (A = plum, B = lavender):
- Row 1: 2A, 8B, 2A
- Row 2: 1A, 2B, 2A, 2B, 2A, 2B, 1A
- Row 3: 2B, 3A, 2B, 3A, 2B
- Row 4: 1B, 3A, 4B, 3A, 1B
- Row 5: 1B, 2A, 2B, 2A, 2B, 2A, 1B
- Row 6: 4B, 4A, 4B
- Row 7: Same as Row 6
- Row 8: Same as Row 5
- Row 9: Same as Row 4
- Row 10: Same as Row 3
- Row 11: Same as Row 2
- Row 12: Same as Row 1
The lavender stitches trace one complete circle in the middle of each repeat, with quarter-circles in the corners. Where a corner arc crosses the center circle, the lines meet in a lens shape. Once repeats sit side by side and stack up, the arcs join into the interlocking rings and four-petal clusters seen on the finished holder.
Rnds 1–5: Work Rows 1–5 of the color sequence. (60 sts each)
Rnd 6 (opening round): Following Row 6, work sts 1–25. In A, ch 10 while carrying B along the chain. Skip sts 26–35. Continue Row 6 over sts 36–60. (50 sc + 10 ch)
Rnd 7: Work Row 7 as usual, placing sts 26–35 into the 10 chains. (60 sts)
Rnds 8–60: Continue through the color sequence. Finish Row 12, then go back to Row 1 and repeat until 5 full repeats are done. (60 sts in every round)
Check the height after every 12 rounds against the checkpoints above. At Rnd 60 the body is 15 in (38.1 cm) tall. Cut B, leaving a 6 in (15.2 cm) tail to weave in.
Flower and Leaf Appliqués
Flowers (make 2):
Rnd 1: With D, make a magic ring and work 5 sc in it. Join with a sl st. (5 sts) Fasten off.
Rnd 2: Join C in any sc. In each sc around, work (sl st, ch 2, 3 dc, ch 2, sl st). (5 petals)
Fasten off and leave a 10 in (25.4 cm) tail for sewing. Each flower measures 1.5 in (3.8 cm) across.
Leaves (make 4):
With E, ch 8. Starting in the 2nd ch from the hook, work sl st, sc, hdc, dc, dc, hdc. Work 3 sc in the last ch. Then work along the other side of the chain: hdc, dc, dc, hdc, sc, sl st. (15 sts)
Fasten off and leave a tail. Each leaf is 2 in (5.1 cm) long and pointed at both ends.
Border: Rim, Hanging Loop, and Opening Edging
Border gauge: 16 sc = 4 in (10.2 cm). Plain sc in A matches the tapestry gauge, so the rim stays the same width as the body.
Rim Rnds 1–3: With A, ch 1, sc in each st around, join. (60 sts each round)
Rim Rnd 4: Ch 1, sc in the first st (at back center), ch 24, sc in each of the next 59 sts, join. (60 sc + ch-24 loop)
Rim Rnd 5: Ch 1, sc in the first sc. Work 36 sc into the ch-24 loop, sc in each of the next 59 sc, join. (60 rim sc + 36 loop sc = 96 sts) Fasten off.
The finished rim is 1.25 in (3.2 cm) deep. The loop hangs 2.75 in (7.0 cm) above the rim.
Why the math works: The rim has 60 sts at 4 sts per inch, which gives 15 in (38.1 cm), the same as the body. With no increases or decreases, the rim stands straight instead of flaring or pulling in. The loop chain is anchored between rim sts 1 and 2, so it adds no rim stitches. Working 36 sc over 24 ch is 1.5 sc per ch, which packs the loop firmly so it holds its shape without twisting.
Opening edging:
Rnd 1: Join A at the right corner of the opening. Work 10 sc into the free tops of Rnd 5 sts 26–35, 2 sc into the left end of the opening, 10 sc into the underside of the chains, and 2 sc into the right end. Join. (10 + 2 + 10 + 2 = 24 sts)
Rnd 2: Ch 1, sc in each st around, join. (24 sts) Fasten off.
The opening relaxes into a round hole about 2.5 in (6.4 cm) across.
Final Blocking
- Weave in all ends on the inside, running each one along the carried strands.
- Stuff the tube firmly with a rolled towel so it’s an even 7.5 in (19.1 cm) wide when flat.
- Mist it until it’s damp but not soaked.
- Pin the base flat into a 4.75 in (12.1 cm) circle and straighten the vertical lines of the color pattern.
- Shape the opening into a circle and the loop into a smooth arch.
- Let it dry completely. Block the flowers and leaves flat at the same time.
- Pin the leaves at the upper right of the front, 1 in (2.5 cm) below the rim and about 1 in (2.5 cm) in from the side fold. Place the two flowers over the leaves, one above the other. Sew everything down using the yarn tails, catching only the outer layer of the tube.
Final Quality-Control Checklist
- [ ] Base is 4.75 in (12.1 cm) across and lies flat
- [ ] Every body round has 60 sts with 5 complete repeats
- [ ] Body is 15 in (38.1 cm) tall and 7.5 in (19.1 cm) wide flat
- [ ] Opening is centered on the front, with a 24-st edging
- [ ] Rim is 1.25 in (3.2 cm) deep with 96 sts in the last round
- [ ] Loop is centered at the back and hangs 2.75 in (7.0 cm)
- [ ] Flowers and leaves are secure and sit flat
- [ ] No carried strands show on the outside
Troubleshooting
- Plum shows through the lavender: Pull the carried strand slightly snug and work over it tightly.
- Tube is puckering: The carried strand is too tight. Every few stitches, stretch the work sideways before continuing.
- Pattern spirals: Join each round with a sl st and start under the marker. Don’t work in a continuous spiral.
- Base curls into a cup: Go up a hook size for the base only.
- Base ruffles: Go down a hook size for the base.
- Opening is too tight: Rework Rnd 6 with ch 12 and skip 12 sts. The edging then has 28 sts.
- Loop stretches out: Add a third round of sc in the 36 loop sts.
Care
Hand wash in cool water, press out the excess, and dry flat over a rolled towel. Don’t tumble dry. The heat can shrink the colorwork unevenly.
Final Notes
The measurements build on each other in a single chain. A gauge of 16 sts per 4 in (10.2 cm) makes each 12-st repeat 3 in (7.6 cm) wide. Five repeats give 60 sts, which is 15 in (38.1 cm) around and 7.5 in (19.1 cm) flat. The base grows by 12 sts per round to reach the same 60 sts, so it fits the tube exactly. Sixty body rounds give 15 in (38.1 cm) of height. Adding the base turning round and the 1.25 in (3.2 cm) rim brings the finished holder to 16.5 in (41.9 cm) tall.
If you check each of these numbers as you go, the holder will come out straight and neat. Happy crocheting!