

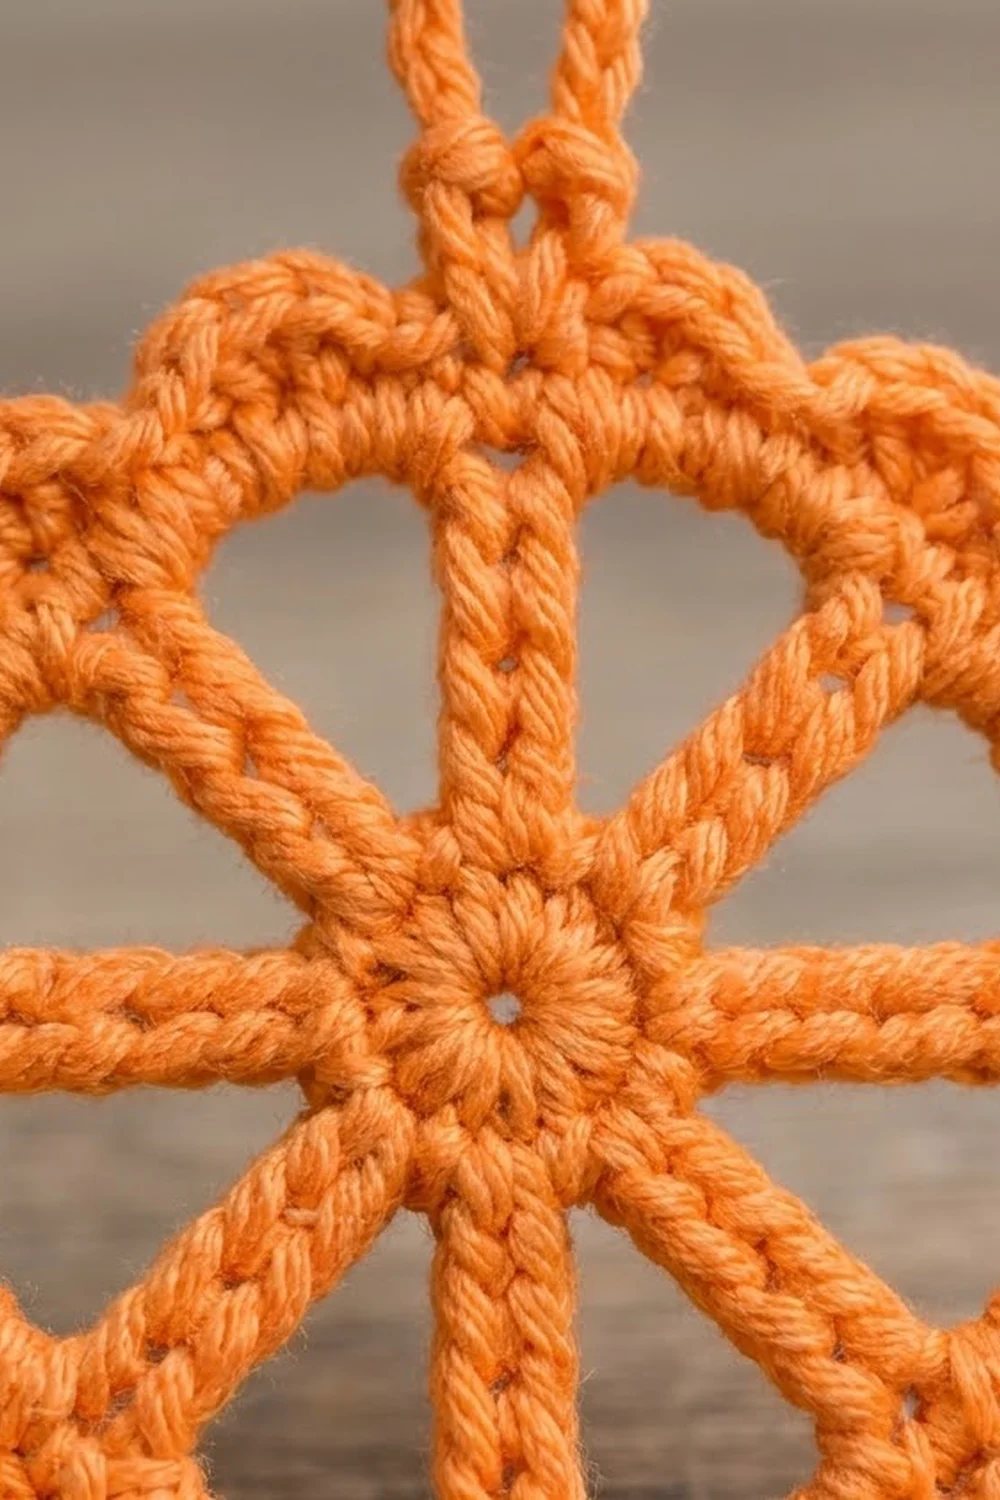
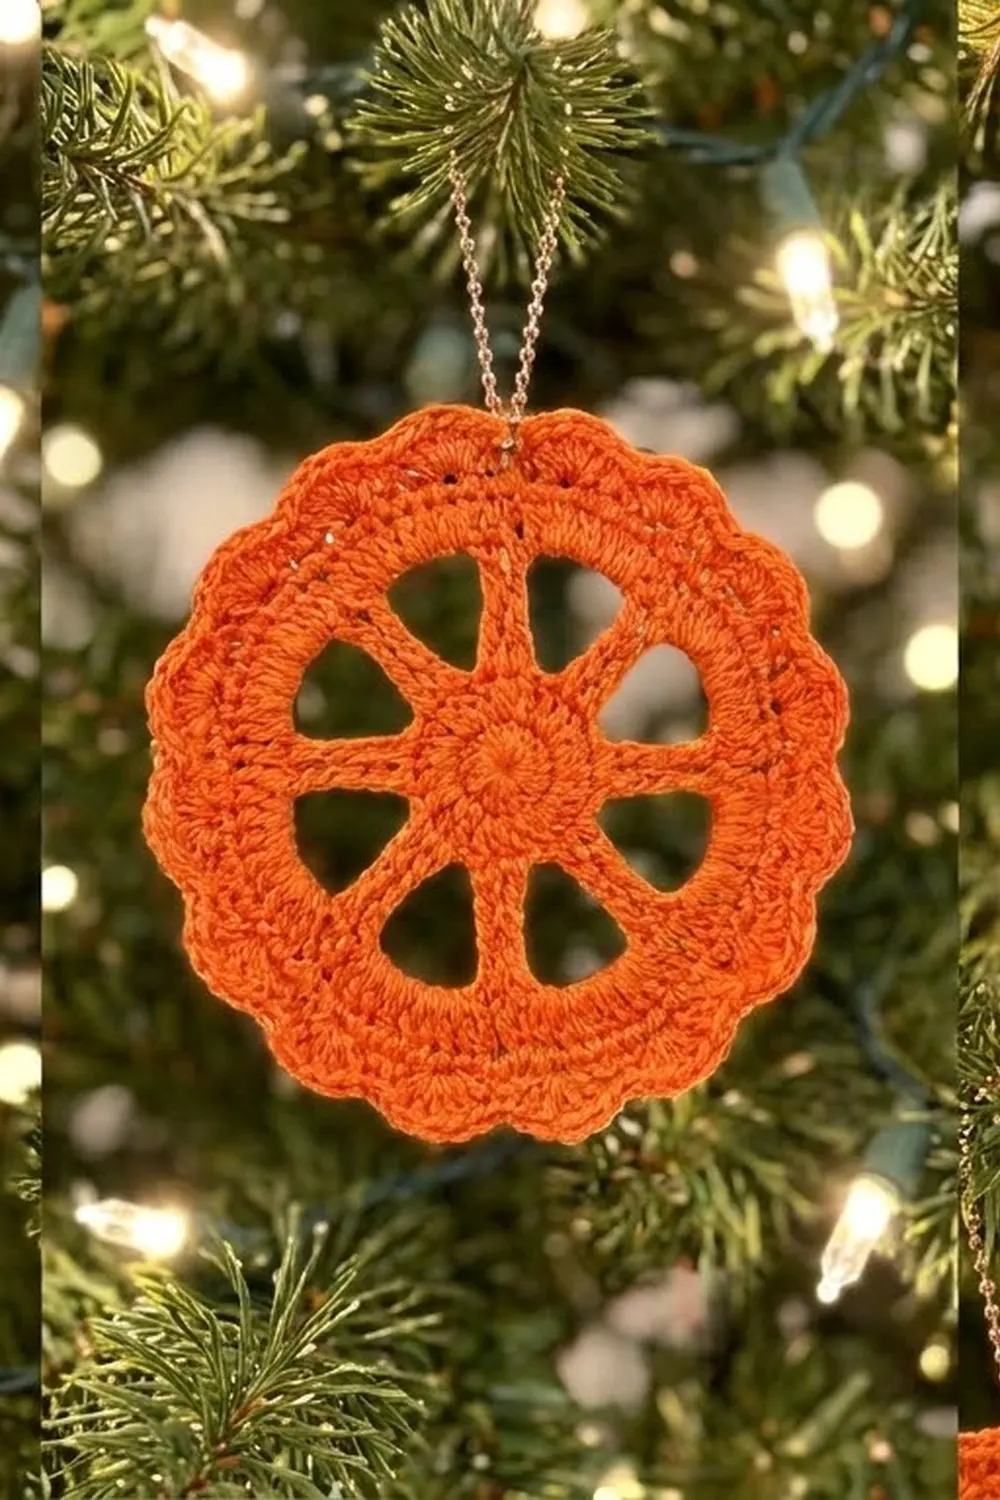
This little ornament looks like a dried orange slice, worked in yarn. A small solid center sits inside an open wheel of eight straight spokes. A firm outer ring holds the spokes in place, and a soft scalloped edge finishes the piece. A chain loop at the top lets it hang from a tree branch, a gift tag, a wreath, or a window hook.
The whole piece uses one color: a warm, bright tangerine orange. Smooth worsted-weight cotton keeps the spokes crisp and the open segments clean, so it reads as a citrus slice even from across the room. It suits rustic, natural, Scandinavian, or farmhouse holiday decor, and it works just as well as a summer kitchen decoration.
This pattern uses US crochet terms. The finished ornament measures 3.25 in (8.3 cm) across, or 4.25 in (10.8 cm) tall with the hanging loop.
The ornament is a single piece, worked in the round from the center out. First you make a solid ring of double crochet. Next comes a round of treble crochet spokes joined by chain arcs. Two rounds of single crochet build the outer ring, a round of shells makes 12 scallops, and a chain loop goes on top. There is no sewing or joining, and you only have two ends to weave in.
Finished Size and Construction
- Finished size: 3.25 in (8.3 cm) across; 4.25 in (10.8 cm) tall with loop
- Skill level: Easy
- Terminology: US crochet terms
- Yarn weight: Worsted (#4), cotton or cotton blend
- Hook: 4.0 mm (US G-6)
- Number of pieces: 1
- Layout: One round motif with 8 spokes and a hanging loop at the top
- Piece size before scallops (after Round 4): 2.75 in (7.0 cm) across
- Scallop border depth: 0.25 in (0.6 cm) on each side
- Hanging loop: 1 in (2.5 cm) long
Materials
Choose a smooth worsted-weight cotton, either mercerized or soft-twist. Cotton holds the spokes straight and blocks flat. Acrylic also works, but the open segments may curl more and need firmer blocking. Avoid fuzzy, brushed, or highly textured yarns, because they blur the spoke lines that make this look like a citrus slice.
For the classic look, pick a clear, saturated orange. For other citrus slices, try lemon yellow, lime green, or a pinkish grapefruit, using the same quantities.
- Orange (tangerine): 10 g, about 20 m, for one ornament
One ornament uses about 6 g (12 m). The amount above includes a margin for your test rounds, the tails, and a possible restart. For a set of ornaments, multiply by the number you want.
Tools:
- 4.0 mm (US G-6) crochet hook
- Tapestry needle
- Scissors
- Stitch marker (optional)
- Ruler or tape measure
- Blocking mat and rust-proof pins
- Spray bottle with water
- Fabric stiffener or spray starch (optional)
Abbreviations (US Terms)
- ch – chain
- sl st – slip stitch
- sc – single crochet
- dc – double crochet
- tr – treble crochet
- st(s) – stitch(es)
- sp(s) – space(s)
- MR – magic ring
- rep – repeat
Special stitch – Scallop: Work 5 dc into the same stitch. Here, each scallop sits between two sc and covers 4 stitches of the previous round.
Treble crochet (tr): Yarn over twice, insert hook in the stitch, yarn over and pull up a loop (4 loops on hook). [Yarn over, pull through 2 loops] 3 times.
Gauge and Checkpoints
Gauge matters here because the spokes have to reach the outer ring without pulling or buckling. Make one test ornament first, or at least work Rounds 1 and 2 and measure them. A small ornament doesn’t take long to rip back, so it is worth checking early.
Base gauge: Round 1 (16 dc in a magic ring) measures 1 in (2.5 cm) across.
Checkpoints:
- After Round 1: 1 in (2.5 cm) across
- After Round 2: 2.25 in (5.7 cm) across, measured from one spoke tip to the opposite spoke tip
- After Round 4: 2.75 in (7.0 cm) across
- After Round 5: 3.25 in (8.3 cm) across
- Hanging loop: 1 in (2.5 cm) long
If your piece is too big: Go down to a 3.75 mm (US F-5) hook. If only the spokes are too long, your trebles may be loose; snug up each loop before the next yarn over.
If your piece is too small: Go up to a 4.5 mm (US 7) hook. If the center cups upward after Round 2, the chain arcs are too tight, so work the chains more loosely.
Always measure flat, without stretching, after smoothing the piece gently with your fingers.
Pattern
Work in joined rounds with the right side facing you the whole time. Do not turn. The starting ch-3 counts as a dc, and the starting ch-4 counts as a tr.
Round 1: Solid Center
Make a magic ring.
Ch 3 (counts as the first dc), then work 15 dc into the ring. Pull the tail to close the ring tightly. Sl st to the top of the starting ch-3.
Stitch count: 16 dc.
The center should be a flat, solid disc 1 in (2.5 cm) across, with only a tiny hole in the middle. If the disc ruffles, your dc are too tall for the ring; pull the tail tighter and check your hook size.
Round 2: Spokes and Arcs
This round makes the 8 spokes and the chain arcs that form the base of the outer ring.
Ch 4 (counts as the first tr), ch 5, skip the next st. Tr in the next st, ch 5, skip the next st. Rep from * 6 more times. Sl st to the 4th ch of the starting ch-4.
Stitch count: 8 tr and 8 ch-5 sps.
Each tr is one spoke, about 5/8 in (1.6 cm) long. The open segments of the slice come from the chain arcs spanning the gaps between spokes, while the skipped stitches keep the spokes evenly spread around the center. The piece now measures 2.25 in (5.7 cm) across from spoke tip to spoke tip.
Lay the piece flat. The ch-5 arcs should form a gentle circle. If they pull the spokes inward or make the center pop up, your chains are too tight. Rework the round with looser chains rather than going on, because the later rounds can’t fix a cupped center.
Tip: Keep all the trebles the same height. Pull up the first loop to the same height each time, and the spokes will look even after blocking.
Round 3: Outer Ring Base
Sl st into the first ch-5 sp. Ch 1. Work 5 sc in the ch-5 sp, then sc in the top of the next tr. Rep from * 7 more times, placing the last sc in the top of the starting ch-4. Sl st to the first sc.
Stitch count: 48 sc (8 segments x [5 sc in the space + 1 sc on the spoke] = 8 x 6 = 48).
This round closes the arcs into a firm, round outer ring. Each segment between spoke tops holds exactly 6 sc. Spread the 5 sc evenly along each chain space so the segments look equal. You can put a stitch marker in the sc on top of the first spoke to make counting easier.
Round 4: Outer Ring
Ch 1. Sc in the same st and in each st around. Sl st to the first sc.
Stitch count: 48 sc (48 worked 1-per-existing-stitch + 0 extra).
This second round of sc thickens the rim, like the band of peel on an orange slice. The piece now measures 2.75 in (7.0 cm) across. If it ruffles, use a smaller hook for this round only. If it cups, use a larger hook.
Scalloped Border
The scallop round is the border of this ornament. You work it straight into Round 4 in the same color.
Border gauge: Each scallop covers 4 sts of Round 4 and is about 0.75 in (1.9 cm) wide along the edge. Each scallop rises 0.25 in (0.6 cm) above the ring.
Round 5: Scallops
Ch 1. Sc in the same st. Skip the next st, 5 dc in the next st, skip the next st, sc in the next st. Rep from * 10 more times. Skip the next st, work 5 dc in the next st, skip the last st. Sl st to the first sc.
Stitch count: 12 scallops = 12 sc + 60 dc = 72 sts.
Why the math works: Each repeat uses exactly 4 sts of Round 4 (sc, skip, 5-dc shell, skip). 48 sts divided by 4 sts per repeat gives 12 repeats, with no stitches left over and none used twice. The last repeat skips its final st, ending right before the first sc, so the round closes cleanly. With 8 spokes and 12 scallops, each 6-st segment carries 1.5 scallops. The scallops are not tied to the spoke positions, so they won’t line up with them. This is on purpose: it gives the edge an even wave all the way around.
The ornament now measures 3.25 in (8.3 cm) across.
Hanging Loop
Don’t fasten off. Sl st into each of the next 3 dc, so your hook sits at the top center (the 3rd dc) of the first scallop.
Ch 12. Sl st into the same 3rd dc of the scallop to close the loop.
Loop count: 12 ch. The loop measures 1 in (2.5 cm) long.
For a sturdier loop, work 1 sl st into each ch back toward the scallop, then sl st into the same dc again. This gives a thicker, doubled hanger that holds up well on a branch.
Fasten off, leaving a 6 in (15.2 cm) tail. Weave the tail down through the scallop and along the back of the ring. Weave the starting tail through the back of Round 1, pulling it once more to close the center hole.
Final Blocking
Blocking straightens the spokes and evens out the scallops. It is quick but important.
- Mist the ornament lightly with water until it feels damp but not soaked.
- Lay it right side up on a blocking mat.
- Pin the center at its middle point, then gently pull each spoke straight out from the center.
- Pin the outer ring into a true circle 2.75 in (7.0 cm) across, with one pin at each spoke tip (8 pins).
- Pin the top of each scallop so the full width is 3.25 in (8.3 cm), using one pin per scallop (12 pins).
- Pull the hanging loop straight up and pin it at 1 in (2.5 cm).
- Leave it to dry completely, for at least 4 hours.
- Unpin. For a stiffer ornament, brush on a light coat of fabric stiffener before step 7, or use spray starch once it is dry.
Final Quality-Control Checklist
- Round 1 has 16 dc and measures 1 in (2.5 cm) across.
- There are exactly 8 tr spokes, evenly spaced, with 1 skipped st between each pair.
- Rounds 3 and 4 each have 48 sc.
- Each segment of the outer ring holds 6 sc.
- Round 5 has 12 scallops of 5 dc each, separated by 12 sc.
- The finished ornament is 3.25 in (8.3 cm) across.
- The hanging loop sits centered on top of a scallop and is 1 in (2.5 cm) long.
- The center hole is closed, and no tails show on the right side.
- The piece lies flat with no cupping or ruffling.
Troubleshooting
The center cups or bulges like a bowl. The Round 2 chains are too tight, or the spokes are too short. Loosen the ch-5 arcs, or go up one hook size for Round 2 only.
The outer ring ruffles. Your sc in Rounds 3–4 are too loose. Use a smaller hook for those rounds, or work the same 5 sc per space more firmly.
The spokes lean or twist. Keep the right side facing you at all times. When blocking, put a pin at each spoke tip and smooth each spoke straight along its length.
The scallop count is wrong. Recount Round 4; you need exactly 48 sts. If you have 47 or 49, find the uneven segment and redo Round 3.
The segments look unequal. In Round 3, spread the 5 sc evenly along each ch-5 sp before you move on.
The loop is off-center. Make sure you sl st across exactly 3 dc before chaining, counting from the first sc.
The center hole won’t close. You may have started with a slipknot instead of a magic ring. Weave the tail around the inside of Round 1 and pull to cinch it closed.
Care
Hand wash in cool water, press out the extra water in a towel, and lay the ornament flat to dry, reshaping the spokes as you go. If you used stiffener, spot clean only.
Final Notes
This ornament grows outward through a simple chain of measurements. Round 1 is a solid center of 16 dc, 1 in (2.5 cm) across. Round 2 adds 8 tr spokes and arcs, bringing it to 2.25 in (5.7 cm). Rounds 3 and 4 form a 48-st outer ring of 2.75 in (7.0 cm). Round 5 adds 12 scallops for a final width of 3.25 in (8.3 cm), and the 1 in (2.5 cm) loop brings the total height to 4.25 in (10.8 cm).
Check each number as you go, and your orange slice will come out round, flat, and ready to hang. Make one, then make a whole bowlful for the tree.
Happy crocheting!