

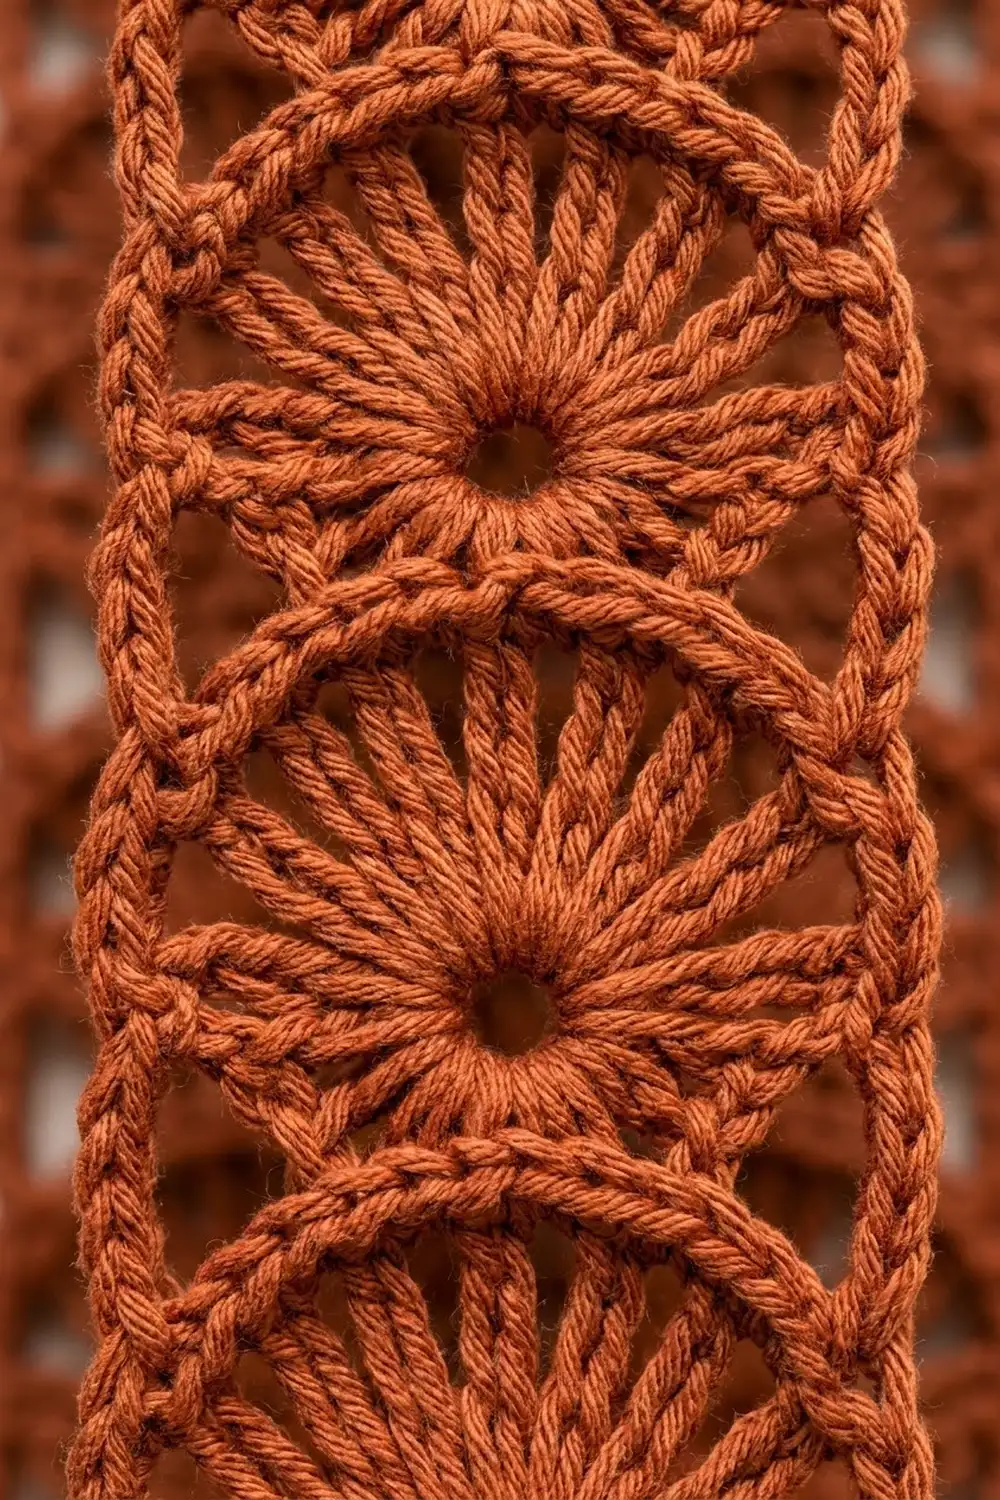
The Terracotta Fan Strip Curtain is made of separate crocheted strips that hang side by side. Each strip has one column of stacked fan motifs. Each fan grows from a small open ring, and its tall spokes spread into a rounded shell. Stacked one above the other, the shells look like a chain of overlapping circles.
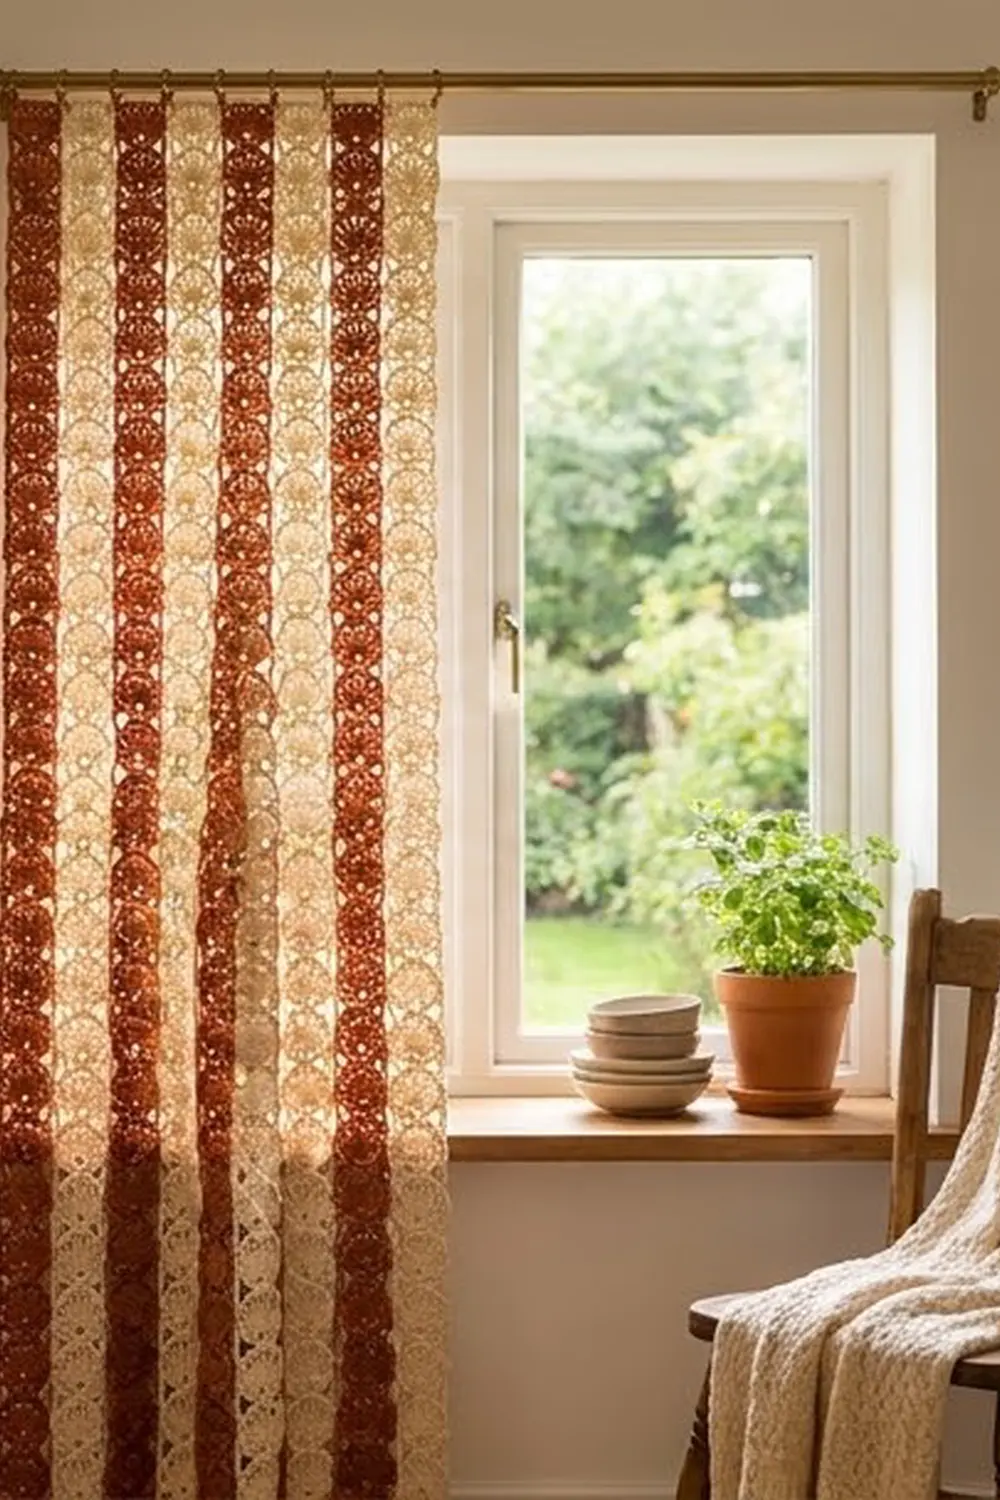
The palette is warm rust and soft cream. Five rust strips and four cream strips alternate across the rod, with rust at both edges. The look is relaxed boho: light still passes between the strips, and the cotton keeps it crisp and earthy.
This pattern uses US crochet terms. Each strip measures 3¾ in (9.5 cm) wide by 61 in (154.9 cm) long. All nine strips hang across about 39¾ in (101.0 cm) of rod.
Each strip is worked in rows from the bottom up, starting with a single crochet base. Every fan takes three rows: a ring row, a spoke row and a top row. When the length is right, two rounds of edging frame the strip: single crochet, then reverse single crochet for the rope texture. The strips are not sewn together. Each one hangs on its own ring clip.
Finished Size and Construction
- Finished strip size: 3¾ in × 61 in (9.5 cm × 154.9 cm)
- Full curtain spread: about 39¾ in (101.0 cm) wide
- Skill level: Easy-Intermediate
- Terminology: US crochet terms
- Yarn weight: Worsted (#4), 100% cotton
- Hook: 5.0 mm (H-8)
- Number of pieces: 9 strips (5 rust, 4 cream)
- Layout: 9 strips side by side, about ¾ in (1.9 cm) apart, not joined
- Strip size before border: 3 in × 60¼ in (7.6 cm × 153.0 cm)
- Fans per strip: 40, each 1½ in (3.8 cm) tall
- Border depth: ⅜ in (1.0 cm) on every side
Materials
Yarn: Use a smooth, mercerized or combed worsted-weight cotton. Cotton holds the fan spokes crisply and hangs straight without stretching much. Acrylic works, but the strips will be softer and may twist on the rod.
- Rust (Color A): 650 g (about 1,105 m), enough for 5 strips
- Cream (Color B): 520 g (about 885 m), enough for 4 strips
One strip uses about 115 g (about 195 m). These quantities include a margin of about 10% for gauge differences and swatching.
Tools:
- 5.0 mm (H-8) crochet hook
- Tapestry needle
- Scissors
- Stitch markers (2–4)
- Measuring tape
- Rust-proof pins and a blocking surface long enough for one strip, or a clean floor with towels
- Spray bottle
- 9 curtain ring clips
- Curtain rod at least 42 in (106.7 cm) long between the finials
Abbreviations (US Terms)
- ch – chain
- sc – single crochet
- tr – treble crochet (yarn over twice, insert hook, pull up a loop, [yarn over, pull through 2 loops] 3 times)
- rsc – reverse single crochet (crab stitch)
- sk – skip
- sl st – slip stitch
- sp(s) – space(s)
- st(s) – stitch(es)
Special stitch – Reverse single crochet (rsc): Do not turn. Working from left to right (right-handed), insert the hook into the next stitch to the right, pull up a loop, yarn over and pull through both loops. This makes the twisted, rope-like edge seen on every strip.
Gauge and Checkpoints
Work a 4-fan test section before committing to a full strip. It uses only a few grams and shows your gauge clearly.
Gauge:
- 13 sc = 3 in (7.6 cm) wide
- 1 sc row = ¼ in (0.6 cm) tall
- 1 tr row = 1 in (2.5 cm) tall
- 1 fan repeat (3 rows) = 1½ in (3.8 cm) tall
Checkpoints:
- After Row 1: the base should be 3 in (7.6 cm) wide.
- After the first fan (Row 4): the piece should be 1¾ in (4.4 cm) tall.
- After 4 fans (Row 13): the piece should be 6¼ in (15.9 cm) tall.
- After 20 fans (Row 61): the piece should be 30¼ in (76.8 cm) tall.
- After 40 fans (Row 121): the piece should be 60¼ in (153.0 cm) tall before the border.
If your piece is too big: go down one hook size, to 4.5 mm (US 7).
If your piece is too small: go up one hook size, to 5.5 mm (I-9).
Height matters more than width here. If your treble rows run short but your width is right, fully lift each loop to hook height before you yarn over. If they run tall, pull the first two loops through a little more snugly.
Strip Pattern (Make 9)
Work every strip the same way and change only the color. Turn at the end of every row.
Foundation
Row 1: Ch 14. Sc in the 2nd ch from the hook and in each ch across. Turn. (13 sc)
Fan Repeat (Rows 2–4)
Row 2 (Ring Row): Ch 1 (does not count as a stitch). Sc in each of the first 5 sc, ch 4, sk the next 3 sc, sc in each of the last 5 sc. Turn. (10 sc, 1 ch-4 sp)
The ch-4 over 3 skipped stitches makes the small round hole at the base of the fan.
Row 3 (Spoke Row): Ch 4 (counts as the first tr), tr in the next sc, ch 3, sk the next 3 sc, 9 tr in the ch-4 sp, ch 3, sk the next 3 sc, tr in each of the last 2 sc. Turn. (13 tr: 2 + 9 + 2, plus 2 ch-3 sps)
The 9 tr crowded into one space spread out into the fan spokes. The ch-3 sps leave the open windows on either side of the fan.
Row 4 (Top Row): Ch 1. Sc in each of the first 2 tr, ch 1, sk the ch-3 sp, sc in each of the next 9 tr, ch 1, sk the ch-3 sp, sc in each of the last 2 tr. Work the final sc into the top of the turning ch-4. Turn. (13 sc, plus 2 ch-1 sps)
The short ch-1 bridges pull the top of the fan into a rounded shell. This row is also the base for the next fan.
Continuing the Strip
Rows 5–121: Repeat Rows 2–4 thirty-nine more times, for 40 fans in total.
In every Ring Row after the first, skip the ch-1 sps and work only into sc. “The first 5 sc” means the 2 edge sc plus the first 3 of the 9 fan sc. The center 3 fan sc are the ones skipped under the new ch-4.
Row-by-row reference:
- Ring Rows: Rows 2, 5, 8 … 119 (40 rows)
- Spoke Rows: Rows 3, 6, 9 … 120 (40 rows)
- Top Rows: Rows 4, 7, 10 … 121 (40 rows)
At the end of Row 121, do not fasten off. The border begins from here.
Count check: 1 foundation row + 40 fans × 3 rows = 121 rows. Height: ¼ in + (40 × 1½ in) = 60¼ in (153.0 cm).
Make All Pieces
Make 9 identical strips:
- Rust (Color A): 5 strips
- Cream (Color B): 4 strips
Layout grid (left to right, as seen from the room):
| A | B | A | B | A | B | A | B | A |
Rust is at both outer edges, so the curtain looks balanced from the window.
Joining: Hanging the Strips
The strips are not stitched to each other. Each one hangs free, which keeps the curtain light and lets it move.
Method: Clip one ring clip to the center of each strip’s top edge, catching the border and the full Top Row underneath it. Thread the rings onto the rod in the order of the layout grid.
Stitch-to-stitch logic: The center of the top edge is the 8th of the 15 stitches along that side, counting from corner to corner. Mark it with a stitch marker before blocking so every clip sits in the same place. Clipping off-center makes a strip twist.
Tension advice: Keep the clip jaws on both border rounds. A clip on the rsc round alone can pull a loop out of shape over time.
Spacing: Leave about ¾ in (1.9 cm) between neighboring strips.
Size checkpoint:
- 9 strips × 3¾ in = 33¾ in (85.7 cm)
- 8 gaps × ¾ in = 6 in (15.2 cm)
- Total spread: 39¾ in (101.0 cm)
If your window is wider, open the gaps a little rather than adding a partial strip.
Border
Each strip gets its own two-round border, worked as soon as Row 121 is finished.
Border gauge:
- Short edges: 1 sc in each stitch of the row
- Long edges: 1 sc per sc row-end and 4 sc per tr row-end, which works out to 4 sc per inch (2.5 cm)
Round 1 (sc): With the right side facing, ch 1. Do not turn.
- Top edge: 3 sc in the first sc of Row 121, sc in each of the next 11 sc (skip the ch-1 sps), 3 sc in the last sc.
- First long edge: Working down the row-ends, skip the Row 121 row-end (the corner group covers it). Then work 239 sc evenly:
- 4 sc in each Spoke Row end (40 × 4 = 160)
- 1 sc in each Ring Row end (40 × 1 = 40)
- 1 sc in each Top Row end from Rows 4–118 (39 × 1 = 39)
- Skip the Row 1 row-end.
- Bottom edge: Working into the underside of the foundation chain, 3 sc in the first ch, sc in each of the next 11 ch, 3 sc in the last ch.
- Second long edge: Work 239 sc up the row-ends exactly as on the first side.
- Join with a sl st to the first sc.
Round 1 counts:
- Short side: 1 corner + 1 + 11 + 1 + 1 corner = 15 sts, including both corner stitches
- Long side: 1 corner + 1 + 239 + 1 + 1 corner = 243 sts, including both corner stitches
- Round total: (4 corner groups × 3 sts) + 11 + 11 + 239 + 239 = 512 sts
Round 2 (rsc): Ch 1. Do not turn. Rsc in each st around. Join with a sl st to the first rsc. Fasten off. (512 rsc)
Why the math works: On the short edges, 13 base stitches become 15 when the corner groups add one stitch on each side. That extra pair gives the corner enough room to turn without cupping. On the long edges, the 4 sc per tr row-end and 1 sc per sc row-end match the row heights at 4 sc per inch (2.5 cm). That is close to the 13 sc per 3 in (7.6 cm) of the short edges, so the border lies flat instead of rippling or pulling tight.
Each long side of 243 stitches spans the 60¼ in (153.0 cm) body plus the corners. The rsc round adds the ⅜ in (1.0 cm) border depth on each side. The finished strip measures 3 in + ¾ in = 3¾ in (9.5 cm) wide and 60¼ in + ¾ in = 61 in (154.9 cm) long.
Final Blocking
- Weave in all ends along the edge columns, never through the fan spokes, where tails would show against the light.
- Lay one strip flat on towels or blocking mats.
- Spray it evenly until the cotton is damp but not dripping.
- Pin the four corners first: 3¾ in (9.5 cm) apart across, 61 in (154.9 cm) apart lengthwise.
- Pin each long edge straight every 6 in (15.2 cm), using a measuring tape as a guide.
- Shape each fan: nudge the 9 spokes into an even half-circle and open the ring hole at the base with a fingertip.
- Open the side windows so each ch-3 sp shows as a clear gap.
- Let it dry completely, usually 12–24 hours.
- Repeat for all 9 strips. Lay the finished strips side by side and check that they are the same length to within ½ in (1.3 cm).
Final Quality-Control Checklist
- Every strip has exactly 40 fans.
- Each Spoke Row has 13 tr: 2 + 9 + 2.
- Each Top Row has 13 sc.
- Every ring hole is open and centered.
- Each strip is 3¾ in (9.5 cm) wide along its whole length.
- Each strip is 61 in (154.9 cm) long, ±½ in (1.3 cm).
- Round 1 of the border has 15 sts per short side and 243 sts per long side.
- The rsc edge is even and does not ruffle.
- Ends are woven in and trimmed close.
- There are 5 rust strips and 4 cream strips, hung in the A-B-A order.
- Clips are centered on the 8th stitch of the top edge.
Troubleshooting
The fans lean to one side. You probably put an uneven number of sc on either side of the ch-4. Recount the Ring Row: 5 sc, ch 4 over 3 skipped sc, then 5 sc.
The strip is getting narrower. You are likely skipping the last tr into the turning ch-4. Always end the Top Row with a sc in the top of the turning ch.
The fans look flat rather than rounded. Your ch-1 bridges may be too loose. Keep them snug, or use ch 0 and sc directly past the ch-3 sp.
The ring holes close up. Make the ch-4 a little looser, and spread the 9 tr evenly across the ch-4 space instead of bunching them at one end.
The long border ripples. Use 3 sc per Spoke Row end instead of 4, and adjust the long-side count to match.
The long border pulls tight. Your tr rows are taller than gauge. Add a fifth sc to every other Spoke Row end.
The strip twists on the rod. Re-block it and move the clip to the exact center stitch.
Care
Hand wash in cool water with mild detergent, gently press out the water, and dry flat, reblocking to 3¾ in × 61 in (9.5 cm × 154.9 cm). Keep out of the dryer, which shrinks cotton and distorts the fans.
Final Notes
The measurements build on each other. Thirteen sc make a 3 in (7.6 cm) base. Each 3-row fan adds 1½ in (3.8 cm), so 40 fans plus the foundation reach 60¼ in (153.0 cm). The ⅜ in (1.0 cm) border brings each strip to 3¾ in × 61 in (9.5 cm × 154.9 cm). Nine strips with ¾ in (1.9 cm) gaps fill about 39¾ in (101.0 cm) of rod. Check each step against its number and the curtain will hang straight.
Happy crocheting!