

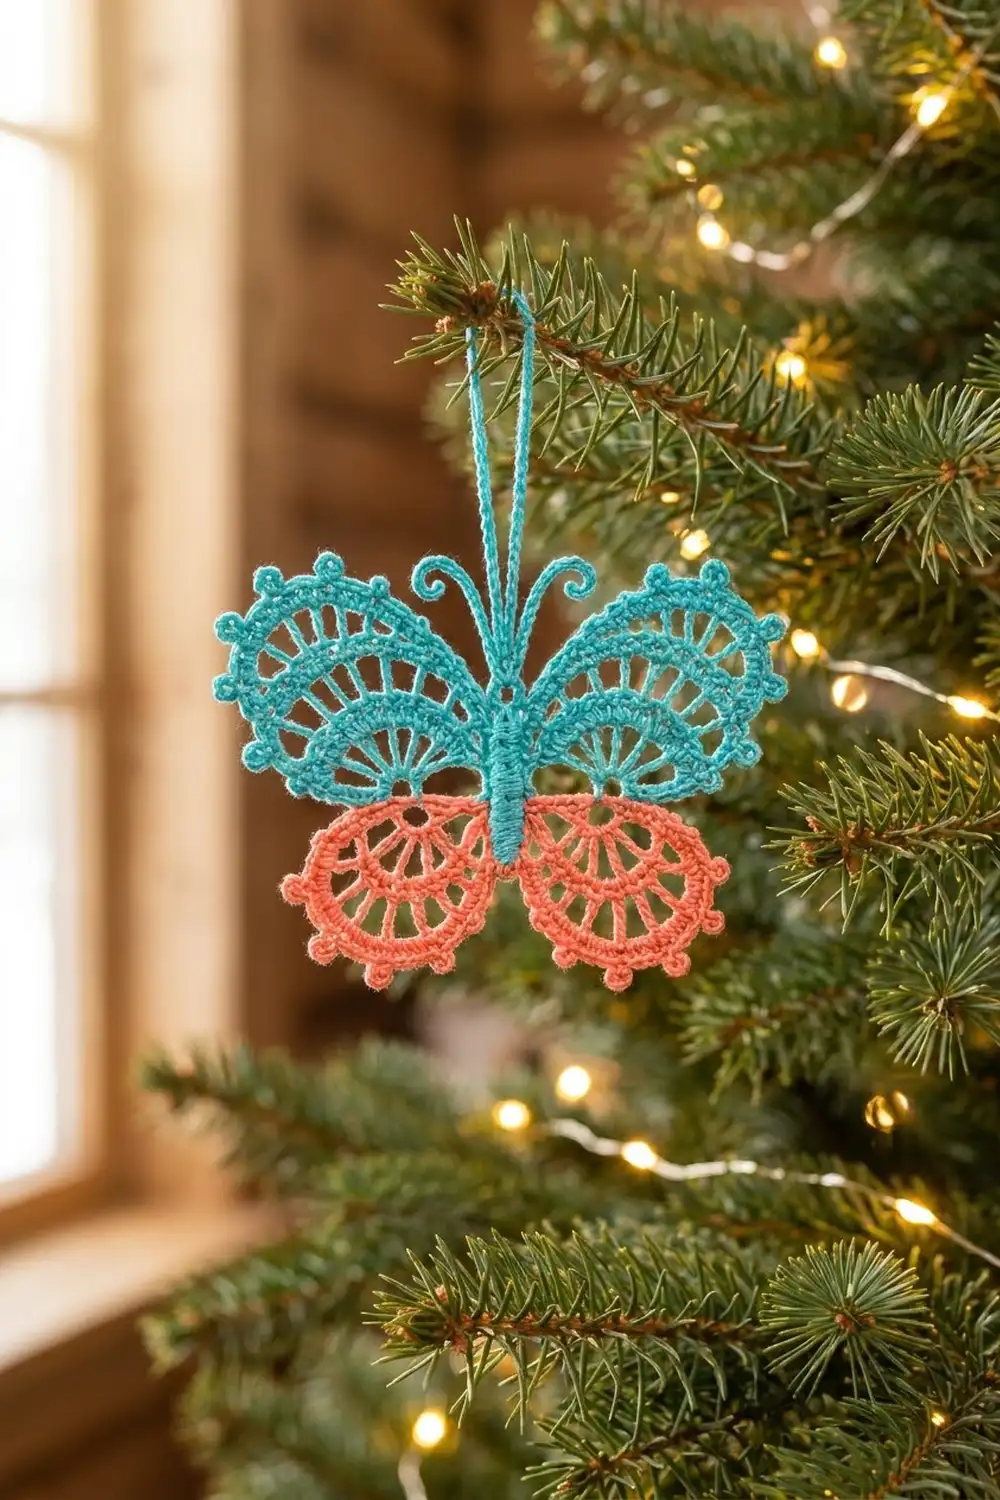
This lace butterfly is a small, airy ornament for hanging on a tree, in a window or on a gift package. It has bright turquoise upper wings, warm coral lower wings, a slim turquoise body, two curled antennae and a reinforced hanging loop.
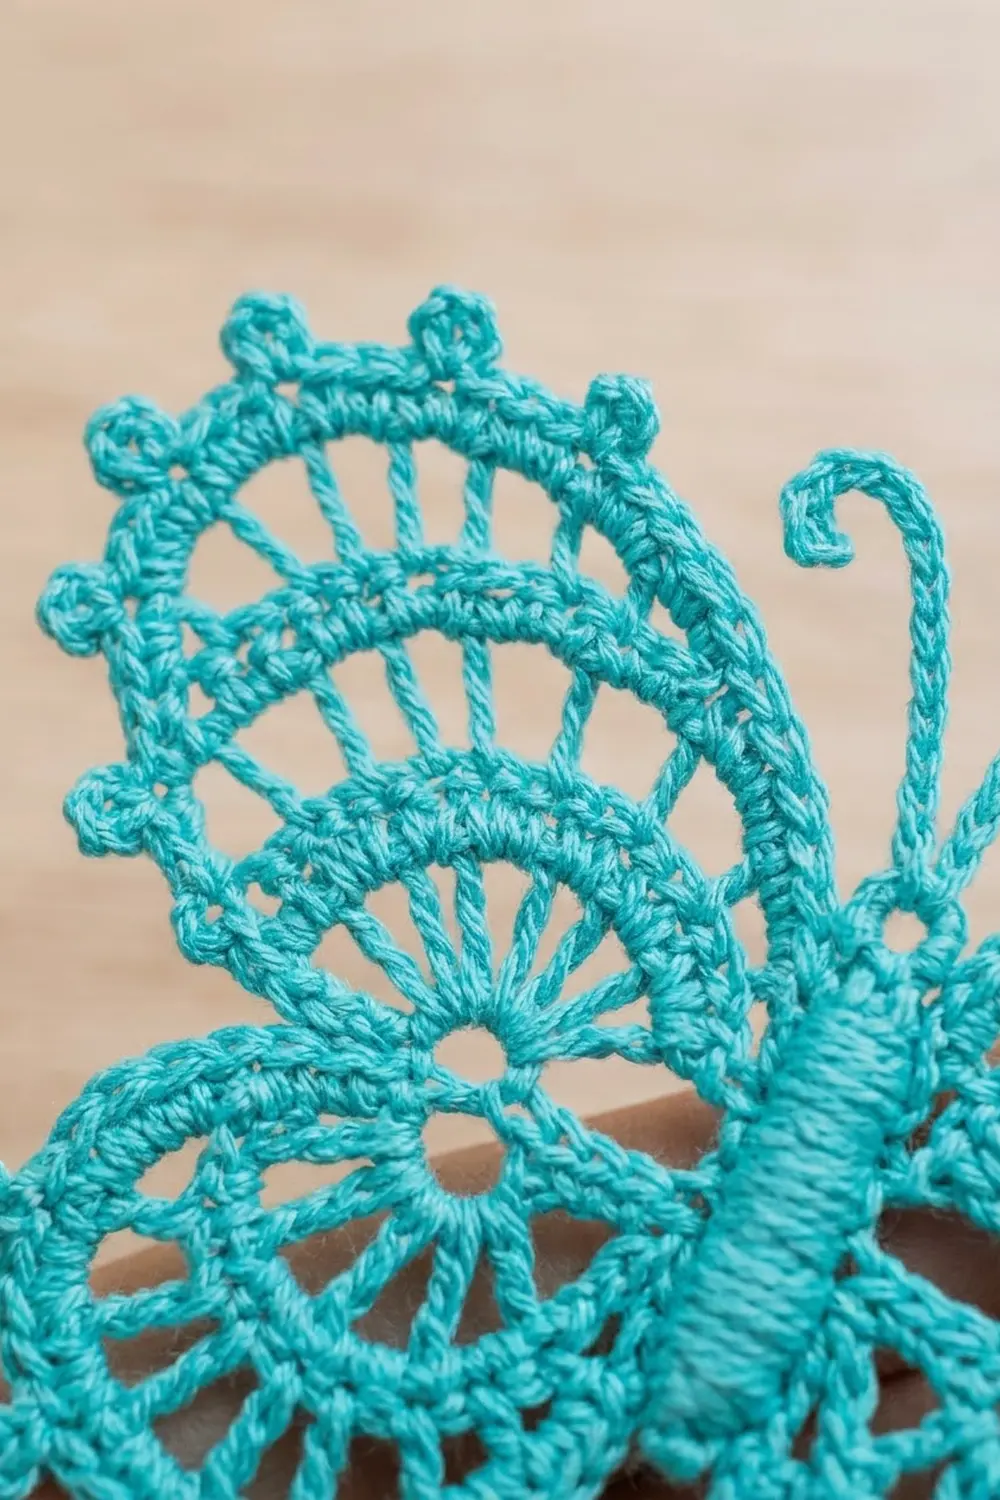
Each wing is a fan of lace rows. It starts with solid double crochet at the base, then open bars in the middle, then a row of chain arches. A scalloped shell edge finished with small picots goes around the outside. The two colors make the butterfly shape easy to see even from across a room.
The pattern uses US crochet terms. The finished butterfly is 4 in (10.2 cm) wide and 3.75 in (9.5 cm) tall, not counting the antennae or loop. With the loop it hangs about 5 in (12.7 cm) tall.
There is no sewing. First you crochet the body as a small oval. Then you work all four wings in rows straight off the long edges of the body. Last, you add the picot border, the antennae and the loop.
Finished Size and Construction
- Finished size: 4 in (10.2 cm) wide x 3.75 in (9.5 cm) tall; 5 in (12.7 cm) tall including loop
- Skill level: Intermediate
- Terminology: US crochet terms
- Yarn weight: Size 3 mercerized cotton crochet thread (Lace / Fine)
- Hook: 2.0 mm (US steel size 4)
- Number of pieces: 1 (the wings are worked directly off the body)
- Layout: body in the center, with 1 upper wing and 1 lower wing on each side
- Body size: 2.75 in (7.0 cm) long x 0.5 in (1.3 cm) wide
- Upper wing reach before border: 1.5 in (3.8 cm) from the body edge
- Lower wing reach before border: 1.1 in (2.8 cm) from the body edge
- Size before border: 3.5 in (8.9 cm) wide x 3.25 in (8.3 cm) tall
- Border depth: 0.25 in (0.6 cm)
Materials
Use size 3 mercerized cotton crochet thread. It holds stiffener well, shows each stitch clearly and gives the shells a crisp edge. A soft or fuzzy yarn will blur the lace.
- Color A, turquoise: 6 g, about 16 m (18 yd), for the body, upper wings, antennae and loop
- Color B, coral: 3 g, about 8 m (9 yd), for the lower wings
These amounts include about 30 percent extra for a gauge swatch and weaving in ends.
Tools:
- 2.0 mm crochet hook
- 4 locking stitch markers
- Tapestry needle with a small eye
- Scissors
- Fabric stiffener or spray starch
- Blocking board or foam mat, and rust-proof pins
Abbreviations (US Terms)
- ch – chain
- sl st – slip stitch
- sc – single crochet
- dc – double crochet
- sk – skip
- st(s) – stitch(es)
- sp – space
- BLO – back loop only
- Rnd – round
Picot: ch 3, sl st in the 3rd ch from the hook.
Shell: 7 dc worked in the same ch-5 arch.
Gauge and Checkpoints
Gauge: 8 sc and 9 sc rows = 1 in (2.5 cm).
Chain gauge for the loop: 12 ch = 1 in (2.5 cm).
Make one complete body before you start the wings and use it as your test piece. The wings are built on the body’s stitch count, so if the body is the right size, the rest of the butterfly will be too.
Check these measurements as you go:
- Body after Rnd 1: 2.75 in (7.0 cm) long.
- Body after Rnd 2: 0.5 in (1.3 cm) wide.
- Upper wing after Row 3: 0.75 in (1.9 cm) from the body edge.
- Upper wing after Row 5: 1.5 in (3.8 cm) from the body edge.
- Lower wing after Row 4: 1.1 in (2.8 cm) from the body edge.
- Before border: 3.5 in (8.9 cm) wide.
-
After border: 4 in (10.2 cm) wide.
-
Body too long: If it is longer than 2.75 in (7.0 cm), switch to a 1.75 mm hook.
- Body too short: If it is shorter than 2.5 in (6.4 cm), switch to a 2.25 mm hook.
Small differences are fine for an ornament, but large ones change how the wings fit together.
Body
Use Color A.
Rnd 1: Ch 22. Sc in the 2nd ch from the hook and in the next 19 ch, then work 3 sc in the last ch. Turn the work so you can crochet along the bottom of the starting chain. Sc in the next 19 ch, then work 2 sc in the same ch as the first sc. Join with a sl st to the first sc. (44 sc)
Rnd 2: Ch 1, sc in BLO of each st around. Join with a sl st to the first sc. (44 sc)
Working in the back loops leaves a ridge of front loops along the body. This gives it the raised, segmented look of a real butterfly body. Fasten off.
Mark the body. Choose one end to be the head. Each end has 3 sc fanned around it, and each long side has 19 sc between the end groups: 3 + 19 + 3 + 19 = 44. On each long side, count from the head:
- Sts 1–10: upper wing base
- St 11: skip (this makes the small gap between the wings)
- Sts 12–18: lower wing base
- St 19: skip
Place a marker in st 1 and st 12 on each side.
Upper Wings (Make 2)
Use Color A. Work each wing in rows into the 10 upper wing base stitches on one side of the body. Turn at the end of every row.
Row 1: Join yarn in st 1 of the upper wing base. Ch 3 (counts as dc), dc in the same st, dc in the next st, [2 dc in the next st, dc in the next st] 4 times. Turn. (15 dc)
Row 2: Ch 4 (counts as dc + ch 1), [dc in the next dc, ch 1] 13 times, dc in the last dc. Turn. (15 dc, 14 ch-1 sps)
Row 3: Ch 5 (counts as dc + ch 2), [dc in the next dc, ch 2] 13 times, dc in the last dc. Turn. (15 dc, 14 ch-2 sps)
Checkpoint: the wing now reaches 0.75 in (1.9 cm) from the body edge.
Row 4: Ch 1, sc in the first dc, [ch 5, sk the next dc, sc in the next dc] 7 times. Turn. (8 sc, 7 ch-5 arches)
Row 5: Sl st into the first arch, ch 3 (counts as dc), 6 dc in the same arch, then 7 dc in each of the next 6 arches. (7 shells, 49 dc)
Fasten off. The wing now reaches 1.5 in (3.8 cm) from the body edge. Repeat on the other side of the body.
The wing fans out because the stitch count stays at 15 while the chain spaces get longer. The open bars and arches make the nested lace curves inside the wing.
Lower Wings (Make 2)
Use Color B. Work each wing into the 7 lower wing base stitches (sts 12–18). Turn at the end of every row.
Row 1: Join yarn in st 12. Ch 3 (counts as dc), dc in the same st, [dc in the next st, 2 dc in the next st] 3 times. Turn. (11 dc)
Row 2: Ch 5 (counts as dc + ch 2), [dc in the next dc, ch 2] 9 times, dc in the last dc. Turn. (11 dc, 10 ch-2 sps)
Row 3: Ch 1, sc in the first dc, [ch 5, sk the next dc, sc in the next dc] 5 times. Turn. (6 sc, 5 ch-5 arches)
Row 4: Sl st into the first arch, ch 3 (counts as dc), 6 dc in the same arch, then 7 dc in each of the next 4 arches. (5 shells, 35 dc)
Fasten off. The wing reaches 1.1 in (2.8 cm) from the body edge. Repeat on the other side.
At this point the butterfly measures 3.5 in (8.9 cm) wide and 3.25 in (8.3 cm) tall.
Border
Work the border on each wing separately, in that wing’s own color. Each border goes up one side edge of the wing, across the shells and down the other side edge. The border gauge is the same as the main gauge: 8 sc = 1 in (2.5 cm).
Upper wing border (Color A): Join yarn on the side edge of the wing, at the end of Row 1 next to the body.
- Side edge 1: 2 sc in the end of each of Rows 1, 2 and 3, then 1 sc in the end of Row 4. (7 sc)
- Shell edge: Sc in each of the next 4 dc, picot, sc in each of the next 3 dc; repeat from * 6 more times. (49 sc, 7 picots)
- Side edge 2: 1 sc in the end of Row 4, then 2 sc in the end of each of Rows 3, 2 and 1. (7 sc)
Sl st into the body and fasten off. Total: 63 sc, 7 picots.
Lower wing border (Color B): Join yarn on the side edge of the wing, at the end of Row 1 next to the body.
- Side edge 1: 2 sc in the end of each of Rows 1 and 2, then 1 sc in the end of Row 3. (5 sc)
- Shell edge: Sc in each of the next 4 dc, picot, sc in each of the next 3 dc; repeat from * 4 more times. (35 sc, 5 picots)
- Side edge 2: 1 sc in the end of Row 3, then 2 sc in the end of each of Rows 2 and 1. (5 sc)
Sl st into the body and fasten off. Total: 45 sc, 5 picots.
Why the math works:
- Shells: You work exactly 1 sc in each dc, so the border matches the shell stitch count (49 or 35) and doesn’t ruffle.
- Picots: Each picot sits on top of the 4th dc, the center of its 7-dc shell, so every scallop gets one centered bead.
- Side edges: The end of a dc row is about as tall as 2 sc, so 2 sc per dc row keeps the side edges flat. The shorter arch row takes 1 sc.
- Size: The border adds 0.25 in (0.6 cm) on every outer edge. That takes the width from 3.5 in (8.9 cm) to 4 in (10.2 cm) and the height from 3.25 in (8.3 cm) to 3.75 in (9.5 cm).
Border totals for the whole butterfly: 2 x 63 + 2 x 45 = 216 sc and 2 x 7 + 2 x 5 = 24 picots.
Antennae and Hanging Loop
Use Color A. Work into the 3 stitches at the head end of the body.
Antenna (make 2): Join yarn in the 1st head-end st. Ch 10, sc in the 2nd ch from the hook, 2 sc in each of the next 3 ch, sl st in each of the next 5 ch, then sl st in the same head-end st. Fasten off. Repeat in the 3rd head-end st.
The 7 sc crowded onto 4 ch make the tip curl. Each antenna is about 0.75 in (1.9 cm) long.
Loop: Join yarn in the center head-end st. Ch 30, sl st in the same st. Ch 1, work 36 sc over the chain loop, then sl st in the first sc. Fasten off.
The 30 ch measure 2.5 in (6.4 cm), so the folded loop stands 1.25 in (3.2 cm) above the head. Covering it with sc makes it strong enough to hang on a branch for many seasons.
Weave in all ends through the solid stitches of the body, where they won’t show.
Final Blocking
- Soak the butterfly in fabric stiffener, or in a mix of equal parts white glue and water.
- Press out the extra liquid gently in a towel. Do not wring it.
- Lay it flat on the blocking board, right side up.
- Pin the body straight at 2.75 in (7.0 cm) long.
- Pin each upper wing so it reaches 1.75 in (4.4 cm) from the body edge, for a total width of 4 in (10.2 cm).
- Pin each picot outward with its own pin so every scallop is round.
- Open each ch-5 arch and ch-2 space with the tip of a pin so the lace shows clearly.
- Shape the antennae into outward curls and lay the loop straight up.
- Let it dry completely, for at least 12 hours.
Final Quality-Control Checklist
- The body has 44 sts and measures 2.75 in (7.0 cm).
- Each upper wing has 7 shells, and each lower wing has 5 shells.
- Each upper wing border has 63 sc and 7 picots.
- Each lower wing border has 45 sc and 5 picots.
- A small gap shows between each upper and lower wing.
- The finished size is 4 in (10.2 cm) x 3.75 in (9.5 cm).
- The left and right halves mirror each other.
- The antennae curl evenly and the loop is centered.
- No ends show on the front.
Troubleshooting
Wings ruffle or cup. Your chain spaces are too long. Make your chains tighter, or use a hook one size smaller for Rows 2–4 only.
Wings curl toward the back. Make sure you turned after every row. Blocking with stiffener will also flatten slight curling.
Shells look crowded. Check that you skipped 1 dc between arches in the arch row. You should have 7 arches on an upper wing and 5 on a lower wing.
Border pulls in. Work 2 sc in the end of each dc row, not 1.
Picots disappear. Pull the sl st snug against the 3rd ch, and pin each picot during blocking.
Body twists. You may have missed the first sc of a round. Count again to make sure you have 44.
Care
Hand wash in cool water only when needed, then stiffen and shape it again. Store it flat in a box between seasons so the wings keep their shape.
Final Notes
Every measurement builds on the one before. A 2.75 in (7.0 cm) body carries upper wings that reach 1.5 in (3.8 cm) and lower wings that reach 1.1 in (2.8 cm), for 3.5 in (8.9 cm) before the border. The 0.25 in (0.6 cm) picot border brings the butterfly to 4 in (10.2 cm) wide and 3.75 in (9.5 cm) tall, and the loop adds 1.25 in (3.2 cm) at the top.
Once your first butterfly matches these numbers, the next ones go quickly. Try other color pairs to make a whole set of tree ornaments.
Happy crocheting!