

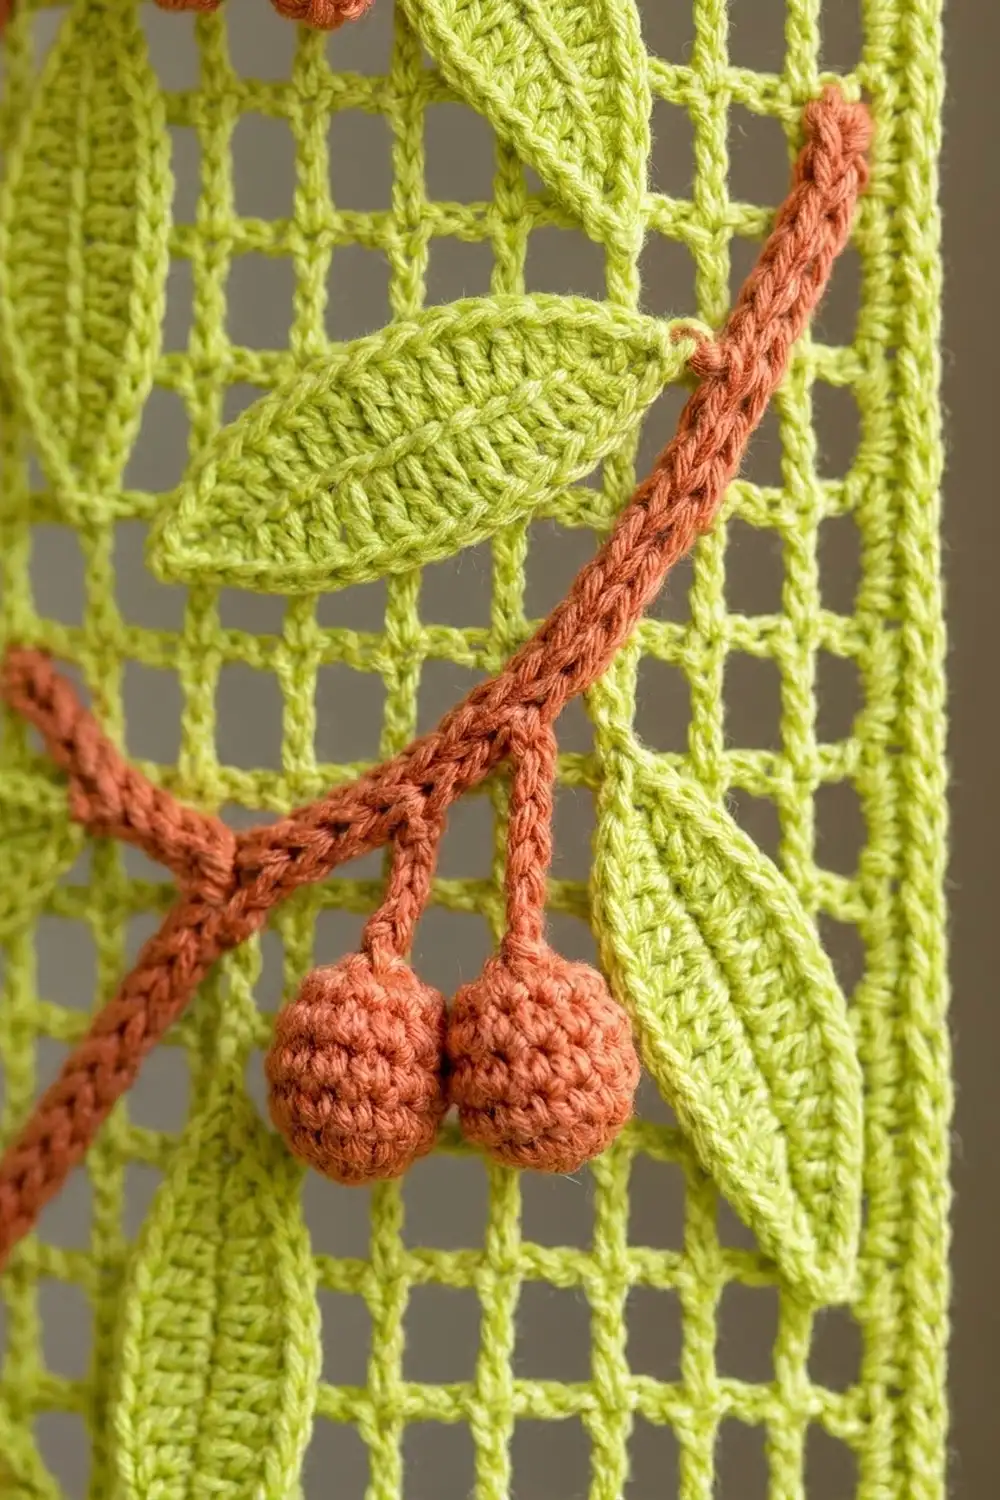
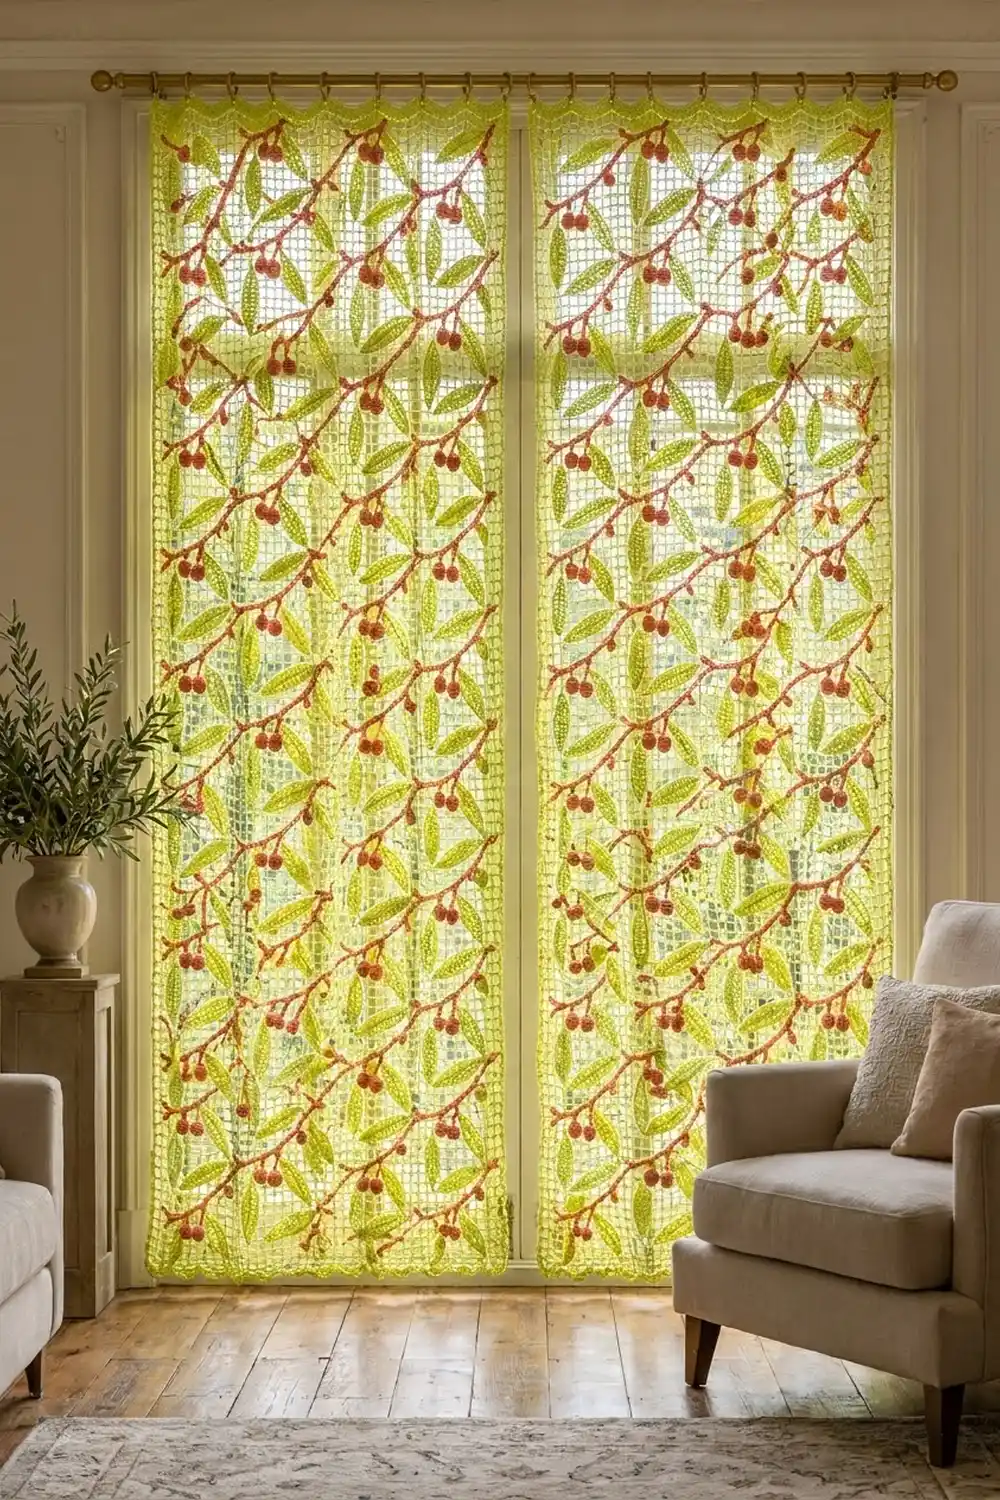
The Berry Branch Filet Curtain is a light, airy window panel. Lime-green filet mesh is covered with sewn-on burnt-orange branches, pairs of round berries and pointed lime leaves. In daylight the mesh glows, and the leaves and berries stand out against the window.
The palette uses two colors: a bright lime for the mesh and leaves, and a warm burnt orange for the branches and berries. The look is botanical and slightly retro. It suits a sunny living room or a garden-facing door.
This pattern uses US crochet terms. One finished panel measures 30 in (76.2 cm) wide by 82 in (208.3 cm) long, including the top hanging scallops. Make two panels for a pair like the one in the photo.
Construction is simple. You crochet five long mesh strips, edge each strip with single crochet and add bottom scallops. Then you sew on the appliqués, join the strips side by side and finish with a scalloped top border for clip rings.
Finished Size and Construction
- Finished panel size: 30 in × 82 in (76.2 cm × 208.3 cm)
- Skill level: Intermediate
- Terminology: US crochet terms
- Yarn weight: DK (weight 3) cotton
- Hook: 4 mm (G-6)
- Number of pieces per panel: 5 strips, plus appliqués
- Layout: 5 strips side by side, 1 row high
- Single strip size (mesh only): 5.5 in × 80 in (14.0 cm × 203.2 cm)
- Single strip size after edging and scallops: 6 in × 81.25 in (15.2 cm × 206.4 cm)
- Panel size before top border: 30 in × 81.25 in (76.2 cm × 206.4 cm)
- Top border depth: 0.75 in (1.9 cm)
Materials
Use a smooth mercerized cotton or cotton blend in DK weight. Cotton keeps the mesh crisp, holds its shape when hung and stands up to sunlight better than acrylic. The quantities below assume about 110 m (120 yd) per 50 g ball.
Per panel:
– Lime green (Color A): 1150 g, about 2530 m (2767 yd). This covers the strips, edging, leaves and top border.
– Burnt orange (Color B): 300 g, about 660 m (722 yd). This covers the branches and berries.
For a pair of panels: 2300 g / 5060 m of Color A and 600 g / 1320 m of Color B.
All quantities include a margin of roughly 10% for swatching and tails.
Tools:
– 4 mm (G-6) crochet hook
– Tapestry needle
– Locking stitch markers
– Rust-proof pins
– Measuring tape
– Small amount of orange yarn scraps for stuffing the berries
– Clip curtain rings (16 per panel)
Abbreviations (US Terms)
- ch – chain
- sl st – slip stitch
- sc – single crochet
- hdc – half double crochet
- dc – double crochet
- sc2tog – single crochet 2 together
- sk – skip
- sp – space
- st(s) – stitch(es)
- MR – magic ring
- RS / WS – right side / wrong side
Special stitch: mesh. One mesh is (ch 1, sk 1 st or sp, dc in next dc). Each mesh is 2 stitches wide: the ch-1 and the dc.
Gauge and Checkpoints
Gauge: 10 mesh and 10 rows = 5 in (12.7 cm), so each mesh is 0.5 in (1.3 cm) square. In sc edging, 4 sc = 1 in (2.5 cm).
Test one piece first. Work Rows 1–16 of the first strip (one full motif block) before committing to all five strips.
Checkpoints:
– After Row 1: the strip is 5.5 in (14.0 cm) wide.
– After Row 16: the strip is 8 in (20.3 cm) tall.
– After Row 32: the strip is 16 in (40.6 cm) tall.
– After Row 80: the strip is 40 in (101.6 cm) tall.
– After Row 160: the strip is 80 in (203.2 cm) tall.
If your piece is too big, go down a hook size, to 3.75 mm (F-5). If it is too small, go up to 4.5 mm (7). Height matters most, because each row should be 0.5 in (1.3 cm) tall. If only your height is off, adjust your turning-chain tension rather than the stitch count.
Strip (Make 5 per Panel)
Use Color A for the strips.
Foundation: Ch 26.
Row 1 (RS, solid): Dc in 4th ch from hook. The skipped 3 ch count as the first dc. Dc in each ch across. Turn. (23 sts)
Row 2 (mesh): Ch 4 (counts as dc + ch 1), sk next st, dc in next st. Ch 1, sk next st, dc in next st. Repeat from * across, working the last dc in the top of the turning ch. Turn. (12 dc and 11 ch-1 sps = 23 sts, 11 mesh)
Rows 3–159 (mesh): Ch 4 (counts as dc + ch 1), sk ch-1 sp, dc in next dc. Ch 1, sk ch-1 sp, dc in next dc. Repeat from * across, working the last dc in the 3rd ch of the turning ch-4. Turn. (23 sts, 11 mesh per row)
Row 160 (solid): Ch 3 (counts as dc). Dc in each ch-1 sp and each dc across, working the last dc in the 3rd ch of the turning ch-4. (23 sts) Do not fasten off.
You now have 160 rows measuring 5.5 in × 80 in (14.0 cm × 203.2 cm).
Strip Edging
Rnd 1 (sc): Ch 1. Work 3 sc in the first st (this is a corner).
– Top edge: Sc in each of the next 21 sts, then 3 sc in the last st (corner).
– Long side: Work 2 sc around the post of each row end down the side. (320 sc)
– Bottom edge: 3 sc in the first foundation st (corner), sc in each of the next 21 sts, 3 sc in the last st (corner).
– Second long side: Work 2 sc in each row end up the side. (320 sc)
– Sl st to the first sc to join.
Rnd 1 total: (21 + 21 + 320 + 320 worked along the edges) + (4 corners × 3 sc) = 694 sc.
Count each edge from the center sc of one corner to the center sc of the next. Each short edge then has 1 + 1 + 21 + 1 + 1 = 25 sts. Each long side has 1 + 1 + 320 + 1 + 1 = 324 sts.
Bottom scallop row: With the RS facing, join Color A in the center sc of the bottom-right corner. Ch 1 and sc in the same st. Sk 2 sts, 7 dc in next st, sk 2 sts, sc in next st. Repeat from * 4 times in total. The last sc lands in the center sc of the opposite corner. Fasten off.
Scallop row count: 4 shells (28 dc) and 5 sc. The 25 edge sts break down as 1 + (4 × 6) = 25.
Strip checkpoint: 6 in × 81.25 in (15.2 cm × 206.4 cm). The sc edge adds 0.25 in (0.6 cm) on each side, and the scallops add 0.75 in (1.9 cm) at the bottom.
Appliqués
Leaf (Make 3 per Block)
Use Color A for the leaves. Ch 13.
– First side: Sc in 2nd ch from hook, hdc in next ch, dc in next 7 ch, hdc in next ch, sc in next ch, 3 sc in last ch.
– Second side: Working along the opposite side of the foundation ch, sc in next ch, hdc in next ch, dc in next 7 ch, hdc in next ch, sc in next ch.
– Sl st in the skipped tip ch, then ch 2 to make the point. Fasten off and leave a 10 in (25.4 cm) tail.
(25 sts) The leaf measures 3 in × 0.75 in (7.6 cm × 1.9 cm). The foundation chain shows as the center vein.
Branch (Make 1 per Block)
Use Color B. Ch 31. Sl st in the back bump of the 2nd ch from hook and in each back bump across. (30 sl sts)
Berry twig: Pick up the 10th sl st from the lower end and ch 5. Sl st in the back bump of the 2nd ch from hook and in the next 3 ch, then sl st back into the branch. (4 sl sts)
The branch measures 7.5 in (19.1 cm) and the twig measures 1 in (2.5 cm). Fasten off and leave a long tail.
Berry (Make 2 per Block)
Use Color B.
– Rnd 1: 6 sc in MR. (6)
– Rnd 2: 2 sc in each st. (12)
– Rnds 3–4: Sc in each st. (12)
– Rnd 5: Sc2tog 6 times. (6) Stuff firmly with orange scraps, close the opening and leave a tail.
Each berry is about 0.75 in (1.9 cm) across.
Placement
Divide each strip into 10 blocks of 16 rows each: Rows 1–16, 17–32, and so on. Count rows from the bottom of each block and mesh from the left.
1. Branch: Pin the lower end at mesh 1, row 2. Pin the upper end at mesh 10, row 13. The branch covers 4.5 in (11.4 cm) across and 6 in (15.2 cm) up, and the twig hangs downward.
2. Berries: Sew two berries side by side at the tip of the twig.
3. Leaves: Sew two leaves above the branch, pointing up and to the left. Sew one leaf below it, pointing down and to the right. Stitch each leaf through its center vein, with the base tucked against the branch.
Sew everything with matching tails, using small stitches through the dc posts only, so nothing shows on the WS.
Make All Pieces
Per panel:
– Color A: 5 strips and 150 leaves
– Color B: 50 branches and 100 berries
Layout (front view):
[S1][S2][S3][S4][S5]
 10   10   10   10   10   blocks per strip
All the branches angle the same way, so the diagonal lines continue across the seams.
Joining
Place two strips with their RS together and the edges lined up from the top corner center to the bottom corner center. Each long side has 324 sts, so the stitches match one to one.
With Color A, sl st through the outer loops of each matching pair: 324 sl sts per seam, 4 seams per panel. End at the bottom corner center so the scallops stay free.
Keep your tension loose and even. Stretch the seam every 10 in (25.4 cm), and if it puckers, rework it with a larger hook.
Checkpoint: The panel is 30 in × 81.25 in (76.2 cm × 206.4 cm).
Top Border
Border gauge: 4 sc = 1 in (2.5 cm), the same as the strip edging.
Row 1: With the RS facing, join Color A at the top-right corner center. Ch 1 and work 1 sc in each st across. That is 5 strips × 25 sts = 125 sc. No extra stitches are added at the seams, because each strip’s corner center sts sit side by side. Turn.
Row 2 (scallops): Ch 1, sc in first st. Sk 1 st, 5 dc in next st, sk 1 st, sc in next st. Repeat from * 31 times in total. (31 shells, 32 sc) Fasten off.
Why the math works: Each strip contributes exactly 25 sts, which gives 125 in total. The scallop repeat is 4 sts plus 1, and 125 = (4 × 31) + 1, so the row starts and ends on a sc. The border is 125 sc ÷ 4 sc per inch = about 30 in (76.2 cm), matching the panel width, so the edge neither ruffles nor pulls in. The two rows add 0.75 in (1.9 cm), bringing the panel to 82 in (208.3 cm).
Final Blocking
- Weave in all the ends along the seams and edging.
- Soak the panel in cool water for 15 minutes, then gently press out the water. Do not wring it.
- Lay it flat on towels or blocking mats.
- Pin it to 30 in × 82 in (76.2 cm × 208.3 cm), keeping the mesh squares square.
- Pin out each scallop, top and bottom.
- Shape the leaves and plump the berries with your fingers.
- Dry it completely before hanging.
Final Quality-Control Checklist
- Each strip has 160 rows and 11 mesh per row.
- Every long side has 324 sts, and every short edge has 25.
- Each strip has 4 bottom scallops, and the panel top has 31 scallops.
- There are 10 blocks per strip, each with 1 branch, 2 berries and 3 leaves.
- All the branches angle from lower left to upper right.
- The seams lie flat with no puckering.
- The panel measures 30 in × 82 in (76.2 cm × 208.3 cm).
Troubleshooting
- The mesh is rectangular, not square: Adjust your dc height or the length of the turning ch.
- The strip is too long or short: Check against the row checkpoints and add or remove whole 16-row blocks only.
- The edging ripples: Work 2 sc per row end, never 3.
- The edging pulls in: Use a looser tension or a larger hook for Rnd 1.
- Leaves curl: Steam-block them before sewing.
- Berries are lopsided: Stuff them evenly before closing Rnd 5.
- Seams pucker: Rework them with a larger hook.
Care
Hand wash in cool water with mild soap and dry flat. Don’t hang the panel while it’s wet, because the weight of the water stretches the mesh.
Final Notes
The measurement chain is straightforward. Each mesh is 0.5 in (1.3 cm). Eleven mesh and 160 rows give a 5.5 in × 80 in (14.0 cm × 203.2 cm) strip. The edging and scallops bring each strip to 6 in × 81.25 in (15.2 cm × 206.4 cm). Five strips make 30 in (76.2 cm), and the top border finishes the panel at 82 in (208.3 cm). Clip one ring into every second sc valley along the top, for 16 rings, and hang.
Happy crocheting!