

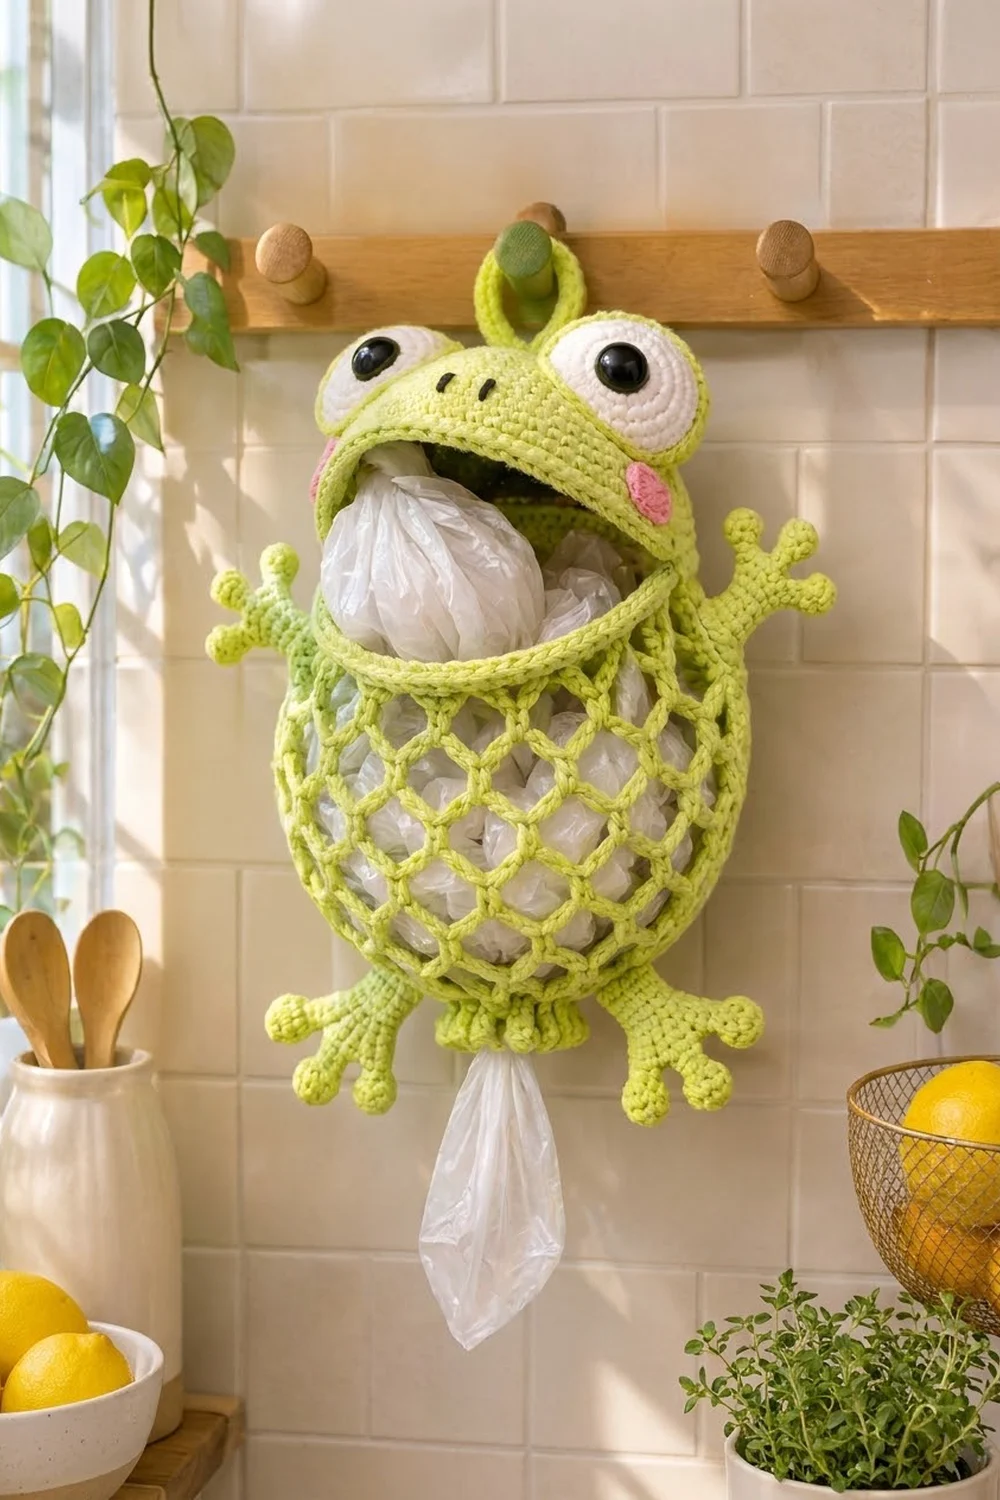
This cheerful frog keeps your kitchen bags in one place. To fill it, lift the head like a lid and push the bags into the mouth. To use it, pull them out one at a time through the drawstring frill at the bottom.
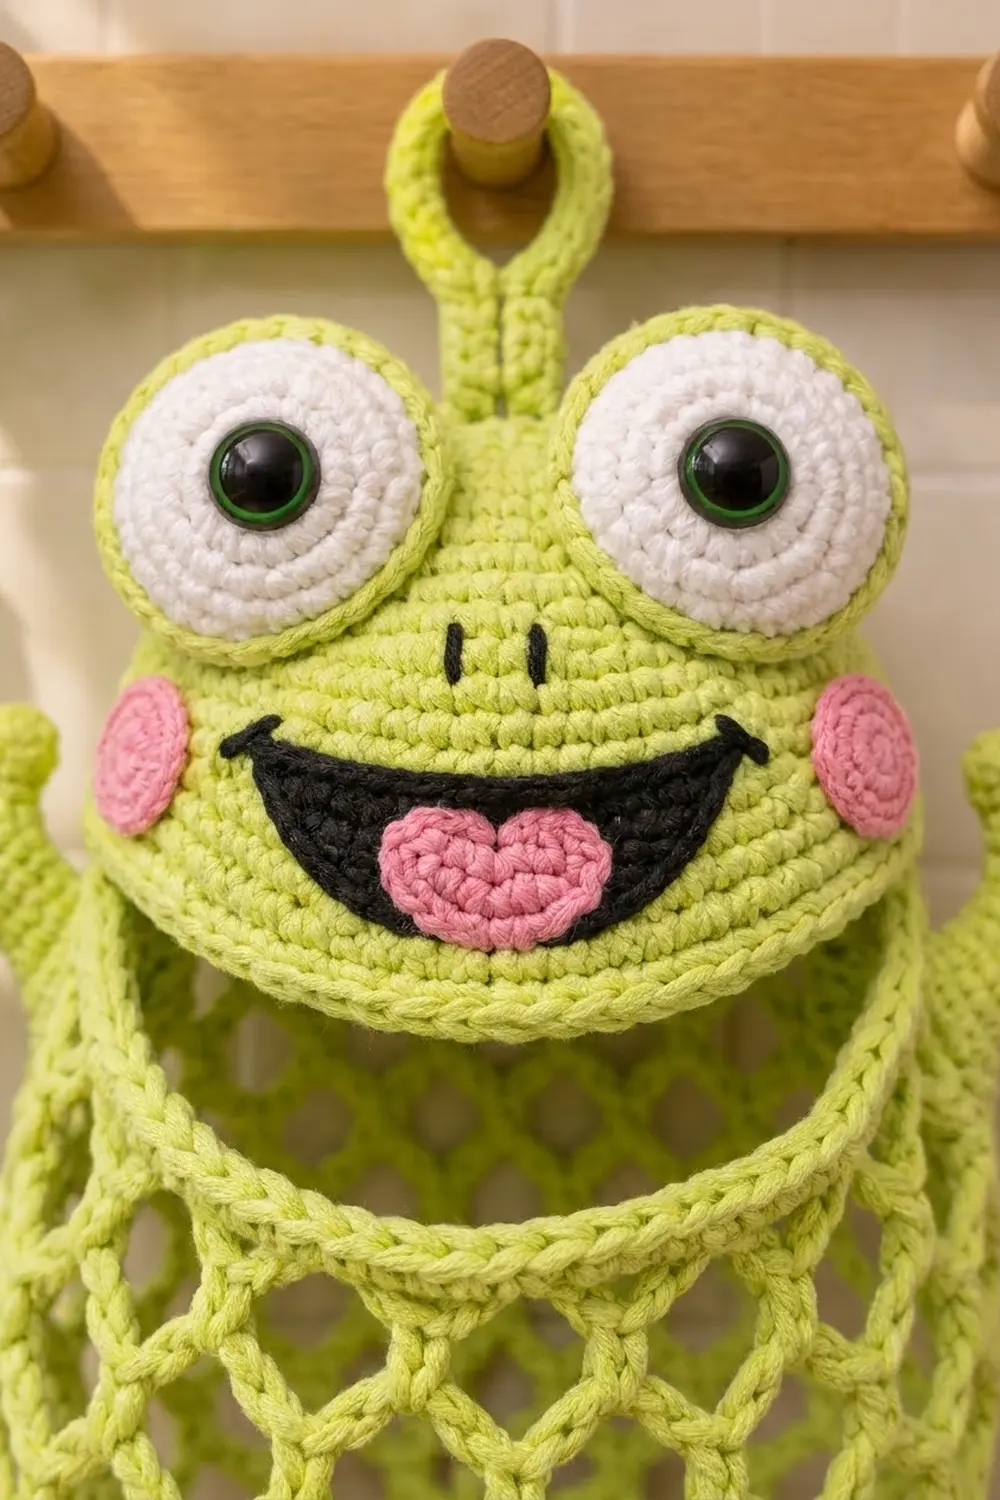
The main color is bright lime green, with big white eyes, pink cheeks, a black smile and a pink heart tongue. The body is an open diamond mesh, so you can see how many bags are left. Teal also works well as a second colorway.
The pattern uses US terms. The finished holder is about 15.5 in (39.4 cm) wide across the arms and 17 in (43.2 cm) tall including the loop. The mesh body is about 12 in (30.5 cm) long and 9.5 in (24.1 cm) wide when filled.
You’ll work the body in the round from the rim down. Then you’ll make a two-layer, lightly stuffed head, add the face, and sew on the limbs and the hanging loop.
Finished Size and Construction
- Finished size: 15.5 in (39.4 cm) wide x 17 in (43.2 cm) tall
- Skill level: Intermediate
- Terminology: US
- Yarn weight: Worsted (#4) cotton
- Hook: 4.0 mm (G-6)
- Number of pieces: 1 holder made from 14 parts (body, 2 head layers, 2 eyes, 2 cheeks, mouth, tongue, 2 arms, 2 legs, loop) plus a drawstring
- Layout: the head is a hinged lid on top of the mesh body, with the arms at the upper sides and the legs at the lower sides
- Piece size (each head layer): 7 in x 5 in (17.8 cm x 12.7 cm)
- Head size before border: 7 in x 5 in (17.8 cm x 12.7 cm); after the border it is 7.4 in x 5.4 in (18.8 cm x 13.7 cm)
- Border depth: 1 round, about 0.2 in (0.5 cm)
Materials
Choose a firm, smooth worsted cotton or cotton blend. It holds its shape under the weight of the bags and washes well. Very stretchy acrylic will let the mesh sag.
- Lime green (main color): 150 g / 231 m
- White: 15 g / 23 m
- Pink: 10 g / 15 m
- Black: 10 g / 15 m
These quantities include a margin of about 15%.
Tools: a 4.0 mm (G-6) hook, two 18 mm black safety eyes, a small handful of fiberfill, a tapestry needle, stitch markers, pins and scissors.
Abbreviations (US Terms)
- ch – chain
- sl st – slip stitch
- sc – single crochet
- hdc – half double crochet
- dc – double crochet
- tr – treble crochet
- inc – 2 sc in the same stitch
- dec – sc2tog
- MR – magic ring
- BLO – back loop only
- st(s) – stitch(es)
Bobble: [yarn over, insert hook, yarn over and pull up a loop, yarn over and pull through 2 loops] 5 times in the same stitch, then yarn over and pull through all 6 loops. Push the bobble to the right side.
Gauge and Checkpoints
Gauge: 18 sc and 20 rounds = 4 in (10.2 cm).
Make the head back first. It’s a plain oval, so it’s the easiest place to check your gauge.
- Head after Rnd 6 (52 sts): about 4.6 in x 2.6 in (11.7 cm x 6.6 cm)
- Head after Rnd 12 (88 sts): 7 in x 5 in (17.8 cm x 12.7 cm)
- Body rim after Rnd 4 (64 sts): 14.2 in (36.1 cm) around, which is 7.1 in (18.0 cm) when laid flat
- Body length, measured relaxed: 3 in (7.6 cm) after Rnd 7, 8 in (20.3 cm) after Rnd 12, 10.5 in (26.7 cm) after Rnd 16 and 12 in (30.5 cm) after Rnd 21
If your pieces come out too big, use a 3.75 mm hook. If they’re too small, use a 4.5 mm hook. The flat rim and the head should match within 0.25 in (0.6 cm), or the lid won’t close neatly.
Head (Make 2: Front and Back)
Use lime green. Join each round with a sl st and start the next with ch 1. The ch 1 doesn’t count as a stitch.
Ch 11.
Rnd 1: 3 sc in 2nd ch from hook, sc in next 8 ch, 3 sc in last ch. Turn the chain and work along its other side: sc in next 8 ch. (22)
Rnd 2: [Inc 3 times, sc 8] twice. (28)
Rnd 3: [(Sc 1, inc) 3 times, sc 8] twice. (34)
Rnd 4: [(Sc 2, inc) 3 times, sc 8] twice. (40)
Rnd 5: [(Sc 3, inc) 3 times, sc 8] twice. (46)
Rnd 6: [(Sc 4, inc) 3 times, sc 8] twice. (52)
Rnds 7–12: Keep going the same way, adding 1 more sc before each inc in every round. Totals: Rnd 7 (58), Rnd 8 (64), Rnd 9 (70), Rnd 10 (76), Rnd 11 (82), Rnd 12 (88).
Each round adds 6 sts, 3 at each curved end, so the oval stays flat. Fasten off the front. Leave the back’s working loop on a marker.
Eyes (Make 2)
Rnd 1: With white, 6 sc in MR. (6)
Rnd 2: Inc in each st. (12)
Rnd 3: (Sc 1, inc) 6 times. (18)
Rnd 4: (Sc 2, inc) 6 times. (24)
Rnd 5: (Sc 3, inc) 6 times. (30)
Insert a safety eye between Rnds 1 and 2 and lock it. Change to green.
Rnd 6: Sc in BLO of each st. (30) This forms the green ring around the white.
Rnds 7–8: Sc in each st. (30)
Rnd 9: (Sc 3, dec) 6 times. (24)
Rnd 10: (Sc 2, dec) 6 times. (18)
Rnd 11: (Sc 1, dec) 6 times. (12) Stuff firmly.
Rnd 12: Dec 6 times. (6)
Close the hole and leave a long tail. Each eye is about 2.2 in (5.6 cm) across.
Cheeks (Make 2)
With pink: Rnd 1: 6 sc in MR. (6) Rnd 2: Inc in each st. (12) Rnd 3: (Sc 1, inc) 6 times. (18)
Join with a sl st and leave a long tail. Each cheek is 1.2 in (3.0 cm) across.
Mouth
Use black and work in rows.
Row 1: Ch 18, sc in 2nd ch from hook and in each ch across. (17) This row is 3.8 in (9.7 cm) wide.
Row 2: Ch 1, turn, dec, sc 13, dec. (15)
Row 3: Ch 1, turn, dec, sc 11, dec. (13)
Row 4: Ch 1, turn, dec, sc 9, dec. (11)
Row 5: Ch 1, turn, dec, sc 7, dec. (9)
Leave a long tail. The finished smile is about 1 in (2.5 cm) tall, and Row 1 is its top edge.
Tongue
With pink, work all of this into a MR: ch 3, 3 tr, 3 dc, ch 1, tr, ch 1, 3 dc, 3 tr, ch 3, sl st into the ring. Pull the ring tight to make a heart about 1.2 in (3.0 cm) wide.
Arms (Make 2)
Use lime green.
Row 1: Ch 13, sc in 2nd ch from hook and in each ch across. (12)
Rows 2–5: Ch 1, turn, sc in each st. (12)
Don’t turn. Rotate the piece so you can work across the 5 row ends.
Fingers: Sc in the first row end. Ch 6, bobble in 4th ch from hook, sc in next 2 ch, sc in next row end. Repeat from * 3 more times. You’ll have 4 fingers set between 5 sc.
Leave a long tail. Each arm is 2.7 in x 1 in (6.9 cm x 2.5 cm), or about 3.5 in (8.9 cm) long with the fingers.
Legs (Make 2)
Work these like the arms, with two changes:
- Start with ch 15, so every row has 14 sc.
- For each toe, ch 7, work the bobble in the 4th ch from hook, then sc in the next 3 ch.
Each leg is about 4.1 in (10.4 cm) long.
Body
Use lime green.
Rnd 1: Ch 64 and join into a ring, taking care not to twist the chain. Ch 1, sc in each ch. (64)
Rnds 2–4: Sc in each st. (64) The rim is now 0.8 in (2.0 cm) deep.
Rnd 5: Ch 1, sc in first st. Ch 5, skip 3 sts, sc in next st. Repeat from * 14 more times. Ch 2, skip 3 sts, dc in first sc. (16 ch-5 loops) The ch 2 + dc counts as the last loop.
Rnds 6–7: Ch 1, sc around the post of the joining st. Ch 5, sc in next loop. Repeat from * 14 more times. Ch 2, dc in first sc. (16 loops)
Rnd 8: Ch 1, sc around the joining post. Ch 7, sc in next loop. Repeat from * 14 more times. Ch 3, tr in first sc. (16 ch-7 loops)
Rnds 9–12: Repeat Rnd 8. (16 loops)
Rnds 13–14: Repeat Rnd 6. (16 ch-5 loops)
Rnds 15–16: Ch 1, sc around the joining post. Ch 3, sc in next loop. Repeat from * 14 more times. Ch 1, hdc in first sc. (16 ch-3 loops)
The body always has 16 loops. Only the chain length changes, and that is what gives it the egg shape.
Rnd 17: Ch 1, 2 sc in each of the 16 loops. (32)
Rnd 18: Sc in each st. (32)
Rnd 19: Ch 4 (counts as dc + ch 1), skip next st. Dc in next st, ch 1, skip next st. Repeat from * 14 more times. Join to 3rd ch of ch-4. (16 dc + 16 ch-1 spaces = 32)
Rnd 20: Sc in each dc and in each ch-1 space. (32)
Rnd 21 (frill): Ch 3, sl st in next st. Repeat from * around. (32 ch-3 loops) Fasten off.
Drawstring: Ch 100, about 22 in (55.9 cm) long. Weave it through the 16 ch-1 spaces of Rnd 19. Cinch the opening to 1.5 in (3.8 cm) and tie a bow.
Hanging loop: Ch 30. Sc in 2nd ch from hook and in each ch across. (29) Ch 1, turn, sc 29. Leave a long tail.
Make All Pieces
- Lime green: 1 body, 2 head layers, 2 arms, 2 legs, 1 loop, 1 drawstring, plus the backs of the eyes
- White: the fronts of both eyes
- Pink: 2 cheeks, 1 tongue
- Black: 1 mouth, plus the nostril embroidery
            [ loop ]
        [ eye ]  [ eye ]
       [   HEAD / LID   ]
[ arm ][   MESH  BODY   ][ arm ]
       [   MESH  BODY   ]
 [ leg ]   [ frill ]   [ leg ]
Assembly (Joining)
- Face: Sew the mouth below the center of the head front, with Row 1 pinned in a gentle upward curve. Sew the tongue onto the lower half of the mouth and a cheek at each mouth corner. With black yarn, embroider two short nostril stitches.
- Head: Join the two layers with the border round (see the next section).
- Eyes: Sew the eyes on so they rise 1 in (2.5 cm) above the top edge of the head. Their centers should be 2.6 in (6.6 cm) apart.
- Hinge: Flatten the rim to 7.1 in (18.0 cm) wide. Mark the center 24 of the 32 back-half sts. On the head back, mark a line 2 in (5.1 cm) above the bottom edge. Whipstitch the 24 marked rim sts along that line, one stitch to one stitch. Leave the other 40 rim sts free so the head can lift.
- Loop: Fold the loop in half and sew both ends to the top center of the head back, so 2 in (5.1 cm) of loop shows above the head.
- Limbs: Sew the arms at Rnds 6–7 and the legs at Rnds 15–16, with the legs angled outward. Tack each leg into a soft bend at its midpoint.
On the body, sew only through solid stitches and the sc at the ends of the mesh loops, not through the chains. Keep your stitches snug but not tight so the mesh doesn’t pucker.
Size check: The holder should measure 17 in (43.2 cm) tall from the top of the loop to the toes and 15.5 in (39.4 cm) across the arms.
Border: Head Joining Edge
Work the border at the head gauge: 18 sc = 4 in (10.2 cm). Stuff the head lightly and hold the two layers wrong sides together.
Rnd 13: Working through both layers, sc in each st: 44 sts along the top half and 44 sts along the bottom half. (88) Add more stuffing before closing the last 15 sts. Join and fasten off.
Why the math works: Both layers end with 88 sts, so every stitch has a partner and nothing is added or skipped. The rim also matches the head. At 4.5 sts per inch, its 64 sts measure 14.2 in (36.1 cm) around, or 7.1 in (18.0 cm) flat, which is almost exactly the head’s 7 in (17.8 cm).
Final Blocking
- Mist the head and limbs lightly with water.
- Pat the head into a 7.4 in x 5.4 in (18.8 cm x 13.7 cm) oval.
- Fan out the fingers and toes and pin them flat.
- Fill the body loosely with bags or a rolled towel so it is 9.5 in (24.1 cm) wide.
- Let everything dry fully before hanging.
Final Quality-Control Checklist
- Every mesh round has 16 loops.
- The rim has 64 sts and the bottom has 32.
- The lid covers the rim with no gaps.
- The 24-st hinge is secure.
- The safety eyes are locked and the eyes are firmly sewn on.
- The drawstring slides freely.
- The loop is stitched through both head layers.
- All tails are woven in.
Troubleshooting
- The head cups or ripples: Recount your rounds. Each one must add exactly 6 sts.
- The mesh is twisted: Rnd 1 was joined with a twist. Restart the rim.
- The body is too long: Use ch-6 loops instead of ch-7 for Rnds 8–12.
- Bags fall out: Cinch the drawstring to 1 in (2.5 cm).
- The lid pops open: Sew a small snap under the chin at the front of the rim.
Care
Hand wash in cool water, roll in a towel to remove the water, and dry flat. Reshape the head while it’s still damp.
Final Notes
Each measurement depends on the one before. A gauge of 18 sc = 4 in (10.2 cm) gives an 88-st head oval of 7 in x 5 in (17.8 cm x 12.7 cm). The 64-st rim lies flat at the same width as the head. The 16 mesh loops make a 12 in (30.5 cm) body, and the limbs bring the frog to 15.5 in x 17 in (39.4 cm x 43.2 cm).
Happy crocheting!