
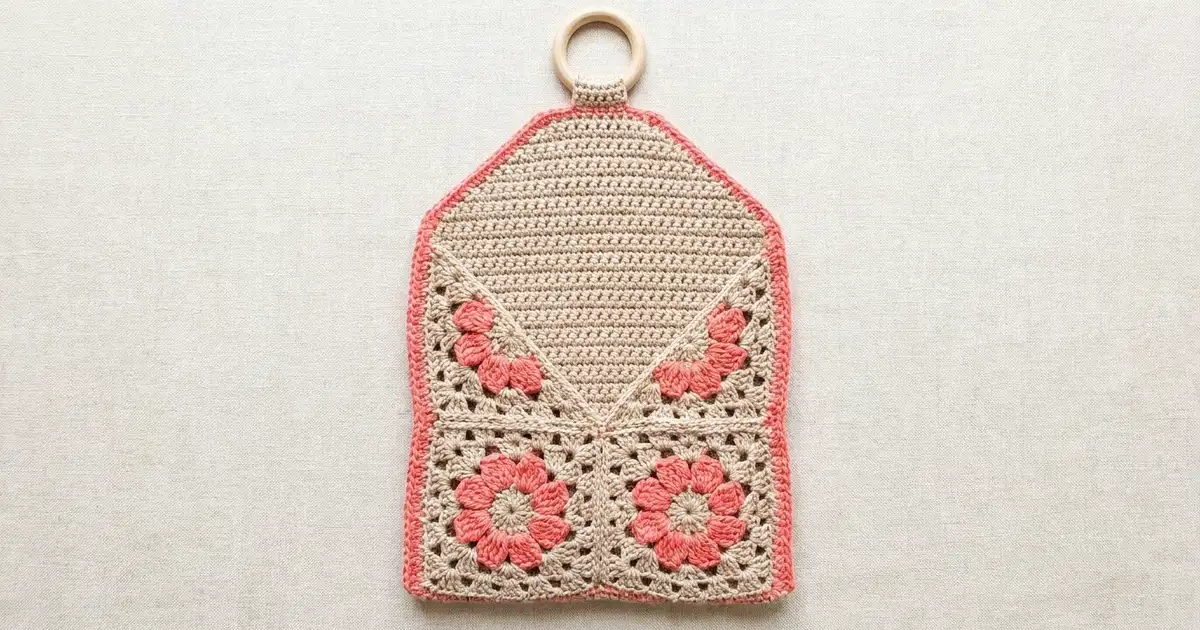
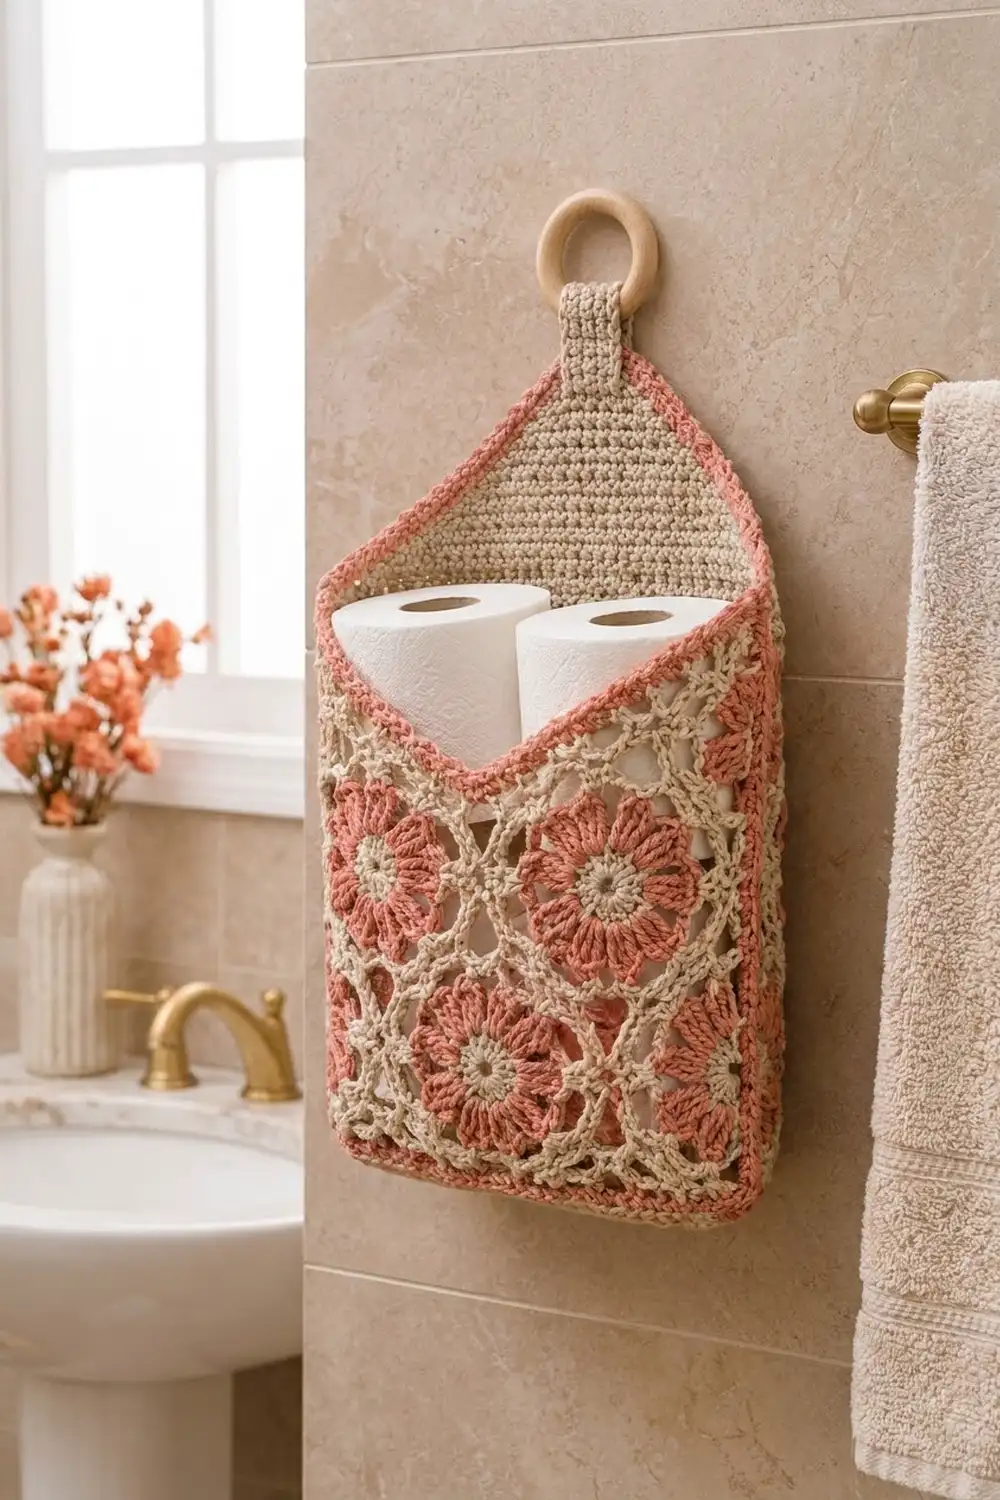
The Rosewood Lace holder hangs on the wall and holds two spare toilet rolls in a lacy flower pocket. Four coral-and-beige flower squares make the front, two textured triangles shape the V opening, and a solid woven-look back panel with a pointed top hangs from a wooden ring.
The palette is soft: warm beige for the structure and coral for the flowers and edges. The style is cottage bathroom: practical, but pretty enough to leave on display.
This pattern uses US crochet terms. The finished holder is 11 in (27.9 cm) wide and 20.75 in (52.7 cm) tall, not counting the ring. The pocket is 4 in (10.2 cm) deep.
You will make four flower squares and join them. Next you add two moss-stitch triangles and a coral border to finish the front. Then you make a moss-stitch back panel with a roof and tab, plus one long side strip (the gusset), and sew everything together.
Finished Size and Construction
- Finished size: 11 in x 20.75 in (27.9 cm x 52.7 cm), pocket depth 4 in (10.2 cm)
- Skill level: Intermediate
- Terminology: US
- Yarn weight: Worsted (#4) cotton
- Hook: 4.5 mm (US 7)
- Number of pieces: 8 (4 squares, 2 triangles, 1 back panel, 1 gusset)
- Front layout: 2 x 2 squares with 2 triangles on top
- Square size: 5 in (12.7 cm), 20 sts per side including corners
- Front before border: 10 in (25.4 cm) wide, 15 in (38.1 cm) tall at the outer edges
- Border depth: 0.5 in (1.3 cm), 2 rounds
- Front after border: 11 in x 16 in (27.9 cm x 40.6 cm)
Materials
Use a smooth, mercerized or combed worsted cotton. Cotton holds its shape and copes well with bathroom humidity. Avoid splitty or very fuzzy yarn, because the lace frame needs clear stitch definition.
- Beige: 300 g, about 510 m (back, gusset, triangles, square centers and frames)
- Coral: 100 g, about 170 m (flowers, border, seams, edging)
These amounts include a safety margin of about 15%.
Tools:
- 4.5 mm (US 7) hook
- Wooden ring, 2.5 in (6.4 cm) across
- Tapestry needle
- Stitch markers
- Blocking mats and rust-proof pins
- Measuring tape
Abbreviations (US Terms)
- ch – chain
- sl st – slip stitch
- sc – single crochet
- hdc – half double crochet
- dc – double crochet
- sc2tog / sc3tog – single crochet 2 or 3 together
- sk – skip
- sp – space
- st(s) – stitch(es)
- cl – 2-dc cluster: yarn over, insert hook in st and pull up a loop, yarn over and pull through 2 loops; repeat once in the same st; yarn over and pull through all 3 loops
Moss stitch (ms): A row of moss stitch begins with ch 1 and a turn. Work sc in the first st, ch 1, sk next st, sc in next ch-1 sp, and end with sc in the last st. In the stitch counts, every sc and every ch-1 counts as 1 st.
Gauge and Checkpoints
- Moss stitch: 16 sts and 16 rows = 4 in (10.2 cm)
- Sc: 16 sts = 4 in (10.2 cm)
- One square: 5 in (12.7 cm)
Make one square first and check it at each stage:
- After Round 3 (the full flower): about 3 in (7.6 cm) across
- After Round 5: about 4.5 in (11.4 cm)
- After Round 6: 5 in (12.7 cm) per side, with 20 sts per side
If the square is too big, go down 0.5 mm. If it is too small, go up 0.5 mm. Then swatch the moss stitch with the same hook. The back panel and gusset rely on 4 rows per inch, so check your row count as carefully as your stitch count.
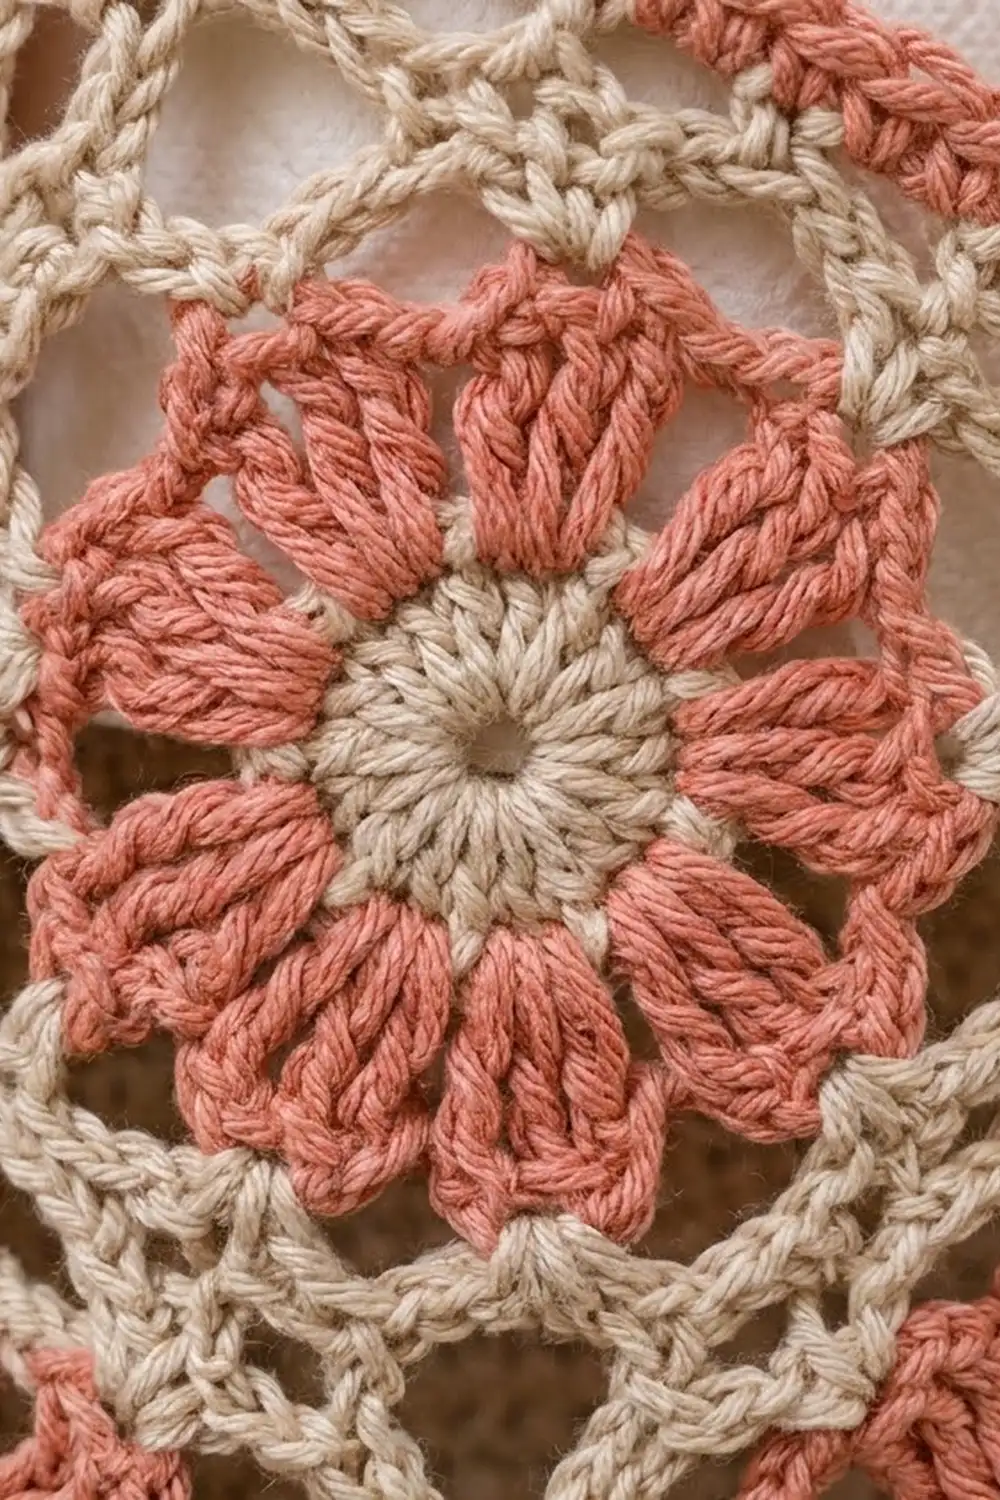
Flower Square (Make 4)
Round 1 (beige): Make a magic ring, ch 3 (counts as dc), and work 11 dc in the ring. Join with a sl st to the top of the ch-3. Fasten off. (12 dc)
Round 2 (coral): Join coral in any dc. Ch 2 and dc in the same st (this counts as the first cl), then ch 2. Cl in next dc, ch 2; repeat from * 10 more times. Join to the top of the first cl. (12 cl, 12 ch-2 sps)
Round 3 (coral): Sl st into the first ch-2 sp. In each ch-2 sp work (sc, hdc, 2 dc, hdc, sc). Join and fasten off. (12 petals, 72 sts)
Round 4 (beige): Join beige with a sc around the post of any Round 2 cl, between two petals. Ch 5, sc around the next cl between petals; repeat from * 10 more times, then ch 5 and join to the first sc. (12 ch-5 loops)
Round 5 (beige): Sl st into the first loop. Ch 3 (counts as dc) and work (2 dc, ch 2, 3 dc) in the same loop for the first corner. Ch 3, sc in next loop, ch 5, sc in next loop, ch 3. (3 dc, ch 2, 3 dc) in next loop, ch 3, sc in next loop, ch 5, sc in next loop, ch 3; repeat from * 2 more times. Join. (4 corners; each side has 2 sc, 2 ch-3 sps and 1 ch-5 sp)
Round 6 (beige): Ch 1. Work 3 sc in the corner ch-2 sp. Sc in each of the next 3 dc, 2 sc in the ch-3 sp, sc in the sc, 4 sc in the ch-5 sp, sc in the sc, 2 sc in the ch-3 sp, and sc in each of the next 3 dc; repeat from * 3 more times. Join and fasten off.
The middle sc of each 3-sc group is the corner st. Between corner sts there are 1 + 3 + 2 + 1 + 4 + 1 + 2 + 3 + 1 = 18 sts. (76 sts: 18 per side between corners + 4 corner sts = 20 per side including both corners)
Make All Pieces
- Squares: 4, made with beige for Rounds 1 and 4–6 and coral for Rounds 2–3
- Triangles: 2 (beige moss stitch, worked onto the joined squares)
- Back panel with roof and tab: 1 (beige)
- Gusset: 1 (beige)
Front layout (A = square, T = triangle):
 T \ / T
 A | A
 A | A
Joining the Squares
Place two squares right sides together. With beige, whipstitch through the back loops only, from corner st to corner st. Each side has 20 sts, so every st is matched to exactly 1 st on the other square. Join the squares in pairs first, then join the two pairs along their long edge.
Keep the tension even and snug, but don’t let the seam pucker. The seam should lie flat and stretch as much as the squares do.
Checkpoint: The joined panel is 40 sts wide and 40 sts tall, which is 10 in x 10 in (25.4 cm x 25.4 cm). No stitches are added at the seams.
Moss-Stitch Triangles (Make 2)
Each triangle is worked onto the top edge of one top square. It has a straight outer edge and decreases toward the center, so the two triangles together form the V.
Row 1 (RS): Join beige in the outer top corner st of the left square. Ch 1, sc in the same st, ch 1, sk next st, sc in next st; repeat from * 8 more times, then sc in the center corner st. (20 sts)
Rows 2–19: Work in moss stitch. Keep the outer edge straight and decrease 1 st at the center edge on every row: work sc2tog over the last 2 sts on rows that end at the center, or over the first 2 sts on rows that start there. Each row has (21 – row number) sts. (Row 19: 2 sts)
Row 20: Ch 1, turn, sc2tog. Fasten off. (1 st)
Work the second triangle on the right square as a mirror image: join at the center corner st, so the decreases fall on the center side.
Checkpoint: Each triangle is 5 in (12.7 cm) tall at the outer edge. The front now measures 15 in (38.1 cm) at the outer edges and 10 in (25.4 cm) at the center of the V.
Front Border
The border is worked in sc at 4 sts per inch, and each round is about 0.25 in (0.6 cm) deep.
Round 1 (coral): Join at the outer top corner of the left triangle and work 3 sc in the Row 20 st. Work down the outer side:
- Down the outer side: 1 sc in each of Rows 19–1 row-ends (19 sts), then 1 sc in each of the 39 square edge sts above the bottom corner (58 sts).
- Bottom left corner: 3 sc in the corner st.
- Bottom edge: sc in each of the 38 sts between the corner sts.
- Bottom right corner: 3 sc in the corner st.
- Up the right side: 58 sc, worked the same way in reverse.
- Top right corner: 3 sc in the Row 20 st.
- Right slope: Work into row-ends 20 through 2: (2 sc in next row-end, sc in next row-end) 8 times, then sc in each of the last 3 row-ends (27 sts).
- V point: Sc2tog, inserting into Row 1 of this triangle for the first part and Row 1 of the other triangle for the second part.
- Left slope: Work 27 sc, mirroring the right slope.
Join to the first sc.
Count: 38 + 3 + 58 + 3 + 27 + 1 + 27 + 3 + 58 + 3 = 221 sts
Round 2 (coral): Ch 1. Sc in each st, working 3 sc in the center st of each of the 4 corner groups. At the V, sc3tog over the st before the V, the V st and the st after it. Join and fasten off.
Count: 221 + (4 corners x 2 extra sts) – 2 (sc3tog) = 227 sts
Why the math works: The bottom edge is 40 square sts, which become 40, then 42 sts between the corner centers. Each side is 40 square sts plus 20 triangle rows, which become 60, then 62 sts between corners. Including the corner sts, each side has 64 sts, or 16 in (40.6 cm), and the bottom has 44 sts, or 11 in (27.9 cm). The slopes use 7 sc for every 5 row-ends. This matches the 1.4 times longer diagonal and keeps the V from rippling.
Back Panel, Roof and Tab
Foundation: With beige, ch 45.
Row 1: Sc in the 2nd ch from the hook, ch 1, sk next ch, sc in next ch; repeat from * 20 more times, then sc in the last ch. (44 sts)
Rows 2–64: Work in moss stitch. (44 sts)
Checkpoint: 11 in x 16 in (27.9 cm x 40.6 cm), the same as the bordered front.
Roof, Rows 65–83: Sc2tog at both ends of every row, keeping the moss pattern correct in between. Each row loses 2 sts: 42, 40, and so on down to 6. (Row 83: 6 sts)
The roof is 19 rows tall, which is 4.75 in (12.1 cm).
Tab, Rows 84–99: Work in moss stitch over the 6 sts. (16 rows, 4 in / 10.2 cm)
Fasten off and leave a long tail. Fold the tab through the ring to the back and sew it to the roof top. You get a 2 in (5.1 cm) loop.
Gusset
Foundation: With beige, ch 17.
Row 1: Sc in the 2nd ch from the hook, (ch 1, sk 1, sc in next) 7 times, sc in the last ch. (16 sts)
Rows 2–170: Work in moss stitch. (16 sts)
Checkpoint: 4 in x 42.5 in (10.2 cm x 108.0 cm).
Assembly and Edging
Gusset to front: Hold the gusset and front wrong sides together. With coral, sc through both layers, matching 1 gusset row-end to 1 front Round 2 st. Work from the top left corner center, down 62 sts to the bottom left corner, across the bottom corner sts and 42 sts, and up to the top right corner. That is 1 + 62 + 1 + 42 + 1 + 62 + 1 = 170 sts, matching the 170 gusset rows.
Gusset to back: Join the other long edge of the gusset to the back panel the same way. The back path is 64 row-ends, 42 bottom sts between the corners, and 64 row-ends, which is also 170.
Top edging (work twice): Join coral at the front top corner. Sc 16 across the top of the gusset, then work 27 sc up the roof slope with (2 sc, 1 sc) over pairs of row-ends 8 times, then 1 sc in each of the last 3 row-ends. Stop at the base of the tab. (43 sts) Fasten off. Work the other side as a mirror image.
Final Blocking
- Weave in all ends along same-color seams.
- Wet the holder in cool water and gently press out the excess.
- Lay it flat and stuff the pocket loosely with a folded towel.
- Pin the front to 11 in x 16 in (27.9 cm x 40.6 cm), opening the lace frames and the petals.
- Pin the roof slopes straight and the V point crisp.
- Let it dry completely, then turn it over and check the back panel’s measurements.
Final Quality-Control Checklist
- Each square has 20 sts per side, and the flowers are centered.
- The square seams are flat, with no gaps at the corners.
- The triangles are mirror images, and the V sits exactly over the center seam.
- The border lies flat, with sharp corners and a clean V point.
- The gusset reaches exactly from the top corner on one side to the top corner on the other.
- The tab is sewn securely and the ring hangs straight.
- Two rolls fit without straining the lace.
Troubleshooting
- Square too big: Use a smaller hook for Rounds 4–6 only.
- Wavy border on the slopes: Use fewer 2-sc row-ends.
- Cupped V or drawn-in slopes: Add 1–2 sc per slope.
- Gusset too long: Unravel extra rows. Don’t stretch the front to fit.
- Roof leans: Make sure you decrease at both ends of every row.
- Holder sags: Stiffen it with spray starch, or slip a plastic canvas sheet behind the back panel.
Care
Hand wash cool, reshape and dry flat. A light starch keeps the lace crisp in a damp bathroom.
Final Notes
The measurements build on each other:
- Four 5 in (12.7 cm) squares make a 10 in (25.4 cm) panel.
- Two 5 in (12.7 cm) triangles bring the outer edges to 15 in (38.1 cm).
- A 0.5 in (1.3 cm) border makes the front 11 in x 16 in (27.9 cm x 40.6 cm), the same size as the 44-st, 64-row back.
- A 170-row gusset fits the 170-st edges exactly.
Check each stage against these numbers and the holder will fit together without any fudging. Happy crocheting!