

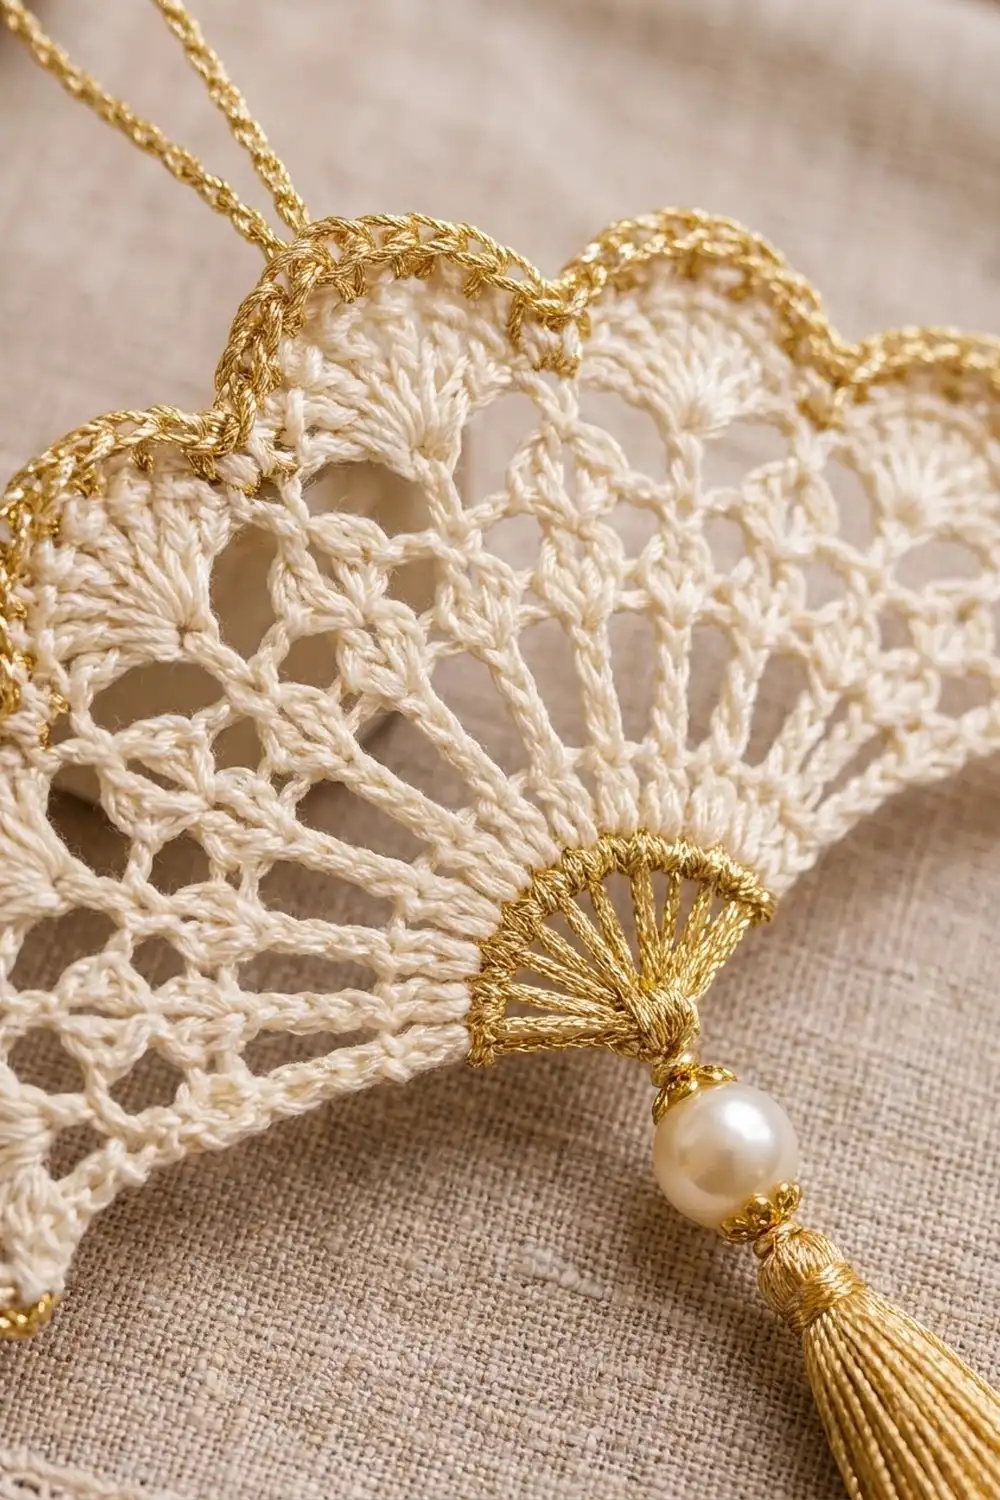
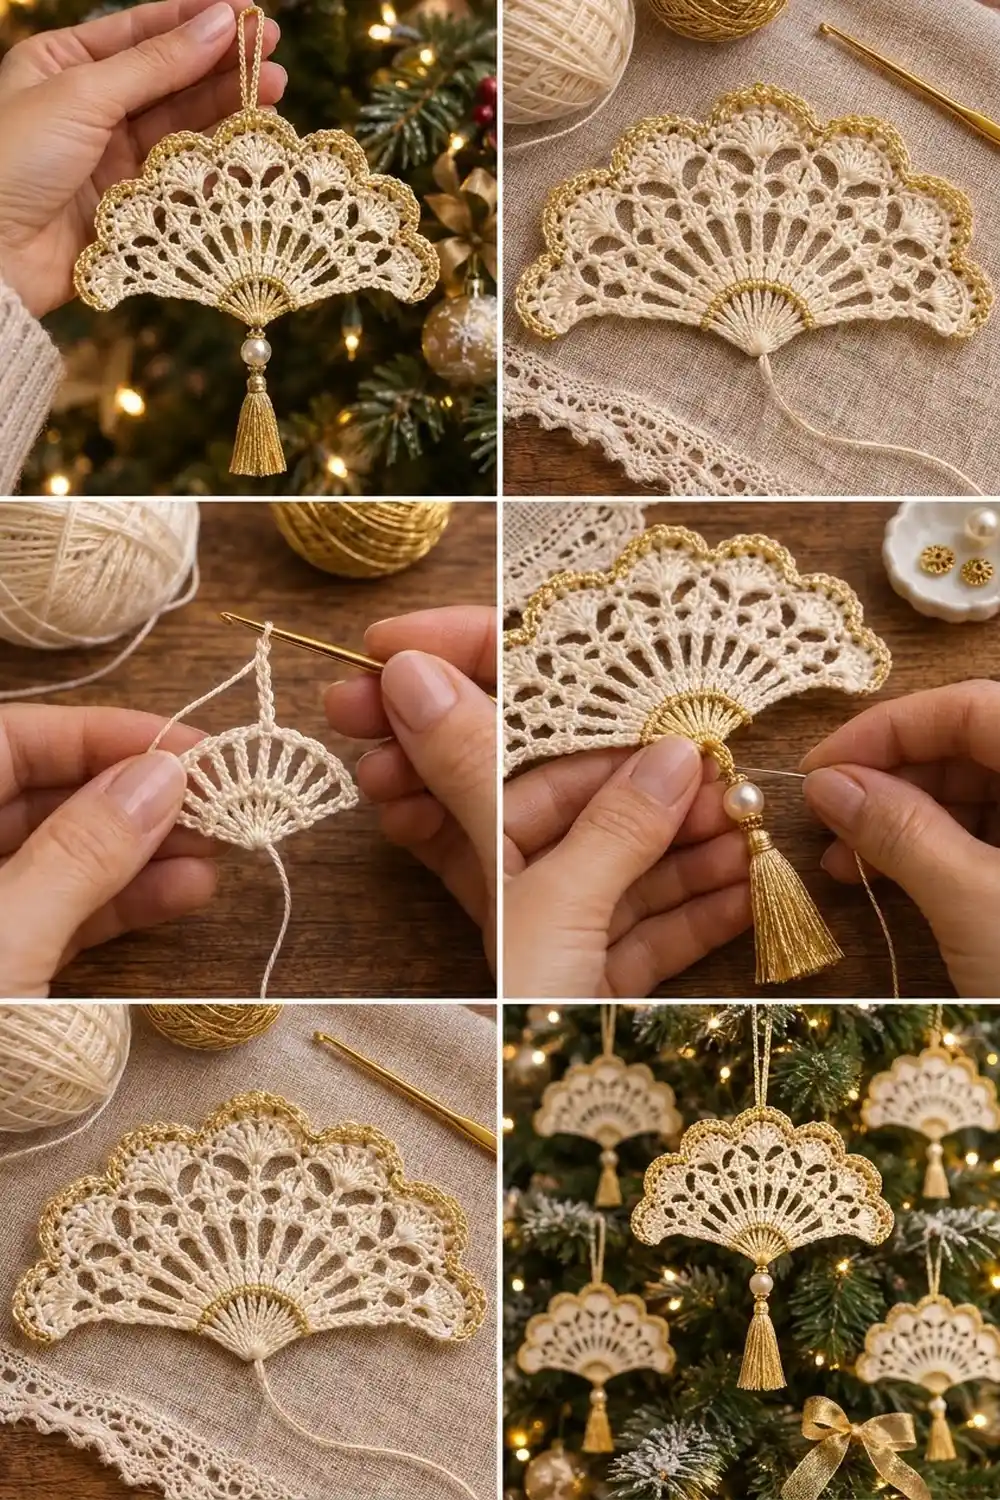
This ornament is a small, delicate fan in ivory thread lace with a gold edge. Seven rounded scallops spread out from a little gold base, and a twisted gold edge outlines the whole curve. A pearl bead and a gold tassel hang from the base, and a gold chain loop at the top lets it hang from a branch. It looks like a lady’s lace fan from a Victorian parlor.
Only two colors are used: soft ivory cotton for the lace and metallic gold for the base spokes, the edge, the loop and the tassel. The style is heirloom thread crochet, but the stitches are basic: chains, single crochet, double crochet, treble crochet and reverse single crochet.
This pattern uses US crochet terms. The finished fan measures 4.5 in (11.4 cm) wide and 2.25 in (5.7 cm) tall. With the loop, bead and tassel, it hangs about 5.75 in (14.6 cm) long.
You work the fan flat in 6 turned rows, starting from a magic ring at the base. Then you add 2 rows of gold edging, the hanging loop and the beaded tassel.
Finished Size and Construction
- Finished size: 4.5 in (11.4 cm) wide × 2.25 in (5.7 cm) tall (fan only)
- Hanging length: about 5.75 in (14.6 cm), loop to tassel tip
- Skill level: Intermediate (fine thread work)
- Terminology: US
- Yarn weight: Lace (0), size 10 crochet thread
- Hook: 1.75 mm (US steel 6)
- Number of pieces: 1 (single motif, no joining)
- Layout: one half-circle fan with 7 scallops
- Piece size before border: 4 in (10.2 cm) wide × 2 in (5.1 cm) tall
- Border depth: 0.25 in (0.6 cm)
Materials
Use a mercerized cotton thread for the ivory lace. It gives crisp stitch definition and blocks well. For the gold, use a metallic size 10 thread, or a cotton/metallic blend that matches the ivory in thickness. A soft, fuzzy gold will hide the corded edge, so avoid one.
- Ivory size 10 cotton thread: 5 g, about 15 m
- Metallic gold size 10 thread: 5 g, about 20 m (includes the tassel)
The quantities above include a safety margin of about 25%.
Tools and notions:
– 1.75 mm (US steel 6) crochet hook
– Fine tapestry needle and a beading needle
– One 8 mm (0.3 in) ivory pearl bead
– Two 6 mm (0.2 in) gold flower bead caps
– A 2 in (5.1 cm) wide piece of cardboard for the tassel
– Small sharp scissors
– Fabric stiffener or starch, rustproof pins and a blocking board
Abbreviations (US Terms)
- ch – chain
- sl st – slip stitch
- sc – single crochet
- dc – double crochet
- tr – treble crochet
- sp(s) – space(s)
- st(s) – stitch(es)
- rep – repeat
- RS – right side
Special stitches:
– V-st: (dc, ch 1, dc) in the same stitch or space.
– Shell: (3 dc, ch 1, 3 dc) in the same space.
– Small shell: (2 dc, ch 2, 2 dc) in the same space.
– Reverse sc (crab stitch): Working from left to right, insert the hook into the next stitch to the right, yarn over, pull up a loop, yarn over, and pull through both loops. This twists each stitch into a raised cord.
Gauge and Checkpoints
Gauge isn’t critical for an ornament, but it controls whether the scallops lie flat. Make one test fan through Row 4 before committing to blocking materials.
Base gauge: Rows 1–3 make a half-circle with a radius of 1.2 in (3.0 cm), measured from the center of the ring to the top of the V-sts.
Radius checkpoints (measured flat, from the ring center to the top edge):
– After Row 1: 0.5 in (1.3 cm)
– After Row 2: 0.9 in (2.3 cm)
– After Row 3: 1.2 in (3.0 cm)
– After Row 4: 1.5 in (3.8 cm)
– After Row 5: 1.75 in (4.4 cm)
– After Row 6: 2 in (5.1 cm), so the piece is 4 in (10.2 cm) wide
– After the border: 2.25 in (5.7 cm) tall, 4.5 in (11.4 cm) wide
Each 9-dc fan in Row 6 should be about 0.9 in (2.3 cm) wide along its curve.
Fan too big: Go down to a 1.5 mm hook, or pull the trebles snug in Row 2. Fan too small: Go up to a 2.0 mm hook. Fan cups upward (edge too short for its radius): go up a hook size for Rows 5–6 only. Fan ruffles: go down a hook size for Rows 5–6.
Pattern: The Fan Body
Every row is worked flat, and you turn at the end of each row. The turning chain counts as a stitch.
Row 1 (gold): Make a magic ring. Ch 3 (counts as dc), work 12 dc into the ring. Pull the tail until the dc sit in a half-circle with the ring closed at the base. Do not join. Fasten off the gold. (13 dc)
These 13 gold dc are the ribbed gold base you see at the bottom of the fan.
Row 2 (ivory): With RS facing, join ivory with a sl st in the top of the last dc of Row 1. Ch 6 (counts as tr + ch 2). Tr in the next dc, ch 2. Rep from * 10 more times, then tr in the last st (the top of the beginning ch-3). Turn. (13 tr, 12 ch-2 sps)
The long trebles form the spokes that radiate from the gold base.
Row 3: Ch 4 (counts as dc + ch 1), dc in the first tr (V-st made). Ch 1, V-st in the next tr. Rep from * 11 more times, working the last V-st into the 4th ch of the turning ch. Turn. (13 V-sts: 26 dc and 25 ch-1 sps in total)
Skip the ch-2 spaces of Row 2 completely. Work only into the tops of the trebles.
Row 4: Sl st into the ch-1 sp of the first V-st. Ch 3 (counts as dc), then work (2 dc, ch 1, 3 dc) in the same sp (first shell). Ch 2, sc in the ch-1 sp of the next V-st, ch 2, shell in the ch-1 sp of the next V-st. Rep from * 5 more times. Turn. (7 shells, 6 sc; 42 dc in total)
Check: the first shell uses 1 V-st and each repeat uses 2, so 1 + 12 = 13 V-sts, all used.
Row 5: Sl st in the next 2 dc and into the ch-1 sp of the shell. Ch 3 (counts as dc), then work (dc, ch 2, 2 dc) in the same sp (first small shell). Ch 3, V-st in the next sc, ch 3, small shell in the ch-1 sp of the next shell. Rep from * 5 more times. Turn. (7 small shells and 6 V-sts: 28 + 12 = 40 dc; 12 ch-3 sps)
This row makes the open lace arches between the shells.
Row 6 (scallops): Sl st in the next dc and into the ch-2 sp. Ch 3 (counts as dc), then work 8 dc in the same sp (first fan). Ch 1, sc in the ch-1 sp of the next V-st, ch 1, 9 dc in the ch-2 sp of the next small shell. Rep from * 5 more times. Fasten off ivory. (7 fans of 9 dc = 63 dc; 6 sc; 12 ch-1 sps)
The ch-3 spaces of Row 5 are left as open windows under the ch-1 spans. Each 9-dc fan becomes one scallop, and each sc pulls the edge down into a valley between scallops.
Checkpoint: Lay the fan flat. It should be 4 in (10.2 cm) across the bottom edge and 2 in (5.1 cm) from the ring to the top of the center scallop.
Border
Border gauge: 11 sc fit across one scallop, about 1 in (2.5 cm) along the outer curve. The two border rows together add 0.25 in (0.6 cm) all around the outer edge.
The border runs up the right side edge, around all 7 scallops and down the left side edge. The gold base (Row 1) stays as it is.
Border Row 1 (gold sc): With RS facing, join gold at the bottom of the right side edge, where Row 2 meets Row 1. Ch 1.
- Right side edge: Work 3 sc in the end of Row 2 (the tr), then 2 sc in the end of each of Rows 3, 4, 5 and 6. (11 sc)
- Top edge: On each 9-dc fan, work 2 sc in the first dc, 1 sc in each of the next 7 dc and 2 sc in the last dc (11 sc per scallop). Between fans, skip the ch-1 sps and work 1 sc in the valley sc. (7 × 11 + 6 = 83 sc)
- Left side edge: 2 sc in the end of each of Rows 6, 5, 4 and 3, then 3 sc in the end of Row 2. (11 sc)
Total: 11 + 83 + 11 = 105 sc. Do not turn.
Border Row 2 (gold crab stitch): Ch 1. Working from left to right back along the edge, work a reverse sc in each sc. (105 reverse sc) Fasten off and weave in the ends.
Why the math works: Each fan has 9 dc on its outer curve. The border sits on a slightly longer arc, so it needs 2 extra stitches per scallop: 9 + 2 = 11 sc. Putting those increases at each end of the fan rounds the lobe without flaring it. The single valley sc keeps the dip sharp between scallops. On the sides, a tr is about 1.5 times as tall as a dc, so it takes 3 sc while each dc row-end takes 2. That keeps the straight edges from puckering. The crab stitch is worked 1-for-1, so it adds texture without changing the count.
Hanging Loop
Count the border from the right side: 11 side sts + 3 × (11 + 1) + 6 = 53. The 53rd crab stitch is the exact center of the middle scallop, because 105 is odd and (105 + 1) ÷ 2 = 53.
Join gold in the 53rd stitch, ch 35, then sl st back into the same stitch. Fasten off and weave in the ends. The loop hangs about 1.25 in (3.2 cm) above the fan. For a firmer, twisted look, work the chain with the gold held double.
Pearl and Tassel
Tassel: Wrap gold thread 40 times around the 2 in (5.1 cm) card. Slide a 10 in (25.4 cm) gold tie strand under the wraps at one edge and knot it tightly. Cut the wraps at the opposite edge. Wrap another strand 6 times around the bundle, 0.25 in (0.6 cm) below the top, knot it and bury the ends inside. Trim the tassel to 1.75 in (4.4 cm).
Assembly: Thread both tie strands onto a beading needle. Pass them up through a bead cap (cup facing down), the pearl and the second bead cap (cup facing up). Then pass them through the center of the magic ring and tie them off securely on the wrong side. The bead and caps should sit snugly, about 0.5 in (1.3 cm) tall in total, directly under the gold base.
Final Blocking
- Wet the fan in cool water and press it in a towel until it is damp, not dripping.
- Dip the fan in fabric stiffener (diluted as the label directs) and squeeze out the excess. Keep the tassel and pearl dry if you can.
- Pin the bottom edge in a straight line, 4.5 in (11.4 cm) long, with the ring at the center.
- Pin the center scallop 2.25 in (5.7 cm) above the ring.
- Pin the tip of each scallop, spacing them evenly around the curve.
- Pin each valley so it dips slightly inward.
- Open every Row 5 window and every Row 2 spoke gap with the tip of a pin.
- Dry the fan completely, then unpin it. Brush the tassel straight with your fingers.
Final Quality-Control Checklist
- [ ] 13 gold dc in the base and 13 ivory tr spokes
- [ ] 7 scallops of 9 dc each, with 6 valley sc
- [ ] 105 border stitches: 11 + 83 + 11
- [ ] Loop centered on the 53rd crab stitch
- [ ] Fan 4.5 in (11.4 cm) wide and 2.25 in (5.7 cm) tall
- [ ] Bottom edge straight, scallops symmetrical
- [ ] Pearl and tassel hang straight below the ring
- [ ] No visible knots or thread ends
Troubleshooting
Scallops are uneven. Count the dc in each fan. Every fan needs exactly 9, including the ch-3 at the start of Row 6.
The magic ring has a hole. Pull the tail again before you weave it in, and sew one stitch across the center.
The side edges ripple. Too many sc went into the row-ends. Rework the sides with exactly 11 sc each.
The side edges pull inward. Use 3 sc in the Row 2 end. A tr row-end needs the extra stitch.
The gold edge looks flat. Crab stitch must be worked left to right. Working right to left makes ordinary sc.
The ornament tilts. The loop is off-center. Recount to the 53rd stitch.
Metallic thread splits. Use a slightly larger hook for the gold rows, and cut strands no longer than 24 in (61.0 cm).
Care
Spot clean only, with a damp cloth. Store the ornament flat in tissue paper so the scallops and tassel keep their shape.
Final Notes
The measurement chain is simple. The base is 0.5 in (1.3 cm) after Row 1, 1.2 in (3.0 cm) after Row 3 and 2 in (5.1 cm) after Row 6. The 105-stitch border brings the fan to 4.5 in (11.4 cm) wide by 2.25 in (5.7 cm) tall. The loop, pearl and tassel bring the hanging length to about 5.75 in (14.6 cm). If the row-by-row checkpoints match, the finished fan will lie flat with even scallops. Make one in ivory and gold, or try silver and white for a winter version.
Happy crocheting!