

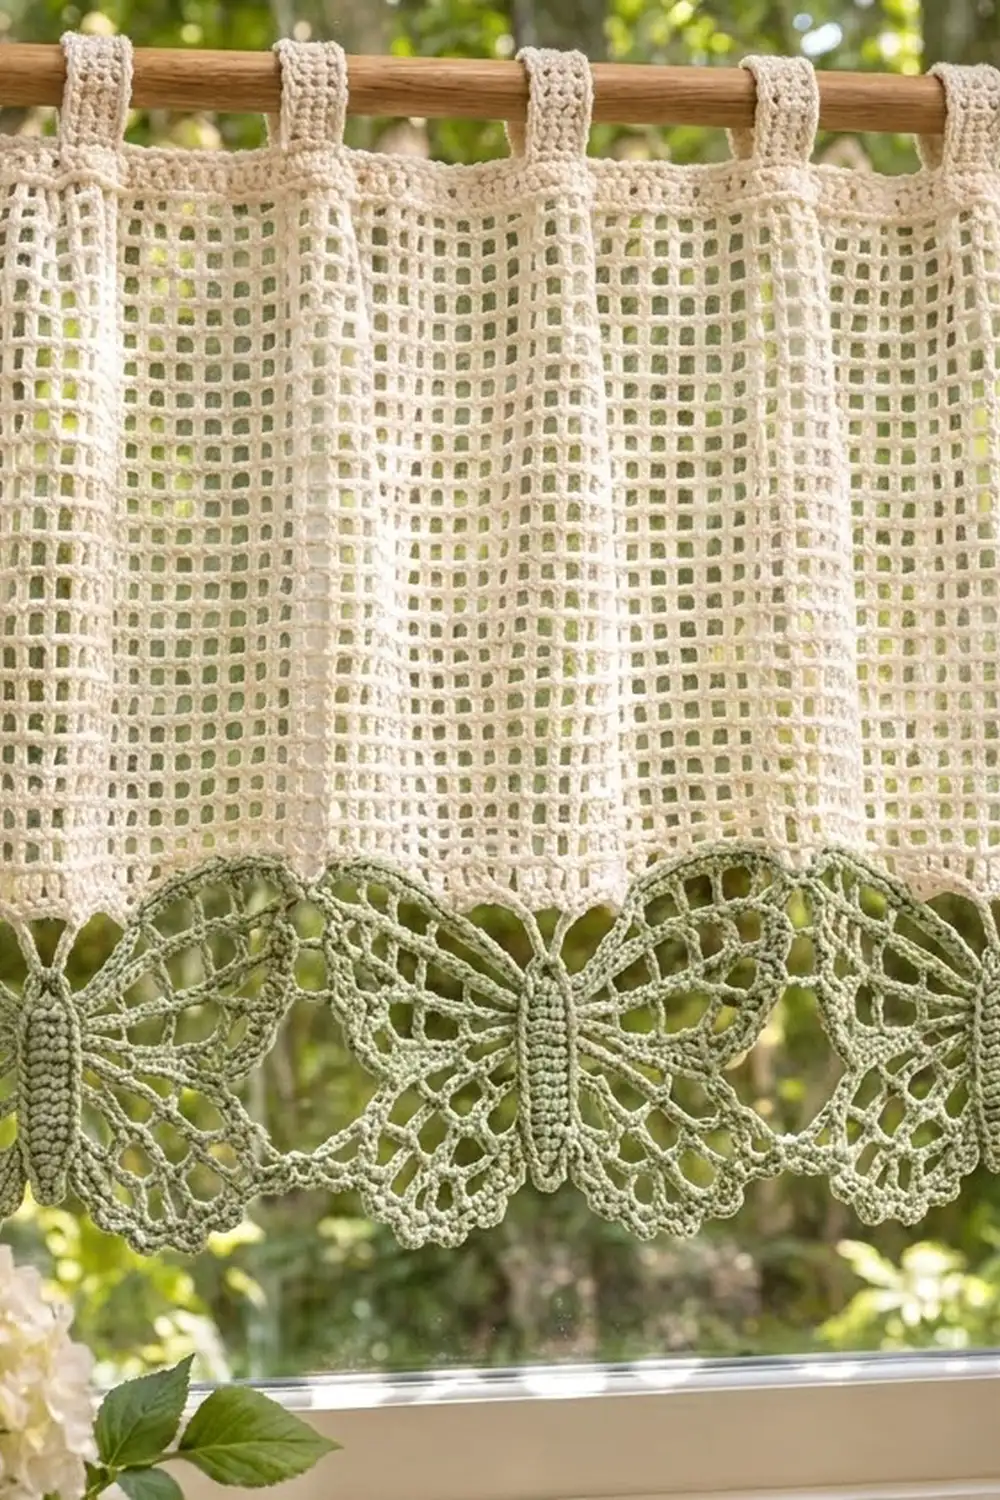
The Garden Flutter Café Curtain is a light filet mesh valance with a row of lacy butterflies along the bottom. The open cream grid lets daylight through. Six sage-green butterflies line up wing to wing along the hem, and nine tab loops slide straight onto a curtain rod.
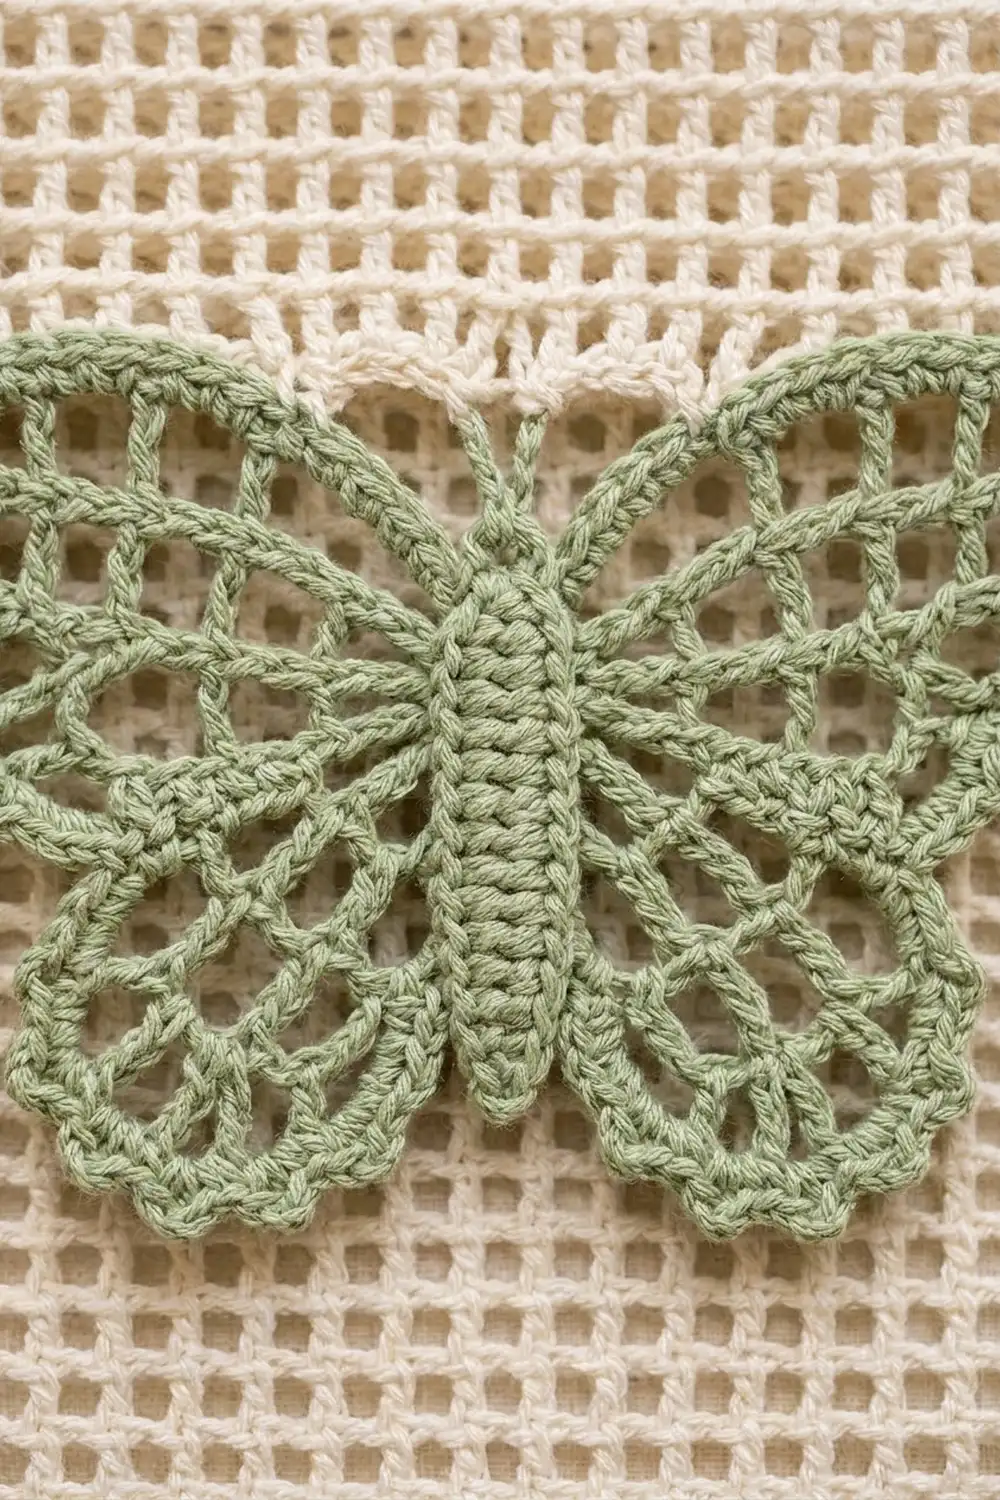
The style is cottage-kitchen simple: two colors, crisp squares and soft scallops. The cream panel is worked flat in classic filet mesh with a solid single crochet band at the top for strength. Each butterfly is a small motif worked in the round, with a ridged body strip sewn on top as an appliqué.
This pattern uses US crochet terms. The finished curtain measures 36.4 in (92.5 cm) wide and 18.4 in (46.7 cm) tall from the top edge to the butterfly hem. The tabs add a 2 in (5.1 cm) loop, so the full hanging height is 20.4 in (51.8 cm).
Construction is simple: crochet the panel from the bottom up, make six butterflies and join them to the panel’s bottom edge as you go, then add the edging and tabs. You’ll finish with blocking.
Finished Size and Construction
- Finished size: 36.4 in x 18.4 in (92.5 cm x 46.7 cm), plus 2 in (5.1 cm) tab loops
- Skill level: Intermediate
- Terminology: US
- Yarn weight: Sport (#2), mercerized cotton
- Hook: 3.5 mm (E-4)
- Number of pieces: 13 (1 panel, 6 butterfly wing motifs, 6 body appliqués). The tabs are worked directly onto the panel.
- Layout: 1 panel above a single row of 6 butterflies
- Butterfly size: 6 in wide x 4.5 in tall (15.2 cm x 11.4 cm)
- Panel size before border: 36 in x 14.2 in (91.4 cm x 36.1 cm)
- Border depth: 0.2 in (0.5 cm) on the sides and top
Materials
Use a smooth mercerized cotton in sport weight. It gives crisp meshes, holds its shape in a sunny window and washes well. The amounts below assume about 155 m (170 yd) per 50 g.
- Cream: 200 g, about 620 m (panel, border, tabs)
- Sage green: 75 g, about 233 m (6 butterflies with bodies)
All quantities include a safety margin of roughly 15%.
Tools:
– 3.5 mm (E-4) crochet hook
– Tapestry needle
– Stitch markers (at least 10)
– Rust-proof pins and a blocking surface
– Measuring tape
– Spray bottle
Abbreviations (US Terms)
- ch – chain
- sl st – slip stitch
- sc – single crochet
- hdc – half double crochet
- dc – double crochet
- tr – treble crochet
- BLO – back loop only
- sp – space
- st(s) – stitch(es)
- RS / WS – right side / wrong side
Special stitches:
– Picot: ch 3, sl st into the top of the dc just made (front loop and side strand).
– Joining picot: ch 1, sl st into the target st or picot, ch 1, sl st into the top of the dc just made.
– Mesh: dc, ch 2. One mesh is 1 dc and 1 ch-2 sp.
Gauge and Checkpoints
Mesh gauge: 8 meshes and 8 mesh rows = 4 in (10.2 cm).
Single crochet gauge: 24 sc and 20 rows = 4 in (10.2 cm).
Test one butterfly first. After blocking it should be 6 in x 4.5 in (15.2 cm x 11.4 cm). Then make a mesh swatch: ch 26, work Row 1 as 25 sc, then work 8 mesh rows (8 meshes each).
Checkpoints:
– Butterfly Rnd 2: 1.25 in (3.2 cm) across
– Butterfly Rnd 3: 3.5 in (8.9 cm) wide
– Butterfly Rnd 4: 4.75 in (12.1 cm) wide
– Butterfly Rnd 5, blocked: 6 in (15.2 cm) wide
– Panel Row 1: 36 in (91.4 cm) wide
– Panel after Row 27: 13.2 in (33.5 cm) tall
– Panel after Row 32: 14.2 in (36.1 cm) tall
If your swatch is too big, go down 0.25 mm. If it is too small, go up 0.25 mm. Both the butterflies and the mesh must hit gauge, because the six butterflies have to fill the panel width exactly.
Panel (Cream)
The panel is worked flat in rows from the bottom edge up.
Ch 218.
Row 1 (RS): Sc in 2nd ch from hook and in each ch across. (217 sc)
Row 2: Ch 5 (counts as dc + ch 2), turn. Skip first 3 sc, dc in next sc. Ch 2, skip 2 sc, dc in next sc. Repeat from * across. (72 meshes, 73 dc)
The math: 217 = 1 + (3 x 72).
Rows 3–27: Ch 5 (counts as dc + ch 2), turn. Dc in next dc. Ch 2, dc in next dc. Repeat from * across, working the last dc in the 3rd ch of the turning ch. (72 meshes, 73 dc each row)
You now have 26 mesh rows. The panel should be 13.2 in (33.5 cm) tall.
Row 28 (conversion row): Ch 1, turn. Sc in first dc. 2 sc in next ch-2 sp, sc in next dc. Repeat from * across, working the last sc in the 3rd ch of the turning ch.
Count: 73 sc (1 in each dc) + 144 sc (2 in each of 72 sps) = 217 sc.
Rows 29–32: Ch 1, turn, sc in each st across. (217 sc)
Fasten off.
Panel before border: 36 in x 14.2 in (91.4 cm x 36.1 cm). This includes 0.2 in (0.5 cm) for Row 1 and 1 in (2.5 cm) for the 5-row top band.
Butterfly Wings (Sage, Make 6)
Work with RS facing throughout. Do not turn.
Rnd 1: Ch 5, sl st to first ch to form a ring. Ch 1, 12 sc in ring, sl st to first sc. (12 sc)
Rnd 2: Ch 1, sc in first st. Ch 3, skip 1 st, sc in next st. Repeat from * 4 more times. Ch 3, skip last st, sl st to first sc. (6 sc, 6 ch-3 sps)
In working order, label the sts as: s1 (the first sc), sp B, s2, sp C, s3, sp D, s4, sp E, s5, sp F, s6, sp A.
– Sp A is the head.
– Sp D is the tail.
– Sps B and F are the upper wings.
– Sps C and E are the lower wings.
Rnd 3: Ch 1, sc in s1. Then work around in this order:
1. Upper fan in B: (tr, ch 3) 6 times, tr.
2. Sc in s2.
3. Lower fan in C: (dc, ch 3) 4 times, dc.
4. Sc in s3.
5. 3 sc in D.
6. Sc in s4.
7. Lower fan in E.
8. Sc in s5.
9. Upper fan in F.
10. Sc in s6.
11. 3 sc in A.
12. Sl st to first sc.
Count: 6 divider sc, 6 head/tail sc, 14 tr, 10 dc and 20 ch-3 sps.
Rnd 4 (lattice): Ch 1, sc in first sc.
– Upper wing: Ch 4, sc in first ch-3 sp. (Ch 5, sc in next ch-3 sp) 5 times. Ch 4, sc in next divider sc. (7 loops)
– Lower wing: Ch 3, sc in first ch-3 sp. (Ch 4, sc in next ch-3 sp) 3 times. Ch 3, sc in next divider sc. (5 loops)
– Tail: Sc in next 3 sc, sc in next divider sc.
– Work a lower wing, then an upper wing (ending in s6).
– Head: Sc in next 3 sc.
– Sl st to first sc.
Count: 24 loops and 32 sc.
Rnd 5 (scalloped edge): Ch 1, sl st in first sc.
– Upper wing:
– In the ch-4 loop: (sc, hdc, dc, hdc, sc).
– In each of the 5 ch-5 loops: (sc, hdc, dc, picot, dc, hdc, sc).
– In the last ch-4 loop: (sc, hdc, dc, hdc, sc).
– Sl st in the divider sc.
– Lower wing:
– In the ch-3 loop: (sc, hdc, sc).
– In each of the 3 ch-4 loops: (sc, hdc, dc, picot, dc, hdc, sc).
– In the last ch-3 loop: (sc, hdc, sc).
– Sl st in the divider sc.
– Tail: Sc in next 3 sc, sl st in divider sc.
– Work a lower wing, then an upper wing.
– Head: Sc in next 3 sc.
– Sl st to first sl st.
Skip the sc between loops from Rnd 4.
Count per upper wing: 40 sts and 5 picots. Count per lower wing: 24 sts and 3 picots. Total: 140 sts and 16 picots.
On each upper wing, number the picots P1 to P5 starting from the head side. P1 and P2 sit on the top edge, and P3 is the wing tip. On each lower wing, number them L1 to L3 starting from the body; L2 is the outer point.
For butterflies 1 to 6, replace some picots with joining picots as described in Joining.
Butterfly Body (Sage, Make 6)
Ch 4.
Row 1: Sc in 2nd ch from hook and in next 2 ch. (3 sc)
Rows 2–14: Ch 1, turn, sc in BLO of each st. (3 sc)
The back-loop rows create the ridged segments.
Row 15: Ch 1, turn. 2 sc in first st, sc in next st, 2 sc in last st. (5 sc)
Row 16: Ch 1, turn. Sc2tog, sc in next st, sc2tog. (3 sc)
Fasten off, leaving a 12 in (30.5 cm) tail.
The body is 3.2 in (8.1 cm) long and 0.5 in (1.3 cm) wide. Center it RS up over the ring, with the head (Rows 15–16) on the head sc and the tail end on the tail sc. Whipstitch all around the edge.
Make All Pieces
- Cream: 1 panel (tabs are added later)
- Sage: 6 wing motifs (the last round of each is joined as you go) and 6 bodies
Layout (RS facing, top of curtain up):
 T     T     T     T     T     T     T     T     T     <- 9 tabs
[============ top band, 5 sc rows ===================]
[                                                    ]
[        filet mesh: 72 meshes x 26 rows             ]
[                                                    ]
[____________ Row 1: 217 sc __________________________]
 [B1]    [B2]    [B3]    [B4]    [B5]    [B6]        <- butterflies, right to left
Joining
Butterflies join to the free loops of the foundation chain at the base of Row 1. Work the joins during each butterfly’s Rnd 5, using joining picots.
Marking the panel: With RS facing, number the 217 bottom stitches from 1 to 217, starting at the right-hand corner.
– Butterfly k uses sts 36k − 35 through 36k. For example, butterfly 1 uses sts 1–36, and butterfly 6 uses sts 181–216.
– St 217 stays free. That 1/6 in (0.4 cm) difference disappears in blocking.
– Six sections of 36 sts = 216 sts = 36 in (91.4 cm), which exactly matches six 6 in (15.2 cm) butterflies.
Panel joins: Hold the butterfly RS up with its head toward the panel. Within its section:
– Right upper wing: P2 joins section st 4, and P1 joins section st 14.
– Left upper wing: P1 joins section st 23, and P2 joins section st 33.
These four points are symmetric around the center of the section. Section sts 4 and 33 are both 3 sts in from the section ends, and sts 14 and 23 are both 4 sts from the center.
Butterfly-to-butterfly joins: For butterfly 2 onward, use joining picots on its right wings:
– Its right upper wing P3 joins the left upper wing P3 of the previous butterfly.
– Its right lower wing L2 joins the left lower wing L2 of the previous butterfly.
The outer wings of butterflies 1 and 6 stay free.
Tension: Keep the joining chains at ch 1 each and don’t tighten the sl st. A tight join puckers the mesh above it.
Size checkpoint: After all six butterflies are joined, the hem should measure 36 in (91.4 cm) across the butterflies and lie flat without pulling the panel.
Border and Tabs (Cream)
Border gauge: Along the top, use 6 sc per inch, which matches Row 32. Along the sides, use 2 sc per mesh row, which is 4 sc per inch. Each 0.5 in (1.3 cm) dc row takes 2 sc, and each sc row takes 1 sc.
Border Row (RS): Join cream in the row-end of Row 1 at the bottom right corner. Ch 1, then work:
1. Right side: Sc in the same row-end (1), 2 sc around each of the 26 mesh row-ends (52), and 1 sc in the end of each of Rows 28–31 (4). (57 sc)
2. Top-right corner: 3 sc in the first st of Row 32.
3. Top: Sc in next 215 sts.
4. Top-left corner: 3 sc in the last st.
5. Left side: 1 sc in each end of Rows 31–28 (4), 2 sc around each mesh row-end (52) and 1 sc in the Row 1 end (1). (57 sc)
Fasten off.
Total: 57 + 3 + 215 + 3 + 57 = 335 sc.
Counts per side, including the corner center stitches:
– Top: 217 sc
– Each side: 58 sc
Check: 217 + 58 + 58 − 2 shared corners + 4 extra corner sts = 335.
Why the math works: The top count matches the 217 panel stitches, so the edge stays flat. The side counts follow the row heights, so the sides neither ruffle nor draw in.
Tabs: Number the top-side stitches from 1 to 217, counting the corner center sts.
– Place a tab every 26 sts, starting at sts 1, 27, 53, 79, 105, 131, 157, 183 and 209.
– Each tab uses 9 sts, and 17 sts are skipped between tabs.
– Check: 9 x 9 + 8 x 17 = 217.
Tab Rows 1–20: Join cream in the first tab st. Ch 1, sc in same st and in next 8 sts. (9 sc) Ch 1, turn, and repeat for 20 rows total.
Fasten off, leaving a 12 in (30.5 cm) tail.
Each tab is 1.5 in (3.8 cm) wide and 4 in (10.2 cm) long, with 2.8 in (7.1 cm) gaps between tabs. Fold each tab to the WS and whipstitch the last row along the base of the tab. This makes a 2 in (5.1 cm) loop that fits rods up to 1 in (2.5 cm) thick.
Final Blocking
- Weave in all ends along mesh posts or inside the body appliqués.
- Soak the curtain in cool water, then roll it in a towel to press out the excess water.
- Lay it flat RS up and pin the panel to 36.4 in x 14.4 in (92.5 cm x 36.6 cm). The top border adds 0.2 in (0.5 cm) to the height.
- Pin the mesh rows straight, using a ruler or long straight edge every 4 in (10.2 cm).
- Open each butterfly to 6 in x 4.5 in (15.2 cm x 11.4 cm). Pin out every picot and the tips of the lower wings.
- Check the overall height: 18.4 in (46.7 cm) to the butterfly hem.
- Let it dry completely before unpinning.
Final Quality-Control Checklist
- Every mesh row has 72 meshes, and the meshes look square.
- Rows 28–32 each have 217 sc.
- The border has 335 sc, with 3 sc at each top corner.
- There are 9 tabs, each with 9 sc, evenly spaced and folded to the WS.
- There are 6 butterflies, each with 16 picots, and each one is joined at 4 points to the panel.
- Neighboring butterflies are joined at P3 and L2.
- The bodies are centered and sewn flat.
- All ends are secured.
Troubleshooting
- The mesh leans to one side: You are working the last dc of the row in the wrong place. Always work it in the 3rd ch of the turning ch.
- The butterflies are wider than 6 in (15.2 cm): Go down a hook size for the motifs only.
- The hem ripples between joins: Your joining chains are too long. Keep them to ch 1.
- The top band flares: Your Row 28 count is off. Recount it to 217 sc.
- A tab twists: Fold it straight and sew the tab tail across all 9 sts.
- The wings cup: Block again, pinning out every picot.
Care
Hand wash in cool water with mild soap, then lay flat to dry and pin back into shape. Avoid hanging the curtain while wet, because the weight of the water stretches the mesh.
Final Notes
Everything here follows one measurement chain:
– 8 meshes = 4 in (10.2 cm), so 72 meshes = 36 in (91.4 cm).
– 217 stitches carry through Row 1, the top band and the top border.
– Six 36-stitch sections hold six 6 in (15.2 cm) butterflies.
– The border brings the width to 36.4 in (92.5 cm).
– The finished curtain is 18.4 in (46.7 cm) tall, plus 2 in (5.1 cm) tab loops.
Check gauge at every stage and the curtain will come out to size. Happy crocheting!