

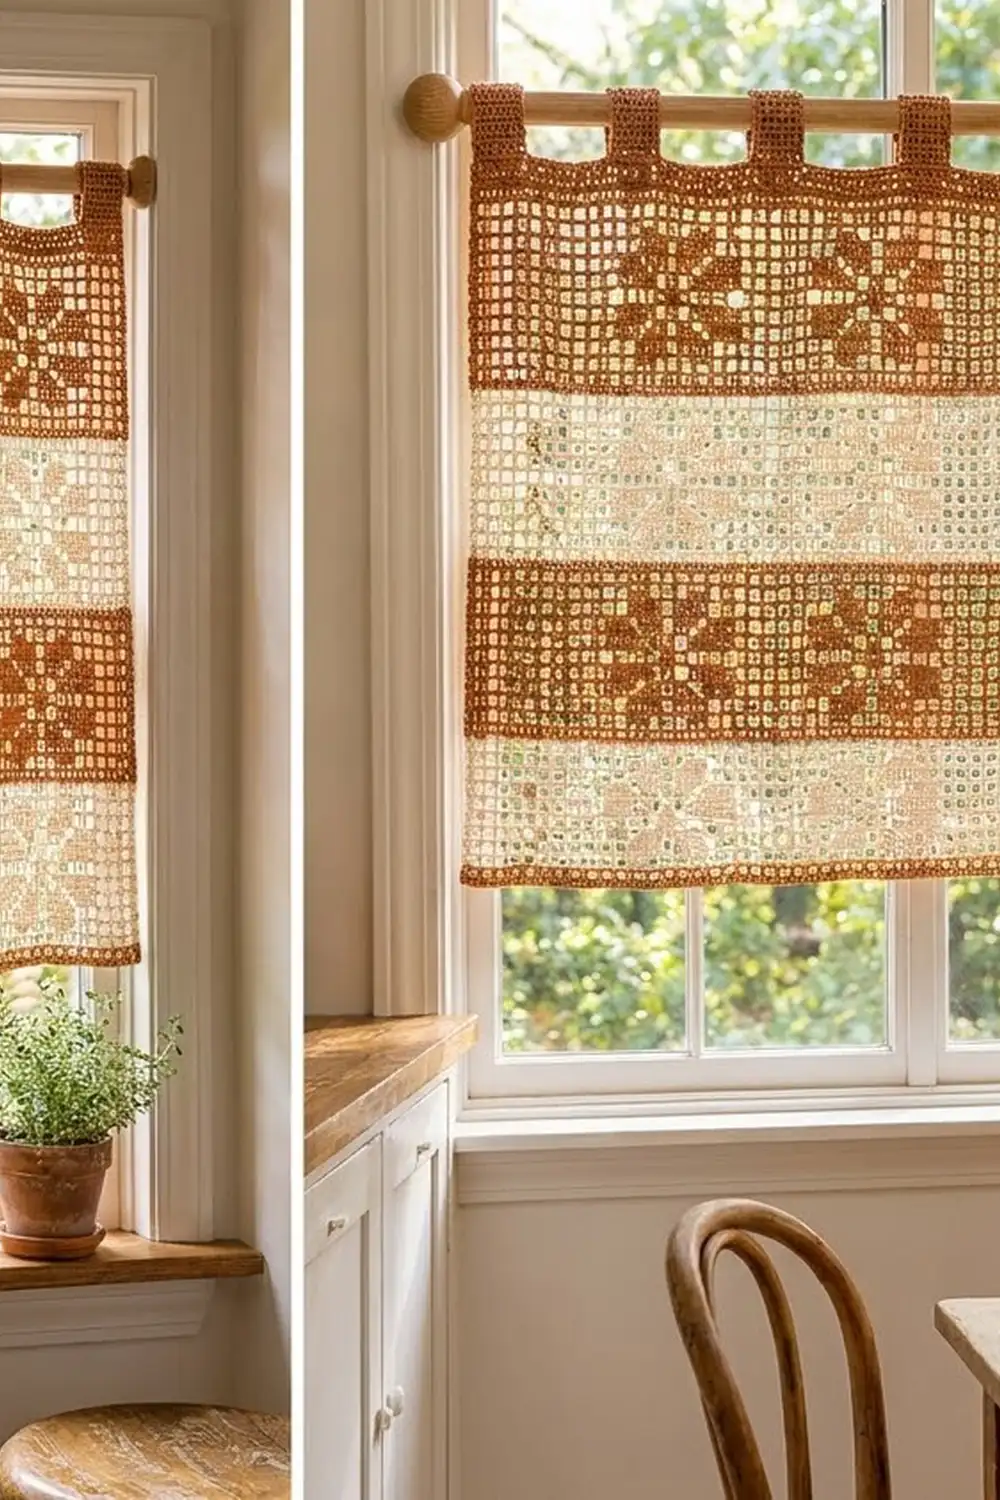
This café curtain is a single rectangular panel of filet crochet worked in four wide stripes: rust, cream, rust, cream. Each stripe holds a row of five eight-point flowers made of solid blocks set into an open mesh grid. Seven rust tabs at the top slip over a standard curtain rod.
In the rust stripes the flowers stand out sharply. In the cream stripes the same flowers are soft and lacy, and they show best when daylight comes through the window. The look is warm and farmhouse-simple, which suits a kitchen, breakfast nook or small bathroom window.
This pattern uses US crochet terms. The finished panel measures 26.5 in (67.3 cm) wide and 24 in (61.0 cm) tall, not counting the tabs. The tab loops rise about 2 in (5.1 cm) above the top edge.
You work the panel in rows from the bottom up and change color at the start of each stripe. Next comes a two-round single crochet border around the whole panel. Last, you crochet seven tabs onto the top edge, fold them to the back and sew them down.
Finished Size and Construction
- Finished size: 26.5 in x 24 in (67.3 cm x 61.0 cm), plus tab loops
- Skill level: Intermediate (easy filet crochet, but you need to count carefully)
- Terminology: US
- Yarn weight: DK (#3), cotton or cotton blend
- Hook: 3.5 mm (E-4)
- Number of pieces: 1 panel, plus 7 tabs worked directly onto it
- Layout: 51 squares wide x 46 rows tall, in 4 horizontal stripes
- Size of each flower motif: 4.5 in (11.4 cm) square
- Panel size before border: 25.5 in x 23 in (64.8 cm x 58.4 cm)
- Border depth: 0.5 in (1.3 cm) on every side
Materials
Choose a smooth mercerized or matte cotton in DK weight. Cotton keeps the square mesh crisp and won’t stretch out of shape while the curtain hangs. Avoid fuzzy or very stretchy yarns, because they blur the motif.
- Color A, rust: 200 g / about 480 m (stripes 2 and 4, border, tabs)
- Color B, cream: 150 g / about 360 m (stripes 1 and 3)
Both quantities include a margin of about 15% for your gauge swatch and for weaving in ends.
Tools:
- 3.5 mm (E-4) crochet hook
- Tapestry needle
- Stitch markers (at least 8)
- Measuring tape and ruler
- Rustproof pins and a blocking surface
- Spray bottle
- Scissors
Abbreviations (US Terms)
- ch – chain
- sc – single crochet
- dc – double crochet
- sk – skip
- st(s) – stitch(es)
- sp – space
- yo – yarn over
- RS / WS – right side / wrong side
Special stitches (filet squares):
- Open square (O): ch 2, sk 2 sts (or the ch-2 sp), dc in the next dc.
- Block (X): dc in the next 2 sts (or 2 dc in the ch-2 sp), then dc in the next dc.
Every row begins with ch 3, which counts as the first dc. After that, each square adds 3 sts. A full row is 1 + (51 x 3) = 154 sts.
Gauge and Checkpoints
Gauge: 10 squares and 10 rows = 5 in (12.7 cm) in filet mesh. That makes each square 0.5 in (1.3 cm) wide and each row 0.5 in (1.3 cm) tall.
Make a test swatch first. Ch 33. Dc in the 4th ch from the hook and in each ch across (31 sts, 10 blocks). Work 9 more rows, mixing open squares and blocks. Lightly steam the swatch, then measure the center.
- Too big: go down a hook size, to 3.25 mm.
- Too small: go up a hook size, to 3.75 mm.
- Width is right but rows are too short: pull up the first loop of each dc a little taller. Row height matters here, because the flowers should look square, not squashed.
Checkpoints on the panel (measured flat, before blocking):
- After Row 1: 25.5 in (64.8 cm) wide
- After Row 12 (end of stripe 1): 6 in (15.2 cm) tall
- After Row 23 (end of stripe 2): 11.5 in (29.2 cm) tall
- After Row 34 (end of stripe 3): 17 in (43.2 cm) tall
- After Row 46 (end of stripe 4): 23 in (58.4 cm) tall
Each flower should measure 4.5 in (11.4 cm) square.
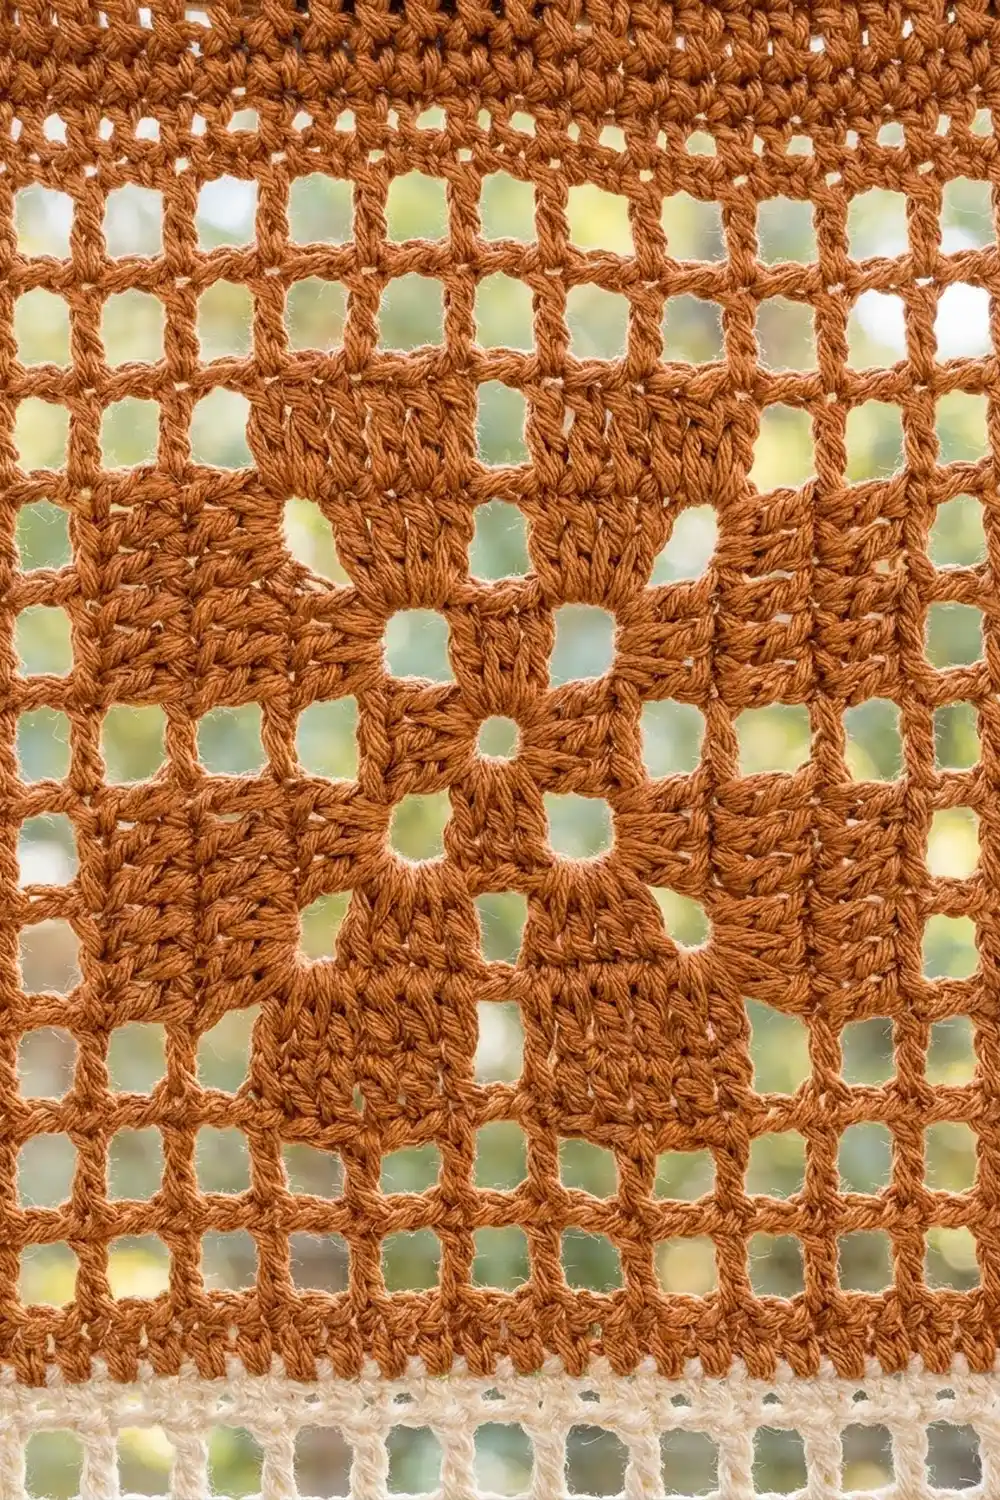
Flower Motif Chart
The motif is 9 squares wide and 9 rows tall. X = block, O = open square.
Motif row 1:  X O O O X O O O X
Motif row 2:  X X O O X O O X X
Motif row 3:  O X X O X O X X O
Motif row 4:  O O X X O X X O O
Motif row 5:  X X X X O X X X X
Motif row 6:  O O X X O X X O O
Motif row 7:  O X X O X O X X O
Motif row 8:  X X O O X O O X X
Motif row 9:  X O O O X O O O X
Four diagonal petals and four straight spokes meet around one open center square. The chart is symmetrical, so it reads the same on RS and WS rows.
Layout for each motif row (51 squares): O, then [9 motif squares, O] 5 times. That is 1 + (5 x 10) = 51 squares. The pattern leaves an open frame square between flowers and at both side edges.
Panel
Working tips: For each color change, finish the last dc of a stripe by pulling the new color through on the final yo. Leave 6 in (15.2 cm) tails and weave them into dc posts of the same color later. Place a marker in the first and last dc every 10 rows so you can count rows easily.
Stripe 1 (Color B, cream): Rows 1–12
Row 1 (foundation): With B, ch 156. Dc in the 4th ch from the hook (the skipped ch count as the first dc) and in each ch across. Turn. (154 sts, 51 blocks)
Row 2 (open row): Ch 3, [ch 2, sk 2, dc in next dc] 51 times. Turn. (154 sts: 52 dc + 51 ch-2 sps)
Rows 3–11 (motif rows): Ch 3, then work motif rows 1–9 in order, following the motif row layout. Turn at the end of each row. (154 sts each row)
Row 12 (open row): Repeat Row 2. Change to A in the last yo of the final dc. Cut B. (154 sts)
Checkpoint: the panel is 6 in (15.2 cm) tall.
Stripe 2 (Color A, rust): Rows 13–23
Row 13: Work as for Row 2.
Rows 14–22: Work motif rows 1–9 as for Rows 3–11.
Row 23: Work as for Row 2. Change to B in the last yo. Cut A. (154 sts)
Checkpoint: the panel is 11.5 in (29.2 cm) tall. Each 11-row stripe measures 5.5 in (14.0 cm).
Stripe 3 (Color B, cream): Rows 24–34
Work as for Stripe 2, using B. At the end of Row 34, change to A.
Checkpoint: the panel is 17 in (43.2 cm) tall.
Stripe 4 (Color A, rust): Rows 35–46
Rows 35–45: Work as for Stripe 2, using A.
Row 46 (top edge): Ch 3, dc in each dc and 2 dc in each ch-2 sp across. Do not turn. (154 sts, 51 blocks)
Checkpoint: the panel measures 25.5 in x 23 in (64.8 cm x 58.4 cm). Count the flowers: there should be 5 in each stripe, 20 in all.
Border
Border gauge: Work 2 sc per dc row-end along the sides and 1 sc per st along the top and bottom. Two rounds of sc measure about 0.5 in (1.3 cm) deep.
Corners: Work 3 sc into the same st at each corner. The center sc of the three is the corner st. Every side count below includes both of that side’s corner sts.
Round 1 (A): Continuing from Row 46, work 3 sc in the last dc of Row 46 (the first corner). Rotate the panel so you can work down the side.
- First side: 2 sc around each of the 46 row-end posts (92 sc).
- Bottom: Working in the free loops of the foundation chain under the 154 sts, work 3 sc under the first st, 1 sc under each of the next 152 sts, and 3 sc under the last st.
- Second side: 2 sc around each of the 46 row-end posts (92 sc).
- Top: 3 sc in the first st of Row 46, then 1 sc in each of the next 152 sts.
Join with a sl st to the first sc.
Counts per side, from corner st to corner st:
– Top and bottom: 156 sc each (1 + 1 + 152 + 1 + 1)
– Sides: 96 sc each (1 + 1 + 92 + 1 + 1)
– Total: (2 x 156) + (2 x 96) − 4 shared corners = 500 sc
Round 2 (A): Ch 1, then sc in each sc around, working 3 sc in each corner st. Join.
Counts per side:
– Top and bottom: 158 sc each
– Sides: 98 sc each
– Total: 500 + 8 = 508 sc
Why the math works: At 1 sc per st, the 154-st rows keep exactly the panel’s width. A dc row is about twice as tall as an sc, so 2 sc per row-end keeps the sides flat. Each 3-sc corner adds 2 sts per corner per round, which is just enough to turn the corner without cupping. The finished size is 25.5 + 1 = 26.5 in (67.3 cm) wide by 23 + 1 = 24 in (61.0 cm) tall.
Fasten off and weave in the ends.
Tabs
The top side of Round 2 has 158 sts, divided like this:
3 edge sts + (7 tabs x 8 sts) + (6 gaps x 16 sts) + 3 edge sts = 3 + 56 + 96 + 3 = 158 sts
With RS facing, start at the top-right corner st. Skip 3 sts and mark the next 8 sts for tab 1. Skip 16 sts and mark the next 8 sts for tab 2. Repeat until all 7 tabs are marked. Exactly 3 sts should be left at the left end.
Each tab:
Row 1: With RS facing, join A in the first marked st. Ch 1, sc in the same st and in each of the next 7 sts. Turn. (8 sc)
Rows 2–16: Ch 1, sc in each sc across. Turn. (8 sc)
Fasten off, leaving a 12 in (30.5 cm) tail. Each tab is about 1.3 in (3.3 cm) wide and 4 in (10.2 cm) long.
Fold each tab to the WS. Use the tail to whipstitch the tab’s last row to the back of border Round 1, directly below where the tab starts. Each loop fits a rod up to 1 in (2.5 cm) in diameter. The gaps between tabs are about 2.7 in (6.9 cm) wide.
Final Blocking
- Weave all ends into dc posts of the matching color.
- Lay the curtain flat on a blocking surface, RS up.
- Pin it to 26.5 in x 24 in (67.3 cm x 61.0 cm). Pin the four corners first, then the middle of each side.
- Square up the mesh. Lay a ruler along a few columns of squares to check that they run straight up and down.
- Spray the curtain until it is evenly damp but not dripping.
- Pat each flower lightly with your palms so the blocks lie flat.
- Pin the tabs flat at an even height.
- Let everything dry completely, about 24 hours, before you unpin it.
Final Quality-Control Checklist
- Every row has 154 sts (51 squares).
- Each stripe has 5 complete flowers with open centers.
- An open frame square sits at both side edges in every motif row.
- The color changes fall exactly at Rows 13, 24 and 35.
- Border Round 2 has 508 sc: 158 on the top and bottom and 98 on each side.
- All 7 tabs are 8 sc wide and evenly spaced, with 3 sts left at each end.
- The blocked panel measures 26.5 in x 24 in (67.3 cm x 61.0 cm).
Troubleshooting
- The panel slants: you probably missed the ch-3 at the start of a row or the last dc at the end. Count to 154 sts every few rows.
- The flowers look squashed: your rows are too short. Work taller dc or go up one hook size.
- The open squares collapse: your ch-2 is too tight. Make the chains as wide as 2 dc.
- The sides ripple after the border: work fewer sc per row-end, about 7 sc per 4 rows.
- The sides pull in: in places, work 5 sc per 2 rows.
- The tabs are uneven: recount the gaps from your markers. Every gap must be exactly 16 sts.
Care
Hand wash in cold water, or machine wash on a gentle cycle inside a laundry bag. Reshape the curtain while it is damp and dry it flat. If needed, press lightly with a warm iron through a cloth.
Final Notes
This whole pattern rests on one measurement chain. Each square is 0.5 in (1.3 cm) wide and each row is 0.5 in (1.3 cm) tall. So 51 squares make 25.5 in (64.8 cm) of width and 46 rows make 23 in (58.4 cm) of height. The two border rounds add 0.5 in (1.3 cm) on each side, for a final 26.5 in x 24 in (67.3 cm x 61.0 cm). The seven tabs, 4 in (10.2 cm) long, then fold into loops that rise about 2 in (5.1 cm). If your swatch matches the gauge, every checkpoint after it will match too.
Happy crocheting!