

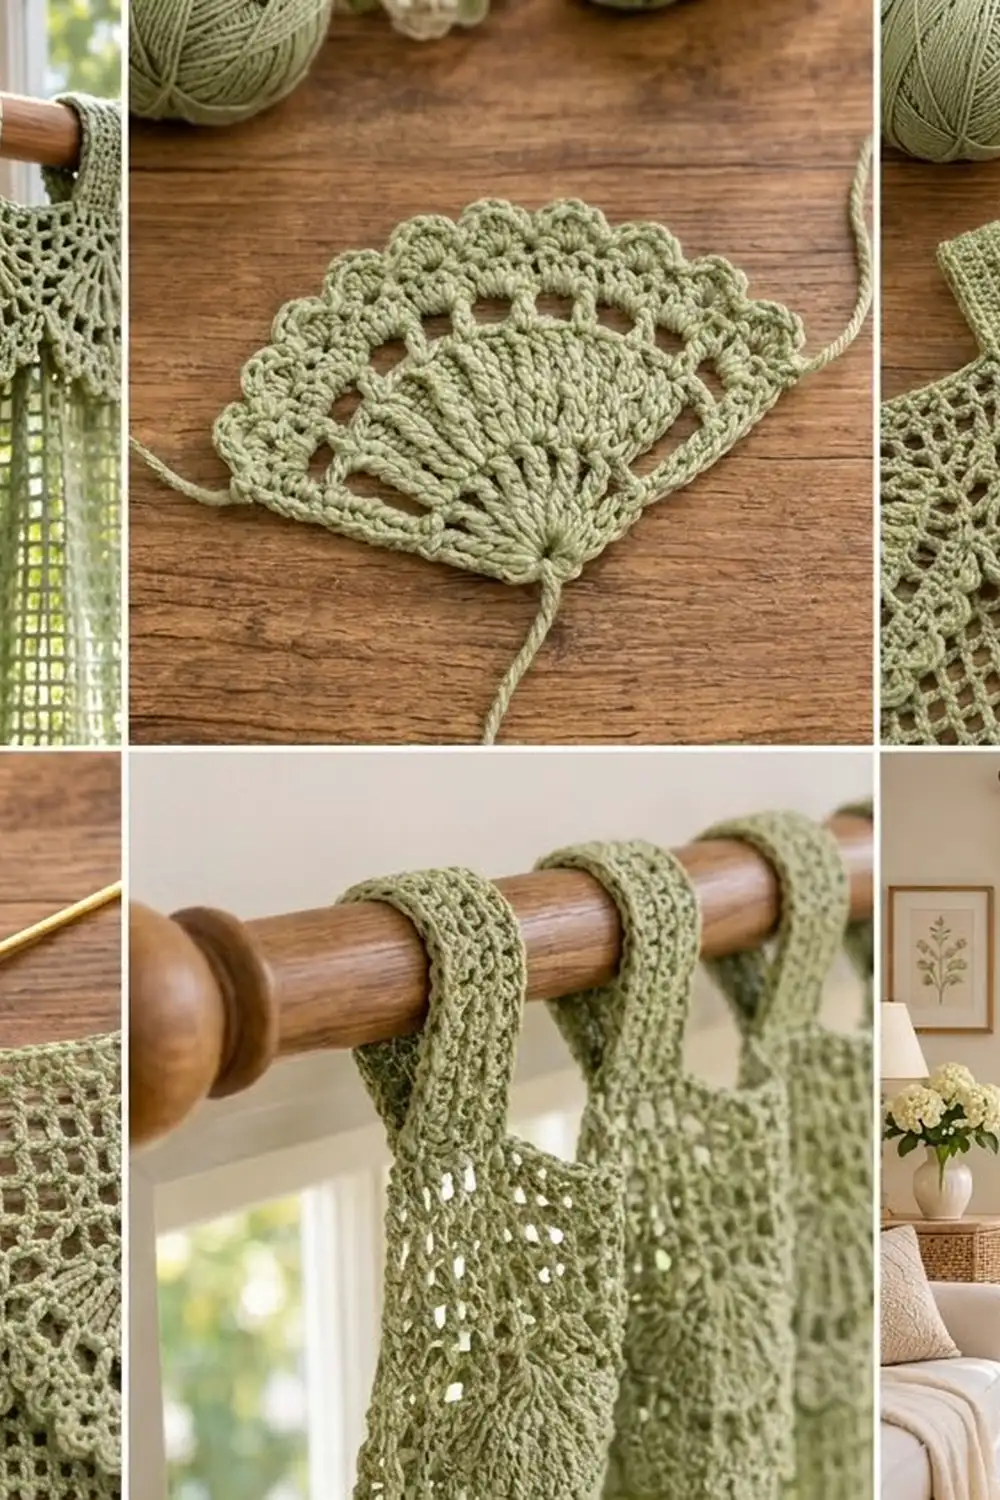
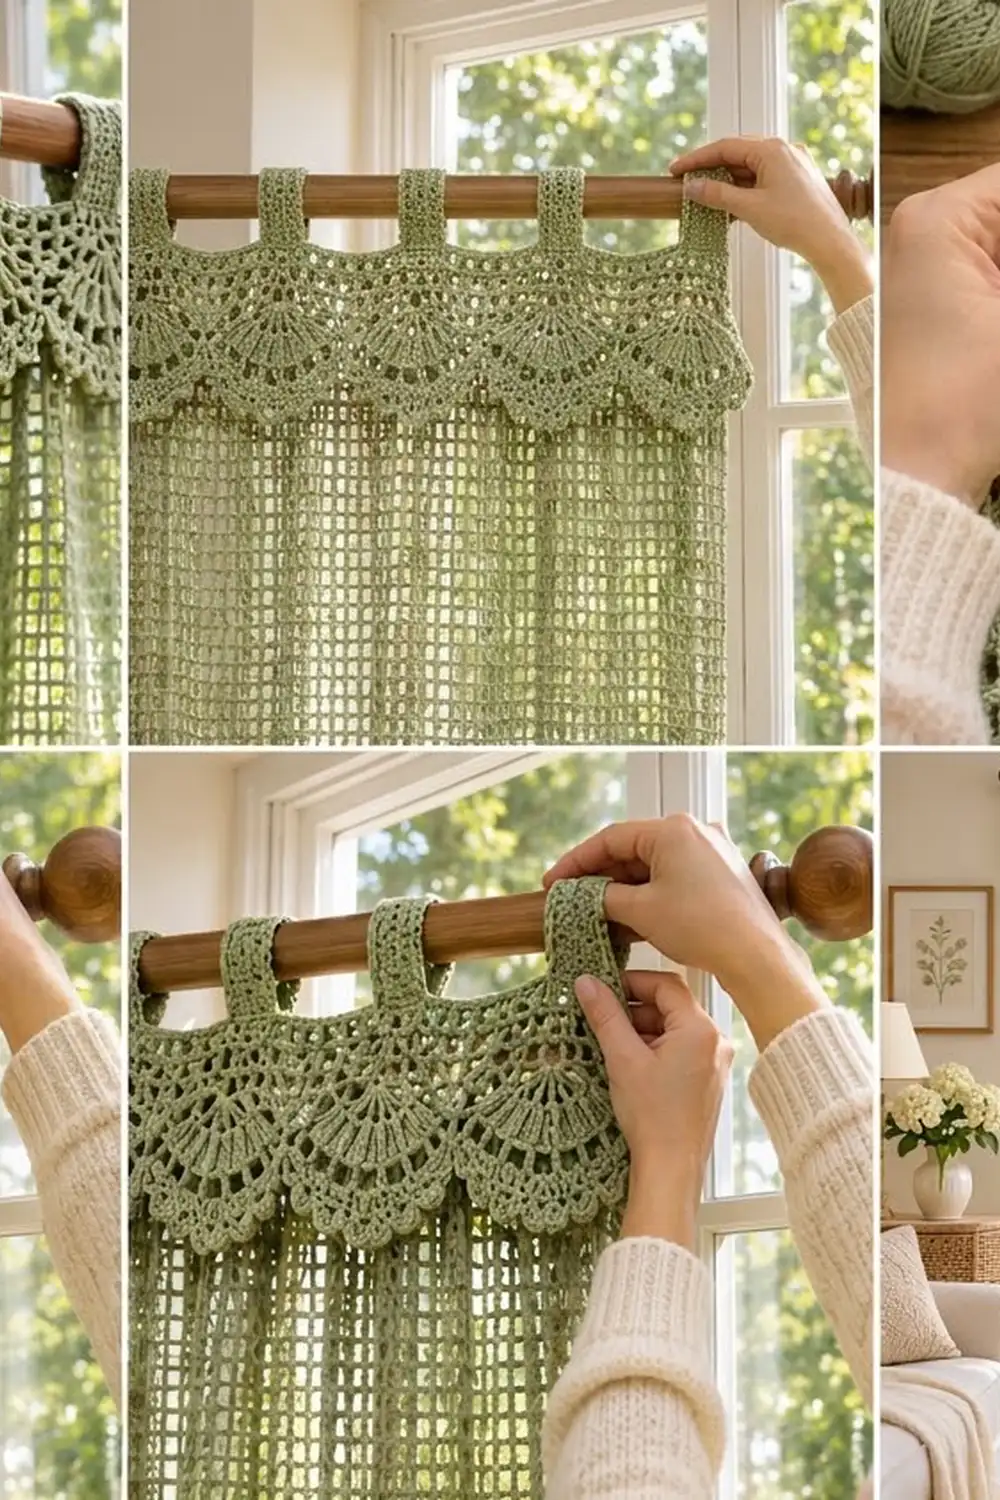
The Sage Meadow panel pairs a light, airy filet mesh with a dressy row of fan shells across the top. The open grid lets daylight through, and the scalloped flounce gives the soft look of a cottage valance without sewing a separate valance.
Everything is worked in one sage-green worsted cotton. Narrow tabs hold the panel on the rod, and a smaller picot fan hem finishes the bottom edge. A flower tieback with a cream center completes the set.
This pattern uses US crochet terms. One finished panel measures 40.5 in (102.9 cm) wide by 80 in (203.2 cm) long, not counting the tabs. Make two panels for a pair.
Construction overview: The panel is worked from the top down. You chain the width, work two solid header rows, and then work 175 rows of filet mesh. Next you work the fan flounce into the free front loops of the first header row. The tabs go into the foundation chain, and the side edging and fan hem finish the piece.
Finished Size and Construction
- Finished size: 40.5 in (102.9 cm) wide x 80 in (203.2 cm) long, plus tabs
- Skill level: Intermediate
- Terminology: US
- Yarn weight: Worsted (#4) cotton or cotton blend
- Hook: 5.0 mm (H-8)
- Number of pieces: 1 panel (make 2 for a pair), plus 1 tieback per panel
- Layout: Single rectangle; the flounce and tabs are worked on, not sewn
- Piece size before border: 40 in (101.6 cm) x 78.7 in (199.9 cm)
- Border depth: Fan hem about 1.3 in (3.3 cm); side edging about 1/4 in (0.6 cm) per side
- Flounce depth: About 2.25 in (5.7 cm)
- Tab length: 7 in (17.8 cm) before folding
Materials
Use a smooth mercerized or matte worsted cotton of about 190 m per 100 g. Cotton drapes well, holds its blocked shape, and stands up to washing and sunlight better than acrylic.
- Sage green: 1,200 g (2,280 m) per panel; 2,400 g (4,560 m) for a pair
- Sage green for tiebacks: 50 g (95 m) for two
- Cream (flower centers): 10 g (19 m)
Tools:
– 5.0 mm (H-8) hook
– Tapestry needle
– Locking stitch markers (at least 12)
– Rust-proof blocking pins and a large padded surface
– Spray bottle
– Measuring tape
Quantities include a margin of about 10% for gauge differences and a swatch.
Abbreviations (US Terms)
- ch: chain
- sl st: slip stitch
- sc: single crochet
- hdc: half double crochet
- dc: double crochet
- sk: skip
- sp(s): space(s)
- st(s): stitch(es)
- BLO / FLO: back loop only / front loop only
- RS / WS: right side / wrong side
Special stitches:
– Fan: (dc, ch 1) 6 times, dc, all in the same stitch. This makes 7 dc and 6 ch-1 sps.
– Picot: ch 3, sl st into the top of the stitch just made.
Gauge and Checkpoints
Gauge in filet mesh: 6 mesh squares = 4 in (10.2 cm) wide, and 9 rows = 4 in (10.2 cm) tall. One mesh square is 3 sts wide, so the gauge is 4.5 sts per inch.
Swatch: Ch 24. Work Row 1 as dc in the 4th ch from the hook and in each ch across, for 22 sts. Then work 10 mesh rows as in Row 3 of the panel (7 squares per row). Block the swatch, then measure 6 squares in the middle.
- If 6 squares measure more than 4.25 in (10.8 cm), go down one hook size.
- If 6 squares measure less than 3.75 in (9.5 cm), go up one hook size.
- If the width matches but the rows are short, pull up a slightly taller loop on each dc instead of changing hooks.
Checkpoints:
– After Row 3, the panel is 40 in (101.6 cm) wide.
– After Row 20, it is 8.9 in (22.6 cm) long.
– After Row 92, it is 40.9 in (103.9 cm) long.
– After Row 177, it is 78.7 in (199.9 cm) long.
Hang the work from clips at each checkpoint for a few minutes, then measure. Cotton mesh stretches lengthwise under its own weight, so a hanging measurement matches real use.
Panel Body
Foundation: Ch 183.
Row 1 (header): Dc in the 4th ch from the hook and in each ch across. The skipped 3 ch count as the first dc. Turn. (181 dc)
Row 2 (RS): Ch 3 (counts as dc). Working in BLO, dc in each st across. Turn. (181 dc) The front loops of Row 1 stay free on the RS for the flounce.
Row 3 (WS, conversion to mesh): Ch 5 (counts as dc + ch 2), sk next 2 sts, dc in next st. Ch 2, sk 2 sts, dc in next st. Repeat from * to * 59 more times. Turn.
Count for Row 3: 61 dc posts + 60 ch-2 sps (120 ch) = 181 sts. (60 squares)
Rows 4–177: Ch 5 (counts as dc + ch 2), dc in next dc. Ch 2, dc in next dc. Repeat from * to * across, working the last dc into the 3rd ch of the turning ch. Turn. (61 dc, 60 ch-2 sps)
You have 175 mesh rows and 177 rows in total. Fasten off after Row 177. The panel now measures 40 in (101.6 cm) x 78.7 in (199.9 cm).
Tip: Every 20 rows, count the squares in that row. A missed ch-2 sp at the edge is the most common cause of a narrowing panel.
Fan Flounce
Hold the panel with the RS facing and the header at the top. Join yarn to the first free front loop of Row 1 at the right edge. The flounce hangs down over the front of the mesh.
F1: Ch 1, sc in each free front loop across. Turn. (181 sc)
F2: Ch 3 (counts as dc), dc in each st across. Turn. (181 dc)
F3 (fan base): Ch 1, sc in first st. Ch 4, sk 8 sts, Fan in next st, ch 4, sk 8 sts, sc in next st. Repeat from * to * 9 more times. Turn.
(10 fans, 11 sc, 20 ch-4 sps)
Each repeat uses exactly 18 sts: 8 skipped + 1 fan st + 8 skipped + 1 sc. So 1 sc + (10 x 18) = 181.
F4 (open fan): Ch 1, sc in first sc. Ch 3, dc in first dc of Fan, (ch 2, dc in next dc) 6 times, ch 3, sc in next sc. Repeat from * to * across. Turn.
(each fan: 7 dc and 6 ch-2 sps; 11 sc)
F5 (solid fan): Ch 1, sc in first sc. Ch 3, dc in first dc, (3 dc in next ch-2 sp, dc in next dc) 6 times, ch 3, sc in next sc. Repeat from * to * across. Turn.
(each fan: 25 dc; 250 dc total; 11 sc)
F6 (picot rim): Ch 1, sc in first sc. 4 sc in ch-3 sp, sc in first dc, (sc in next 2 dc, picot) 12 times, 4 sc in next ch-3 sp, sc in next sc. Repeat from * to * across. Fasten off.
(each repeat: 34 sc; total 1 + 340 = 341 sc and 120 picots)
The fans meet at the 11 sc valleys. Those valleys are what form the scalloped valance outline.
Tabs
Hold the panel with the foundation chain at the top and the RS facing. Number the free loops of the foundation chain 1–181 from right to left. Place markers for 11 tabs, each 7 sts wide:
- Tab 1: sts 1–7
- Tabs 2–10: centered on sts 19, 37, 55, 73, 91, 109, 127, 145, and 163. For example, tab 2 uses sts 16–22.
- Tab 11: sts 175–181
The tabs sit about 4 in (10.2 cm) apart, which matches the fan repeat. Interior tabs sit above the scallop valleys.
Each tab: Join yarn in the first marked st. Ch 1, sc in the same st and in the next 6 sts, for 7 sc. Then work Rows 2–28 as ch 1, turn, sc in each st across (7 sc). This gives 28 rows, 7 in (17.8 cm) long and about 1.5 in (3.8 cm) wide. Leave a 12 in (30.5 cm) tail.
Fold each tab to the WS. Whipstitch its last row along the WS of Row 2 directly below its own base. The finished loop fits a rod up to 1.5 in (3.8 cm) in diameter.
Border
Border gauge: 2 sc per row-end of a dc row, or 4.5 sc per inch. This equals the body gauge of 4.5 sts per inch, so the side edges lie flat without ruffling or pulling in.
Round 1 (edge sc): With the RS facing, join yarn at the top-left corner of Row 1, just below the left tab.
– Left side: Work 2 sc in each row-end down to the bottom. (177 rows x 2 = 354 sc) Ch 1 at the corner.
– Bottom: Working into Row 177, sc in each dc and 2 sc in each ch-2 sp. (61 sc + 120 sc = 181 sc) Ch 1 at the corner.
– Right side: Work 2 sc in each row-end up to the top. (354 sc) Fasten off.
The ch-1 corners are turning spaces, not stitches. Each side’s count stands alone: 354 + 181 + 354 = 889 sc.
Why the math works:
– Sides: 354 sc ÷ 4.5 per in = 78.7 in (199.9 cm). That equals the body length before the border.
– Bottom: The 181 sc match the 181 sts of the header. That lets the hem use the same 18-st fan repeat as the flounce.
Round 2 (hem fan base): With the RS facing, join yarn in the first bottom sc at the right corner. Ch 1, sc in the same st. Ch 4, sk 8 sts, Fan in next st, ch 4, sk 8 sts, sc in next st. Repeat from * to * 9 more times. Turn.
(10 fans, 11 sc)
Round 3 (open fan): Work as F4. Turn.
(each fan: 7 dc and 6 ch-2 sps; 11 sc)
Round 4 (petal picot edge): Ch 1, sc in first sc. 4 sc in ch-3 sp, sc in first dc, [(sc, hdc, dc, picot, dc, hdc, sc) in next ch-2 sp, sc in next dc] 6 times, 4 sc in next ch-3 sp, sc in next sc. Repeat from * to * across. Fasten off.
(each repeat: 4 + 1 + 42 + 4 + 1 = 52 sts; total 1 + 520 = 521 sts and 60 picots)
The hem adds about 1.3 in (3.3 cm), so the finished length is 80 in (203.2 cm). The side edging adds about 1/4 in (0.6 cm) per side, so the finished width is 40.5 in (102.9 cm).
Flower Tieback (Make 1 per Panel)
Band: Ch 9. Sc in the 2nd ch from the hook and in each ch across, for 8 sc. Then work rows of ch 1, turn, 8 sc until the band measures 24 in (61.0 cm). On the last row, ch 12 and sl st into the last sc to make a loop. Fasten off.
Flower:
– Rnd 1 (cream): 6 sc in a magic ring. Sl st to join. (6 sc)
– Rnd 2 (cream): Ch 1, 2 sc in each st. Join. (12 sc) Fasten off.
– Rnd 3 (sage): Join in any st. Ch 3, sk 1, sl st in next. Repeat 6 times. (6 ch-3 loops)
– Rnd 4 (sage): In each ch-3 loop, work (sc, hdc, 3 dc, hdc, sc). Join. (6 petals, 42 sts)
The flower measures about 3 in (7.6 cm) across. Sew it over the loop end of the band. Sew a 3/4 in (1.9 cm) button to the other end, and pass the button through the ch-12 loop to close the tieback.
Final Blocking
- Weave in all ends along dc posts. Never weave across an open square.
- Soak the panel in cool water for 15 minutes, then press the water out gently. Do not wring it.
- Roll the panel in towels to remove excess moisture.
- Lay it flat on a padded surface. Pin the sides straight at 40.5 in (102.9 cm) wide and the length at 80 in (203.2 cm).
- Pin each mesh column straight with a measuring tape along every 10th column.
- Lift the flounce, smooth the mesh underneath, and lay the flounce back down. Pin each fan rim into an even half circle, with a pin in each picot.
- Pin each hem fan and open each petal picot.
- Let it dry completely, which takes about 24–48 hours. Then hang the panel for a day before you hem or adjust anything.
Final Quality-Control Checklist
- Every mesh row has 60 squares and 61 posts.
- The side edges have 354 sc each, with no visible ripples.
- The flounce has 10 fans, and the valleys line up with the tab centers.
- The hem has 10 fans, sitting directly below the flounce fans.
- The 11 tabs are equal in length and sewn straight on the WS.
- The finished size is 40.5 in (102.9 cm) x 80 in (203.2 cm).
- If you made a pair, both panels match within 1/2 in (1.3 cm).
Troubleshooting
- Panel slants or narrows: You missed the first or last ch-2 sp. Count squares every 20 rows.
- Panel is too long when hung: The cotton is stretching. Remove mesh rows in groups of 9, which equals 4 in (10.2 cm).
- Flounce cups or ruffles: F1 has too many stitches or too loose a tension. Recheck the 181 sc and use a tighter tension.
- Fans lean to one side: A repeat skipped 7 or 9 sts instead of 8. Count each skip.
- Side edging waves: You worked 3 sc into some row-ends. Keep it to exactly 2 per row.
- Tabs twist: You sewed a tab at an angle. Unpick it and line up the last row with Row 2.
Care
Hand wash or machine wash cold on a gentle cycle in a mesh bag, then lay flat and re-pin the fans to dry. Do not tumble dry, and do not hang the panel while it is wet.
Final Notes
The measurement chain runs like this:
– The gauge of 6 squares and 9 rows per 4 in (10.2 cm) gives a 181-st, 40 in (101.6 cm) width.
– The 177 rows give 78.7 in (199.9 cm).
– The 354 side sc and the 181 hem sc keep the edges true.
– The 18-st fan repeat lines up the flounce, the tabs, and the hem.
– The final size is 40.5 in (102.9 cm) x 80 in (203.2 cm).
Make two panels, add the tiebacks, and enjoy the light coming through.
Happy crocheting!