

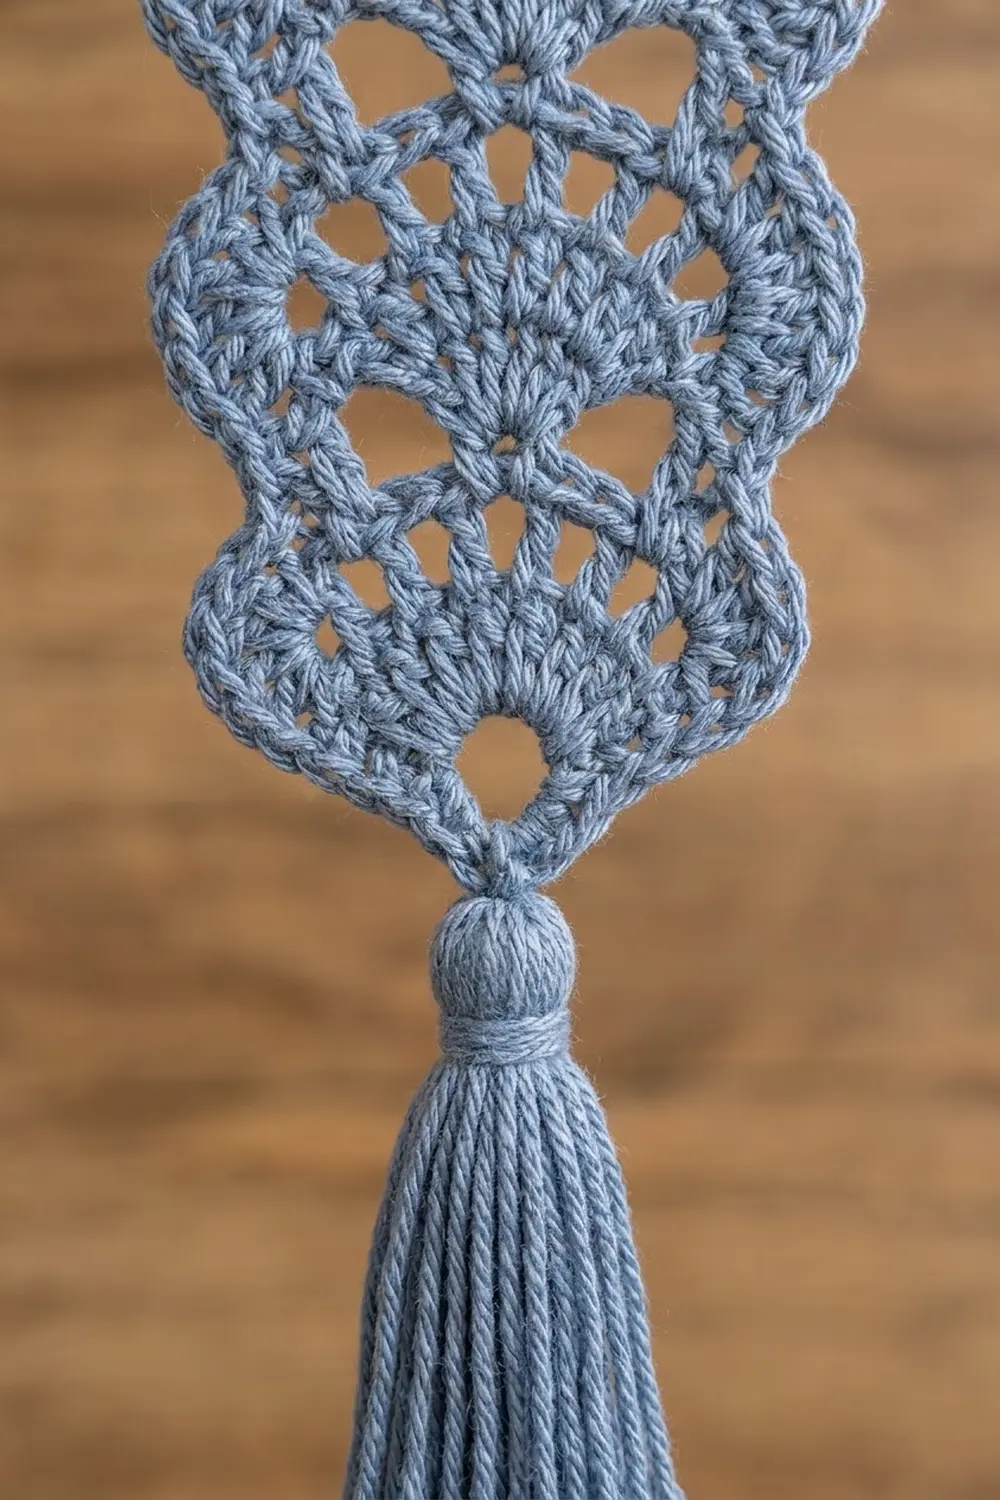
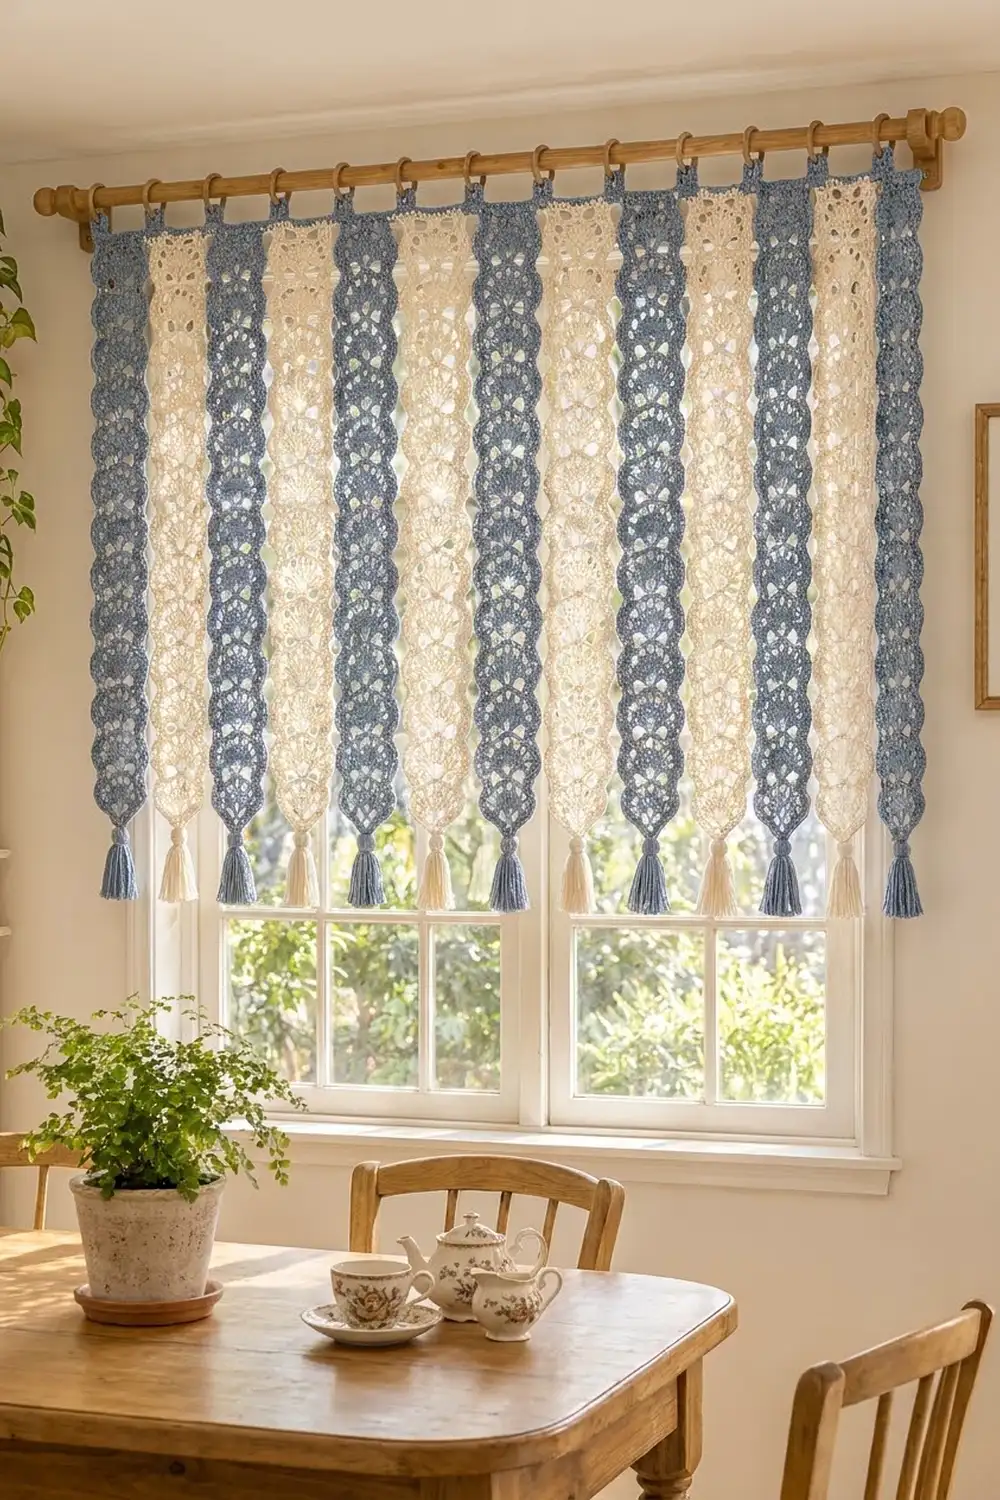
The Harbor Fan Strip Valance is a light, airy window topper. It is made from narrow lace strips that hang side by side from a solid header band. Each strip is a column of stacked fans with a gently scalloped outline, and each one ends in a pointed tip with a full tassel.
The colors are soft and coastal. Dusty denim blue and warm cream strips alternate across the window, and a blue header with a row of open filet squares ties them together. The style sits between cottage and farmhouse, and the valance filters light without blocking the view.
This pattern uses US crochet terms. The finished valance is 42.25 in (107.3 cm) wide and 19.5 in (49.5 cm) long from the top of the header to the strip tips. The 4 in (10.2 cm) tassels and the 3 in (7.6 cm) tabs, which fold into loops, are extra.
Construction is simple. You work 13 separate strips in rows from the bottom tip up, then join them with the first header rows. After that you add the mesh border and tabs, attach the tassels and block.
Finished Size and Construction
- Finished size: 42.25 in x 19.5 in (107.3 cm x 49.5 cm), not counting tassels and tabs
- Skill level: Easy intermediate
- Terminology: US crochet terms
- Yarn weight: Worsted (#4), cotton or cotton blend
- Hook: 5 mm (H-8)
- Number of pieces: 13 strips, plus 1 header band worked directly across them
- Layout: 13 strips in one row, alternating blue and cream, with blue at both ends
- Strip size: 3.25 in x 18 in (8.3 cm x 45.7 cm)
- Size before border: 42.25 in x 18.5 in (107.3 cm x 47.0 cm)
- Border (header) depth: 1 in (2.5 cm) above the joining rows
- Tassels: 4 in (10.2 cm), one per strip, in the strip’s color
Materials
Choose a smooth, firm worsted cotton or cotton blend with about 170 m per 100 g. Cotton gives crisp fans and hangs straight in sunlight. Avoid fuzzy or very stretchy acrylic, which blurs the open stitches and lets long strips stretch.
- Blue (Color A): 300 g, about 510 m (7 strips, 7 tassels, header and tabs)
- Cream (Color B): 200 g, about 340 m (6 strips, 6 tassels)
These amounts include a margin of about 15 to 20 percent for your test strip, tassel trimming and small differences in tension.
Tools:
- 5 mm (H-8) crochet hook
- Tapestry needle
- Scissors
- Stitch markers (at least 26)
- Stiff card 4.5 in (11.4 cm) tall, for tassels
- Blocking mats, rust-proof pins and a spray bottle
- Curtain rod up to 0.75 in (1.9 cm) in diameter, or clip rings
Abbreviations (US Terms)
- ch chain
- sl st slip stitch
- sc single crochet
- dc double crochet
- sk skip
- sp space
- st(s) stitch(es)
- tch turning chain
- RS / WS right side / wrong side
- rep repeat
Special stitch – open fan: On a fan base of 5 dc, work 1 dc in each fan dc with ch 1 between them. This spreads the fan to its full width and makes the small gaps between the fan ribs.
Gauge and Checkpoints
Gauge: 16 sc and 18 rows = 4 in (10.2 cm) in sc.
Pattern gauge matters more than the sc swatch, so make one complete strip before you make the rest. Measure at these checkpoints, lying flat and unstretched:
- After Row 3 (first fan): 1.5 in (3.8 cm) tall. Row 2 measures 3.25 in (8.3 cm) across.
- After Row 18 (6 fans): 9 in (22.9 cm) tall.
- After Row 36 (finished strip): 18 in (45.7 cm) tall and 3.25 in (8.3 cm) wide across the top row of 13 sc.
If your strip is too big, go down 0.5 mm in hook size. If it is too small, go up 0.5 mm. Width is the key number, because the 13 strips must add up to the 169-stitch header. If a strip is a little long or short, you can work one fan repeat more or less, as long as every strip has the same number of rows.
Strip (Make 13)
Each strip starts at the pointed bottom tip and is worked upward in turned rows. Every fan uses a 3-row repeat: a fan base, an open fan and a loop row. The fan base pulls in over the side loops, which creates the scalloped edge.
Foundation: Ch 4, sl st in first ch to form a ring. This ring becomes the tip where the tassel hangs.
Row 1 (RS): Ch 3 (counts as dc), 6 dc in ring. Turn. (7 dc)
Row 2: Ch 4 (counts as dc + ch 1), [dc in next dc, ch 1] 5 times, dc in top of tch. Turn. (7 dc, 6 ch-1 sps; 13 sts across)
Row 3 (loop row): Ch 1, sc in first dc, [ch 3, sk next dc, sc in following dc] 3 times, placing the last sc in the 3rd ch of the tch. Skip over the ch-1 sps. Turn. (4 sc, 3 ch-3 loops)
This completes fan 1, about 1.5 in (3.8 cm) tall.
Row 4 (fan base): Ch 4 (counts as dc + ch 1), sk first ch-3 loop, 5 dc in center ch-3 loop, ch 1, sk next ch-3 loop, dc in last sc. Turn. (7 dc: 1 edge dc, 5 fan dc, 1 edge dc; 2 ch-1 sps)
On each side, a single ch 1 spans a whole ch-3 loop. This pulls the edge in and forms the narrow waist between fans. At this row the strip is about 1.75 in (4.4 cm) wide.
Row 5 (open fan): Ch 4 (counts as dc + ch 1), dc in first fan dc, [ch 1, dc in next fan dc] 4 times, ch 1, dc in 3rd ch of tch. Turn. (7 dc, 6 ch-1 sps; 13 sts across)
Row 6 (loop row): Work as Row 3. (4 sc, 3 ch-3 loops)
Rows 7–33: Rep Rows 4–6 nine more times. (11 fans complete; strip about 16.5 in / 41.9 cm tall)
Row 34 (fan base): Work as Row 4. (7 dc, 2 ch-1 sps)
Row 35 (open fan): Work as Row 5. (7 dc, 6 ch-1 sps)
Row 36 (top row, WS): Ch 1, sc in first dc, [sc in next ch-1 sp, sc in next dc] 6 times, placing the last sc in the 3rd ch of the tch. (13 sc = 7 sc in dc + 6 sc in ch-1 sps)
Fasten off, leaving a 6 in (15.2 cm) tail. The strip has 12 fans and measures 3.25 in x 18 in (8.3 cm x 45.7 cm).
Make All Pieces
- Blue (Color A): 7 strips
- Cream (Color B): 6 strips
Lay the strips flat in this order, RS facing and tips pointing down:
Position: 1  2  3  4  5  6  7  8  9  10 11 12 13
Color:    B  C  B  C  B  C  B  C  B  C  B  C  B
B = blue, C = cream. Weave in all ends except the top tails, which you can use later to close any small gaps at the header. Lightly spray-block each strip to 3.25 in x 18 in (8.3 cm x 45.7 cm) before joining, so every top edge is the same width.
Joining
You join the strips by working the first two header rows straight across their top edges. There is no sewing.
Method: Line up the strips side by side with Row 36 at the top and the RS of the valance facing you. Place a marker in the first and last sc of every strip to help you keep count.
Header Row 1 (RS): Join blue in the first sc of strip 1. Ch 1, sc in same st and in each of the next 12 sts of strip 1. Without adding any chains, sc in each of the 13 sts of the next strip; rep from * across all remaining strips. Turn. (169 sc = 13 strips x 13 sc)*
The last sc of one strip and the first sc of the next sit directly side by side. No stitches are added at the seams, so the count is exactly 13 x 13.
Header Row 2: Ch 1, sc in each sc across. Turn. (169 sc)
Tension advice: Keep these rows relaxed. If you pull tight, the header will be narrower than the strips and the fans will cup. If a join between strips gapes, snug the working yarn before the next stitch.
Size checkpoint: The piece now measures 42.25 in x 18.5 in (107.3 cm x 47.0 cm). Each strip’s section of the header should still measure 3.25 in (8.3 cm).
Border (Header Band and Tabs)
The border is worked along the top edge only. The side edges of the strips stay free, so the valance can move and let in light.
Border gauge: 4 sc per inch (2.54 cm) across, the same as your swatch. In the mesh row, each dc and each ch-1 sp takes the place of one stitch.
Header Row 3 (mesh): Ch 4 (counts as dc + ch 1), sk next sc, dc in next sc. Ch 1, sk next sc, dc in next sc; rep from * 82 more times. Turn. (85 dc, 84 ch-1 sps = 169 sts)*
Header Row 4: Ch 1, sc in first dc. Sc in next ch-1 sp, sc in next dc; rep from * across, ending in the 3rd ch of the tch. Turn. (169 sc = 85 sc in dc + 84 sc in ch-1 sps)*
Header Row 5: Ch 1, sc in each sc across. Fasten off. (169 sc)
Why the math works: The mesh row needs an odd number of stitches: 1 + (2 x number of squares). Since 169 = 1 + (2 x 84), the mesh starts and ends on a dc with no partial square. Rows 1 to 5 each hold exactly 169 stitches, so the header stays 42.25 in (107.3 cm) wide and matches the 13 strips below. Rows 3–5 add 1 in (2.5 cm), for a total header depth of 1.5 in (3.8 cm).
Tabs (make 13): Work one tab on each strip’s 13-st section of Row 5, centered on sts 5–9.
- Tab Row 1 (RS): Join blue in the 5th sc of the section, ch 1, sc in same st and next 4 sts. Turn. (5 sc)
- Tab Rows 2–14: Ch 1, sc in each st across. Turn. (5 sc)
Fasten off, leaving a 12 in (30.5 cm) tail. Each tab is 1.25 in (3.2 cm) wide and about 3 in (7.6 cm) long. There are 8 sts, or 2 in (5.1 cm), between tabs. Fold each tab to the WS and whipstitch Row 14 to the back of Header Row 4. This makes a loop about 1.5 in (3.8 cm) deep for the rod or rings.
Tassels (Make 13)
Wrap yarn in the strip’s color 25 times around the 4.5 in (11.4 cm) card. Slip a 10 in (25.4 cm) tie strand under the wraps at the top and knot it tightly. Cut the loops at the bottom. Wrap a second strand around the bundle 0.5 in (1.3 cm) below the top and knot it. Trim the tassel to 4 in (10.2 cm). Thread the tie strand through the foundation ring of the matching strip and knot it securely inside the tassel.
Final Blocking
- Weave in all remaining ends along stitches of the same color.
- Spray the valance until damp, but not dripping.
- Pin the header straight to 42.25 in x 1.5 in (107.3 cm x 3.8 cm).
- Pin each strip downward from the header to 18 in (45.7 cm), keeping its center line square to the header.
- Pin each open-fan row to 3.25 in (8.3 cm), and let each fan-base waist pull in to about 1.75 in (4.4 cm).
- Comb the tassels straight and trim them even.
- Let it dry completely before unpinning.
Final Quality-Control Checklist
- 13 strips in the correct order: B C B C B C B C B C B C B
- Every strip has 12 fans and ends with 13 sc
- Header Rows 1, 2, 4 and 5 each have 169 sc
- Header Row 3 has 85 dc and 84 open squares
- 13 tabs, each centered over its strip
- Width 42.25 in (107.3 cm); length 19.5 in (49.5 cm) without tassels
- All tassels are 4 in (10.2 cm) and firmly attached
- No ends showing on the RS
Troubleshooting
Fans curl forward. The loop row is too tight. Loosen your ch-3 loops or use ch 4 instead.
The strip edge is straight, not scalloped. In the fan-base row, make sure you skip the side loops and work only ch 1 across each one.
Strips are different lengths. Count fans, not inches. Rip back or add a repeat so every strip has 12 fans.
Header is shorter than the strips. Work Header Rows 1 and 2 with a hook 0.5 mm larger.
Mesh squares slant. Always skip exactly one sc and work into the next one. Recount to make sure you have 85 dc.
Tabs twist. Fold each tab straight back and pin it in place before sewing.
Care
Hand wash in cool water with mild soap, roll in a towel to remove water, and dry flat, pinning to size if needed. Don’t hang the valance while it’s wet, because the weight of the tassels can stretch the strips.
Final Notes
The measurements build on each other. The 13 sc at the top of each strip measure 3.25 in (8.3 cm). Thirteen strips give 169 sc and 42.25 in (107.3 cm), and every header row keeps those 169 stitches. Each strip has 12 fans of 1.5 in (3.8 cm), for 18 in (45.7 cm). Add the 1.5 in (3.8 cm) header, and the valance hangs 19.5 in (49.5 cm), plus tassels. Check your first strip, keep the counts steady, and the rest will fall into place.
Happy crocheting!