

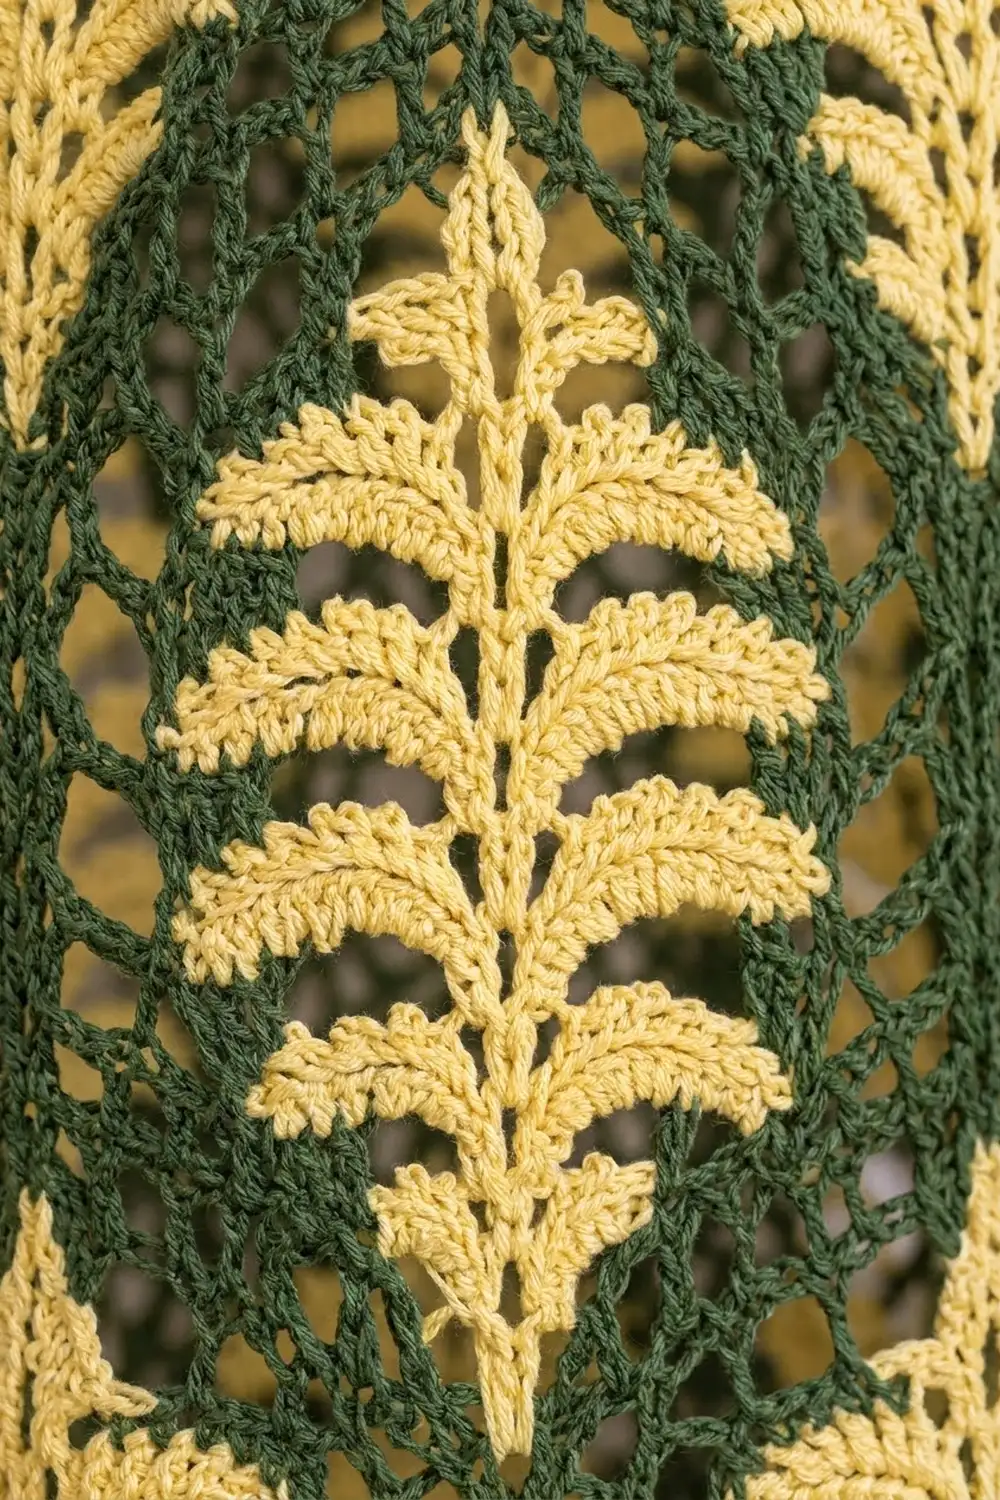
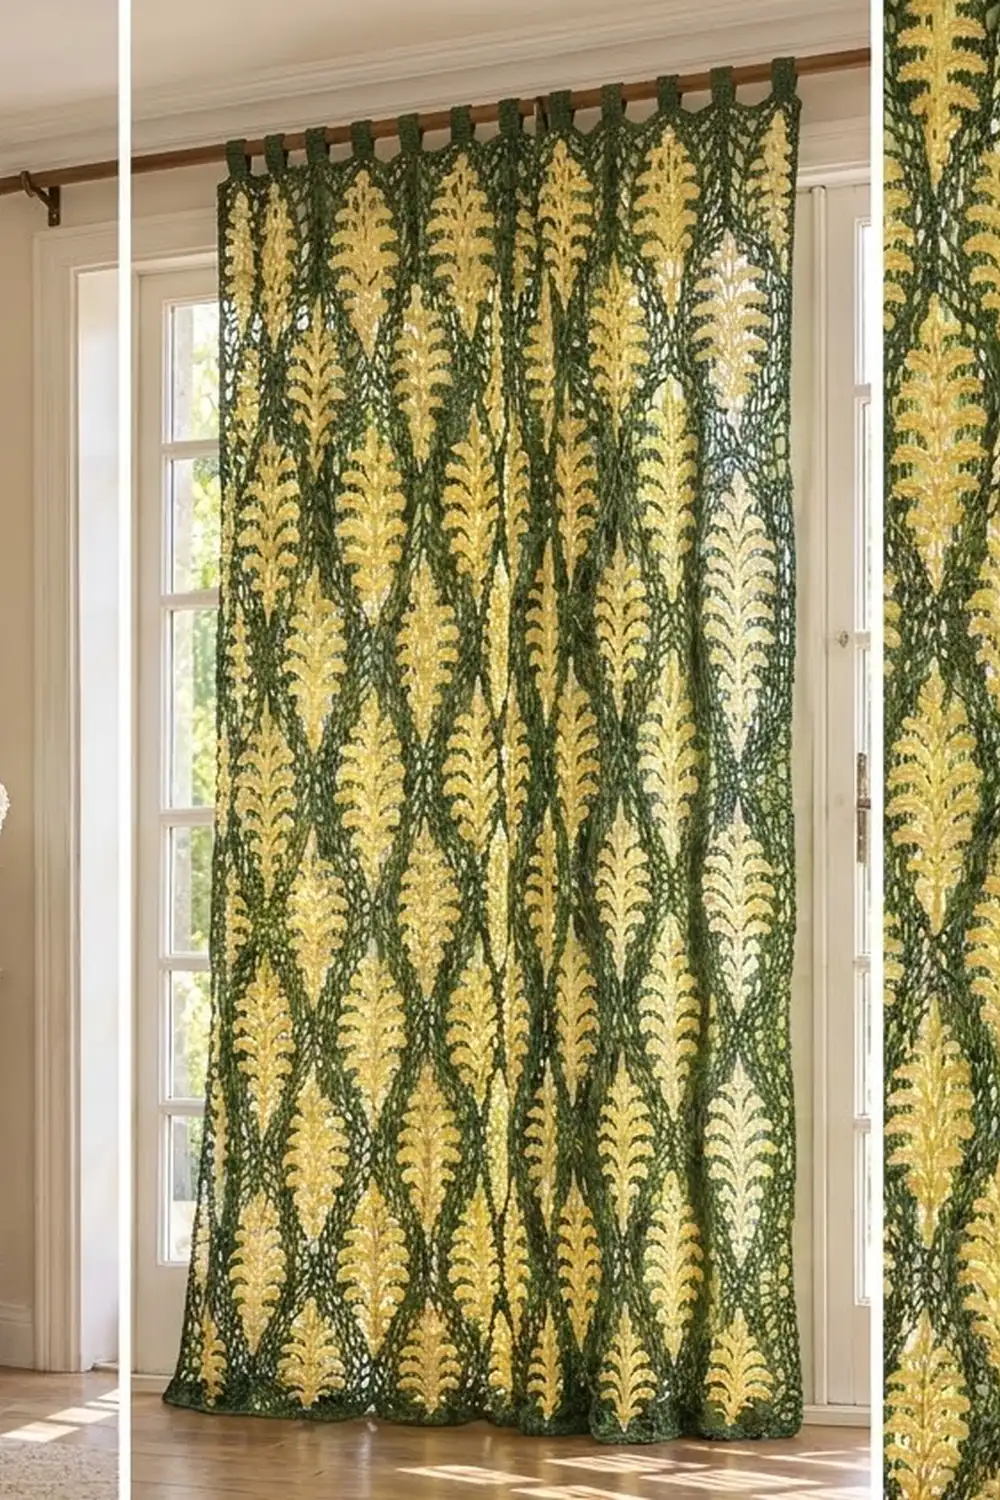
The Fernlight Lace Curtain is a full-length, tab-top panel made from tall fern motifs. Each motif has a solid butter-yellow fern in the center, framed by open forest-green mesh. Once you join the motifs, the green frames become a lattice and the ferns line up in vertical columns that glow in the sun.
The look is botanical and slightly vintage. The pattern uses US crochet terms throughout.
The finished panel measures 50 x 86 in (127.0 x 218.4 cm). With the tab loops, it hangs about 89 in (226.1 cm) from the top of the rod.
You make 56 identical rectangular motifs, each 6 x 12 in (15.2 x 30.5 cm). Then you join them 8 across and 7 down, add a 3-round border, and work 9 tabs straight off the top edge.
Finished Size and Construction
- Finished size: 50 x 86 in (127.0 x 218.4 cm), plus 3 in (7.6 cm) tab loops
- Skill level: Intermediate
- Terminology: US crochet terms
- Yarn weight: Worsted (#4) cotton
- Hook: 5.0 mm (H-8)
- Number of pieces: 56 motifs, plus 9 tabs worked onto the border
- Layout: 8 motifs across x 7 down
- Motif size: 6 x 12 in (15.2 x 30.5 cm)
- Size before border: 48 x 84 in (121.9 x 213.4 cm)
- Border depth: 1 in (2.5 cm) on every side
Materials
Use a smooth worsted-weight cotton. It shows the fern texture crisply, blocks flat, and stretches very little while hanging. The amounts below assume about 170 m per 100 g, so check your label.
- Color A, butter yellow (ferns): 450 g, about 765 m
- Color B, forest green (mesh, joining, border, tabs): 1,300 g, about 2,210 m
These amounts include a margin of about 10–15% for swatching and ripping back.
Tools:
– 5.0 mm (H-8) hook
– Tapestry needle
– 4 stitch markers
– Scissors
– Measuring tape
– Blocking mats
– Rust-proof pins
Abbreviations (US Terms)
- ch – chain
- sl st – slip stitch
- sc – single crochet
- hdc – half double crochet
- dc – double crochet
- tr – treble crochet
- dtr – double treble crochet
- sp(s) – space(s)
- st(s) – stitch(es)
- RS / WS – right side / wrong side
Special stitches:
- Picot: Ch 3, sl st in top of the stitch just made.
- Large frond: Ch 10. Working back along the chain: sc in 2nd ch from hook, hdc in next ch, [dc in next ch, picot] 3 times, dc in next 4 ch (9 ch used).
- Medium frond: Ch 8. Sc in 2nd ch from hook, hdc in next ch, [dc in next ch, picot] 2 times, dc in next 3 ch (7 ch used).
- Small frond: Ch 6. Sc in 2nd ch from hook, hdc in next ch, dc in next ch, picot, dc in next 2 ch (5 ch used).
Each frond ends back at the spine.
Gauge and Checkpoints
Main gauge: 4 sc = 1 in (2.5 cm) in motif Rnd 4, after blocking.
Make and block one complete motif before you start the rest. It is your gauge swatch. Measure each stage lightly flattened:
- Fern only: about 3.5 x 9.5 in (8.9 x 24.1 cm)
- After Rnd 1: pointed oval, about 4.25 x 10.25 in (10.8 x 26.0 cm)
- After Rnd 2: rectangle, about 5 x 11 in (12.7 x 27.9 cm)
- After Rnd 3: about 5.5 x 11.5 in (14.0 x 29.2 cm)
- After Rnd 4, blocked: 6 x 12 in (15.2 x 30.5 cm)
Too big? Go down to a 4.5 mm (7) hook. Too small? Go up to a 5.5 mm (I-9). Being off by 0.25 in (0.6 cm) per motif adds up to 2 in (5.1 cm) across the width and 1.75 in (4.4 cm) down the length.
Motif
Fern (Color A)
You work the fern in two passes along a chain spine. First you go up, making the right-hand fronds. Then you come back down with sl sts, making the left-hand fronds.
Up pass: With A, ch 10 (6 stem ch plus 4 spine ch). [Large frond, ch 4] 3 times. [Medium frond, ch 4] 2 times. Small frond, ch 3.
Tip leaflet: Ch 6, sc in 2nd ch from hook, hdc in next ch, dc in next ch, picot, dc in next 2 ch. The leaflet points straight up.
Down pass: Sl st in next 3 spine ch, small frond. [Sl st in next 4 ch, medium frond] 2 times. [Sl st in next 4 ch, large frond] 3 times. Sl st in next 10 ch to reach the stem base. Fasten off.
Check: The spine has 33 ch, and the down pass has 33 sl sts (3 + 4 x 5 + 10). There are 6 mirrored pairs of fronds (3 large, 2 medium, 1 small) plus the tip leaflet. That makes 13 points plus the stem base.
Frame (Color B)
Rnd 1 (outline): With RS facing, join B with a sl st at the stem base. Ch 1, sc in same st.
– Up the right side: ch 9, sc in tip of large frond 1, [ch 6, sc in tip of next frond] 3 times, [ch 5, sc in tip of next frond] 2 times, ch 6, sc in tip leaflet.
– Down the left side: ch 6, sc in small frond tip, [ch 5, sc in next frond tip] 2 times, [ch 6, sc in next frond tip] 3 times, ch 9, sl st to first sc.
You now have 14 sc and 14 ch-loops in a pointed oval.
Rnd 2 (squaring round): Sl st to the sc on right large frond 1. This is the bottom-right corner. Ch 2 (counts as hdc).
- Right long side: 8 hdc in next ch-6 loop, hdc in next sc, 8 hdc in next loop, dc in next sc, 8 dc in next loop, dc in next sc, 7 tr in next ch-5 loop, tr in next sc, 7 tr in next loop, dtr in small-frond sc. That is 44 sts (1 + 8 + 1 + 8 + 1 + 8 + 1 + 7 + 1 + 7 + 1).
- Corner: Ch 2.
- Top short side: Dtr in same sc. In next loop, work 2 dtr, 2 tr, 2 dc, 2 hdc. Work 2 sc in tip-leaflet sc. In next loop, work 2 hdc, 2 dc, 2 tr, 2 dtr. Dtr in left small-frond sc. That is 20 sts (1 + 8 + 2 + 8 + 1).
- Corner: Ch 2.
- Left long side: Dtr in same sc, 7 tr in next loop, tr in next sc, 7 tr in next loop, dc in next sc, 8 dc in next loop, dc in next sc, 8 hdc in next loop, hdc in next sc, 8 hdc in next loop, hdc in left large-frond sc. That is 44 sts.
- Corner: Ch 2.
- Bottom short side: Dtr in same sc. In next ch-9 loop, work 2 dtr, 2 tr, 2 dc, 2 hdc. Work 2 sc in stem sc. In next ch-9 loop, work 2 hdc, 2 dc, 2 tr, 2 dtr. Dtr in starting sc. That is 20 sts.
- Corner: Ch 2, sl st to top of beginning ch-2.
Rnd 2 total: 128 sts (44 + 20 + 44 + 20) plus 4 corner ch-2 sps. The graded stitch heights fill in the narrow ends of the oval and turn it into a rectangle.
Rnd 3 (mesh): Sl st into the bottom-right corner sp, ch 3 (counts as dc).
- Each long side: [Ch 2, skip 2 sts, dc in next st] 14 times, ch 2, skip 2 sts, (dc, ch 2, dc) in corner sp.
- Each short side: [Ch 2, skip 2 sts, dc in next st] 6 times, ch 2, skip 2 sts, (dc, ch 2, dc) in corner sp.
At the final corner, work dc, ch 2, then sl st to top of beginning ch-3.
Each long side uses 44 sts (14 x 3 + 2) and has 16 dc and 15 ch-2 sps. Each short side uses 20 sts (6 x 3 + 2) and has 8 dc and 7 ch-2 sps.
Rnd 3 total: 48 dc, 44 side ch-2 sps, 4 corner ch-2 sps.
Rnd 4 (edging): Sl st into corner sp, ch 1, sc in same sp. Along each side, sc in each dc and 2 sc in each ch-2 sp. Work (sc, ch 2, sc) in each corner sp. End with sc in first corner sp, ch 2, sl st to first sc. Fasten off.
- Each long side: 1 corner sc + 16 + 30 + 1 corner sc = 48 sc
- Each short side: 1 + 8 + 14 + 1 = 24 sc
- Total: 144 sc plus 4 corner ch-2 sps
The side counts include both corner sc. At 4 sc per inch, 48 sc = 12 in (30.5 cm) and 24 sc = 6 in (15.2 cm).
Make All Pieces
Make 56 motifs. Each uses about 7 g of A and 18 g of B.
- Color A: 56 ferns, about 392 g
- Color B: 56 frames, about 1,008 g. The rest of B goes to joining, the border, and the tabs.
Layout (F = one motif, fern tip up):
Row 1:  F  F  F  F  F  F  F  F
Row 2:  F  F  F  F  F  F  F  F
Row 3:  F  F  F  F  F  F  F  F
Row 4:  F  F  F  F  F  F  F  F
Row 5:  F  F  F  F  F  F  F  F
Row 6:  F  F  F  F  F  F  F  F
Row 7:  F  F  F  F  F  F  F  F
Lightly block every motif to 6 x 12 in (15.2 x 30.5 cm) before joining.
Joining
Method: Use a slip stitch join through back loops with B, worked on the WS. The seams stay flat and narrow, so the lattice looks continuous from the front.
Horizontal seams first: Hold two rows of motifs RS together, with the short edges matching. Sl st through both corner ch-2 sps, then through each matching pair of sc, 24 to 24 per motif. At each motif junction, sl st through the paired corner sps of the motifs you just finished, then through the paired corner sps of the next motifs. Each seam joins 192 sc pairs (8 x 24). Make 6 horizontal seams.
Vertical seams next: Join the long edges the same way, 48 to 48 per motif. Each seam joins 336 sc pairs (7 x 48), and there are 7 seams. Work 1 sl st over each crossing seam.
Tension: Keep the seam sl sts as loose as the sc. If a seam puckers, use a hook one size larger, just for joining.
Checkpoint: The joined panel measures 48 x 84 in (121.9 x 213.4 cm). The seams add no stitches to the outer edges.
Border
Border gauge: 4 sc = 1 in (2.5 cm). Each sc round adds 0.25 in (0.6 cm), and the dc round adds 0.5 in (1.3 cm).
Rnd 1: With RS facing, join B in the first sc of the top edge. Sc in every outer-edge sc. Skip the joined corner sps at motif junctions. At each panel corner, ch 2 between sides. Sl st to first sc.
- Top and bottom: 192 sc each (8 motifs x 24)
- Sides: 336 sc each (7 motifs x 48)
- Total: 1,056 sc
Rnd 2: Ch 3 (counts as dc), dc in each sc around, working (2 dc, ch 2, 2 dc) in each corner sp. Sl st to top of ch-3.
- Top and bottom: 196 dc each (2 + 192 + 2)
- Sides: 340 dc each (2 + 336 + 2)
- Total: 1,072 dc
Rnd 3: Ch 1, sc in each dc around, working (sc, ch 2, sc) in each corner sp. Sl st to first sc. Fasten off.
- Top and bottom: 198 sc each (1 + 196 + 1)
- Sides: 342 sc each (1 + 340 + 1)
- Total: 1,080 sc
Why the math works: Rnd 1 matches the joined edge stitch for stitch, so the panel stays 48 x 84 in (121.9 x 213.4 cm). Extra stitches appear only at the corners, where the border turns around the 1 in (2.5 cm) it adds at each end.
– Top edge: 198 sc / 4 = 49.5 in, plus about 0.5 in (1.3 cm) from the two corner ch-2 sps = 50 in (127.0 cm).
– Sides: 342 / 4 = 85.5 in, plus 0.5 in = 86 in (218.4 cm).
Tabs
Number the 198 top-edge sc from right to left.
- Tab 1: Join B in sc 1. Ch 1, sc in sc 1–6. Work 24 rows of 6 sc in total, which is 6 in (15.2 cm). Fasten off, leaving a long tail.
- Tabs 2–9: Skip 18 sc, then work the next tab over 6 sc. Check: 6 + (18 + 6) x 8 = 198.
The end tabs sit at the corners, and the 7 middle tabs are centered over the vertical seams. Tabs are 1.5 in (3.8 cm) wide with 4.5 in (11.4 cm) gaps. Fold each tab to the WS and sew its last row to the top of border Rnd 1. This makes a 3 in (7.6 cm) loop that fits rods up to 1.5 in (3.8 cm) across.
Final Blocking
- Weave in the remaining ends along seams, never through the open mesh.
- Soak in cool water for 15 minutes, then press out the water without wringing.
- Roll the panel in towels.
- Lay it flat, RS up, on mats or on a sheet over carpet.
- Pin the corners to 50 x 86 in (127.0 x 218.4 cm).
- Pin along the seams so each motif sits at 6 x 12 in (15.2 x 30.5 cm).
- Fan out the fronds and open the picots with your fingertips.
- Let it dry completely (24–48 hours) before unpinning.
Final Quality-Control Checklist
- All motifs measure 6 x 12 in (15.2 x 30.5 cm), with every fern tip pointing up.
- Border Rnd 3 counts 198 sc on the top and bottom and 342 sc per side.
- The seams lie flat.
- All 9 tabs match and are securely sewn.
- The panel measures 50 x 86 in (127.0 x 218.4 cm).
Troubleshooting
- Fern curls: The spine sl sts are too tight. Loosen them, or go up a hook size for the down pass.
- Frame won’t square up: Recount Rnd 2. The sides must be exactly 44 and 20 sts.
- Rnd 3 misses a corner: You skipped 3 sts somewhere. Count the ch-2 sps: 15 per long side, 7 per short side.
- Panel width is uneven: Re-block any oversized motifs before joining.
- Panel grows in length: Cotton relaxes as it hangs. Block to the exact length and don’t stretch it while wet.
Care
Hand wash in cool water with a mild detergent and dry flat, re-pinning to size. Never hang it wet, because the weight will stretch it.
Final Notes
Here is how the measurements build:
– A 3.5 x 9.5 in (8.9 x 24.1 cm) fern is framed into a 6 x 12 in (15.2 x 30.5 cm) motif of 24 x 48 sc.
– 8 x 7 motifs give 192 x 336 sc, which is 48 x 84 in (121.9 x 213.4 cm).
– The border brings the panel to 50 x 86 in (127.0 x 218.4 cm).
Get the first motif right and every number after it follows.
Happy crocheting!