

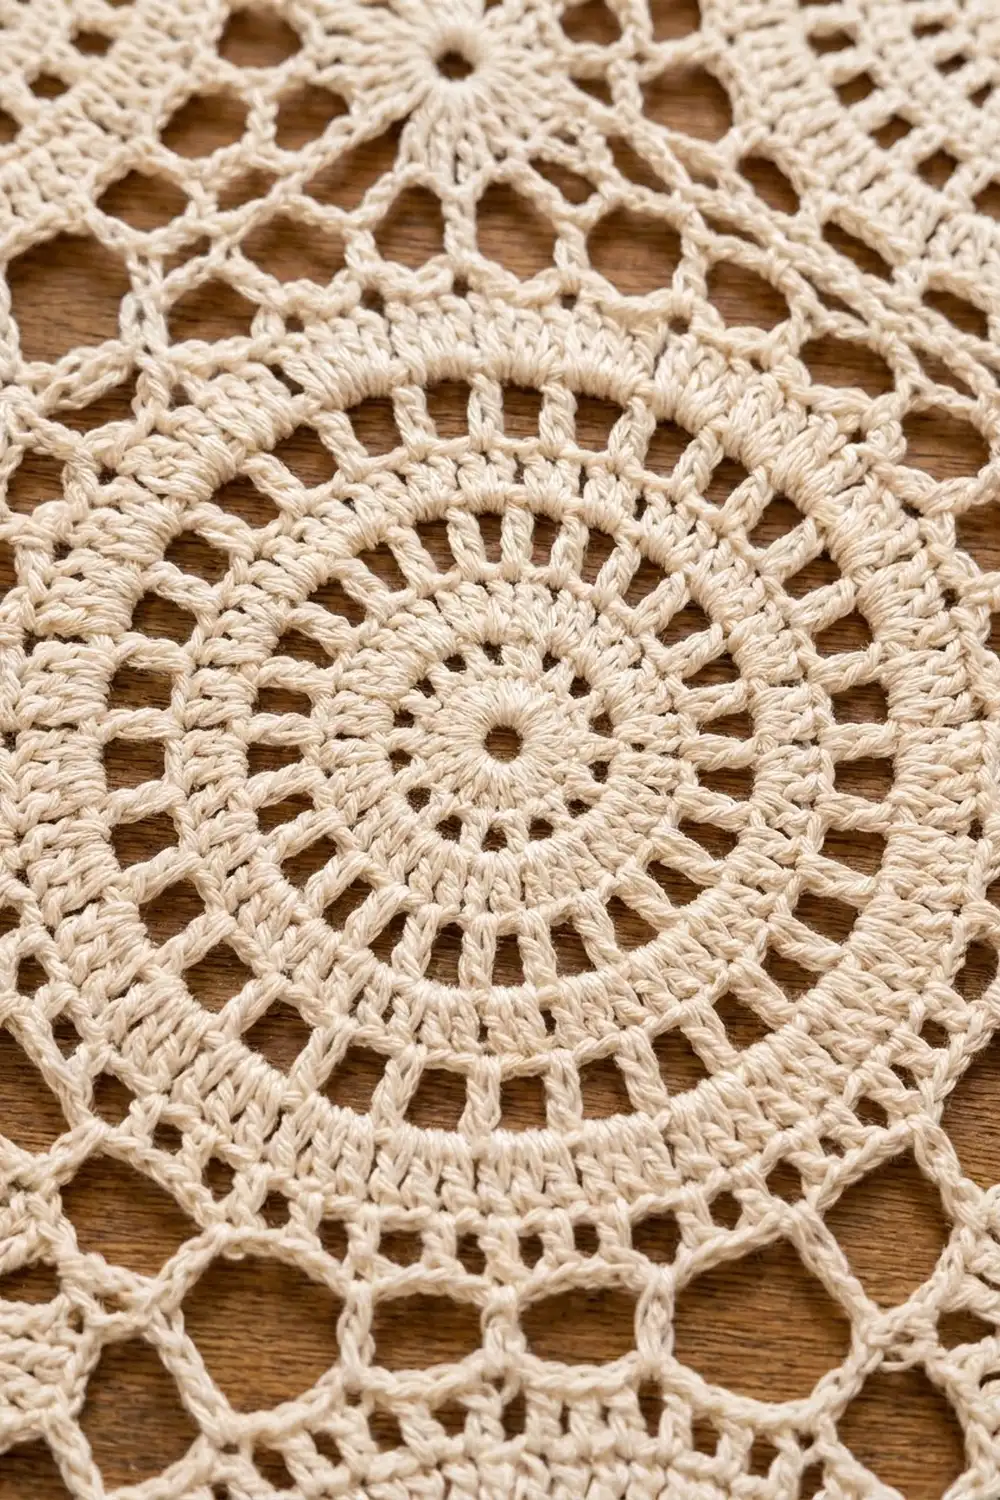
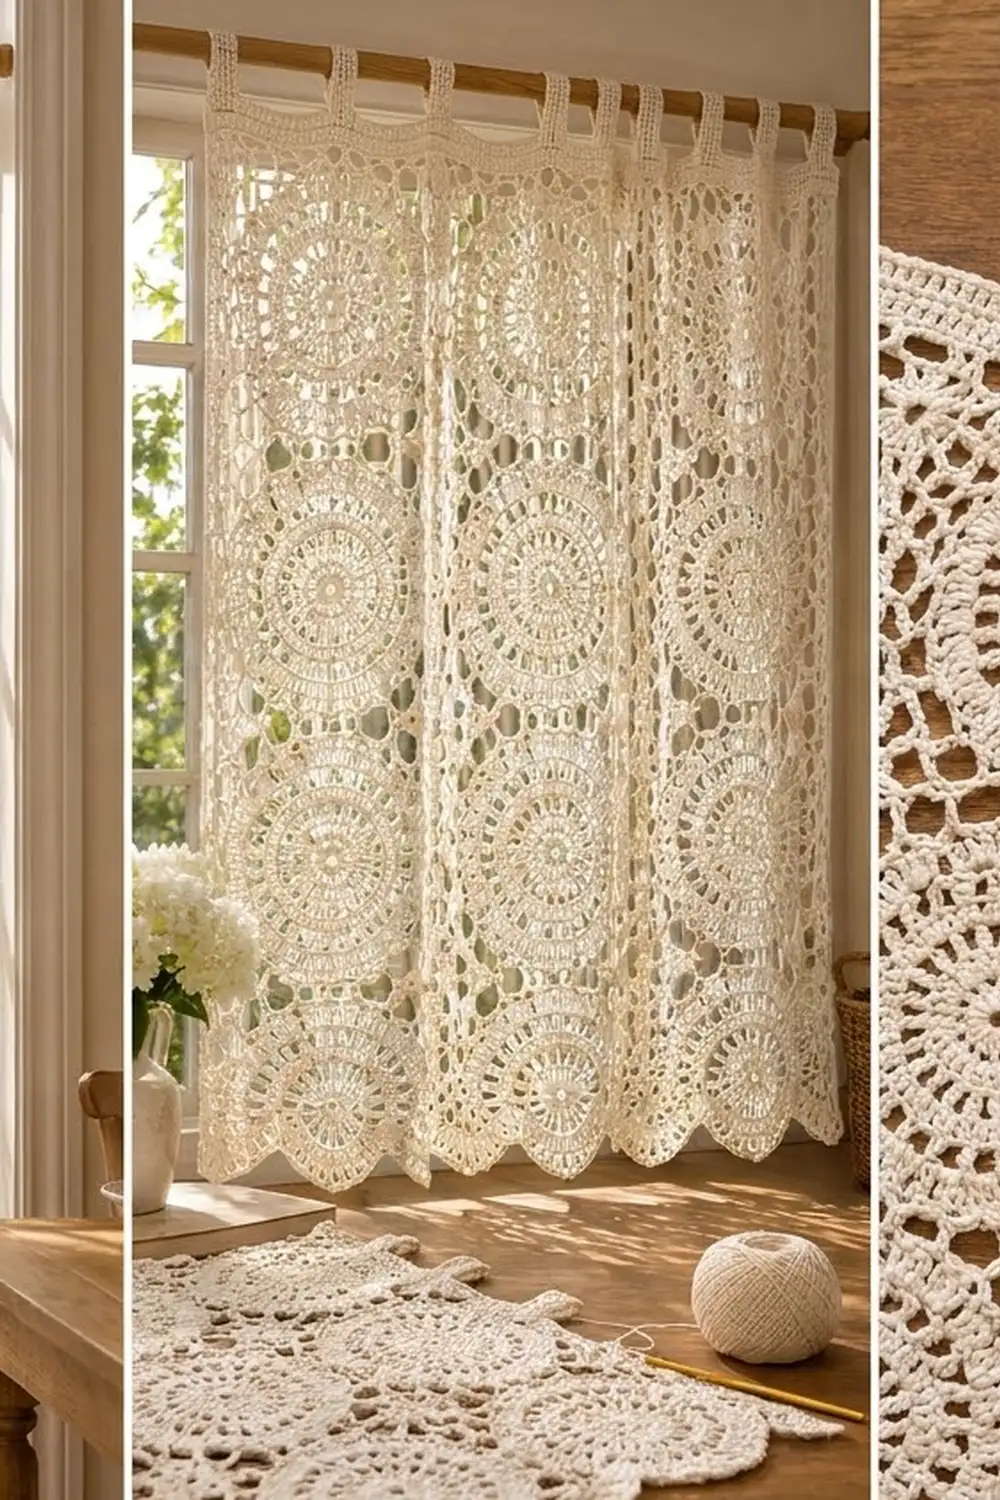
This curtain panel is made from rows of round mandala motifs in one shade of ivory cotton. Each motif has a solid center, a ring of open spokes, a solid band, a ring of tall treble spokes and a round of chain arches. A final lace round frames the circle into a square, so the joined panel reads as columns of circles with open windows of mesh between them.
The style is soft and old-fashioned. Light passes through the spoke rings and the mesh. The bottom edge ends in a row of picot scallops, and a dense top band carries six tab loops that slide straight onto a curtain rod. All instructions use US crochet terms.
The finished panel measures 41 in (104.1 cm) wide and 67 in (170.2 cm) long, from the top band to the scallop tips. The tab loops add about 2.5 in (6.4 cm) above the band, for a total hanging height of 69.5 in (176.5 cm).
Construction is simple. You make 40 identical motifs, each 8 in (20.3 cm) square. You join them flat into a grid 5 motifs wide and 8 motifs tall. Then you work two rounds of single crochet around the whole panel and add a top band with tabs and a scalloped bottom edge.
Finished Size and Construction
- Finished size: 41 in x 67 in (104.1 cm x 170.2 cm), plus 2.5 in (6.4 cm) tab loops
- Skill level: Intermediate
- Terminology: US crochet terms
- Yarn weight: DK / light worsted (#3) cotton
- Hook: 4.0 mm (US G-6)
- Number of pieces: 40 motifs
- Layout: 5 motifs wide x 8 motifs tall
- Motif size: 8 in (20.3 cm) square, 35 sts per side
- Size before border: 40 in x 64 in (101.6 cm x 162.6 cm)
- Border depth: 0.5 in (1.3 cm) on the sides, 1.25 in (3.2 cm) at the top band, 1.75 in (4.4 cm) at the bottom including scallops
Materials
Choose a smooth cotton or cotton blend in DK weight, about 220 m per 100 g. Cotton gives crisp stitch definition, holds its shape when hung and survives regular washing. Avoid fuzzy or very stretchy yarn. The panel is heavy, and acrylic will lengthen over time.
- Ivory: 850 g (about 1,870 m)
This quantity includes a margin of about 15% for gauge testing, differences in tension, and the tabs.
Tools:
- 4.0 mm (US G-6) crochet hook
- Tapestry needle
- Stitch markers (at least 8)
- Measuring tape
- Blocking mats and rust-proof pins
- Spray bottle
- Sharp scissors
Abbreviations (US Terms)
- ch – chain
- sl st – slip stitch
- sc – single crochet
- dc – double crochet
- tr – treble crochet
- sp – space
- st(s) – stitch(es)
- RS / WS – right side / wrong side
Special stitch – Treble crochet (tr): Yarn over twice, insert hook in stitch or space, yarn over and pull up a loop (4 loops on hook), [yarn over, pull through 2 loops] 3 times.
Special stitch – Picot: Ch 3, sl st in the top of the stitch just made.
Gauge and Checkpoints
Make one complete motif before anything else. It is your gauge swatch, and no yarn is wasted because it goes into the panel.
Gauge: One blocked motif = 8 in (20.3 cm) square. Along the Round 8 edge, 35 sc = 8 in (20.3 cm), which is 4.375 sts per inch.
Checkpoints while you work (unblocked, measured flat):
- After Round 1: about 1.25 in (3.2 cm) across
- After Round 2: about 2.25 in (5.7 cm) across
- After Round 4: about 4.25 in (10.8 cm) across
- After Round 6: about 6.5 in (16.5 cm) across
- After Round 7: about 7.25 in (18.4 cm) per side
- After Round 8 and blocking: 8 in (20.3 cm) per side
Being off by up to 0.25 in (0.6 cm) either way is fine.
If your motif is too big (over 8.25 in / 21.0 cm), go down to a 3.75 mm hook. If it is too small (under 7.75 in / 19.7 cm), go up to 4.5 mm. Do not change stitch counts, because the border math depends on 35 sts per side.
If the center cups, your spokes are too short, so loosen your yarn overs on Rounds 5 and 7. If the circle ruffles, tighten your chains on Round 6.
Mandala Motif (Make 40)
Work in rounds with the RS facing. Do not turn.
Round 1: Make a magic ring. Ch 3 (counts as dc), 15 dc in ring. Join with sl st to top of ch-3. Pull the ring closed. (16 dc)
Round 2: Ch 3 (counts as dc), dc in same st, 2 dc in each st around. Join. (32 dc)
Round 3 (spoke round): Ch 3 (counts as dc), dc in next st, ch 2, dc in next 2 sts, ch 2; repeat from * 14 more times. Join. (32 dc and 16 ch-2 sps)
The ch-2 spaces make the first ring of small windows.
Round 4 (solid band): Ch 3 (counts as dc), dc in next st, 2 dc in next ch-2 sp, dc in next 2 sts, 2 dc in next ch-2 sp; repeat from * 14 more times. Join. (64 dc)
This is a conversion round: 32 dc worked 1 per stitch + 32 dc worked into the 16 spaces = 64 dc.
Round 5 (treble spokes): Ch 4 (counts as tr), tr in next st, ch 3, skip 2 sts, tr in next 2 sts, ch 3, skip 2 sts; repeat from * 14 more times. Join to top of ch-4. (32 tr and 16 ch-3 sps)
Each repeat uses 4 stitches, and 16 x 4 = 64, so the spokes are evenly spaced.
Round 6 (arch round): Sl st in next tr, sl st in next ch-3 sp. Ch 1, sc in same sp, ch 5, sc in next ch-3 sp, ch 5; repeat from * 14 more times. Join to first sc. (16 sc and 16 ch-5 loops)
Check that the circle lies flat at about 6.5 in (16.5 cm).
Round 7 (squaring lace round): Sl st in next 3 ch to reach the center of the first ch-5 loop. Ch 4 (counts as tr), ch 3, tr in same loop (first corner made), ch 7, dc in next loop, ch 7, sc in next loop, ch 7, dc in next loop, ch 7, (tr, ch 3, tr) in next loop, ch 7, dc in next loop, ch 7, sc in next loop, ch 7, dc in next loop, ch 7; repeat from * 2 more times. Join to top of ch-4. (8 tr, 8 dc, 4 sc = 20 sts; 16 ch-7 sps; 4 corner ch-3 sps)
The tall corners and short stitches at the middle of each side pull the circle into a square. This leaves open mesh windows at each corner.
Round 8 (trim round): Sl st in corner ch-3 sp. Ch 1, (sc, ch 2, sc) in same sp, sc in next tr, 7 sc in next ch-7 sp, sc in next dc, 7 sc in next ch-7 sp, sc in next sc, 7 sc in next ch-7 sp, sc in next dc, 7 sc in next ch-7 sp, sc in next tr, (sc, ch 2, sc) in corner ch-3 sp; repeat from * 2 more times, then from * to ** once. Join to first sc. Fasten off and weave in ends.
Count: (20 sts worked 1 per stitch) + (16 x 7 = 112 sc in ch-7 sps) + (8 corner sc) = 140 sc and 4 corner ch-2 sps.
Per side: 1 corner sc + 1 + 7 + 1 + 7 + 1 + 7 + 1 + 7 + 1 + 1 corner sc = 35 sc, corner stitches included. 4 x 35 = 140.
Block each motif lightly to 8 in (20.3 cm) square before joining. This makes joining much easier.
Make All Pieces
Make 40 motifs in Ivory. All motifs are identical.
Layout (5 wide x 8 tall, each M = one motif):
M M M M M
M M M M M
M M M M M
M M M M M
M M M M M
M M M M M
M M M M M
M M M M M
Joining
Join the motifs with a flat slip stitch seam through the back loops only. The seams stay thin, so the lace windows still show clearly.
Stitch-to-stitch logic: Each motif side has 35 sc between its corner ch-2 sps. Hold two motifs WS together and use the same orientation for every seam. Start in the matching corner ch-2 sps. Sl st through the back loops of each matching pair of sc, ending in the next pair of corner ch-2 sps. That makes 35 sl sts per seam.
- Join the motifs into 8 horizontal strips of 5 motifs each.
- Join the strips along their long edges. Where 4 corners meet, work one sl st through all the corner ch-2 sps together to lock the point.
Tension: Each slip stitch should be the same length as the sc it joins. If the seam puckers, use a 4.5 mm hook for joining only. If it gapes, use 3.75 mm.
Size checkpoint: The joined panel should measure 40 in x 64 in (101.6 cm x 162.6 cm) on a flat surface, without stretching.
Border
Border gauge: 35 sc = 8 in (20.3 cm); 9 rounds of sc = 2 in (5.1 cm).
Round 1: With RS facing, join yarn in the first sc after the top-right corner of the panel. Ch 1, sc in each sc along the top edge. At each seam, skip the two joined corner ch-2 sps and continue in the first sc of the next motif. At each panel corner, ch 2 over the corner ch-2 sp without working a stitch into it. Work all 4 sides the same way. Join.
- Top and bottom: 5 x 35 = 175 sc each
- Sides: 8 x 35 = 280 sc each
- Total: 910 sc and 4 corner ch-2 sps
No stitches are added at the seams, because each motif’s 35 already includes its own corner stitches.
Round 2: Ch 1, sc in each sc around, working (sc, ch 2, sc) in each corner ch-2 sp. Join. Fasten off.
- Top and bottom: 175 + 2 corner sc = 177 sc each
- Sides: 280 + 2 corner sc = 282 sc each
- Total: 918 sc and 4 corner ch-2 sps
These two rounds add about 0.5 in (1.3 cm) to every edge, so the panel is now 41 in (104.1 cm) wide.
Top Band
Work in rows across the 177 sc of the top edge only.
Row 1 (RS): Join yarn in the first sc of the top edge, skipping the corner ch-2 sp. Ch 3 (counts as dc), dc in each sc across. Turn. (177 dc)
Row 2 (WS): Ch 1, sc in each st across. Turn. (177 sc)
Counting border Rounds 1–2, the top band is now 1.25 in (3.2 cm) deep above the motifs.
Tabs (Make 6)
There are 6 tabs of 7 sts with 5 gaps of 27 sts: 6 x 7 + 5 x 27 = 42 + 135 = 177. The math comes out exact, so the end tabs line up with the side edges.
Tab 1: With RS facing, join yarn in sc 1 of Row 2. Ch 1, sc in same st and next 6 sts. Turn. (7 sc) Ch 1, sc in each st across, turn. Repeat until the tab measures 6 in (15.2 cm), about 27 rows. Fasten off, leaving a 12 in (30.5 cm) tail.
Remaining tabs: Skip 27 sts after each tab and work the next tab over the following 7 sts. Tabs start at sts 1, 35, 69, 103, 137 and 171. The last tab ends on st 177.
Each tab is 1.6 in (4.1 cm) wide, and each gap is about 6.2 in (15.7 cm).
Fold each tab to the WS and sew the tip to the back of Row 1 with the tail. The finished loop rises about 2.5 in (6.4 cm) above the band.
Bottom Scallop Edging
Work in rows across the 177 sc of the bottom edge only.
Row 1 (RS): Join yarn in the first sc of the bottom edge. Ch 1, sc in same st, skip 3 sts, 9 dc in next st, skip 3 sts, sc in next st; repeat from * 21 more times. Turn. (22 shells)
Check: 1 + 22 x 8 = 177 sts used exactly.
Row 2 (WS): Ch 1, sl st in first sc, sc in next 4 dc, sc in next dc, picot, sc in next 4 dc, sl st in next sc; repeat from * 21 more times. Fasten off. (22 picot scallops, 9 sc each)
The scallops add 1.25 in (3.2 cm), so the bottom border is 1.75 in (4.4 cm) in total.
Final Blocking
- Weave in all remaining ends along the seams or inside solid rounds.
- Soak the panel for 15 minutes in cool water with mild soap.
- Roll it in towels to press out the water. Do not wring it.
- Lay it flat on blocking mats, RS up.
- Pin the outer edges to 41 in x 67 in (104.1 cm x 170.2 cm).
- Pin the picot on each scallop so the points are even.
- Open up each motif’s spokes and corner mesh with your fingers.
- Let it dry fully, usually 24–48 hours, before unpinning.
Final Quality-Control Checklist
- Every motif has 35 sc per side and 140 sc total.
- Each motif blocks to 8 in (20.3 cm) square.
- Every seam has 35 sl sts, and every 4-corner point is locked.
- The joined panel measures 40 in x 64 in (101.6 cm x 162.6 cm).
- Border Round 2 counts are 177 on the top and bottom and 282 on each side.
- There are 6 tabs, spaced 27 sts apart.
- There are 22 scallops, each with a centered picot.
- The finished panel measures 41 in x 67 in (104.1 cm x 170.2 cm).
Troubleshooting
Motif ruffles after Round 6: Your ch-5 loops are too long. Tighten your chains, or work ch 4 instead of ch 5 and keep the same counts.
Motif cups after Round 7: The corner trebles are too short. Pull up a taller first loop on each tr.
Sides of a motif bow inward: Check that every ch-7 sp on Round 8 has exactly 7 sc.
Panel is narrower at the seams: Your joining is too tight. Use a larger hook for the seams.
Tabs are uneven: Before you start the tabs, put a marker on the first st of each one.
Scallops flare: Your dc are loose. Use a smaller hook for the edging only.
Care
Hand wash in cool water with mild soap and dry flat. If the scallops curl, pin them again, and never hang the panel while it is wet, because its weight will stretch it.
Final Notes
The measurement chain is simple. One motif with 35 sts per side blocks to 8 in (20.3 cm). Five across and eight down give 40 in x 64 in (101.6 cm x 162.6 cm). The border adds 0.5 in (1.3 cm) on the sides, 1.25 in (3.2 cm) at the top and 1.75 in (4.4 cm) at the bottom, for 41 in x 67 in (104.1 cm x 170.2 cm). The tabs add another 2.5 in (6.4 cm) on top. Check your first motif carefully, and the rest of the curtain will follow.
Happy crocheting!