

This curtain panel is made of 96 rose granny squares. Each square has a raised burgundy rose with three layers of petals, set in a light, lacy blush-pink frame. Burgundy seams form a grid across the panel, and a corded burgundy edge finishes it. Tab tops let it slide straight onto a standard curtain rod.
Only two colors are used: deep burgundy for the roses, outlines, seams, border and tabs, and soft blush pink for the lace. The style is romantic and a little vintage. The open lace lets daylight through, while the stacked roses add depth and shadow.
This pattern uses US crochet terms. The finished panel measures 49.5 in × 73.5 in (125.7 cm × 186.7 cm) without the tabs. The tabs add about 3.5 in (8.9 cm) of hanging loop above the top edge.
Construction is simple. You work each square in the round from the rose outward, change to pink for the lace, and finish with one burgundy round. Then you join the squares in an 8 × 12 grid, work three border rounds, and sew 9 tabs to the top edge.
Finished Size and Construction
- Finished size: 49.5 in × 73.5 in (125.7 cm × 186.7 cm), plus tabs
- Skill level: Intermediate
- Terminology: US
- Yarn weight: Worsted (#4)
- Hook: 5.0 mm (US H-8)
- Number of pieces: 96 squares + 9 tabs
- Layout: 8 squares wide × 12 squares tall
- Square size: 6 in × 6 in (15.2 cm × 15.2 cm), 27 stitches per side
- Size before border: 48 in × 72 in (121.9 cm × 182.9 cm)
- Border depth: 0.75 in (1.9 cm) per side
Materials
Yarn: Use a smooth worsted-weight cotton or cotton blend. Cotton gives crisp petals, holds its shape on a hanging panel and doesn’t fuzz in sunlight. Avoid very stretchy acrylic, because a 6-foot (1.8 m) panel will lengthen under its own weight.
- Color A, burgundy: 1,600 g (about 2,880 m)
- Color B, blush pink: 950 g (about 1,710 m)
These quantities assume about 180 m per 100 g and include a margin of roughly 10% for swatching, tails and dye-lot safety. Buy all of each color from the same dye lot.
Tools:
– 5.0 mm (US H-8) crochet hook
– Tapestry needle
– Stitch markers
– Measuring tape
– Blocking mats, rust-proof pins and a spray bottle
– Scissors
Abbreviations (US Terms)
- ch – chain
- sl st – slip stitch
- sc – single crochet
- hdc – half double crochet
- dc – double crochet
- sp – space
- st(s) – stitch(es)
- rep – repeat
- RS – right side
- rsc – reverse single crochet (crab stitch)
Special stitch: back post single crochet (bpsc). Insert the hook from back to front to back around the post of the stitch you’re told to use, then complete a sc. In this pattern, bpsc anchors each new petal layer behind the one before it.
Gauge and Checkpoints
Gauge: One blocked square measures 6 in × 6 in (15.2 cm × 15.2 cm), with 27 sts per side on Round 12. That works out to 4.5 sts per 1 in (2.5 cm) along the edge.
Make one full square first and block it before you start the rest. Every later number in this pattern depends on that square.
Checkpoints (measured flat, rose pressed gently):
– After Round 7: the rose measures about 3.75 in (9.5 cm) across.
– After Round 8: the loop round measures about 3.5 in (8.9 cm) across.
– After Round 9: about 4.25 in (10.8 cm) square.
– After Round 10: about 5 in (12.7 cm) square.
– After Round 11: about 5.5 in (14.0 cm) square.
– After Round 12: 6 in (15.2 cm) square.
If your square is too big, switch to a 4.5 mm hook. If it is too small, switch to a 5.5 mm hook. If only the lace rounds are off, change hooks for Rounds 9–12 only, and keep the rose the same.
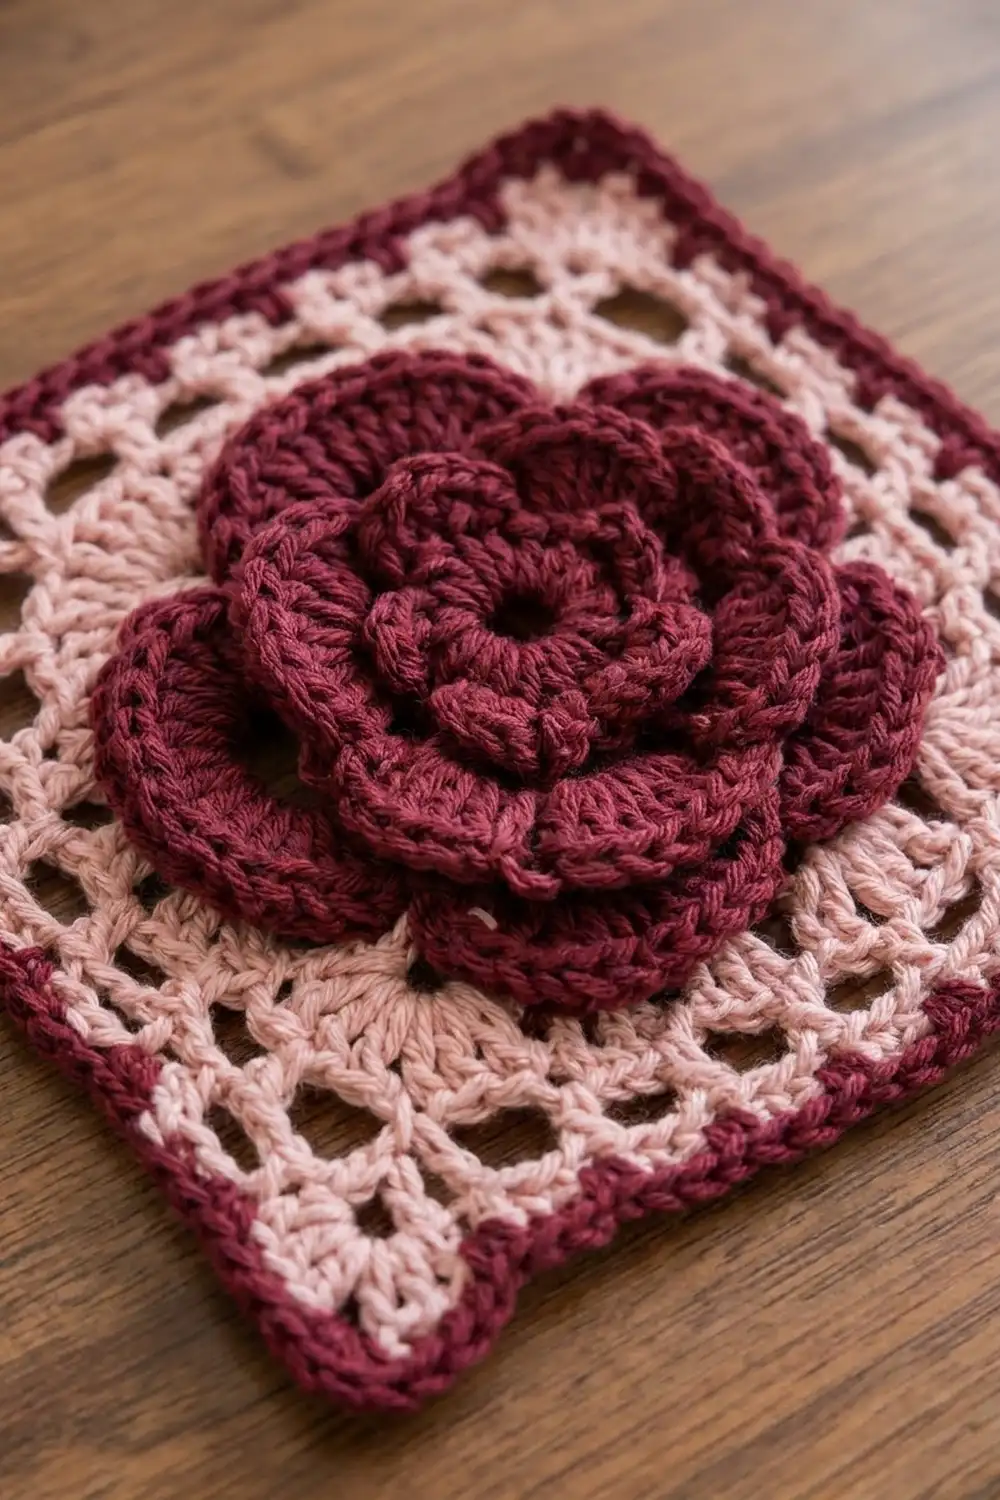
Rose Square (Make 96)
Rose (Color A)
Round 1: Make a magic ring. Ch 1, then work 8 sc in the ring. Join with a sl st to the first sc. (8 sc)
Round 2: Ch 1. Sc in the next st, ch 3; rep from * around. Join to the first sc. (8 sc, 8 ch-3 loops)
Round 3 (first petal layer): In each ch-3 loop, work (sc, hdc, 3 dc, hdc, sc). Join to the first sc. (8 petals, 56 sts)
Round 4: Ch 1. Working behind the petals, bpsc around the next sc from Round 2, ch 5; rep from * around. Join to the first bpsc. (8 bpsc, 8 ch-5 loops)
Round 5 (second petal layer): In each ch-5 loop, work (sc, hdc, 5 dc, hdc, sc). Join. (8 petals, 72 sts)
Round 6: Ch 1. Working behind the petals, bpsc around the next bpsc from Round 4, ch 6; rep from * around. Join. (8 bpsc, 8 ch-6 loops)
Round 7 (third petal layer): In each ch-6 loop, work (sc, hdc, 7 dc, hdc, sc). Join. (8 petals, 88 sts) Fasten off Color A.
The three petal layers sit directly behind one another, so the rose stacks upward into a cupped, three-tier bloom.
Lace Frame (Color B)
Round 8: Join Color B with a bpsc around any bpsc from Round 6. Ch 7. Bpsc around the next Round 6 bpsc, ch 7; rep from * 6 more times. Join. (8 bpsc, 8 ch-7 loops)
Round 9 (squaring round): Sl st into the first ch-7 loop. Ch 3 (counts as dc). Work (2 dc, ch 3, 3 dc) in the same loop for the corner. Ch 2, work 4 dc in the next loop, ch 2. Work (3 dc, ch 3, 3 dc) in the next loop, ch 2, work 4 dc in the next loop, ch 2; rep from * 2 more times. Join to the top of the ch-3. (40 dc: 10 per side; 4 ch-3 corners; 8 ch-2 sps)
Round 10: Sl st in the next 2 dc and into the corner sp. Ch 3, then work (2 dc, ch 3, 3 dc) in the same sp. Ch 2, 3 dc in the next ch-2 sp, ch 2, skip 4 dc, 3 dc in the next ch-2 sp, ch 2, (3 dc, ch 3, 3 dc) in the corner sp; rep from * around, leaving out the last corner. Join. (48 dc: 12 per side; 4 ch-3 corners; 12 ch-2 sps)
Round 11: Sl st in the next 2 dc and into the corner sp. Ch 3, then work (2 dc, ch 3, 3 dc) in the same sp. Ch 2, (3 dc in the next ch-2 sp, ch 2) 3 times, (3 dc, ch 3, 3 dc) in the corner sp; rep from * around, leaving out the last corner. Join. (60 dc: 15 per side; 4 ch-3 corners; 16 ch-2 sps) Fasten off Color B.
The ch-2 spaces create the open lattice look of the pink frame.
Outline (Color A)
Round 12: Join Color A in any corner ch-3 sp. Ch 1, then work 3 sc in the same sp. Sc in each dc and 2 sc in each ch-2 sp to the next corner, 3 sc in the corner sp; rep from * around, leaving out the last corner. Join. Fasten off and weave in the ends.
Count: Each side has 15 sc worked into dc plus 8 sc worked into spaces, for 23 sts between corner groups. With 3 sc in each of the 4 corners, the total is 4 × 23 + 12 = 104 sts. Mark the center sc of each corner as the corner stitch. Each side measures 27 sts from corner stitch to corner stitch, including both corner stitches.
Make All Pieces
- Squares: 96 total. Each one uses Color A for Rounds 1–7 and 12, and Color B for Rounds 8–11. Each square uses about 13 g of Color A and 9 g of Color B.
- Tabs: 9 in Color A (see below).
Layout grid (R = rose square; 8 columns × 12 rows):
Row 1:  R R R R R R R R
Row 2:  R R R R R R R R
Row 3:  R R R R R R R R
Row 4:  R R R R R R R R
Row 5:  R R R R R R R R
Row 6:  R R R R R R R R
Row 7:  R R R R R R R R
Row 8:  R R R R R R R R
Row 9:  R R R R R R R R
Row 10: R R R R R R R R
Row 11: R R R R R R R R
Row 12: R R R R R R R R
Every square is identical, so you can place them in any order. Lay them all out once and check that the rose color looks even across the panel.
Joining
Method: Raised single-crochet seam in Color A. Hold two squares with wrong sides together and RS facing out. Sc through both loops of both squares. This makes the burgundy ridge on the front.
Stitch-to-stitch logic: Start in the corner stitch and end in the corner stitch. Each square edge takes 27 sc, matching its 27 sts exactly. Don’t add a chain or extra stitch at the seam between squares.
Order:
1. Join the horizontal seams first. Place Row 1 above Row 2 and join across all 8 squares in one continuous seam: 8 × 27 = 216 sc. Repeat for all 11 horizontal seams.
2. Next, join the vertical seams. Each one runs the full height: 12 × 27 = 324 sc. Where it crosses a horizontal seam, work over the ridge into the corner stitches. Repeat for all 7 vertical seams.
Tension: Keep the seams as relaxed as the square edges. Every 27 sts, check that the seam lies flat and is exactly as long as one square edge, 6 in (15.2 cm). If the seams pucker, go up to a 5.5 mm hook for joining only.
Size checkpoint: Before the border, the panel should measure 48 in × 72 in (121.9 cm × 182.9 cm).
Border
Border gauge: 4.5 sc per 1 in (2.5 cm), the same as the square edges. The border rounds are 4 rounds per 1 in (2.5 cm), so 3 rounds add about 0.75 in (1.9 cm).
Starting edge counts: The top and bottom each have 8 × 27 = 216 sts, and each long side has 12 × 27 = 324 sts. These counts include the panel’s corner stitches.
Round 1 (RS, Color A): Join in any st. Work 1 sc in each st around, and work 3 sc in each of the 4 panel corner stitches. Join.
– Top and bottom: 214 non-corner sts + 2 sc beside each corner + 2 corner centers = 218 sts per side
– Long sides: 322 + 2 + 2 = 326 sts per side
– Total: 2 × 214 + 2 × 322 + 4 × 3 = 1,084 sts
Round 2: Ch 1. Sc in each st, working 3 sc in each corner center st. Join.
– 220 sts per top and bottom side, 328 sts per long side
– Total: 1,092 sts
Round 3: Ch 1. Working left to right, rsc in each st around, with no corner increases. Join and fasten off. (1,092 sts)
Why the math works: Each square edge is 27 sts over 6 in (15.2 cm). The border is worked at the same 4.5 sts per 1 in (2.5 cm), so 216 sts sit flat over 48 in (121.9 cm) and 324 sts sit flat over 72 in (182.9 cm). The 3-sc corners add exactly the 2 sts per side per round that a turning corner needs. Crab stitch doesn’t increase, so the corners stay crisp.
Tabs (Make 9, Color A)
Ch 10. Sc in the 2nd ch from the hook and in each ch across. (9 sc) Ch 1 and turn. Work 1 sc in each st for each row until the tab measures 7 in (17.8 cm), about 30 rows. Fasten off, leaving a long tail. Each tab is 2 in (5.1 cm) wide.
Placement: Center one tab on each of the 7 vertical seams. Place the 2 remaining tabs flush with the outer corners. Fold each tab in half and stitch both ends to the back of the border. This makes a 3.5 in (8.9 cm) loop, which fits rods up to 1.5 in (3.8 cm) in diameter.
Final Blocking
- Block each square to 6 in × 6 in (15.2 cm × 15.2 cm) before joining. Pin the corners first.
- After the border is done, lay the panel flat on mats or a clean sheet on the floor.
- Mist the panel evenly until it’s damp, not soaked.
- Pin the panel to 49.5 in × 73.5 in (125.7 cm × 186.7 cm). Check that both diagonals are equal.
- Lift and shape each rose with your fingers so the petals stand up. Don’t press the roses flat.
- Let the panel dry completely, then hang it. Check the length again after 24 hours of hanging.
Final Quality-Control Checklist
- Every square has 104 sts on Round 12, 27 per side.
- All 96 squares measure 6 in (15.2 cm).
- Each rose has 3 petal layers, with 8 petals per layer.
- The seams lie flat, with the ridges facing the front.
- The pre-border panel measures 48 in × 72 in (121.9 cm × 182.9 cm).
- Border Round 2 has 220 / 328 sts per side.
- The corners are square, and the edges are straight and not wavy.
- All 9 tabs are the same length and sewn securely.
- All ends are woven in at least 1.25 in (3.2 cm).
Troubleshooting
The square cups toward the rose: Your bpsc rounds are too tight. Relax the chain loops on Rounds 4, 6 and 8, or add 1 extra ch to each loop on Round 8.
The square ruffles: Your lace rounds are too loose. Go down 0.5 mm for Rounds 9–11.
The petals flop: Use firmer cotton, or tighten the hdc and dc in the petal rounds.
The seams pucker: Join with a hook 0.5 mm larger, and check the 27-to-27 stitch match at every square.
The border waves: You’ve added extra sts. Count each side against 218 / 326 on Round 1.
The panel grows when hung: Re-block it, and give it a light spray of fabric starch on the lace areas.
The tabs stretch: Work the tabs with a 4.5 mm hook to make the fabric denser.
Care
Hand wash in cool water, or machine wash on a gentle cycle in a large laundry bag. Dry flat, and support the full weight of the panel while it’s wet so it doesn’t stretch.
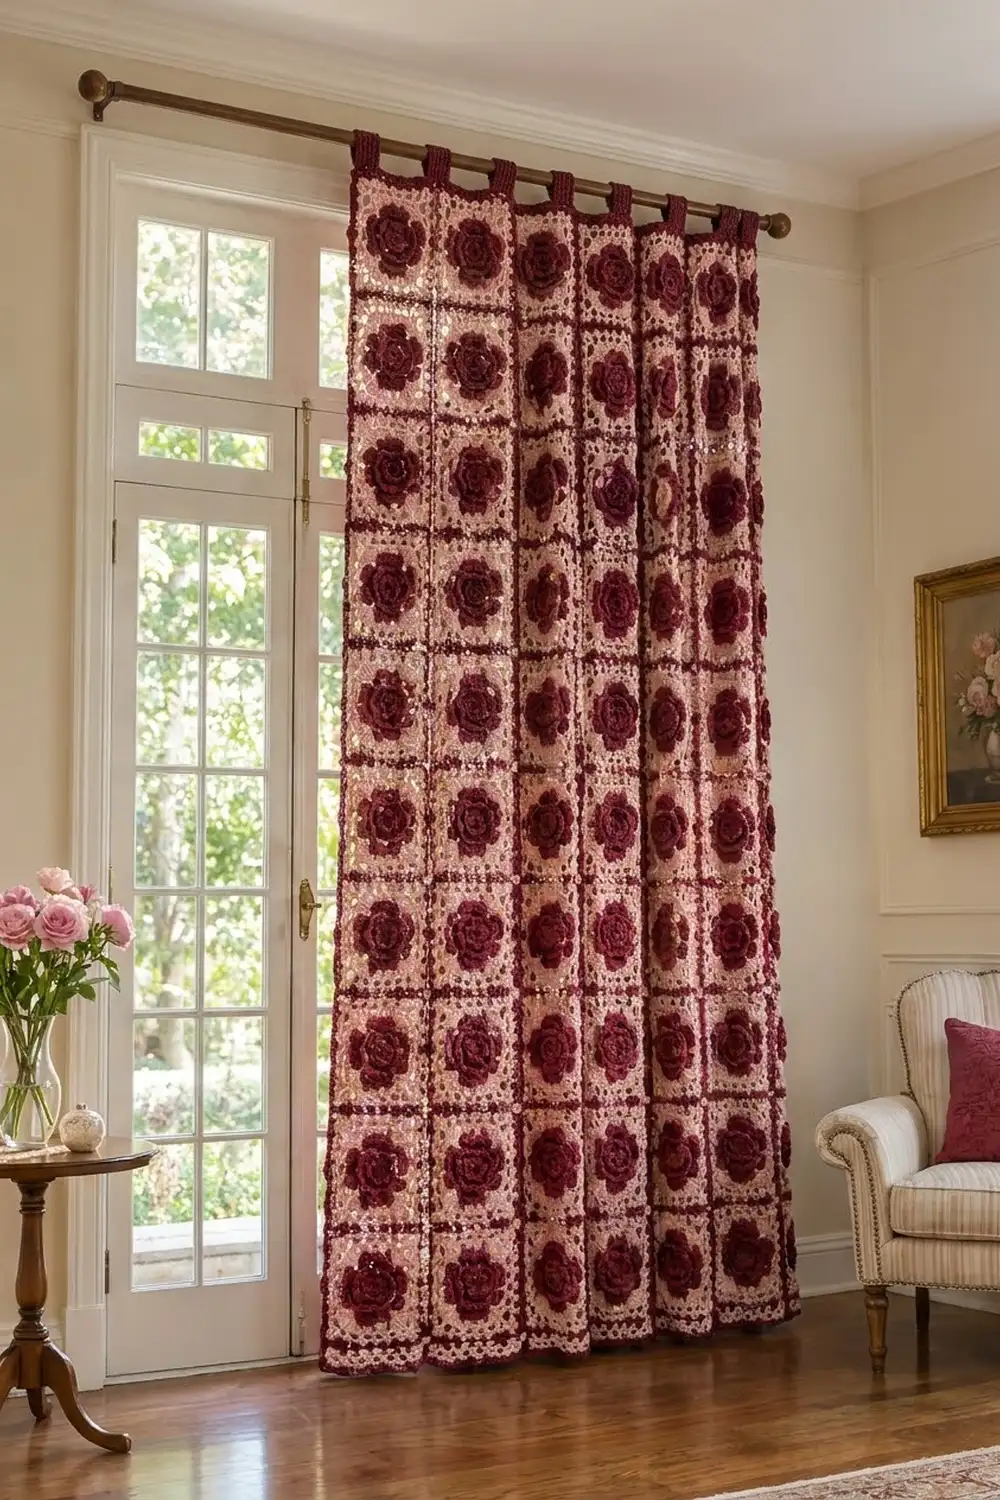
Final Notes
The measurement chain is short and reliable. One square is 27 sts and 6 in (15.2 cm) per side. Eight squares across give 216 sts and 48 in (121.9 cm), and twelve squares down give 324 sts and 72 in (182.9 cm). Three border rounds add 0.75 in (1.9 cm) per side, for a final size of 49.5 in × 73.5 in (125.7 cm × 186.7 cm). If the first square is right, everything after it lines up.
Happy crocheting!