

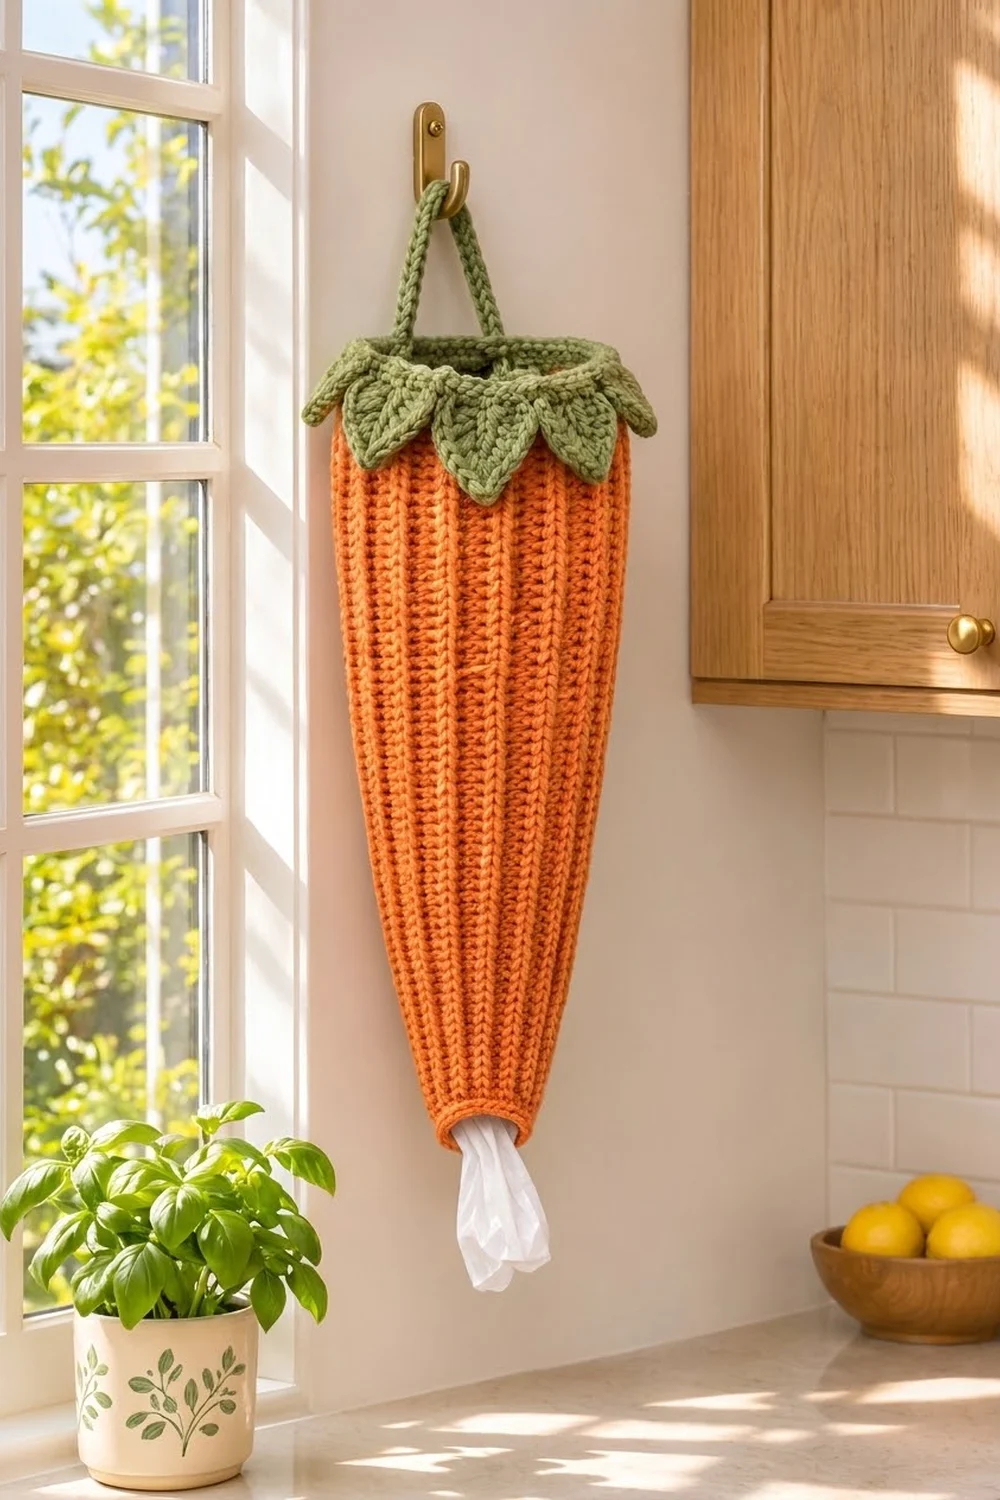
This cheerful carrot keeps plastic bags out of sight and close at hand. You push bags in through the wide leafy top and pull them out one at a time from the small opening at the bottom. It hangs flat against a wall or cabinet side and gives the kitchen a bit of garden color.
The body is warm carrot orange with raised front-post ribs that run the full length of the cone. The ribs get closer together toward the bottom, just like the lines on a real carrot. A sage-green collar finishes the top, and twelve pointed leaves fold down over the orange. A doubled green cord makes a sturdy hanging loop.
This pattern uses US crochet terms. The finished holder is about 18.5 in (47.0 cm) long, 6.9 in (17.5 cm) wide flat at the top, and 3.4 in (8.6 cm) wide flat at the bottom.
Construction overview: You work the body bottom-up in joined rounds, starting with a short sc cuff. Ribbed rounds then increase gradually to shape the cone. You change to green for the collar, then work the leaves into front loops left free inside the collar. Last, you chain the strap and attach it directly to the rim. It is one piece, so there is no sewing.
Finished Size and Construction
- Finished size: 18.5 in (47.0 cm) long × 6.9 in (17.5 cm) wide flat at the top
- Skill level: Easy+ (front post double crochet, working in front and back loops)
- Terminology: US
- Yarn weight: Worsted (#4)
- Hook: 5.0 mm (US H-8)
- Number of pieces: 1
- Layout: Single tapered tube, no assembly
- Piece size: 17.5 in (44.5 cm) body length, 3.4 in (8.6 cm) to 6.9 in (17.5 cm) wide flat
- Size before border: 17.5 in (44.5 cm) long × 6.9 in (17.5 cm) wide at the top
- Border (leaf collar) depth: 1 in (2.5 cm) collar band; leaves hang about 1.25 in (3.2 cm)
Materials
Use a smooth worsted-weight yarn so the ribs show clearly. Acrylic is light and easy to wipe clean. Cotton or a cotton blend gives a firmer, more structured cone. Avoid fuzzy or very splitty yarns, which hide the post stitches.
- Orange (body): 65 g / 110 m
- Sage green (collar, leaves, strap): 20 g / 35 m
- 5.0 mm (US H-8) crochet hook
- 4 stitch markers (one locking marker for the start of round)
- Tapestry needle
- Scissors
- Measuring tape
- Rust-proof pins and a rolled towel for blocking
The quantities include a margin of about 15% for gauge swatching and small differences in tension.
Abbreviations (US Terms)
- ch – chain
- sl st – slip stitch
- sc – single crochet
- hdc – half double crochet
- dc – double crochet
- tr – treble crochet
- BLO – back loop only
- FL – front loop
- st(s) – stitch(es)
- rnd(s) – round(s)
- fpdc – front post double crochet
Special stitch – fpdc: Yarn over and insert the hook from front to back to front around the post of the stitch below. Yarn over, pull up a loop, then (yarn over, pull through 2 loops) twice. The fpdc sits forward and forms the raised rib.
Picot tip: Ch 3, then sl st in the 3rd ch from the hook.
Gauge and Checkpoints
Rib pattern gauge: 14 sts and 8 rnds = 4 in (10.2 cm) in alternating fpdc/dc rounds.
Sc gauge (cuff and collar): 14 sc and 16 rnds = 4 in (10.2 cm).
The body works as its own gauge swatch, so start with Rnds 1–8 and check them before going further.
Checkpoints: measure height from the base of Rnd 3, laying the tube flat without stretching it.
| After Rnd | Sts | Height from Rnd 3 | Flat width |
|---|---|---|---|
| 8 | 24 | 3 in (7.6 cm) | 3.4 in (8.6 cm) |
| 15 | 30 | 6.5 in (16.5 cm) | 4.3 in (10.9 cm) |
| 22 | 36 | 10 in (25.4 cm) | 5.1 in (13.0 cm) |
| 29 | 42 | 13.5 in (34.3 cm) | 6.0 in (15.2 cm) |
| 36 | 48 | 17 in (43.2 cm) | 6.9 in (17.5 cm) |
Adding the 0.5 in (1.3 cm) cuff gives a body length of 17.5 in (44.5 cm).
If your piece is too big: go down one hook size (4.5 mm / US 7) and start again.
If your piece is too small: go up one hook size (5.5 mm / US I-9).
If only the height is off: add or remove plain pattern rounds in Rnds 31–36 rather than changing the hook.
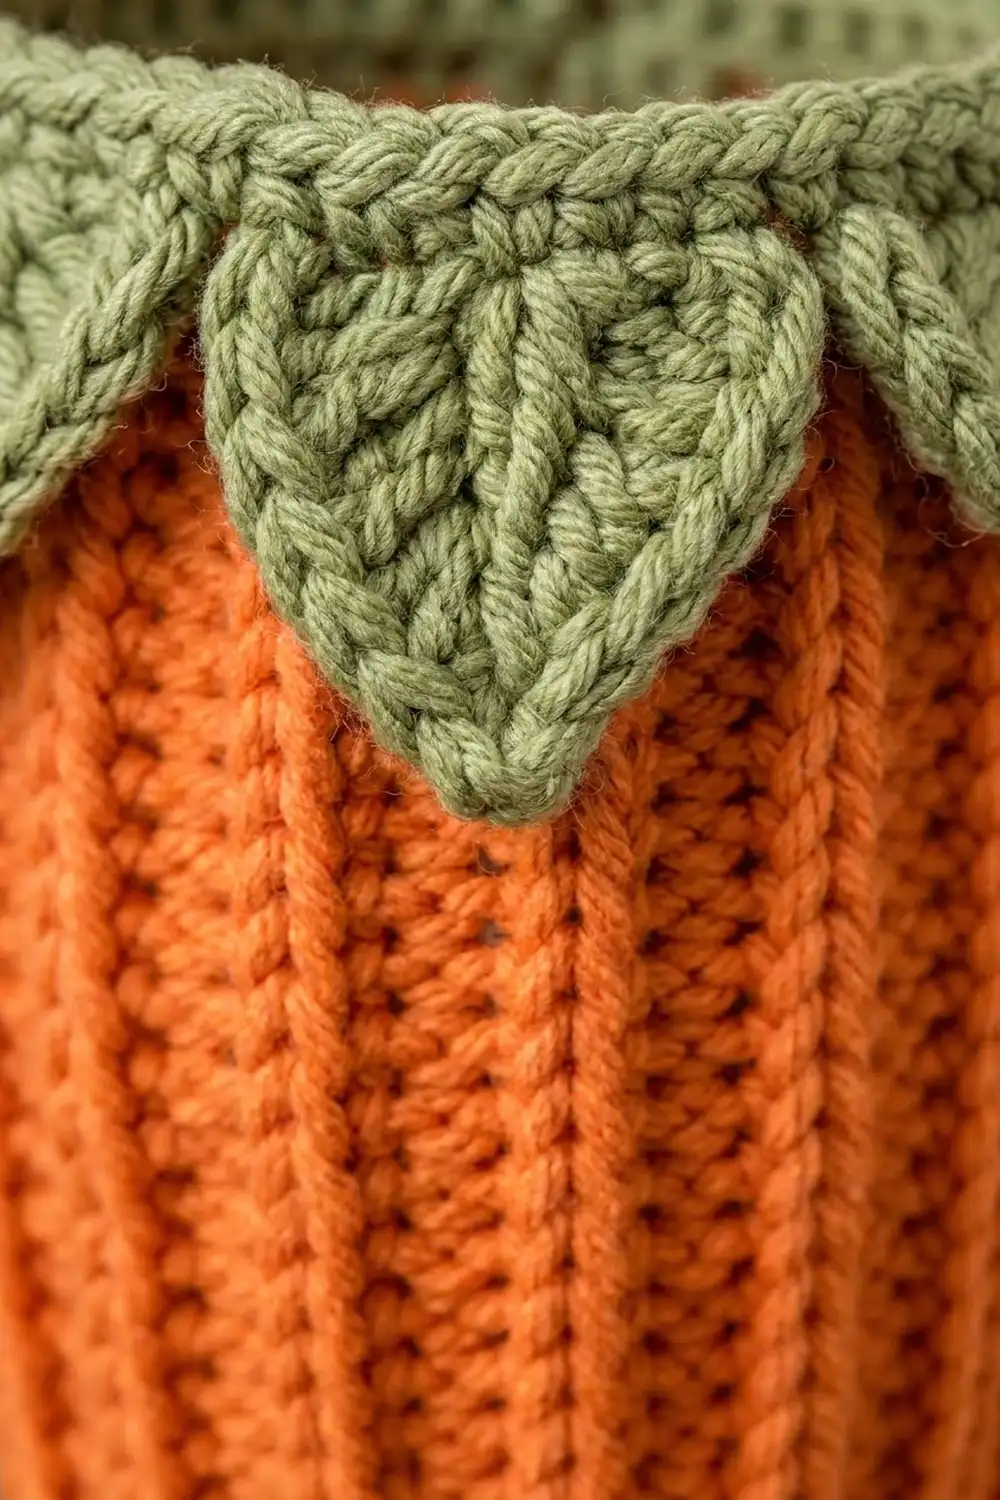
Body (Orange)
Work in joined rounds without turning. The ch 1 or ch 2 at the start of a round never counts as a stitch. Join each round with a sl st to the first stitch, and move the start-of-round marker up as you go.
Bottom Cuff
Foundation: With orange, ch 24 and join with a sl st to the first ch to form a ring. Take care not to twist the chain.
Rnd 1: Ch 1, sc in each ch around, join. (24 sc)
Rnd 2: Ch 1, sc in each st around, join. (24 sc)
The cuff is now about 0.5 in (1.3 cm) tall. It forms the firm dispensing rim at the bottom.
Rib Setup
Rnd 3: Ch 2, dc in each st around, join. (24 dc)
Rnd 4: Ch 2, fpdc around next st, dc in next st; repeat from * around, join. (24 sts: 12 fpdc, 12 dc)*
Rnds 5–8: Ch 2, fpdc around next fpdc, dc in next dc; repeat from * around, join. (24 sts)*
Twelve raised ribs are now set up. They continue all the way to the top. Check the first row of the table: 3 in (7.6 cm) tall from Rnd 3 and 3.4 in (8.6 cm) wide flat.
Shaping the Cone
From here on, every fpdc is worked around the fpdc below it, and every dc goes into a dc. The increases only happen in the dc panels between ribs, so the ribs stay straight and spread apart gradually.
Rnd 9 (increase): Ch 2, fpdc, 2 dc in next dc, fpdc, dc in next dc; repeat from * 5 more times, join. (30 sts)*
Each repeat uses 4 sts and makes 5 sts: 6 × 5 = 30.
Rnds 10–15: Ch 2, work fpdc around each fpdc and dc in each dc, join. (30 sts)
Rnd 16 (increase): Ch 2, fpdc, dc in next 2 dc, fpdc, 2 dc in next dc; repeat from * 5 more times, join. (36 sts)*
Each repeat uses 5 sts and makes 6 sts: 6 × 6 = 36. Every panel now has 2 dc.
Rnds 17–22: Ch 2, work fpdc around each fpdc and dc in each dc, join. (36 sts)
Rnd 23 (increase): Ch 2, fpdc, dc in next dc, 2 dc in next dc, fpdc, dc in next 2 dc; repeat from * 5 more times, join. (42 sts)*
Each repeat uses 6 sts and makes 7 sts: 6 × 7 = 42.
Rnds 24–29: Ch 2, work fpdc around each fpdc and dc in each dc, join. (42 sts)
Rnd 30 (increase): Ch 2, fpdc, dc in next 3 dc, fpdc, dc in next dc, 2 dc in next dc; repeat from * 5 more times, join. (48 sts)*
Each repeat uses 7 sts and makes 8 sts: 6 × 8 = 48. Every panel now has 3 dc.
Rnds 31–36: Ch 2, work fpdc around each fpdc and dc in each dc, join. (48 sts: 12 fpdc, 36 dc)
Fasten off the orange. The body should measure 17 in (43.2 cm) from the base of Rnd 3, and 17.5 in (44.5 cm) including the cuff. Lay it flat and check that it is 6.9 in (17.5 cm) across the top, which is a circumference of 13.7 in (34.8 cm).
Border: Leaf Collar and Strap (Green)
Border gauge: 14 sc and 16 rnds = 4 in (10.2 cm), so each sc round adds 0.25 in (0.6 cm).
When the tube is flattened, each “side” is one face of the holder: 24 sts on the front and 24 sts on the back.
Collar Band
Rnd 37: Join green in any st of Rnd 36. Ch 1, sc in each st around, join. (48 sc: 24 per side)
Rnd 38: Ch 1, sc in BLO of each st around, join. (48 sc: 24 per side)
This leaves the front loops of Rnd 37 free for the leaves.
Rnds 39–40: Ch 1, sc in each st around, join. (48 sc: 24 per side)
Fasten off. The band is 4 rnds, or 1 in (2.5 cm), and rolls slightly outward like the top of a carrot.
Leaves
Hold the holder with the top facing you. Each leaf is worked across 4 free front loops of Rnd 37.
Leaf round: Join green with a sl st in any free FL of Rnd 37. This counts as FL 1 of the first leaf. Then work the leaf as follows:
- (hdc, dc, tr) in the next FL (FL 2)
- picot tip
- (tr, dc, hdc) in the next FL (FL 3)
- sl st in the next FL (FL 4)
For the remaining leaves, sl st in the next FL, (hdc, dc, tr) in the next FL, picot tip, (tr, dc, hdc) in the next FL, sl st in the next FL; repeat from * 10 more times. Join to the first sl st and fasten off. (12 leaves: 6 per side)*
The two tr stitches sit side by side under the picot. They form the pointed tip and a center line that reads as the leaf’s vein. Fold all the leaves down so they lie over the top of the orange body. Each leaf hangs about 1.25 in (3.2 cm).
Hanging Strap
Flatten the holder so that 24 sts of Rnd 40 sit on each side. Mark st 1 and st 25, which are directly opposite each other at the two side folds.
Strap: Join green with a sl st in st 1 of Rnd 40. Ch 45, then sl st in st 25. Sl st in the back bump of each of the 45 ch back to st 1, then sl st in st 1. (45 ch + 45 sl sts)
This makes a doubled cord about 15 in (38.1 cm) long that won’t stretch. Fasten off and weave in the ends.
Why the Math Works
The collar keeps the body’s 48 sts, so the green fits the orange exactly with no ruffling or pulling in. 48 front loops ÷ 4 loops per leaf = 12 leaves, with no leftover stitches. Because 24 sts sit on each face, 6 leaves land on the front and 6 on the back. Attaching the strap at sts 1 and 25 puts its ends exactly 24 sts apart, so the holder hangs balanced. The finished length is the 17.5 in (44.5 cm) body plus the 1 in (2.5 cm) collar, for a total of 18.5 in (47.0 cm).
Final Blocking
- Weave in all the ends along the inside of the tube, following the direction of the ribs.
- Roll a towel into a cone and slide it inside so the body is filled but not stretched.
- Mist the piece lightly with water, or hover a steam iron over it without touching. Do not press acrylic directly.
- Smooth the ribs so they run straight down the cone.
- Fold the leaves down and pin each picot tip to the towel so the points lie flat.
- Check that the piece is 18.5 in (47.0 cm) long and 6.9 in (17.5 cm) wide at the top, and that the bottom cuff is round.
- Let it dry completely before removing the pins and the towel.
Final Quality-Control Checklist
- Twelve fpdc ribs run from the cuff to the collar without breaking
- Stitch counts were 24, 30, 36, 42 and 48 at the end of each section
- The body measures 17.5 in (44.5 cm) including the cuff
- The collar has 48 sts with no gaps where you changed color
- There are 12 leaves, all with pointed tips and evenly spaced
- The strap is attached at two opposite points and the holder hangs straight
- The bottom opening lets one bag through but holds the rest
Troubleshooting
The ribs spiral or lean. You probably worked an fpdc around a dc. Recount each repeat against the table and make sure every fpdc is worked around an fpdc.
The cone flares at the increase rounds. Your tension is loose on the 2-dc stitches. Keep those stitches as snug as the rest.
Bags fall out of the bottom. Work Rnd 1 with a 4.5 mm hook, or add one more sc round to the cuff.
The collar ruffles. Your sc is looser than your dc. Work the collar rounds with a 4.5 mm hook.
The leaves curl upward. Block them pinned flat. You can also tack each leaf tip down with a single stitch of green yarn.
The strap stretches. Make sure you worked the return sl sts into the back bumps of the chain, which locks the cord in place.
Care
Hand wash in cool water, reshape over a rolled towel, and dry flat. Acrylic versions can go in the machine on a gentle cycle inside a mesh bag.
Final Notes
The measurement chain is simple:
- Gauge: 14 sts and 8 rnds = 4 in (10.2 cm)
- Bottom: 24 sts = 3.4 in (8.6 cm) wide flat
- Shaping: four 6-stitch increases bring the body to 48 sts and 6.9 in (17.5 cm) wide
- Body: 34 rib rounds = 17 in (43.2 cm), plus the cuff = 17.5 in (44.5 cm)
- Collar: 1 in (2.5 cm), for a finished length of 18.5 in (47.0 cm)
- Leaves: 48 loops ÷ 4 = 12 leaves
If you check each measurement as you go, the carrot will finish at the right size and hang neatly on its hook.
Happy crocheting!