

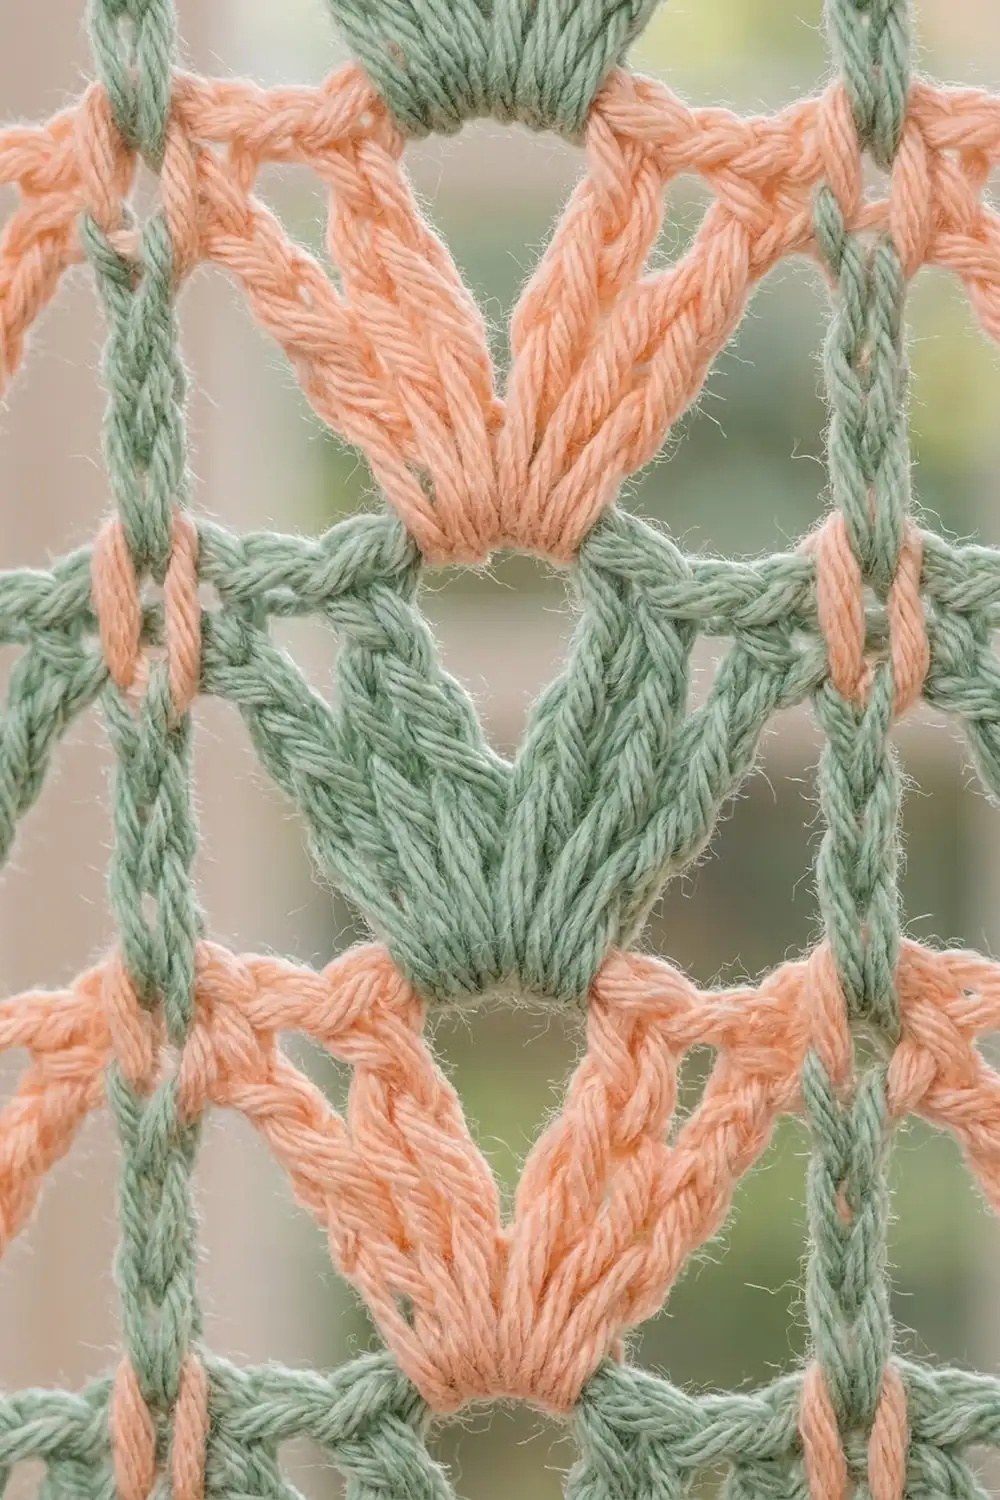
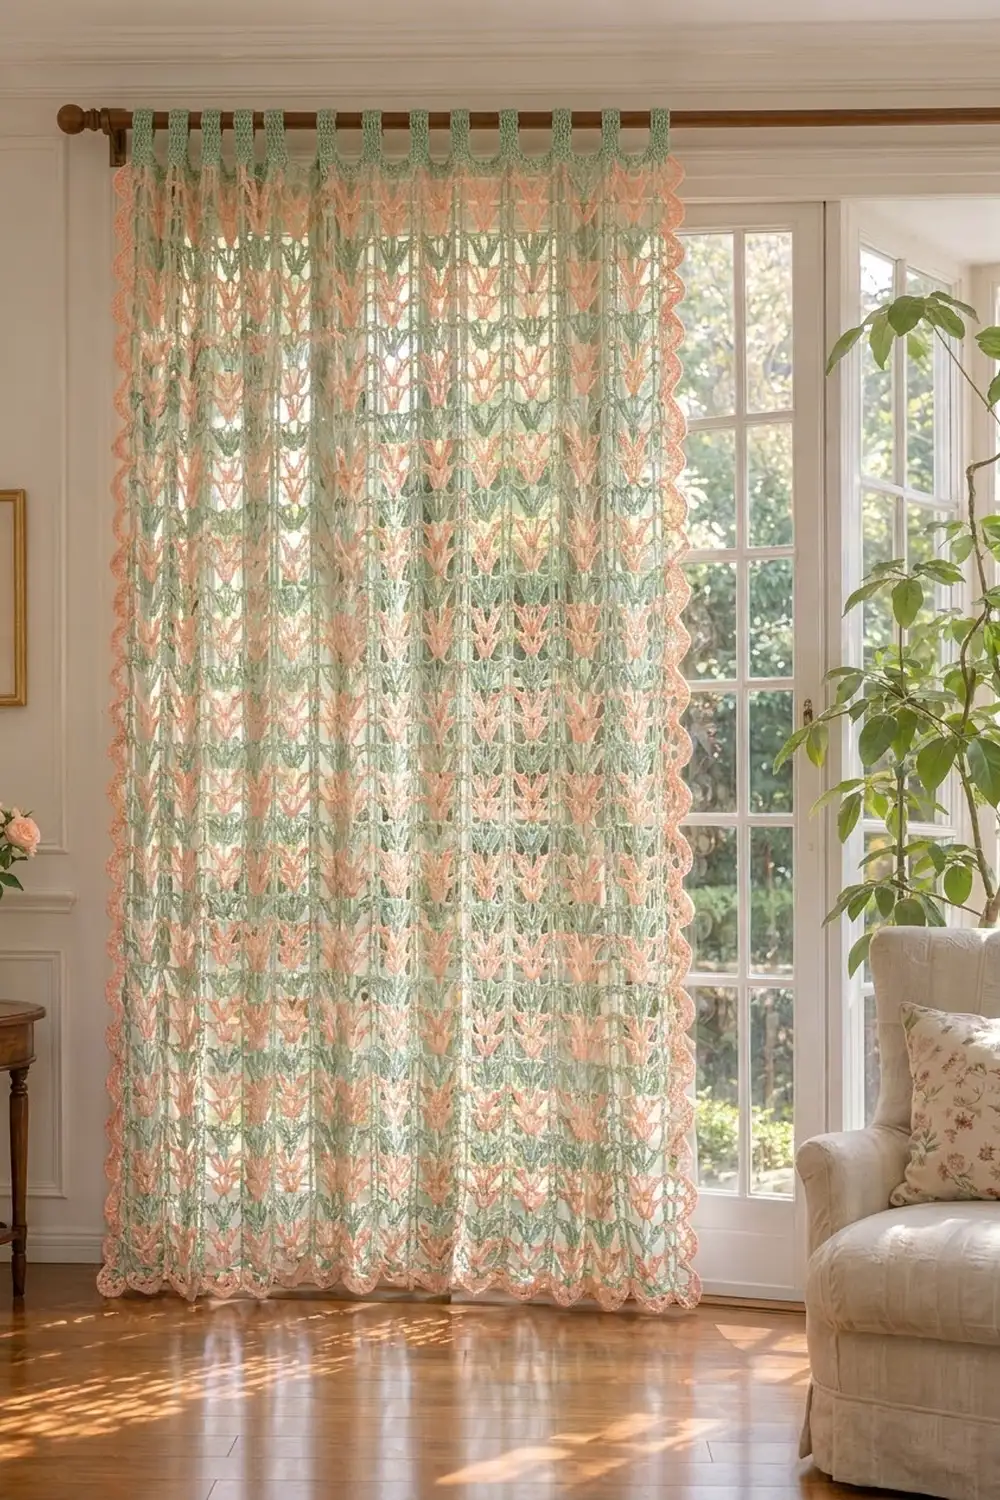
This tab-top curtain panel is made from rows of small V-shaped fans that stack into neat vertical columns. Each fan looks like a tiny tulip opening upward, and tall single posts between the columns give the fabric an airy lattice that lets daylight through.
Sage green and soft peach alternate every row, which makes horizontal stripes of green and peach tulips. A peach scalloped edge runs down both long sides and across the hem. Sage-green tabs along the top loop over a standard curtain rod.
The pattern uses US crochet terms. The finished panel measures 48 in (121.9 cm) wide and 75.5 in (191.8 cm) long from the top edge to the hem, or 78.5 in (199.4 cm) to the top of the tab loops.
The panel is one piece. You work it from the bottom up in right-side rows and fasten off at the end of each row, so the color changes stay clean. A single crochet row then finishes the top edge. Next you work nine tabs straight onto that top row, and finally you add a two-row peach border around the sides and bottom.
Finished Size and Construction
- Finished size: 48 × 75.5 in (121.9 × 191.8 cm); 78.5 in (199.4 cm) including tab loops
- Skill level: Easy (simple repeat; the large size is the main challenge)
- Terminology: US
- Yarn weight: DK (#3) cotton or cotton blend
- Hook: 4.0 mm (G-6)
- Number of pieces: 1 panel, with 9 tabs worked directly onto it
- Layout: 23 tulip columns across, 74 fan rows high
- Size before border: 46 × 74.5 in (116.8 × 189.2 cm)
- Border depth: 1 in (2.5 cm) on both long sides and the bottom; the top edge has the tabs instead of a border
Materials
Yarn: Use a smooth, mercerized DK cotton or a cotton-linen blend. Cotton hangs straight, keeps its shape in sunlight, and shows the tulip fans clearly. Avoid fuzzy yarns, which blur the lattice.
- Color A (sage green): 350 g / 770 m (about 7 × 50 g balls of 110 m each). Used for odd fan rows, the foundation, the top row, and the tabs.
- Color B (peach): 350 g / 770 m (about 7 × 50 g balls of 110 m each). Used for even fan rows and the border.
The quantities include a margin of about 25%, which covers your gauge swatch, the long tails from row-by-row color changes, and normal tension differences.
Tools:
– 4.0 mm (G-6) crochet hook
– Tapestry needle
– Scissors
– Locking stitch markers (at least 20)
– Measuring tape
– Rust-proof pins and a large blocking surface, such as foam mats or a clean carpet covered with a sheet
Abbreviations (US Terms)
- ch: chain
- sl st: slip stitch
- sc: single crochet
- tr: treble crochet (yarn over twice, insert hook, pull up a loop, then [yarn over, pull through 2 loops] 3 times)
- sp: space
- st(s): stitch(es)
- RS / WS: right side / wrong side
- rep: repeat
Special stitches:
– V-fan: (2 tr, ch 2, 2 tr) all in the same stitch or space. This makes the tulip shape.
– Scallop: 5 tr in the same stitch.
– Corner scallop: 7 tr in the same stitch.
Gauge and Checkpoints
Gauge (after blocking): 2 pattern repeats measured post to post = 4 in (10.2 cm) wide. 4 fan rows = 4 in (10.2 cm) tall. Each repeat starts from 8 foundation chains, which works out to 4 foundation stitches per inch (2.5 cm).
Test swatch first. With A, ch 34. Work Row 1 (33 sc), then work 8 fan rows following the pattern below. You will have 4 V-fans and 5 posts per row. Block the swatch, then measure:
– Post to post across 4 repeats: 8 in (20.3 cm)
– Height of the 8 fan rows: 8 in (20.3 cm)
If your swatch is too big, go down to a 3.75 mm hook. Being off by just 0.25 in (0.6 cm) per repeat adds 5.75 in (14.6 cm) across the full panel. If it is too small, go up to a 4.5 mm hook.
If only the row height is off, keep your hook and change the number of fan rows instead. Always add or remove fan rows in pairs, which keeps the color sequence and the border math working (see the Border section).
Measurement checkpoints for the panel (height includes Row 1):
– After Row 1: 46 in (116.8 cm) wide
– After Row 21 (20 fan rows): 20.25 in (51.4 cm) tall
– After Row 41 (40 fan rows): 40.25 in (102.2 cm) tall
– After Row 61 (60 fan rows): 60.25 in (153.0 cm) tall
– After Row 76: 74.5 in (189.2 cm) tall
Measure lying flat, without stretching. Lace will grow slightly when it is blocked and hung.
Panel
Unless a row says otherwise, work every row with the RS facing, from right to left. Fasten off at the end of each row and leave 6 in (15.2 cm) tails. The border covers those tails later.
Foundation: With A, ch 186.
Row 1 (RS): Sc in 2nd ch from hook and in each ch across. Fasten off. (185 sc)
Row 2 (RS, B): With RS facing, join B with a sl st in the first sc at the right-hand edge. Ch 4 (counts as tr here and throughout). Ch 1, skip 3 sc, V-fan in next sc, ch 1, skip 3 sc, tr in next sc. Rep from * 22 more times; the last tr goes in the last sc. Fasten off.
(23 V-fans and 24 posts, which is 116 tr including the beginning ch-4; also 46 ch-1 sps and 23 ch-2 sps)*
The posts sit in sc 1, 9, 17 … 185, and the fans sit in sc 5, 13 … 181. Each repeat uses exactly 8 sc: 23 × 8 + 1 = 185.
Row 3 (RS, A): Join A with a sl st in the 4th ch of the beginning ch-4 at the right-hand edge. Ch 4. Ch 1, skip the next ch-1 sp and 2 tr, V-fan in the ch-2 sp of the next fan, ch 1, skip 2 tr and the ch-1 sp, tr in the next post. Rep from * 22 more times; the last tr goes in the last tr. Fasten off.
(23 V-fans and 24 posts, the same as Row 2)*
Each new fan sits directly in the center of the fan below it, so the tulips build straight vertical columns. The posts also stack, which makes the long vertical lines of the lattice.
Rows 4–75: Rep Row 3. Use B for every even row and A for every odd row. Every row keeps 23 V-fans and 24 posts. You will have 74 fan rows in total (Rows 2–75): 37 in B and 37 in A. Do not fasten off at the end of Row 75.
Row 76 (WS, A): Turn. Ch 1, sc in first tr. Sc in next ch-1 sp, sc in each of next 2 tr, sc in ch-2 sp, sc in each of next 2 tr, sc in next ch-1 sp, sc in next post. Rep from * 22 more times; the last sc goes in the 4th ch of the beginning ch-4. Fasten off.
(185 sc: 8 per repeat × 23 + 1)*
Checkpoint: 46 × 74.5 in (116.8 × 189.2 cm).
Tabs
Lay the panel RS up with Row 76 at the top. Counting from the right-hand edge, place markers on the first and last stitch of each tab:
sts 1–9, 23–31, 45–53, 67–75, 89–97, 111–119, 133–141, 155–163, 177–185.
That gives 9 tabs of 9 sts each, about 2.25 in (5.7 cm) wide, with 8 gaps of 13 sts, about 3.25 in (8.3 cm) wide. Check: 9 × 9 + 8 × 13 = 185.
Each tab:
– Row 1: With RS facing, join A in the first marked st. Ch 1, sc in same st and in each of next 8 sts. (9 sc)
– Rows 2–24: Ch 1, turn, sc in each sc across. (9 sc)
Fasten off and leave a 12 in (30.5 cm) tail. The tab is about 6 in (15.2 cm) long.
Fold each tab to the WS and whipstitch its last row across the back of the same 9 sts at its base. This makes a 3 in (7.6 cm) loop that fits a rod up to 1.5 in (3.8 cm) in diameter.
Border
Border gauge: Border Row 1 places 3 sc around each fan-row end post, which is 3 sc per 1 in (2.5 cm), and 1 sc in each sc-row end. Along the bottom it places 1 sc in each foundation loop, which is 4 sc per 1 in (2.5 cm). The posts at the side edges are open lattice, so 3 sc per row lies flat there without flaring.
Border Row 1 (RS, B): With RS facing, join B in the end of Row 76 at the top right corner. Ch 1, then work:
- Right side: Sc in the end of Row 76, 3 sc around the end post of each fan row (Rows 75 down to 2, 222 sc), and sc in the end of Row 1. (224 sc. In this pattern, the side count is row-end stitches only, and the corner groups are counted separately.)
- Corner: 3 sc in the corner foundation loop.
- Bottom: Sc in each of the next 183 foundation loops. (183 sc)
- Corner: 3 sc in the last foundation loop.
- Left side: Sc in the end of Row 1, 3 sc around each fan-row end post (Rows 2–75), and sc in the end of Row 76. (224 sc)
Total: 224 + 3 + 183 + 3 + 224 = 637 sc. While you work, enclose the row tails under these stitches.
Border Row 2 (WS, B): Ch 1, turn, sc in first sc.
- Side: Skip 2 sc, scallop in next sc, skip 2 sc, sc in next sc. Rep from * 36 more times. (37 scallops)*
- Corner: Skip the last side sc and the first corner sc, then work a corner scallop in the center corner sc. Skip the 3rd corner sc and the first bottom sc, then sc in the next sc.
- Bottom: Rep from * 30 times. (30 scallops) Skip the last bottom sc and the first corner sc, corner scallop in the center corner sc, skip the 3rd corner sc and the first side sc, sc in the next sc.
- Side: Rep from * 37 times. The last sc lands in the final sc. Fasten off.
Totals: 106 scallops (37 + 30 + 37 + 2 corners) and 107 sc.
Why the math works:
– Each scallop repeat uses 6 sts. On each side, 1 sc + 37 × 6 = 223, so skipping st 224 and the first corner sc puts the corner scallop exactly on the center corner sc.
– On the bottom, the 183 sts are made up of 1 skipped + 1 sc + 30 × 6 + 1 skipped.
– Each fan row adds 3 border sts, so a pair of rows adds 6, which is exactly one scallop. That is why you change the length in pairs.
Border depth: about 0.25 in (0.6 cm) of sc plus 0.75 in (1.9 cm) of scallops, which is 1 in (2.5 cm). Final size: 46 + 1 + 1 = 48 in (121.9 cm) wide and 74.5 + 1 = 75.5 in (191.8 cm) long.
Final Blocking
- Weave in all remaining tails along the posts in the matching color.
- Soak the panel in cool water with a little wool wash for 15 minutes. Press the water out gently; do not wring.
- Roll the panel in large towels to remove extra water.
- Lay it flat RS up and pin the width to 48 in (121.9 cm) and the length to 75.5 in (191.8 cm).
- Line up the posts so every tulip column is vertical, and check with a measuring tape every 12 in (30.5 cm).
- Pin out each scallop as a rounded point, and pin each corner scallop as a fan.
- Lay the tabs flat above the top edge. Let everything dry completely.
- Hang the panel for a day before trimming the rod height. Cotton lace may relax by up to 0.5 in (1.3 cm).
Final Quality-Control Checklist
- Every fan row has 23 V-fans and 24 posts.
- The colors alternate peach and green with no repeats.
- The tulip columns are straight from hem to top.
- Row 76 has 185 sc, and the 9 tabs are evenly spaced.
- Border Row 1 has 224 sc on each side and 183 on the bottom.
- There are 106 scallops, and the corner scallops are centered.
- The panel measures 48 × 75.5 in (121.9 × 191.8 cm).
- All tails are secured and invisible from the RS.
Troubleshooting
- The columns drift sideways: You probably worked a fan in a ch-1 sp instead of the ch-2 sp. Every fan must go in the center of the fan below.
- The panel narrows as you go: The posts are pulling tight. Make the ch-1 sps looser, or go up half a hook size for the posts only.
- The side edges ripple: Tighten your border sc. If the edges still ripple, block them more firmly; do not change the stitch count.
- The side edges pull in: Your border sc are too tight. Work Border Row 1 with a hook one size larger.
- A corner scallop is off-center: Recount the side. It must have exactly 224 sc.
- A tab tilts: Re-sew it so its last row lines up exactly with its 9 base sts.
Care
Hand wash in cool water, or machine wash in a mesh bag on a delicate cycle. Then reshape and dry flat. To keep the panel at length, don’t tumble dry and don’t hang it while wet.
Final Notes
Here is the full measurement chain: a 4 in (10.2 cm) gauge for 2 repeats gives a 46 in (116.8 cm) panel, and 74 fan rows plus 2 sc rows give 74.5 in (189.2 cm). The 1 in (2.5 cm) border brings it to 48 × 75.5 in (121.9 × 191.8 cm), and the tab loops add 3 in (7.6 cm). If you check your size at each checkpoint, the scallops will meet the corners exactly.
Happy crocheting!