

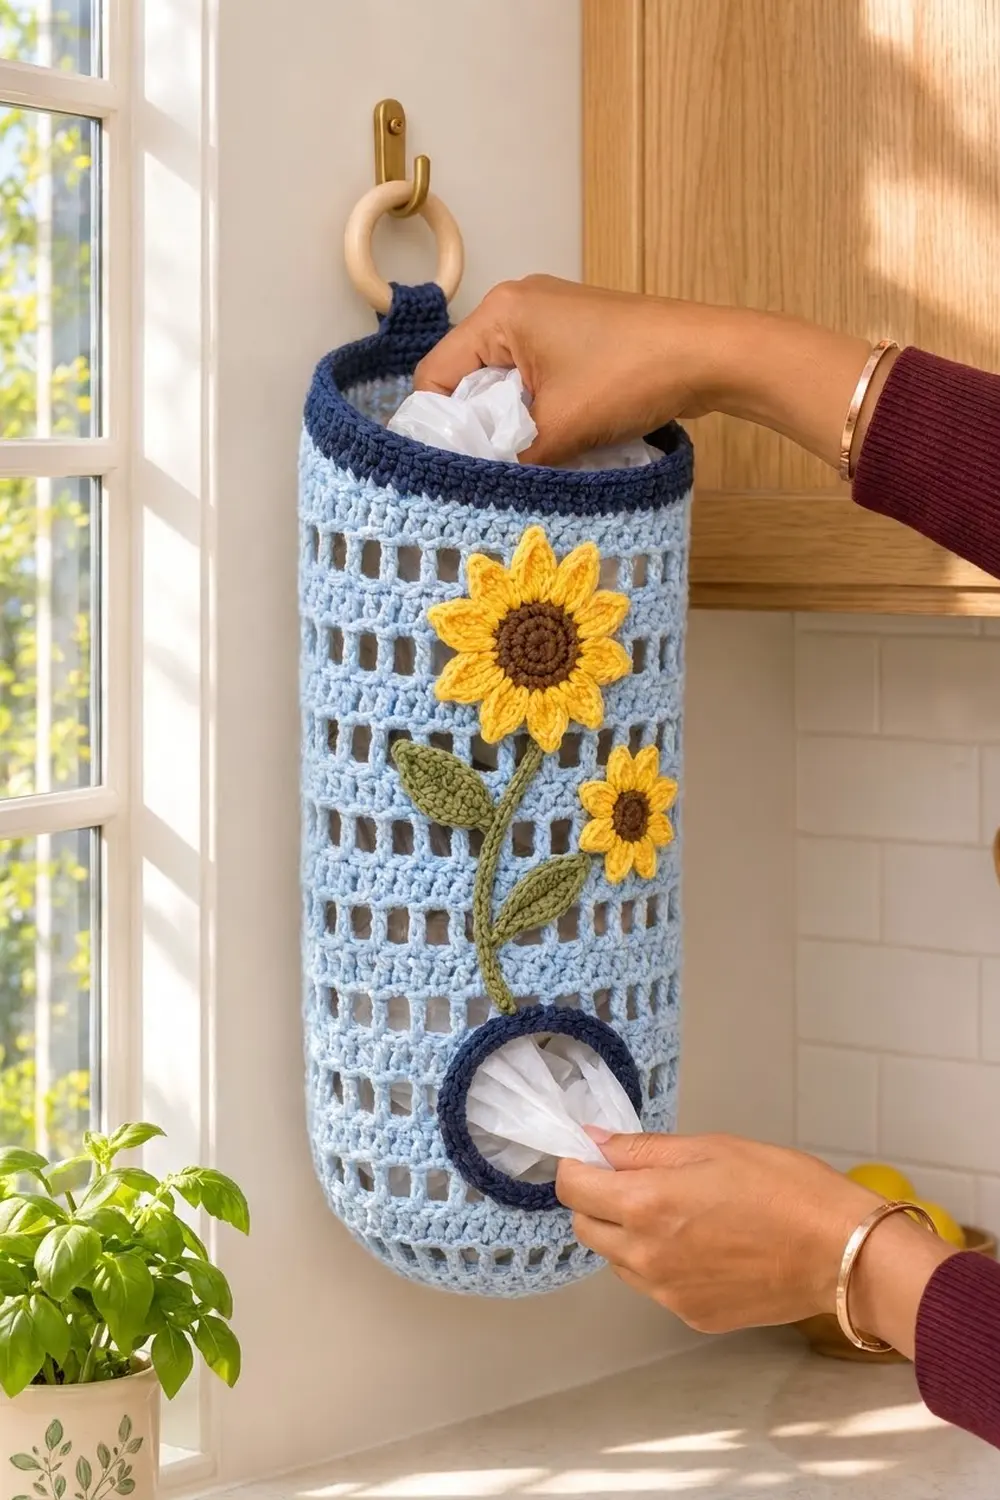
The Sunny Sill Bag Holder is a tall, soft-blue tube that hangs by a navy tab from a wooden ring and keeps grocery bags tidy. You push bags in through the top and pull them out one at a time through a round, navy-trimmed opening near the bottom.
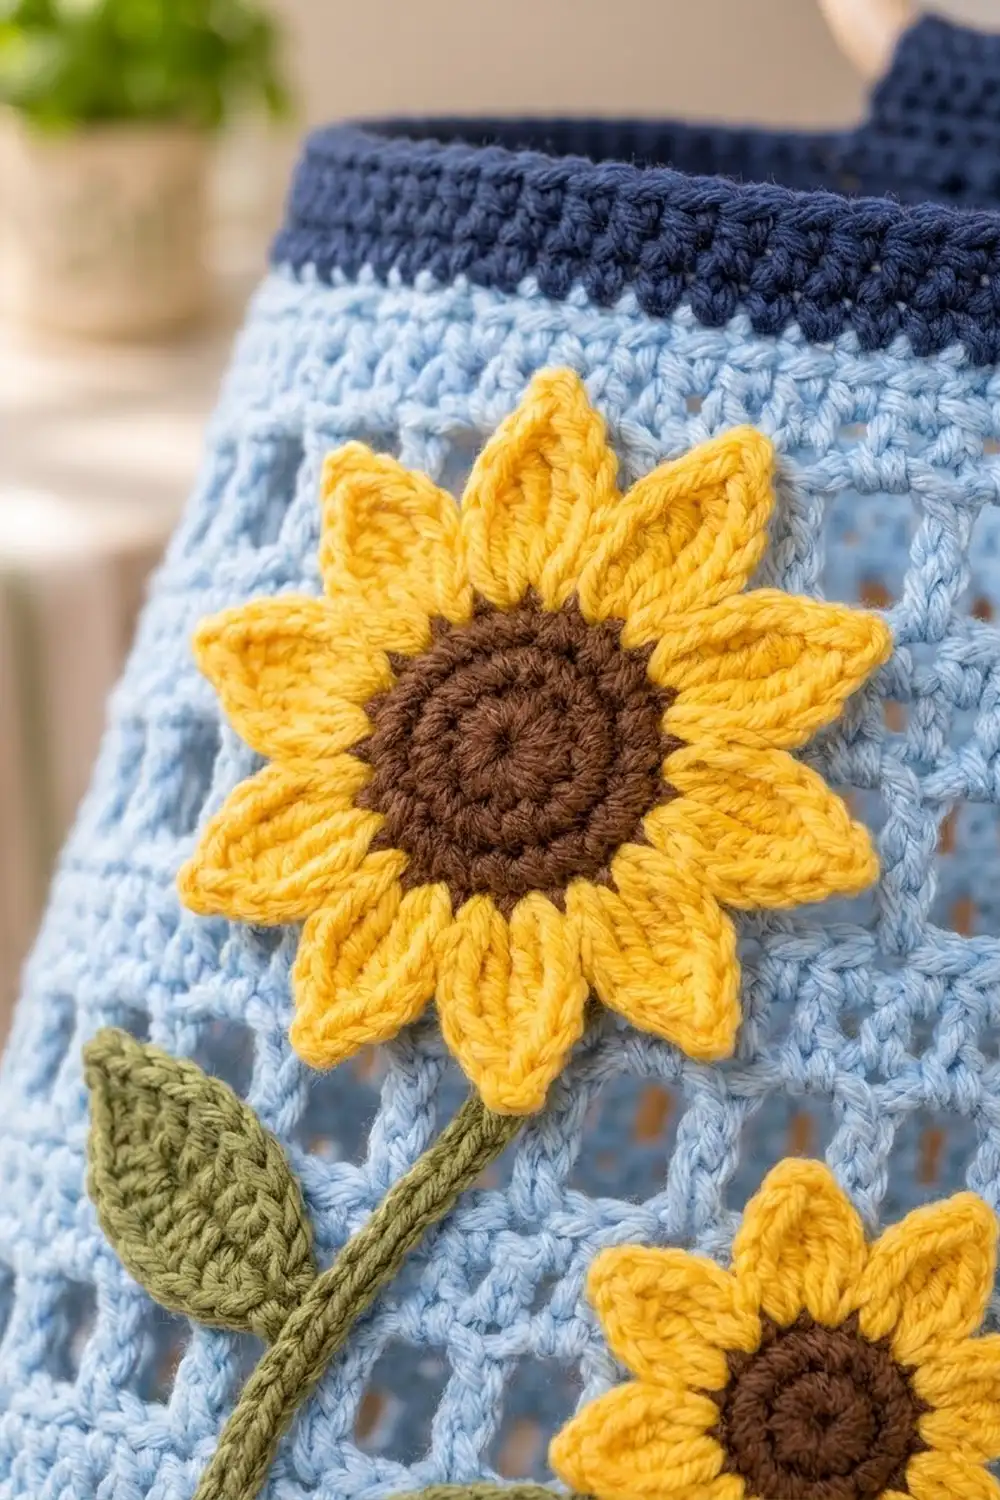
The body alternates single rounds of open filet mesh with bands of solid single crochet, so it looks light and airy. A navy rim finishes the top. Two sunflowers with brown centers and pointed yellow petals sit on the front, joined by a slim green stem with two olive leaves.
This pattern uses US crochet terms. The finished holder is about 16 in (40.6 cm) long and 5.5 in (14.0 cm) across. The hanging tab rises about 2 in (5.1 cm) above the rim.
You start at the bottom with a rounded base worked in the round. The body is also worked in rounds, except for a short section of turned rows that leaves a gap for the dispensing opening. Next, you make the flower appliqués and sew them on. Last, you add the navy rim, the hanging tab and the opening edging.
Finished Size and Construction
- Finished size: 16 in (40.6 cm) long x 5.5 in (14.0 cm) diameter; 8.6 in (21.8 cm) wide laid flat
- Skill level: Intermediate (the body is easy; the shaping and appliqués add a little challenge)
- Terminology: US
- Yarn weight: Worsted (#4), cotton or cotton blend
- Hook: 5.0 mm (H-8) for the body; 4.0 mm (G-6) for the appliqués
- Number of pieces: 1 body plus 6 appliqués (2 sunflowers, 1 stem, 1 branch, 2 leaves)
- Layout: Appliqués stacked vertically on the front, centered above the opening
- Body circumference: 60 sts, about 17.1 in (43.4 cm)
- Size before border: 15 in (38.1 cm) long
- Border depth: 1 in (2.5 cm) navy rim
Materials
Choose a smooth worsted cotton. It holds its shape, shows the mesh crisply and washes well in a kitchen. Acrylic also works, but it stretches more when the holder is full.
- Color A, light blue: 150 g / 270 m (295 yd)
- Color B, navy: 50 g / 85 m (93 yd)
- Color C, sunflower yellow: 20 g / 35 m (38 yd)
- Color D, chocolate brown: 10 g / 18 m (20 yd)
- Color E, olive green: 10 g / 18 m (20 yd)
All quantities include a margin of roughly 15 percent to cover your gauge swatch and small tension differences.
Tools:
- 5.0 mm (H-8) and 4.0 mm (G-6) crochet hooks
- Wooden ring, 2 in (5.1 cm) diameter
- Tapestry needle
- Stitch markers (at least 3)
- Scissors and a tape measure
- Rust-proof pins and a rolled towel or tall jar for blocking
Abbreviations (US Terms)
- ch: chain
- sl st: slip stitch
- sc: single crochet
- hdc: half double crochet
- dc: double crochet
- sc2tog: single crochet 2 together
- sk: skip
- st(s): stitch(es)
- sp: space
- rnd(s): round(s)
- RS / WS: right side / wrong side
Mesh stitch: (dc in next st, ch 1, sk next st). Each mesh pair counts as 2 sts: the dc and the ch-1 sp.
Rnd joins: On dc rnds, the ch 2 at the start does not count as a st. Join every rnd with a sl st to the first st.
Gauge and Checkpoints
With the 5.0 mm hook, 14 sts and 8 rnds of dc = 4 in (10.2 cm). In sc, 14 sts and 16 rnds = 4 in (10.2 cm). One repeat of the body pattern (1 mesh rnd + 2 sc rnds) is 1 in (2.5 cm) tall.
Use the base as your test piece, since it is the first part of the holder anyway. Check these points as you go:
- After Rnd 3: The flat circle is about 3.25 in (8.3 cm) across.
- After Rnd 7: The cup is about 5.5 in (14.0 cm) across, with sides about 2 in (5.1 cm) deep.
- After Rnd 10: The circumference is about 17.1 in (43.4 cm).
- Before the rim: The body is 15 in (38.1 cm) long.
If your piece is too big, go down a hook size. If it is too small, go up a hook size. Change hooks rather than stitch counts, because the opening and the appliqué placement depend on 60 sts.
Base
With Color A and the 5.0 mm hook, make a magic ring.
Rnd 1: Ch 2, 12 dc in ring, join. (12 sts)
Rnd 2: Ch 2, 2 dc in each st around, join. (24 sts)
Rnd 3: Ch 2, *dc in next st, 2 dc in next st; rep from * 11 more times, join. (36 sts)
Rnd 4: Ch 2, *dc in next 5 sts, 2 dc in next st; rep from * 5 more times, join. (42 sts)
Rnd 5: Ch 2, *dc in next 6 sts, 2 dc in next st; rep from * 5 more times, join. (48 sts)
Rnd 6: Ch 2, *dc in next 7 sts, 2 dc in next st; rep from * 5 more times, join. (54 sts)
Rnd 7: Ch 2, *dc in next 8 sts, 2 dc in next st; rep from * 5 more times, join. (60 sts)
Rnds 4–7 add only 6 sts each, so the edge curves up into a rounded bowl instead of lying flat. Place a marker in the first st of Rnd 7 and move it up as you work. It marks st 1, the start of the round.
Body
Rnd 8 (mesh): Ch 4 (counts as dc + ch 1), sk next st, *dc in next st, ch 1, sk next st; rep from * 28 more times, sl st in 3rd ch of beg ch-4. (30 dc + 30 ch-1 sps = 60 sts)
Rnd 9: Ch 1, sc in each dc and each ch-1 sp around, join. (60 sts)
Rnd 10: Ch 1, sc in each st around, join. (60 sts)
Rnds 8–10 make up Repeat 1 of the body pattern.
Dispensing Opening (Rows 11–19)
Now work in turned rows over sts 1–49 only, leaving the last 11 sts of Rnd 10 (sts 50–60) unworked. This gap is about 3.1 in (7.9 cm) wide.
Row 11 (mesh, RS): Ch 4 (counts as dc + ch 1), sk next st, *dc in next st, ch 1, sk next st; rep from * 22 more times, dc in next st. Turn. (25 dc + 24 ch-1 sps = 49 sts)
Row 12 (WS): Ch 1, sc in each dc and ch-1 sp across, ending in 3rd ch of beg ch-4. Turn. (49 sts)
Row 13 (RS): Ch 1, sc in each st across. Turn. (49 sts)
Rows 14–16: Repeat Rows 11–13. (Row 14 is a WS mesh row.)
Rows 17–18: Repeat Rows 11–12.
Row 19 (RS): Ch 1, sc in each of 49 sts, ch 11, sl st in first sc of this row to close the round. (49 sc + 11 ch = 60 sts)
The opening now measures about 3.1 in (7.9 cm) wide x 3 in (7.6 cm) tall. The opening defines center front, with its center at st 55.
Upper Body
Rnd 20 (mesh): Work as Rnd 8, treating each of the 11 ch as a st. (60 sts)
Rnds 21–22: Work as Rnds 9–10. (60 sts)
Rnds 23–46: Repeat Rnds 20–22 eight more times. Fasten off Color A.
You now have 13 repeats: Repeat 1, three repeats beside the opening and nine above it. The body measures 15 in (38.1 cm) from the bottom of the base to the top of Rnd 46.
Appliqués
Use the 4.0 mm hook for every appliqué. The smaller hook keeps the pieces firm and flat. Leave a 10 in (25.4 cm) tail on each piece for sewing.
Large Sunflower
Rnd 1: With Color D, make a magic ring, ch 2, 10 hdc in ring, join. (10 sts)
Rnd 2: Ch 2, 2 hdc in each st around, join. Fasten off D. (20 sts)
The brown center is about 1.25 in (3.2 cm) across.
Rnd 3 (petals): Join Color C in any st. *Ch 6, sl st in 2nd ch from hook, sc in next ch, hdc in next ch, dc in next 2 ch, sk next st of Rnd 2, sl st in next st; rep from * 9 more times. Fasten off. (10 petals)
Each petal uses 2 sts of Rnd 2, so 10 petals use all 20 sts. The sl st at the tip makes the point, and the dc at the base gives the petal its width. The flower is about 3.75 in (9.5 cm) across.
Small Sunflower
Rnd 1: With Color D, make a magic ring, ch 2, 8 hdc in ring, join. (8 sts)
Rnd 2: Ch 2, 2 hdc in each st around, join. Fasten off D. (16 sts)
Rnd 3 (petals): Join Color C. *Ch 5, sl st in 2nd ch from hook, sc in next ch, hdc in next ch, dc in next ch, sk next st, sl st in next st; rep from * 7 more times. Fasten off. (8 petals)
The flower is about 2.75 in (7.0 cm) across.
Stem and Branch
Stem: With Color E, ch 26. Sl st in the back bump of the 2nd ch from hook and of each ch across. (25 sl sts, about 5 in / 12.7 cm)
Branch: With Color E, ch 10. Sl st in the back bump of the 2nd ch from hook and of each ch across. (9 sl sts, about 2 in / 5.1 cm)
Leaves (make 2)
With Color E, ch 9.
Rnd 1: Sc in 2nd ch from hook, hdc in next ch, dc in next 3 ch, hdc in next ch, sc in next ch, 3 sc in last ch. Working along the other side of the foundation ch: sc in next ch, hdc in next ch, dc in next 3 ch, hdc in next ch, sc in next ch. (17 sts)
Tip: Ch 2, sl st in 2nd ch from hook, sl st in first sc. Fasten off.
Each leaf is about 2.25 in (5.7 cm) long and comes to a point at the tip.
Make All Pieces
| Piece | Qty | Colors |
|---|---|---|
| Body | 1 | A |
| Large sunflower | 1 | D center, C petals |
| Small sunflower | 1 | D center, C petals |
| Stem | 1 | E |
| Branch | 1 | E |
| Leaf | 2 | E |
Front placement map (top to bottom, center front):
[ navy rim ...................... ]
[        LARGE SUNFLOWER          ]
[  LEAF    stem    SMALL FLOWER   ]
[          stem   / branch        ]
[            stem    LEAF         ]
[         ( OPENING )             ]
[ rounded base .................. ]
Joining: Attaching the Appliqués
Slide a rolled towel or a tall jar inside the body so you only sew through the front layer. Pin all the pieces in place before you sew any of them.
- Large sunflower: Center it above the opening, with its center 3.5 in (8.9 cm) below the top of Rnd 46. The 1 in (2.5 cm) rim will be added above that later.
- Stem: Tuck one end under the lower petals of the large flower. Curve the stem gently to the left and then back to center, ending 1 in (2.5 cm) above the top of the opening.
- Small sunflower: Place its center 6 in (15.2 cm) below the top of Rnd 46 and 1.75 in (4.4 cm) to the right of the stem.
- Branch: Run it from the stem to just under the small flower’s petals.
- Leaves: Place one leaf to the left of the upper stem and the other to the right of the lower stem. Point both tips up and outward.
Sew each flower on with small whipstitches through the back loops of Rnd 2 and through the base of each petal. Leave the petal tips unsewn so they lift slightly. Sew the stem and branch down along their center line, and sew around the edges of the leaves.
Keep your stitches snug but not tight. If the body puckers, loosen the last few stitches. Checkpoint: laid flat, the body should still measure 8.6 in (21.8 cm) wide, with no pulling around the flowers.
Border: Rim, Hanging Tab and Opening Edging
Border gauge: With the 5.0 mm hook and Color B, 14 sc and 16 rnds = 4 in (10.2 cm).
Top Rim
Rnd 47: Join Color B in the marked st. Ch 1, sc in each st around, join. (60 sts: 30 front + 30 back)
Rnds 48–50: Ch 1, sc in each st around, join. (60 sts)
The rim is 1 in (2.5 cm) deep. Rnd 47 places exactly 1 sc in each of the 60 sts of Rnd 46 and adds none. That keeps the rim at the same circumference as the body, so it neither flares nor pulls in. Fasten off.
Hanging Tab
The center back is opposite the opening’s center (st 55), at st 25. With RS facing, join Color B in st 23 of Rnd 50.
Row 1: Ch 1, sc in sts 23–27. Turn. (5 sts)
Rows 2–16: Ch 1, sc in each st across. Turn. (5 sts)
The tab is about 1.4 in (3.6 cm) wide and 4 in (10.2 cm) long. Fold it over the wooden ring from front to back, then sew the last row to the inside of the rim. About 2 in (5.1 cm) of tab shows above the rim.
Opening Edging
With RS facing, join Color B at a bottom corner of the opening.
Rnd 1: Ch 1. Work 1 sc in each of the 11 unworked sts of Rnd 10. Work 12 sc up the side of the opening: 2 sc in each mesh-row end and 1 sc in each sc-row end. Work 1 sc in each of the 11 ch along the underside of Row 19, then 12 sc down the other side. Join. (11 + 12 + 11 + 12 = 46 sts)
Rnd 2: Ch 1, sc in each st around, working an sc2tog across each of the 4 corners, join. (46 − 4 = 42 sts)
Rnd 3: Sl st in each st around. Fasten off. (42 sts)
The 4 decreases take out the square corners, so the edging pulls into a circle. The clear opening is about 2.75 in (7.0 cm) across.
Final Blocking
- Weave in all ends, running each one through stitches of the same color.
- Soak the holder in cool water, then gently squeeze the water out. Do not wring it.
- Roll it in a towel and press to remove more water.
- Slide it over a tall jar or a rolled towel about 5.5 in (14.0 cm) across.
- Shape the opening around a jar lid about 2.75 in (7.0 cm) across.
- Pin the petal tips flat and straighten the rim.
- Let it dry completely, then check your measurements again.
Final Quality-Control Checklist
- Length is 16 in (40.6 cm) from the bottom of the base to the top of the rim.
- Circumference is about 17.1 in (43.4 cm) all the way up.
- The mesh rounds line up evenly, and the seam does not slant.
- The opening is round, centered on the front and neatly edged in navy.
- The hanging tab sits directly opposite the opening.
- The flowers are centered above the opening, and their petals lie flat.
- All ends are woven in securely.
Troubleshooting
- Base ruffles: You have extra sts. Recount Rnds 4–7 (42, 48, 54 and 60 sts).
- Base stays flat: Your tension is loose. Go down a hook size for Rnds 4–7.
- Seam leans: Always join into the first st, not into the turning chain.
- Opening is lopsided: Check that each of Rows 11–19 has 49 sts.
- Opening stays square: Make sure Rnd 2 has an sc2tog right at each corner.
- Petals curl: Pin them flat while blocking, or remake them with a 4.5 mm hook.
- Rim flares: Rework the rim with a 4.5 mm hook.
Care
Hand wash in cool water and dry flat or over a jar. Cotton versions can also be machine washed on a gentle cycle inside a mesh bag.
Final Notes
The measurement chain is simple. The base grows to 60 sts, which is 17.1 in (43.4 cm) around and 5.5 in (14.0 cm) across. Thirteen 1 in (2.5 cm) repeats on top of the 2 in (5.1 cm) base bring the body to 15 in (38.1 cm). The 1 in (2.5 cm) navy rim brings the total to 16 in (40.6 cm). If your base checkpoints match, the opening, flowers and rim will all fall into place.
Happy crocheting!