

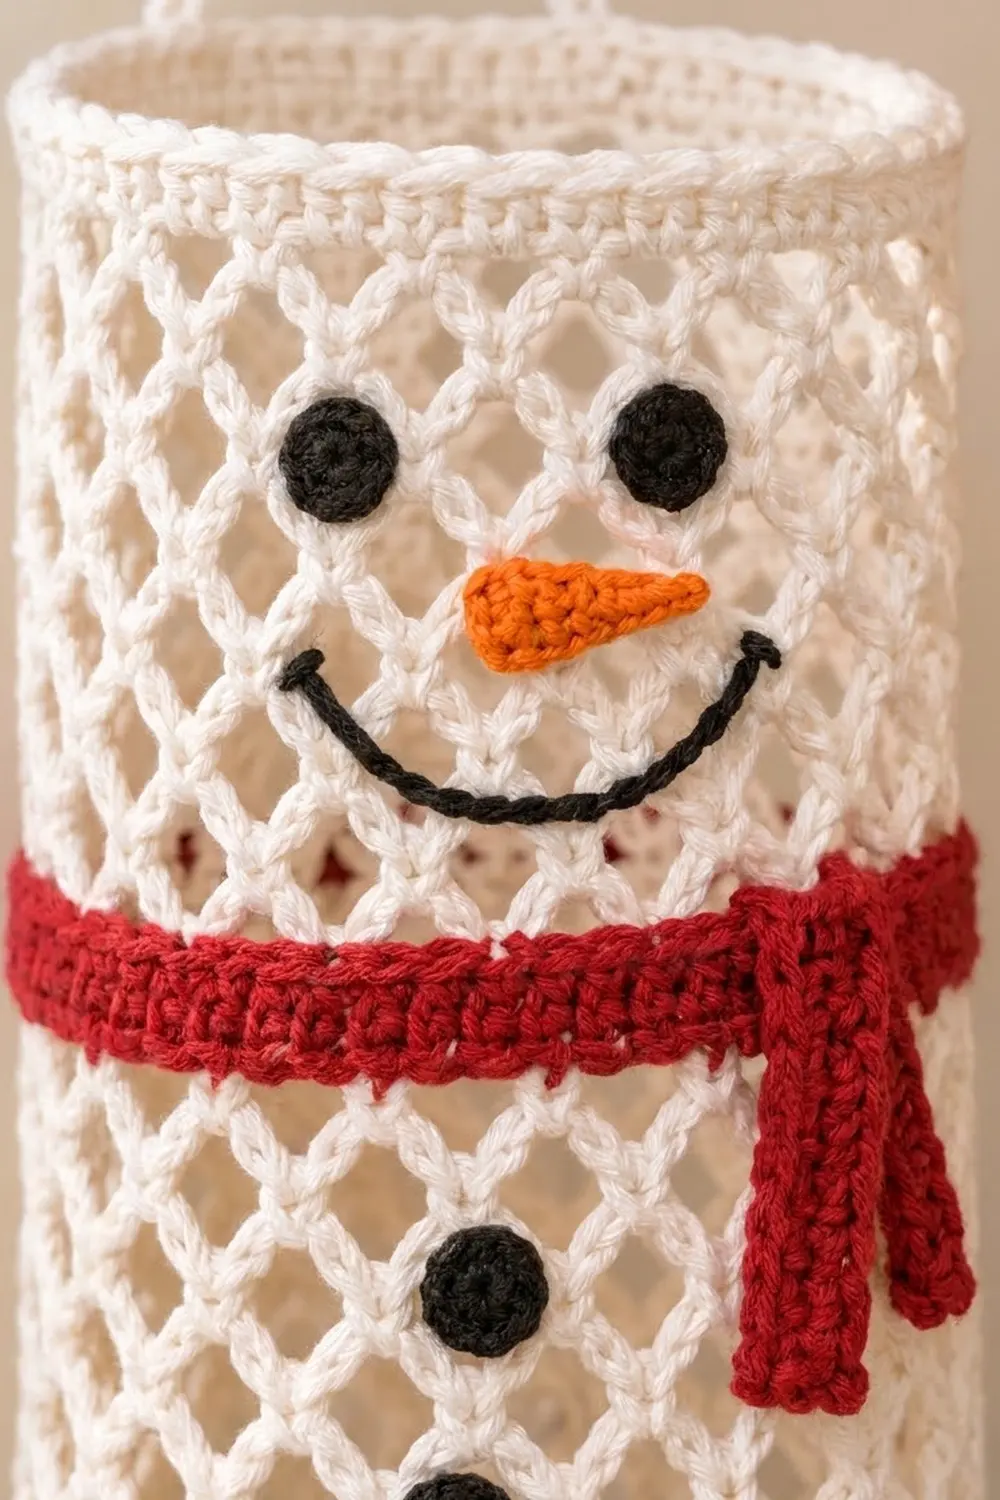
This cheerful snowman keeps plastic grocery bags in one tidy place. You push bags in at the top and pull them out one at a time through a round hole near the bottom. The body is an airy diamond mesh, so you can see how full it is, and it uses less yarn than a solid tube.
The palette is simple: a white body, a red scarf, black eyes, buttons and smile, and a small orange carrot nose. It looks festive in a kitchen in December, but it is still useful long after the holidays.
The pattern uses US crochet terms. The finished holder is about 7 in (17.8 cm) wide laid flat and 20 in (50.8 cm) long, not counting the hanging strap. The strap adds a loop about 4.5 in (11.4 cm) tall.
The body is worked top-down as one seamless tube. You start with a solid sc rim, then work mesh rounds. The dispensing hole is made by working a short section in rows and then bridging the gap with a chain. The bottom closes with shrinking loops, a few sc rounds and an sc seam. The face, scarf and buttons are small separate pieces that you sew on at the end.
Finished Size and Construction
- Finished size: 7 in (17.8 cm) wide flat × 20 in (50.8 cm) long
- Skill level: Easy-intermediate
- Terminology: US
- Yarn weight: Worsted (#4), cotton or cotton blend
- Hook: 5.0 mm (H-8)
- Number of pieces: 1 body, plus 8 small appliqués (2 eyes, 3 buttons, 1 nose, 1 scarf band, 1 scarf tail)
- Layout: Single vertical tube; the face is at the top, the scarf about 5 in (12.7 cm) down, then the buttons, then the hole
- Circumference: 14 in (35.6 cm), which is 56 sc or 14 mesh loops
- Size before border: 7 in × 19.75 in (17.8 cm × 50.2 cm)
- Border depth: 0.25 in (0.6 cm) at the top rim; the hole edging is 0.5 in (1.3 cm) wide
Materials
Use a smooth, firm cotton. It holds the mesh shape, stays put on the hook, and stands up to washing. Acrylic also works, but the mesh will stretch longer when the holder is full.
- White: 130 g, about 245 m
- Red: 20 g, about 38 m
- Black: 10 g, about 19 m
- Orange: 5 g, about 9 m
All quantities include a margin of about 15 percent for swatching and tension differences.
Tools:
– 5.0 mm (H-8) crochet hook
– Tapestry needle
– 4 locking stitch markers
– Scissors
– Measuring tape
– Pins and a spray bottle for blocking
– A 3 in (7.6 cm) cardboard tube or rolled towel to use as a blocking form (optional)
Abbreviations (US Terms)
- ch: chain
- sl st: slip stitch
- sc: single crochet
- hdc: half double crochet
- dc: double crochet
- sc2tog: single crochet 2 together
- rev sc: reverse single crochet (crab stitch)
- sk: skip
- st(s): stitch(es)
- rnd: round
Special stitches:
– Mesh loop closing (ch 2, dc): At the end of a mesh round, ch 2 and then dc into the first sc. Together the ch 2 and the dc act as the last ch-5 loop, and they leave your hook at the center of that loop, ready for the next round.
– Rev sc: Work single crochet from left to right (if you crochet right-handed). This makes the twisted, rolled edge you see on the rim.
Gauge and Checkpoints
- Sc gauge: 16 sc and 16 rnds = 4 in (10.2 cm)
- Mesh gauge: 4 ch-5 loops and 8 mesh rnds = 4 in (10.2 cm), so 1 loop per inch and 2 rnds per inch
Make the black eye first as a small test piece. It should measure 0.75 in (1.9 cm) across. If it does, your sc tension is close.
Check the body at these points:
- After Rnd 4: circumference 14 in (35.6 cm); 7 in (17.8 cm) laid flat
- After Rnd 28: 13 in (33.0 cm) long from the top edge
- After Row 34: 16 in (40.6 cm) long
- After Rnd 36: 17 in (43.2 cm) long
- After closing: 19.75 in (50.2 cm) long
If the piece is too big, go down half a hook size. If it is too small, go up half a size. For mesh that comes out too long but is the right width, work your chains a little tighter rather than changing hooks.
Body
The beginning of each round sits at the center front. Leave a marker there as a guide. The hole and the buttons will line up along this column.
Top Band
Foundation: Ch 56. Join with a sl st to the first ch, taking care not to twist the chain.
Rnd 1: Ch 1, sc in each ch around. Join with a sl st to the first sc. (56 sc)
Rnds 2–4: Ch 1, sc in each st around. Join. (56 sc)
Checkpoint: the band is 1 in (2.5 cm) tall and 7 in (17.8 cm) wide laid flat.
Mesh Section
Rnd 5 (conversion round): Ch 1, sc in the first st. Ch 5, sk 3 sts, sc in the next st; repeat from * 12 more times. Ch 2, sk 3, dc in the first sc. (14 sc anchors, 14 ch-5 loops; 56 sts ÷ 4 = 14)
Rnds 6–28: Ch 1, sc around the post of the closing dc. Ch 5, sc in the next loop; repeat from * 12 more times. Ch 2, dc in the first sc. (14 loops in each round)
You now have 24 mesh rounds, and the piece measures 13 in (33.0 cm).
Dispensing Hole (Worked in Rows)
From here you leave loops 13 and 14 unworked. Loop 1 is the closing loop at your hook. This leaves a gap 3 loops wide (3 in, 7.6 cm) across the center front.
Row 29 (RS): Ch 1, sc around the post of the dc (loop 1). Ch 5, sc in the next loop; repeat from * 10 more times, ending in loop 12. Turn. (12 sc, 11 loops)
Row 30 (WS): Ch 5 (counts as the first loop), sc in the first ch-5 loop. Ch 5, sc in the next loop; repeat from * 9 more times. Turn. (11 sc, 11 loops)
Rows 31–34: Repeat Row 30. (11 sc, 11 loops in each row)
Checkpoint: the gap is about 3 in (7.6 cm) wide and 3 in (7.6 cm) tall. The body measures 16 in (40.6 cm).
Closing the Gap
Rnd 35 (RS): Turn. Ch 5, sc in the first loop. Ch 5, sc in the next loop; repeat from * 9 more times. Ch 14 for the bridge, then sl st in the 3rd ch of the beginning ch-5. (11 ch-5 loops + 1 ch-14 bridge)
Rnd 36: Sl st in the next 2 ch, so you are at the center of the beginning loop. Ch 1, sc in the same loop. Ch 5, sc in the next loop; repeat from * 9 more times (11 sc anchors). Ch 5, sk the first 2 bridge ch, sc in the next ch. Ch 5, sk 4 ch, sc in the next ch; repeat from * once. Ch 2, dc in the first sc. (14 loops: 10 + 3 over the bridge + 1 closing loop)
The bridge anchors fall in chains 3, 8 and 13. This puts the mesh back to 14 loops.
Rounded Bottom
Rnd 37: Ch 1, sc around the post of the dc. Ch 4, sc in the next loop; repeat from * 12 more times. Ch 1, hdc in the first sc. (14 ch-4 loops)
Rnd 38: Ch 1, sc around the post of the hdc. Ch 4, sc in the next loop; repeat from * 12 more times. Ch 1, hdc in the first sc. (14 ch-4 loops)
Rnd 39: Ch 1, sc around the post of the hdc. Ch 3, sc in the next loop; repeat from * 12 more times. Ch 1, hdc in the first sc. (14 ch-3 loops)
Rnd 40: Ch 1, sc around the post of the hdc. Ch 3, sc in the next loop; repeat from * 12 more times. Ch 3, sl st in the first sc. (14 ch-3 loops)
Rnd 41 (conversion round): Sl st into the first loop. Ch 1, then work 3 sc in each ch-3 loop around. Join. (14 sc, 1 per loop, + 28 extra, 2 more per loop = 42 sc)
Rnd 42: Ch 1. Sc in the next 5 sts, sc2tog; repeat from * 5 more times. Join. (36 sc)
Rnd 43: Ch 1. Sc in the next 4 sts, sc2tog; repeat from * 5 more times. Join. (30 sc)
Closing seam: Flatten the tube so the hole is centered on the front. Sl st along to a side fold if needed. Working through both layers, sc 15 across. (15 sc) Fasten off and weave in the end.
Checkpoint: the bottom is 3.75 in (9.5 cm) wide and the body is 19.75 in (50.2 cm) long. Because the loops get shorter before the decrease rounds, the bottom tapers into a U-shape.
Appliqués
Eyes and buttons (make 5, black):
– Rnd 1: In a magic ring, work 6 sc. (6 sc)
– Rnd 2: Work 2 sc in each st. Join. (12 sc)
– Each circle measures 0.75 in (1.9 cm) across. Leave a 10 in (25.4 cm) tail for sewing.
Carrot nose (orange):
1. Ch 7.
2. Starting in the 2nd ch from the hook, work: sl st, sc, sc, hdc, hdc.
3. Work 4 dc in the last ch.
4. Rotate and work along the other side of the chain: hdc, hdc, sc, sc, sl st.
The nose has 14 sts (5 + 4 + 5) and is about 1.5 in (3.8 cm) long. The wide dc end becomes the base of the carrot.
Scarf band (red):
– Foundation: Ch 57.
– Row 1: Sc in the 2nd ch from the hook and in each ch across. (56 sc)
– Rows 2–4: Ch 1, turn, sc across. (56 sc)
– The band measures 14 in × 1 in (35.6 cm × 2.5 cm), which matches the tube’s circumference.
Scarf tail (red):
– Foundation: Ch 17.
– Row 1: Sc in the 2nd ch from the hook and in each ch across. (16 sc)
– Rows 2–3: Ch 1, turn, sc across. (16 sc)
– The tail measures 4 in × 0.75 in (10.2 cm × 1.9 cm).
Border
Border gauge is the same as the body’s sc gauge: 16 sts = 4 in (10.2 cm).
Top rim, Rnd 1: Join white at the center front of Rnd 4. Ch 1, rev sc in each st around. Join. (56 rev sc: 56 worked 1 per st + 0 extra) That is 28 sts across the front and 28 across the back.
Hole edging, Rnd 1: Join white at the bottom of the hole. Work the edging stitches around the opening like this:
– Bottom (bridge): 14 sc, 1 in each bridge ch
– Left side: 12 sc, 2 per row-end
– Top: 12 sc spread across the free loops
– Right side: 12 sc, 2 per row-end
Join. (50 sc)
Hole edging, Rnd 2: Ch 1. Sc in the next 3 sts, sc2tog; repeat from * 9 more times. Join. (40 sc)
Why the math works: The rim stays at 56 sts because 14 loops × 4 sts = 56, so it lies flat without ruffling. Around the hole, Rnd 1 gives 50 sc, about 12.5 in (31.8 cm) of edging. Rnd 2 removes 10 sts, which pulls the square gap into a firm circle about 3 in (7.6 cm) across.
Hanging strap:
1. Find the side folds of the top. They are at st 15 and st 43 of Rnd 4, which are 28 sts apart.
2. Join white at st 15, just below the rim. Ch 40, then sl st in st 43.
3. Sc in each ch back across. (40 sc)
4. Sl st at st 15 and fasten off.
The strap is 10 in (25.4 cm) long.
Assembly of Details
- Scarf band: Wrap the band over mesh Rnds 13–14, with its top edge 5 in (12.7 cm) below the rim. Sew the short ends together at the right side, then tack the band to the mesh every 1 in (2.5 cm).
- Scarf tail: Sew the top of the tail at the band’s right-side seam so it hangs straight down.
- Eyes: Sew them over Rnd 6–7, 1.5 in (3.8 cm) apart, centered on the front column.
- Nose: Sew it centered on Rnd 8–9, with the point angled slightly to one side.
- Smile: With black yarn, chain-stitch a curve 2.5 in (6.4 cm) wide across Rnds 9–11.
- Buttons: Sew them on the center column over Rnds 17, 20 and 23, each 1.5 in (3.8 cm) apart.
Final Blocking
- Wet the holder and press out the water in a towel.
- Slide a rolled towel inside the tube so it is 14 in (35.6 cm) around.
- Pin the tube to 19.75 in (50.2 cm), measured from the base of the rim.
- Shape the mesh so the diamonds are even, about 1 in (2.5 cm) each.
- Press the hole into a circle around the 3 in (7.6 cm) tube or form.
- Round the bottom corners into a smooth U-shape with your fingers.
- Pin the scarf tail straight and let everything dry completely.
Final Quality-Control Checklist
- The rim has 56 rev sc and lies flat.
- Every mesh round has 14 loops.
- The hole rows have 11 loops each.
- The bridge carries 3 anchors (in chains 3, 8 and 13).
- The bottom decreases go 42 → 36 → 30 sc, with a 15-sc seam.
- The hole edging has 40 sc and makes a round opening.
- The strap is attached at both side folds, 28 sts apart.
- The face, buttons and hole sit on one vertical center line.
- All ends are woven in and secure.
Troubleshooting
- The mesh slants or twists: Use the ch 2, dc closing every round so the start point does not drift.
- The hole is lopsided: Count your rows. You need exactly 6 rows (Rows 29–34).
- The bottom puckers: Work Rnd 41 more loosely. Make sure you have exactly 3 sc per loop.
- The scarf is too loose: Your red tension is looser than your white. Remove 4 sc or go down a hook size.
- The strap stretches: Add a second sc row along the strap.
- The appliqués curl: Steam-block them flat before you sew them on.
Care
Hand wash in cool water, press out the water in a towel, and dry flat with the tube stuffed into shape. Avoid the dryer, because heat can stretch the mesh.

Final Notes
The measurement chain is simple. 56 sc make a 14 in (35.6 cm) band. Those 56 sts become 14 one-inch loops. 24 mesh rounds bring you to 13 in (33.0 cm), 6 hole rows to 16 in (40.6 cm), and 2 rejoin rounds to 17 in (43.2 cm). The bottom shaping takes the body to 19.75 in (50.2 cm), and the rev sc rim brings the finished length to 20 in (50.8 cm). If you check each step, your snowman will hang straight and hand out bags one at a time.
Happy crocheting!