

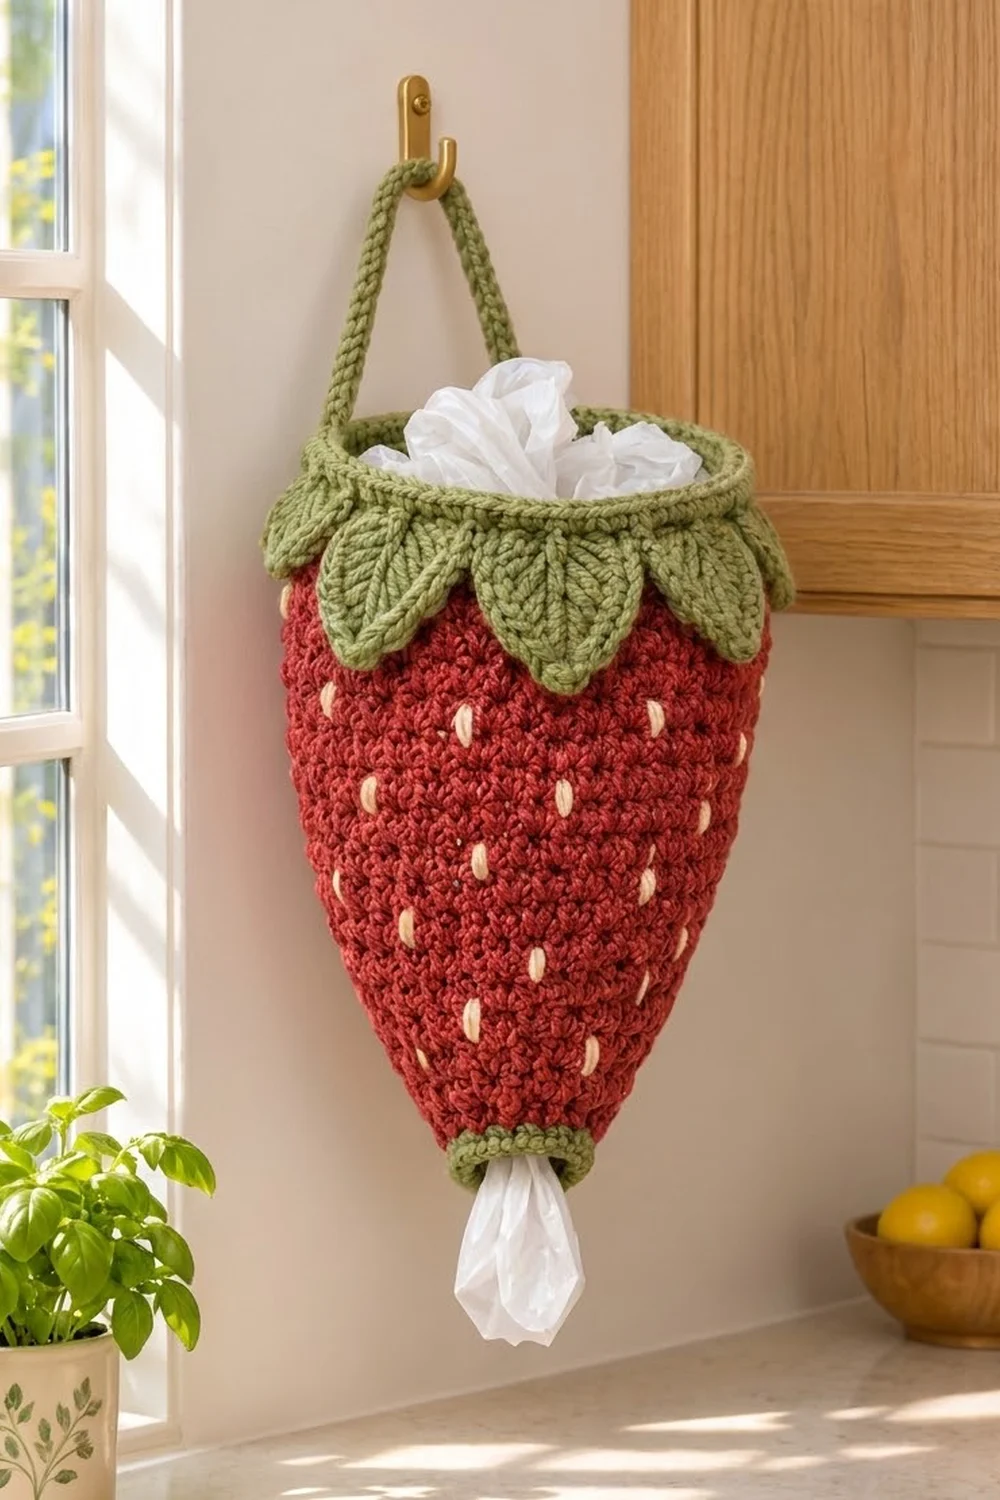
This strawberry bag holder gives your plastic bags a home. You push bags in through the wide green collar at the top and pull them out one at a time through the ribbed cuff at the bottom. It hangs from a single strap on any hook, cabinet knob or door handle.
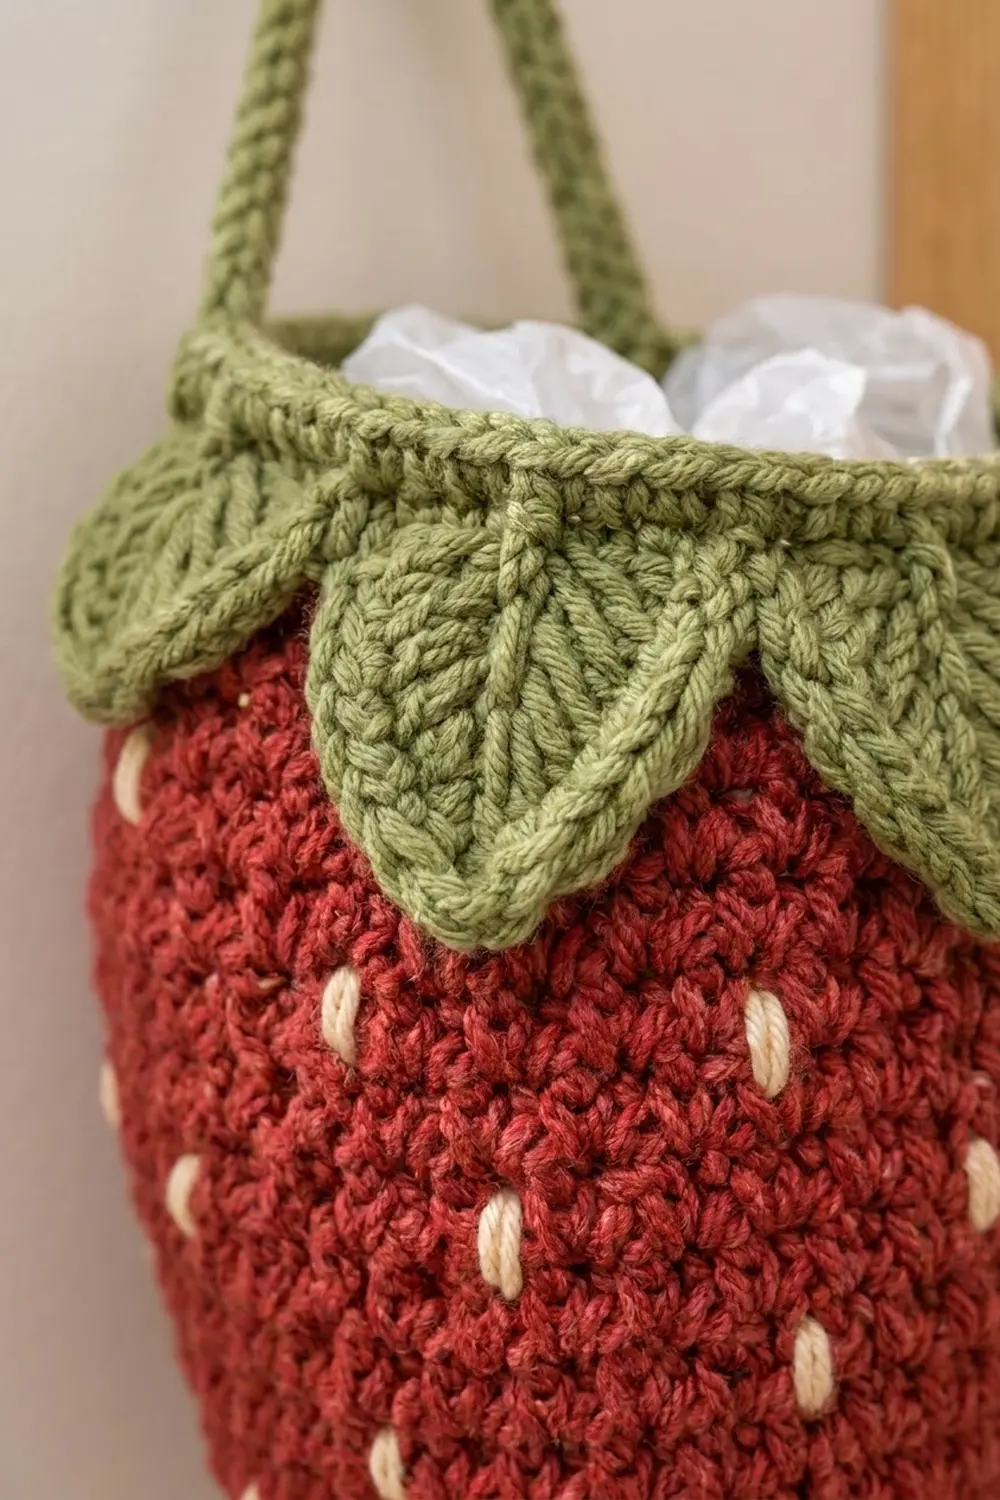
The color scheme is classic strawberry. The body is deep red with small cream seeds embroidered on it, and the sage green parts are the bottom cuff, the top collar, a crown of eight pointed leaves and the strap. Worked in single crochet, the body has a firm, pebbly texture that keeps its cone shape even when the holder is only half full.
The finished holder measures 12.5 in (31.8 cm) long and 6.9 in (17.5 cm) wide laid flat at the top. The pattern uses US crochet terms.
Construction is simple. You work the body in one piece from the bottom up. You start with the green ribbed cuff, switch to red and increase in a steady taper, then switch back to green for the collar. The leaves are worked straight off the collar, so there’s nothing to sew on. Last, you add the seeds and leaf veins with embroidery and sew on the strap.
Finished Size and Construction
- Finished size: 12.5 in (31.8 cm) long, 6.9 in (17.5 cm) wide flat at the top
- Top circumference: 13.7 in (34.8 cm)
- Bottom opening circumference: 5.1 in (13.0 cm)
- Skill level: Easy (advanced beginner)
- Terminology: US
- Yarn weight: Worsted (#4)
- Hook: 5.0 mm (H-8)
- Number of pieces: 1 body (cuff, red body, collar and leaves worked in one piece) plus 1 strap
- Layout: a vertical cone, narrow end down, with the leaf crown around the top
- Size before collar: 11 in (27.9 cm) long, 6.9 in (17.5 cm) wide flat
- Collar depth: 1.5 in (3.8 cm)
- Leaf length (with edging): 1.75 in (4.4 cm)
Materials
Use a smooth worsted-weight cotton or cotton blend. Cotton holds the cone shape well and doesn’t stretch out under the weight of the bags. Acrylic also works, but it makes a softer, slouchier holder.
Pick a red with a little depth, such as cranberry or brick red, so the cream seeds stand out. A muted sage green looks more natural than a bright kelly green and goes well with wood cabinets. Use the same brand and fiber for all three colors so they wash and shrink the same way.
- Red (body): 100 g / about 180 m
- Sage green (cuff, collar, leaves, strap): 50 g / about 90 m
- Cream (seeds): 10 g / about 18 m
All quantities include a margin of about 20 percent for gauge differences and a test swatch.
Tools:
- 5.0 mm (H-8) crochet hook
- Stitch marker
- Yarn needle with a large eye
- Scissors
- Measuring tape
- Pins and a spray bottle for blocking
Abbreviations (US Terms)
- ch: chain
- sc: single crochet
- sl st: slip stitch
- dc: double crochet
- inc: 2 sc in the same stitch
- sc2tog: single crochet 2 together
- BLO: back loop only
- FLO: front loop only
- st(s): stitch(es)
- rnd(s): round(s)
Special stitches
- Front post double crochet (FPdc): Yarn over and insert the hook from front to back to front around the post of the stitch. Complete it as a dc.
- Back post double crochet (BPdc): Yarn over and insert the hook from back to front to back around the post of the stitch. Complete it as a dc.
- Reverse single crochet (rev sc): Work sc from left to right (right to left if you crochet left-handed) into the next stitch. This makes a rolled, cord-like edge.
Gauge and Checkpoints
Gauge: 14 sc and 16 rnds = 4 in (10.2 cm) in sc worked in the round.
That works out to 3.5 sts and 4 rnds per inch. Every measurement in this pattern comes from these two numbers, so check your gauge before you start the body. Chain 16, join into a ring and work 16 rnds of sc. The tube should be 4.6 in (11.7 cm) around and 4 in (10.2 cm) tall.
Checkpoints: Measure the body laid flat after these rounds.
| After | Sts | Flat width | Length from bottom |
|---|---|---|---|
| Red Rnd 1 | 18 | 2.6 in (6.6 cm) | 1.25 in (3.2 cm) |
| Red Rnd 7 | 30 | 4.3 in (10.9 cm) | 2.75 in (7.0 cm) |
| Red Rnd 12 | 36 | 5.1 in (13.0 cm) | 4 in (10.2 cm) |
| Red Rnd 17 | 42 | 6.0 in (15.2 cm) | 5.25 in (13.3 cm) |
| Red Rnd 22 | 48 | 6.9 in (17.5 cm) | 6.5 in (16.5 cm) |
| Red Rnd 40 | 48 | 6.9 in (17.5 cm) | 11 in (27.9 cm) |
If your piece is too big, go down a half or whole hook size. If it’s too small, go up a size. Small differences in length are easy to fix: add or remove plain rounds between Red Rnds 23 and 40. Don’t change the stitch counts, because the collar and leaf math depends on exactly 48 sts.
Bottom Cuff (Sage Green)
With green, ch 18 and join with a sl st to the first ch to form a ring. Take care not to twist the chain.
Rnd 1: Ch 1, sc in each ch around, sl st to the first sc. (18 sts)
Rnd 2: Ch 2 (doesn’t count as a stitch), FPdc around the next st, BPdc around the next st; repeat from * 8 more times, sl st to the first FPdc. (18 sts: 9 FPdc, 9 BPdc)
Rnd 3: Ch 2, FPdc around the FPdc, BPdc around the BPdc; repeat around, sl st to the first FPdc. (18 sts)
The FPdc stitches stacked on top of each other make the vertical ribs. The cuff should be 1 in (2.5 cm) tall and 2.6 in (6.6 cm) wide laid flat. Fasten off green.
The cuff needs to be snug so it holds the bags back until you pull one out. If your post stitches feel loose, work them with a little more tension than your regular stitches.
Red Body
Join red in any stitch of Rnd 3. From here on, work in a continuous spiral: don’t join the rounds. Place a marker in the first stitch of each round and move it up as you go.
Red Rnd 1: Sc in each st around. (18 sts)
Red Rnd 2 (growth): Sc in the next 2 sts, inc; repeat 6 times. (24 sts)
Red Rnds 3–6: Sc in each st around. (24 sts)
Red Rnd 7 (growth): Sc in the next 3 sts, inc; repeat 6 times. (30 sts)
Red Rnds 8–11: Sc around. (30 sts)
Red Rnd 12 (growth): Sc in the next 4 sts, inc; repeat 6 times. (36 sts)
Red Rnds 13–16: Sc around. (36 sts)
Red Rnd 17 (growth): Sc in the next 5 sts, inc; repeat 6 times. (42 sts)
Red Rnds 18–21: Sc around. (42 sts)
Red Rnd 22 (growth): Sc in the next 6 sts, inc; repeat 6 times. (48 sts)
Red Rnds 23–40: Sc around. (48 sts)
The 5 growth rounds are spaced 5 rounds apart. That gives the smooth cone taper, and the 18 straight rounds at the top give the rounded shoulder of a strawberry. Each growth round adds exactly 6 sts: 18 + (5 × 6) = 48.
To avoid visible corners where the increases stack up, you can shift the increases on alternate growth rounds. For example, on Rnds 7 and 17, work the inc first and then the plain stitches.
Keep the same tension through the whole body. A firm, even single crochet gives the pebbly texture in the photo and stops the bags from showing through. If you can see light through the fabric, go down a hook size and check your gauge again.
At the end of Red Rnd 40, sl st into the next st to smooth the step at the end of the spiral. Fasten off red. The body should now measure 11 in (27.9 cm) long, including the cuff.
Border: Collar and Leaf Crown
For this holder, the border is the green collar at the top, the leaf crown and the leaf edging. The border gauge is the same as the body: 3.5 sts and 4 rnds per inch. The collar is worked straight up with no increases, so it stays 48 sts all the way. Each of the 8 leaves sits on 6 stitches: 8 × 6 = 48. That’s why the leaves meet edge to edge with no gaps and no crowding.
Collar
Join green in any stitch of Red Rnd 40. Work joined rounds from here.
Collar Rnd 1: Ch 1, sc in each st around, sl st to the first sc. (48 sts)
Collar Rnd 2: Ch 1, sc in the BLO of each st around, sl st to the first sc. (48 sts) This leaves the 48 front loops of Collar Rnd 1 free on the outside. You’ll work the leaves into those loops.
Collar Rnds 3–5: Ch 1, sc in each st around, sl st to the first sc. (48 sts)
Collar Rnd 6: Ch 1, rev sc in each st around, sl st to the first st. (48 sts) Fasten off.
The rev sc round rolls over to make the thick, rounded rim. The collar measures 1.5 in (3.8 cm) deep.
Leaves
Turn the holder upside down so the free front loops of Collar Rnd 1 face you and the leaves will grow downward over the red. Each leaf is worked in rows on 6 free loops.
Leaf 1, Row 1: Join green in any free front loop. Ch 1, sc in the same loop and the next 5 free loops, turn. (6 sts)
Row 2: Ch 1, sc in each st across, turn. (6 sts)
Row 3: Ch 1, sc2tog, sc in the next 2 sts, sc2tog, turn. (4 sts)
Row 4: Ch 1, sc in each st across, turn. (4 sts)
Row 5: Ch 1, sc2tog twice, turn. (2 sts)
Row 6: Ch 1, sc2tog. (1 st) Fasten off.
Leaves 2–8: Join green in the next free loop of Collar Rnd 1, right next to the previous leaf. Repeat Rows 1–6. Each leaf uses its own 6 loops, and all 48 loops are used once you finish Leaf 8.
Before you start Leaf 1, it helps to mark every sixth free loop with a scrap of yarn. That way you can check that you have exactly 8 sections before you work any leaves.
Leaf Edging
Join green in Collar Rnd 1 at the point where Leaf 8 meets Leaf 1.
Edging Rnd: For each leaf: work 6 sc evenly along the first side edge (1 sc per row end), then (sc, ch 2, sc) in the tip stitch, then 6 sc along the second side edge, then sl st into Collar Rnd 1 at the point where this leaf meets the next one. Repeat for all 8 leaves and sl st to the starting point. Fasten off.
Count per leaf: 6 + 2 + 6 = 14 sc, 1 ch-2 tip and 1 sl st. Total: 112 sc, 8 ch-2 tips and 8 sl sts.
The leaf body has 6 rows, so each side edge takes exactly 6 sc. That keeps the edges flat. The ch-2 at the tip gives each leaf its sharp point. With the edging, each leaf is 1.75 in (4.4 cm) long and 1.7 in (4.3 cm) wide at the base.
Strap
With green, ch 51.
Row 1: Sc in the 2nd ch from the hook and in each ch across, turn. (50 sts)
Row 2: Ch 1, sc in each st across. (50 sts) Fasten off and leave a long tail.
The strap measures 14.3 in (36.3 cm) long and 0.5 in (1.3 cm) wide.
Finishing: Seeds, Veins and Strap
Seeds: Thread cream yarn on the yarn needle. On Red Rnds 4, 8, 12, 16, 20, 24, 28 and 32, make one straight vertical stitch for every 6 sts. Bring the needle up at the base of the round and take it down at the top of the round, so each seed is 0.25 in (0.6 cm) tall. Shift each seed round over by 3 sts from the round below so the seeds are staggered.
The seed counts are 4, 5, 6, 6, 7, 8, 8 and 8, for 52 seeds in total. The leaves cover Red Rnds 34–40, so there are no seeds there.
Work the seeds with the body stuffed loosely so the fabric doesn’t pucker. Go over each seed twice in the same holes for a plumper, raised seed. Carry the yarn on the inside for no more than 2 in (5.1 cm) at a time.
Veins: With green, backstitch one line down the center of each leaf, from the collar to 0.25 in (0.6 cm) above the tip.
Strap: Sew 0.75 in (1.9 cm) of each strap end to the inside of the collar. Place the two ends on opposite sides of the rim, 24 sts apart. Weave in all ends on the inside.
Final Blocking
- Lightly spray the whole holder with water until it’s damp but not soaked.
- Stuff the body firmly with plastic bags or a rolled towel to bring out the cone shape.
- Pin each leaf flat against the red body, with its point aimed straight down.
- Roll the rev sc rim between your fingers to round it.
- Check the measurements: 12.5 in (31.8 cm) long and 6.9 in (17.5 cm) wide flat at the top.
- Let it dry completely before you remove the stuffing and pins.
Final Quality-Control Checklist
- 48 sts in every collar round
- 8 leaves, each with a 6-st base, all the same size and evenly spaced
- Ribs on the bottom cuff run straight and don’t twist
- Seeds are staggered and even, with nothing above Red Rnd 32
- Strap ends are secure on opposite sides of the rim
- Bags pass easily out of the bottom but don’t fall out on their own
- All ends are woven in on the inside
Troubleshooting
The cone looks lopsided: Stacked increases make a corner. Shift the increase position on alternate growth rounds.
The spiral leans to one side: This is normal for sc worked in a spiral. Block it straight while the body is stuffed.
The leaves ruffle: You’ve probably added extra sc in the edging. Use exactly 6 sc per side.
The leaves curl up: Pin them flat while they’re damp and let them dry completely.
There are gaps between the leaves: Make sure each leaf uses 6 loops and the next leaf starts in the very next loop.
The bottom cuff is too loose: Work Cuff Rnds 2–3 with a hook one size smaller.
The rim flares: Your rev sc is too loose. Work it with a smaller hook.
Care
Hand wash in cool water, press out the water in a towel, and dry flat with the body stuffed so it keeps its shape. Don’t tumble dry.
Final Notes
All the measurements come from one gauge: 3.5 sts and 4 rnds per inch. The 18-st cuff grows by 6 sts on each of the 5 growth rounds, ending at 48 sts and 6.9 in (17.5 cm) flat. 40 red rounds bring the body to 11 in (27.9 cm), and the 1.5 in (3.8 cm) collar finishes it at 12.5 in (31.8 cm) long. Each of the 8 leaves sits on 6 sts of the collar, which uses all 48 sts. Check your gauge first, check each checkpoint, and the holder will come out at the right size.
Happy crocheting!