

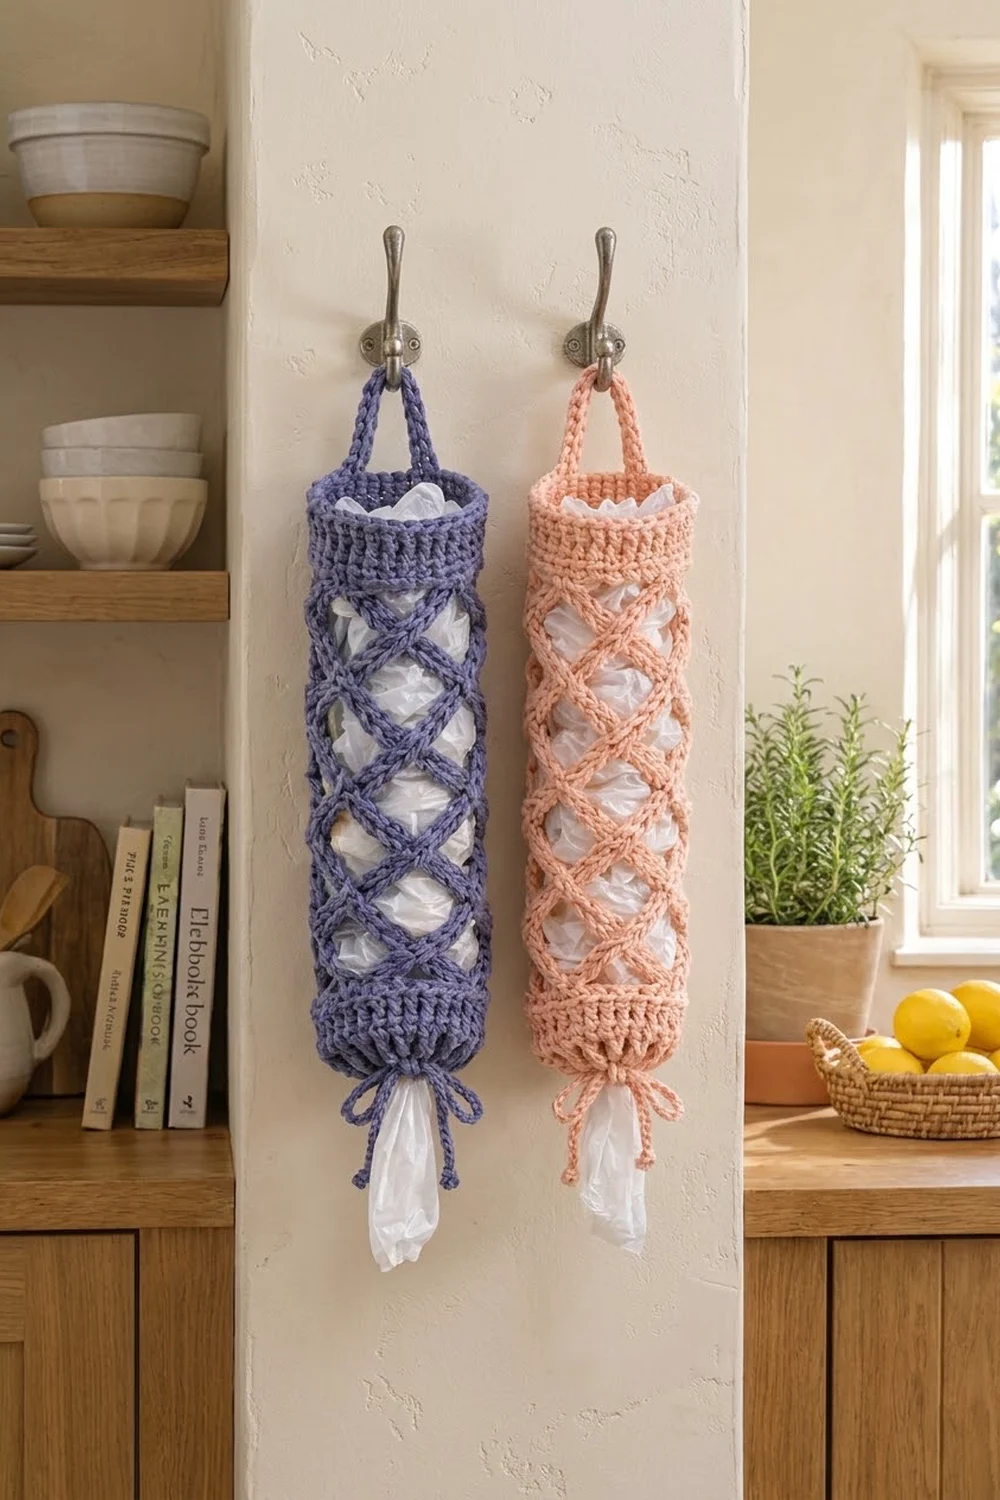
This bag holder is a tall crocheted tube that keeps loose grocery bags in one place. Solid bands at the top and bottom hold the shape. Between them, an open diamond lattice of thick, braided-looking cords lets the bags show through.
The sample is shown in two colorways: dusty periwinkle blue and soft peach. Each holder uses one color only. The style is clean and slightly retro, and it suits kitchen walls, pantry doors and laundry hooks. You push bags in at the top and pull them out through the drawstring opening at the bottom.
The pattern uses US crochet terms. The finished holder is 6 in (15.2 cm) wide when flat, 12 in (30.5 cm) around, and 16.75 in (42.5 cm) long, not counting the handle. The handle rises about 3 in (7.6 cm) above the rim.
Construction overview: you work in joined rounds from the bottom up. First comes a foundation ring, then an eyelet round for the drawstring, then the solid bottom band. Next are seven lattice rounds made of single crochet chain loops, followed by a round that turns the lattice back into stitches, then the top band and a reverse single crochet edge. The strap handle is worked straight onto the rim. Last, you make a cord drawstring and thread it through the eyelets.
Finished Size and Construction
- Finished size: 6 in (15.2 cm) wide flat × 16.75 in (42.5 cm) long
- Circumference: 12 in (30.5 cm)
- Skill level: Easy–Intermediate
- Terminology: US
- Yarn weight: Bulky (#5) cotton or cotton blend
- Hook: 6.0 mm (US J-10)
- Number of pieces: 1 tubular body with the handle worked on, plus 1 drawstring cord (threaded, not sewn)
- Layout: single vertical tube
- Body size before border: 16.5 in (41.9 cm) long
- Border depth: 0.25 in (0.6 cm), one round of reverse single crochet at the top rim
Materials
Yarn: Use a smooth bulky cotton or cotton-acrylic blend. Cotton holds the lattice open and does not stretch much under the weight of the bags. Avoid fuzzy yarns, because they hide the braided texture of the cords.
- Colorway 1: Periwinkle Blue, 110 g / 155 m per holder
- Colorway 2: Peach, 110 g / 155 m per holder
Each holder takes one color. The amounts include a margin of about 15% for your gauge swatch and the drawstring.
Tools:
– 6.0 mm (US J-10) crochet hook
– 2 locking stitch markers
– Tapestry needle
– Scissors
– Measuring tape
– Rust-proof pins and a blocking surface
Abbreviations (US Terms)
- ch: chain
- sl st: slip stitch
- sc: single crochet
- dc: double crochet
- sk: skip
- st(s): stitch(es)
- sp: space
- rev sc: reverse single crochet (crab stitch)
- scc: single crochet chain (special stitch)
Special stitch – single crochet chain (scc): Insert your hook under the left vertical strand of the stitch you just made. Yarn over and pull up a loop (2 loops on hook). Yarn over and draw through both loops. That is 1 scc. Each new scc is worked into the one before it, so you get a firm, rounded cord about twice as thick as a plain chain. This cord is what gives the lattice its braided look.
Scc gauge: 8 scc = 3 in (7.6 cm), measured relaxed.
Gauge and Checkpoints
Gauge: 12 sc and 12 rounds = 4 in (10.2 cm) in sc worked in joined rounds. Each sc round is about 1/3 in tall. A dc round counts as two sc rounds in height.
Before you start the holder, make a test piece. Chain 36, join it into a ring, and work Rounds 1–8 below. Then check:
- Checkpoint 1 (after Round 8): The tube measures 6 in (15.2 cm) across when flat and 3 in (7.6 cm) tall.
- Checkpoint 2 (after Round 12): The lattice measures 6 in (15.2 cm) tall when lightly stretched downward.
- Checkpoint 3 (after Round 15): The lattice measures 10.5 in (26.7 cm).
- Checkpoint 4 (after Round 24): The body measures 16.5 in (41.9 cm) long.
- Checkpoint 5 (after Round 25): The holder measures 16.75 in (42.5 cm) long.
If the tube is too wide, go down to a 5.5 mm hook. If it is too narrow, go up to a 6.5 mm hook. If only the lattice is too long or too short, keep your hook and change the length of each loop instead: use 7 scc for the standard design, or work one fewer or one more mesh round. The loop count must stay odd so that every loop has a center stitch.
Bottom Band
Foundation: Ch 36. Without twisting the chain, sl st to the first ch to form a ring.
Round 1: Ch 1, sc in each ch around, sl st to the first sc. (36 sc)
Round 2 (eyelet round): Ch 4 (counts as dc + ch 1), sk the next st, dc in the next st, ch 1, sk the next st 17 times, sl st to the 3rd ch of the beginning ch-4. (36 sts: 18 dc + 18 ch-1 sps)
Round 3: Ch 1, sc in each dc and in each ch-1 sp around, sl st to the first sc. (36 sc)
Rounds 4–8: Ch 1, sc in each st around, sl st to the first sc. (36 sc in each round)
Place a marker in the first st of Round 8. That spot is the back of the holder.
Checkpoint: 6 in (15.2 cm) wide flat and 3 in (7.6 cm) tall. Round 1 sits below the eyelets as a small lip, so the drawstring gathers cleanly.
Lattice Section
Each mesh round makes 6 loops around the tube. Each loop is 7 scc long. Every new round is anchored with a sc in the center stitch (the 4th scc) of each loop below. The offset anchors are what make the loops cross into diamonds.
Round 9 (set-up mesh round): Ch 1, sc in the first st, work 7 scc, sk the next 5 sts, sc in the next st 5 times, work 7 scc, sk the last 5 sts, sl st to the first sc. (6 loops: 42 scc + 6 sc anchors)
Check the math: 6 repeats × (1 anchor + 5 skipped) = 36 sts, which uses every stitch of Round 8 once.
Round 10: Sl st in each of the first 4 scc of the first loop, so you end in its center stitch. Ch 1, sc in the same scc, work 7 scc, sc in the 4th scc of the next loop 5 times, work 7 scc, sl st to the first sc. (6 loops: 42 scc + 6 sc anchors)
Rounds 11–15: Repeat Round 10. (6 loops: 42 scc + 6 sc anchors in each round)
That makes 7 mesh rounds in total (Rounds 9–15).
Checkpoint: With a light downward tug, the lattice measures 10.5 in (26.7 cm). Each mesh round adds about 1.5 in (3.8 cm).
Top Band
Round 16 (conversion round): Sl st in each of the first 4 scc of the first loop. Ch 1, sc in the same scc, ch 5, sc in the 4th scc of the next loop 5 times, ch 5, sl st to the first sc. (36 sts: 6 sc + 30 ch)
The 6 sc are worked one per existing loop center, and the 30 ch are the new stitches added. Together they bring you back to the bottom band’s count.
Round 17: Ch 1, sc in each sc and in each ch around, sl st to the first sc. (36 sc)
Rounds 18–24: Ch 1, sc in each st around, sl st to the first sc. (36 sc in each round)
The top band (Rounds 16–24) is nine rounds tall, or about 3 in (7.6 cm).
Checkpoint: The body measures 16.5 in (41.9 cm) long and still 6 in (15.2 cm) wide flat. If the top band flares, Round 16’s chains are too loose. Redo that round with ch 4 between anchors, and in Round 17 work 1 extra sc into one ch-4 sp in each of the 6 sections. That still gives 36 sts.
Border
Border gauge: Rev sc is worked 1 per stitch at the same 12 sts = 4 in (10.2 cm) as the body. It adds 0.25 in (0.6 cm) of depth and no width.
Round 25: Ch 1. Working from left to right, rev sc in each st around, sl st to the first rev sc. Fasten off. (36 rev sc)
To keep the rim even, think of it in 4 quarters (front left, front right, back right, back left) of 9 rev sc each: 4 × 9 = 36. Place markers at sts 1 and 19 so the rim is split into two halves of 18 sts. The handle attaches at these two points.
Why the math works: Every band round has 36 sts. Rev sc works 1 into each existing st and adds nothing, so the rim keeps the band’s 12 in (30.5 cm) circumference. It will not ruffle or pull in.
Handle:
Row 1: Join yarn with a sl st in st 1 of Round 25. Ch 27, then sl st in st 19 (directly across the rim). (27 ch)
Row 2: Sl st in st 20, turn. Sc in each ch across, then sl st in st 36. (27 sc)
Row 3: Sl st in st 35, turn. Sc in each sc across, then sl st in st 21. Fasten off. (27 sc)
The handle is 9 in (22.9 cm) long and about 0.75 in (1.9 cm) wide. It arches about 3 in (7.6 cm) above the rim.
Drawstring:
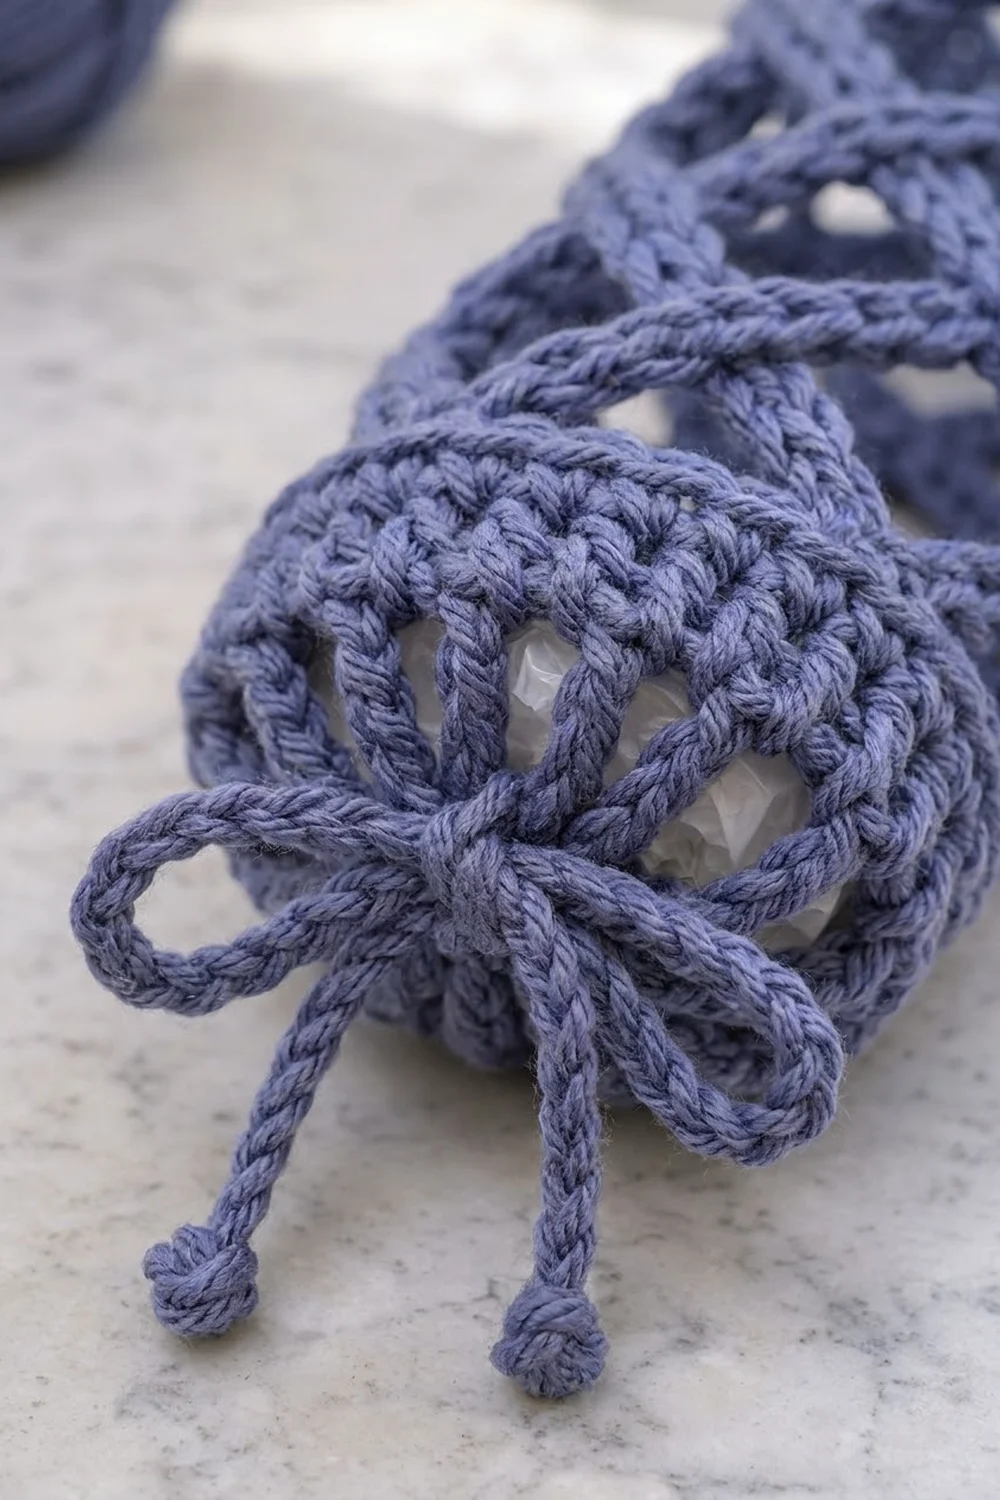
Ch 2, sc in the 2nd ch from hook, then work 63 scc. (64 cord sts) The cord measures 24 in (61.0 cm). Fasten off and tie an overhand knot at each end.
Starting at the front, thread the cord over and under through the 18 ch-1 eyelets in Round 2. Bring both ends out of the same gap. Pull the cord until the bottom opening is about 1.5 in (3.8 cm) across, then tie a bow.
Final Blocking
- Weave in all ends, running each one through at least 2 in (5.1 cm) of solid band.
- Untie the drawstring and pull the cord out.
- Soak the holder in cool water for 10 minutes, then gently press out the water without wringing.
- Roll it in a towel to take out extra moisture.
- Slide a rolled towel or a 4 in (10.2 cm) wide cardboard tube inside to hold the cylinder shape.
- Lay it flat. Pin the bands to 6 in (15.2 cm) wide and the full length to 16.75 in (42.5 cm).
- Straighten each diamond so all the anchor points line up in diagonal lines.
- Let it dry completely, then thread the drawstring back in.
Final Quality-Control Checklist
- The bottom and top bands each have exactly 36 sts.
- Round 2 has 18 even eyelets.
- Every mesh round has 6 loops of 7 scc.
- Every anchor sits in the 4th scc of the loop below it.
- The diamonds line up straight with no twist up the tube.
- The rev sc edge lies flat and is 36 sts around.
- The handle ends sit directly across from each other.
- The drawstring cinches to about 1.5 in (3.8 cm) and the knots don’t slip.
- The finished size is 6 × 16.75 in (15.2 × 42.5 cm).
Troubleshooting
- The lattice spirals: You probably worked into the 3rd or 5th scc instead of the 4th. Count each loop as you go.
- The loops are too floppy: Your scc stitches are loose. Tighten your tension, or work 5 scc per loop. In Round 16, use ch 4 and the fix from the Top Band checkpoint.
- The top band flares: See the note under the Top Band checkpoint.
- The bags fall out the bottom: Tighten the drawstring, or make a second knot in the bow.
- The handle tilts: Check that it attaches 18 sts apart on each side.
- The cord is too thin: Work the scc into both strands of the left side of the previous stitch.
Care
Hand wash or machine wash on cool in a mesh bag, and dry flat in shape. Cotton can be reshaped while damp.
Final Notes
Every measurement in this pattern builds on the one before it. A gauge of 12 sc = 4 in (10.2 cm) gives a 36-st band that is 12 in (30.5 cm) around and 6 in (15.2 cm) flat. The bottom band is 3 in (7.6 cm) tall. Seven mesh rounds add 10.5 in (26.7 cm), and the top band adds another 3 in (7.6 cm), bringing the body to 16.5 in (41.9 cm). The border adds 0.25 in (0.6 cm), for a finished length of 16.75 in (42.5 cm). Measure at each checkpoint and the holder will come out at the right size.
Happy crocheting!