

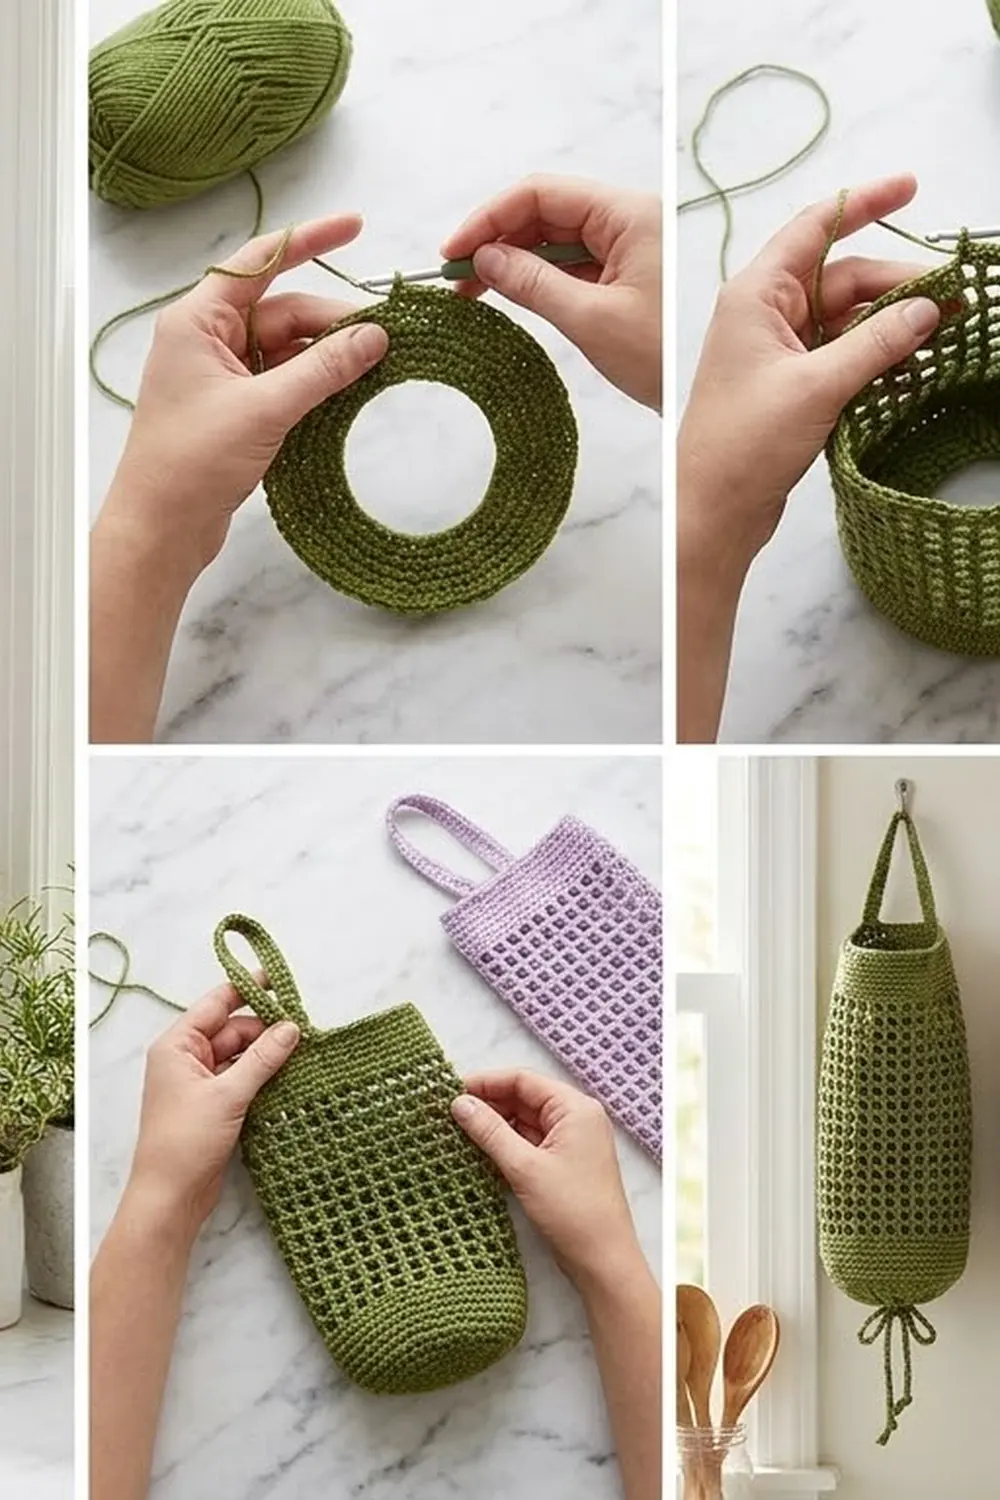
This is a tall, airy tube that hangs on a hook and holds a whole stash of plastic grocery bags. You stuff the bags in at the top and pull them out one at a time through a small cinched hole at the bottom. The open square mesh lets you see at a glance how many bags are left, and it uses much less yarn than a solid holder.
The sample is shown in two colorways: a warm olive green and a soft lavender. Each holder uses one color only, so it’s an easy way to match your kitchen or use up a single cake of cotton. The look is clean and modern: solid bands at the top and bottom frame a grid of neat open squares.
The pattern uses US crochet terms. The finished holder is about 6 in (15.2 cm) wide laid flat, 12 in (30.5 cm) around and 18.5 in (47.0 cm) tall, not counting the hanging strap.
It’s worked as one piece from the bottom up, with no seams. You make a single crochet ring with an eyelet round for the drawstring, then a tall body of treble mesh and a solid top band. Finally you add a strap and thread in a chain drawstring.
Finished Size and Construction
- Finished size: 6 in (15.2 cm) wide flat, 12 in (30.5 cm) around, 18.5 in (47.0 cm) tall
- Skill level: Easy
- Terminology: US crochet terms
- Yarn weight: Worsted / Aran (#4), cotton or cotton blend
- Hook: 5.0 mm (US H-8)
- Number of pieces: 1 seamless tube, plus a crochet-chain drawstring
- Layout: Single vertical tube, worked bottom up in joined rounds
- Piece size: 48 stitches around, 24 stitches per flattened side
- Size before top band: 17 in (43.2 cm) tall (bottom band plus mesh)
- Top band depth: 1.5 in (3.8 cm)
- Strap: 1 in (2.5 cm) wide, 10 in (25.4 cm) long
Materials
Yarn: Use a smooth worsted weight cotton or a cotton-acrylic blend. Cotton holds the square shape of the mesh and doesn’t stretch much under the weight of the bags. Avoid fuzzy or very stretchy acrylic, because the mesh will sag and lengthen over time.
- Main color (choose one): Olive green or lavender, 100 g (about 170 m / 186 yd)
Tools:
- 5.0 mm (US H-8) crochet hook
- Tapestry needle
- Stitch marker
- Scissors
- Measuring tape
- Optional: a 4 in (10.2 cm) wide jar, bottle or cardboard tube for blocking
The yarn amount includes a margin of roughly 25% for your gauge swatch, the drawstring and weaving in ends. The holder itself uses about 75 g.
Abbreviations (US Terms)
- ch – chain
- sl st – slip stitch
- sc – single crochet
- tr – treble crochet (yarn over twice, insert hook, pull up a loop, [yarn over, pull through 2 loops] 3 times)
- fsc – foundation single crochet
- sk – skip
- sp – space
- st(s) – stitch(es)
- rnd(s) – round(s)
Special stitch: Mesh square. One mesh square is 1 tr plus the ch-2 space after it. Each square takes up 3 stitches of the round: the tr counts as 1 and the ch-2 counts as 2.
Beginning ch-6: In the mesh rounds, ch 6 at the start of the round counts as 1 tr plus ch 2.
Gauge and Checkpoints
Single crochet gauge: 16 sc and 16 rnds = 4 in (10.2 cm), worked in the round.
Mesh gauge: 4 mesh squares (12 sts) = 3 in (7.6 cm) wide, and 4 mesh rnds = 3 in (7.6 cm) tall. Each square is about 0.75 in (1.9 cm) on each side.
Test the piece first. Your first 8 rounds work as a gauge swatch. Make the bottom band, lay it flat and measure it before you start the mesh.
Checkpoints:
- After Rnd 1: The ring measures 12 in (30.5 cm) around and 6 in (15.2 cm) laid flat.
- After Rnd 8 (bottom band): The band is 2 in (5.1 cm) tall and still 6 in (15.2 cm) wide flat.
- After Rnd 12 (4 mesh rounds): The mesh is 3 in (7.6 cm) tall, and the squares look square instead of tall or squat.
- After Rnd 28 (mesh finished): The tube is 17 in (43.2 cm) tall.
- After Rnd 34 (top band): The tube is 18.5 in (47.0 cm) tall.
If the piece is too big: Change to a 4.5 mm (US 7) hook. If your squares are too tall but the width is right, work the mesh with dc instead of tr: ch 5 to start each round, and dc instead of tr. Add 2 to 4 more mesh rounds to reach 17 in (43.2 cm).
If the piece is too small: Change to a 5.5 mm (US I-9) hook. If the mesh is too short, add mesh rounds one at a time until you reach 17 in (43.2 cm).
Bottom Band
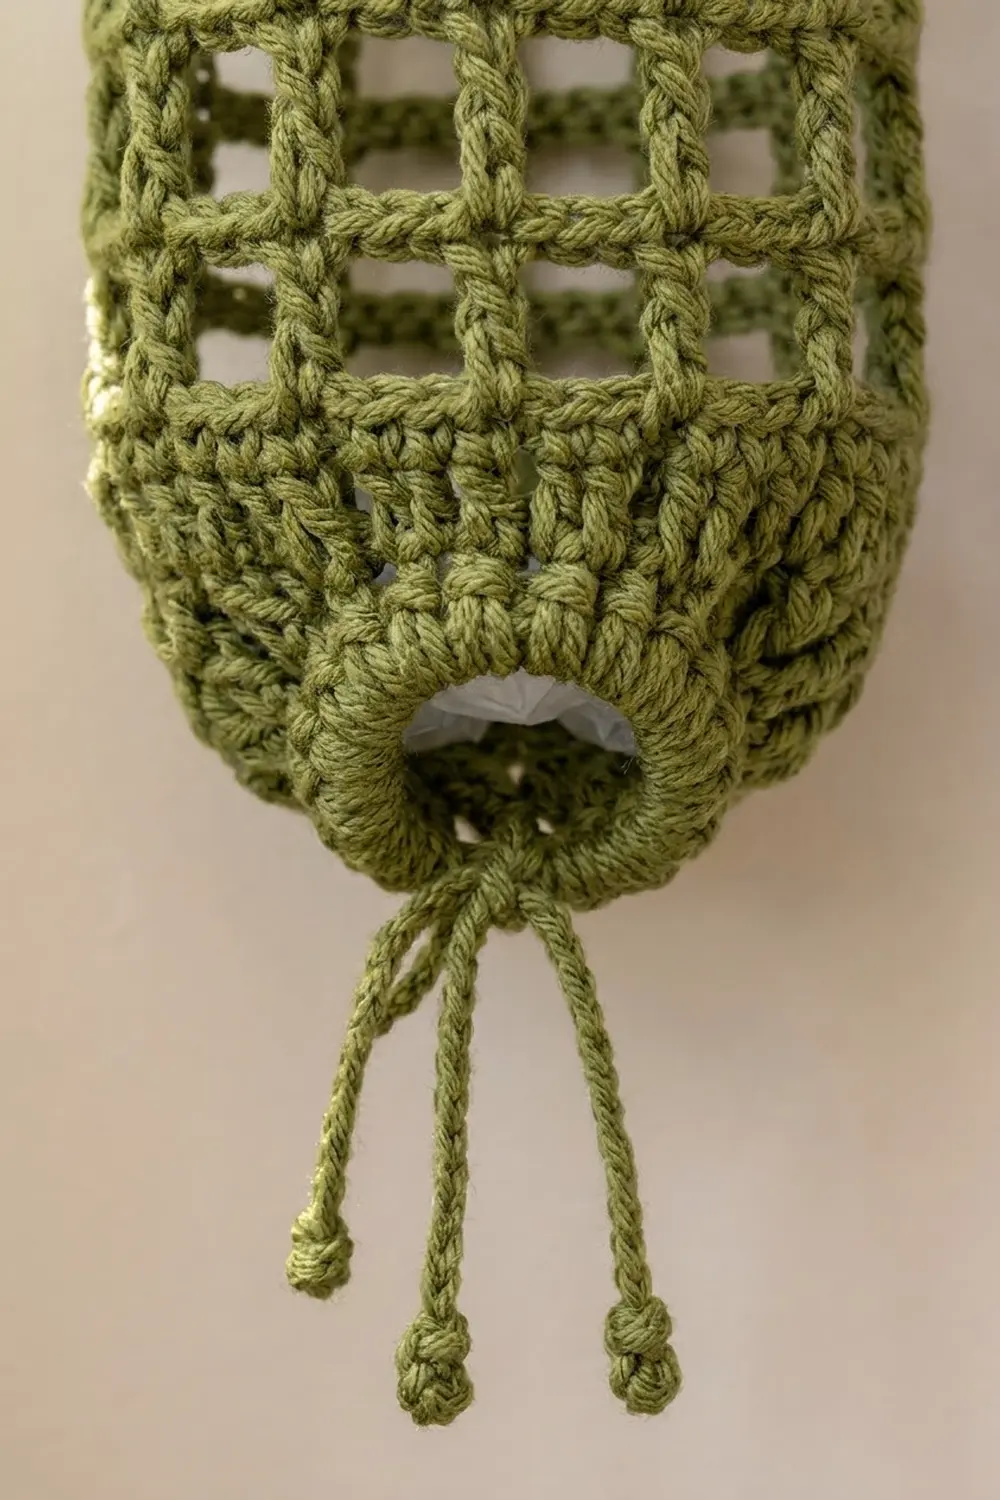
The holder starts at the bottom edge. The eyelet round sits close to the edge, so the drawstring gathers the very bottom into a small dispensing hole.
Rnd 1: Fsc 48, then join with a sl st to the first fsc, taking care not to twist. (48 sts)
If you don’t use foundation stitches, ch 48, join with a sl st to form a ring without twisting, then ch 1 and sc in each ch around. Join. (48 sts)
Rnd 2 (eyelet round): Ch 1, sc in next 4 sts, ch 2, sk 2 sts; rep from * 7 more times. Join with a sl st to the first sc. (32 sc + 8 ch-2 sps = 48 sts; 8 eyelets)*
Rnd 3: Ch 1, sc in next 4 sc, 2 sc in next ch-2 sp; rep from * 7 more times. Join. (32 sc worked 1 per sc + 16 sc in the spaces = 48 sts)*
Rnds 4–8: Ch 1, sc in each st around, then join. (48 sts)
Place a marker in the join of Rnd 8. The band should now be 2 in (5.1 cm) tall. Lay it flat and check that it’s 6 in (15.2 cm) wide.
Mesh Body
The mesh is worked straight up with no increases. Every round has 16 squares. Join every round so the columns of tr stack in straight vertical lines.
Rnd 9 (first mesh round): Ch 6 (counts as tr + ch 2), sk next 2 sts, tr in next st, ch 2, sk next 2 sts; rep from * 14 more times. Join with a sl st to the 4th ch of the beginning ch-6. (16 tr + 16 ch-2 sps = 48 sts; 16 squares)*
Rnd 10: Ch 6 (counts as tr + ch 2), tr in next tr, ch 2; rep from * 14 more times. Join with a sl st to the 4th ch of the beginning ch-6. (16 tr + 16 ch-2 sps = 48 sts; 16 squares)*
Rnds 11–28: Repeat Rnd 10. (48 sts; 16 squares each round)
That gives 20 mesh rounds in total (Rnds 9–28), for 15 in (38.1 cm) of mesh. Including the bottom band, the tube is 17 in (43.2 cm) tall.
Tips for neat mesh:
- Work each tr into the top of the tr below, not into the chain space.
- Keep the ch-2 relaxed but even, about the same width as the stitch it skips.
- The joins form a slightly visible line. That line becomes the side fold when the holder hangs.
Border (Top Band)
The top band is a solid single crochet rim. It gives the opening a firm edge for stuffing in bags and anchors the strap.
Border gauge: 16 sc = 4 in (10.2 cm), the same as the bottom band, so both bands are 6 in (15.2 cm) wide laid flat.
Rnd 29 (conversion round): Ch 1, sc in the same st as the join, 2 sc in next ch-2 sp, sc in next tr, 2 sc in next ch-2 sp; rep from * 14 more times. Join with a sl st to the first sc. (16 sc worked 1 per tr + 32 sc in the 16 spaces = 48 sts; 24 sts per flattened side)*
Rnds 30–34: Ch 1, sc in each st around, then join. (48 sts; 24 sts per flattened side)
Do not fasten off. The top band is now 6 rounds deep, or 1.5 in (3.8 cm).
Why the math works: Each mesh square takes up 3 stitches: 1 tr and 2 chains. Working 1 sc into each tr and 2 sc into each ch-2 space gives back exactly 3 sc per square. That’s 16 squares × 3 = 48 sts, the same count as the bottom band. When you flatten the tube, each side has 8 squares × 3 = 24 sts. Because the count never changes, the rim won’t flare or pull in, and the top band is the same 6 in (15.2 cm) width as the bottom.
Hanging Strap
The strap is worked in rows straight off the top band, then sewn to the opposite side.
Row 1: Ch 1, sc in the same st as the join and in the next 3 sts (sts 1–4), turn. (4 sts)
Rows 2–40: Ch 1, sc in each st across, turn. (4 sts)
The strap should be 10 in (25.4 cm) long and 1 in (2.5 cm) wide. Fasten off and leave a 12 in (30.5 cm) tail.
Count 24 sts around the rim from the start of the strap to find sts 25–28, which sit directly opposite. Without twisting the strap, sew the last row to the top of sts 25–28 with the tail. Go through both layers twice so the strap can carry a full load of bags.
Drawstring
Chain: Ch 72 so the chain is about 18 in (45.7 cm) long. Fasten off.
Weave the chain in and out through the 8 eyelets in Rnd 2, starting and ending at the same side fold. Pull it until the bottom closes to an opening about 1.5 in (3.8 cm) across. Tie the ends in a bow or a loose single knot. Then tie an overhand knot about 1 in (2.5 cm) from each end and trim, leaving a short tuft. These knotted ends hang below the holder.
Final Blocking
- Weave in all ends along the solid bands, not through the mesh, where they would show.
- Spray the holder lightly with water until it’s damp but not dripping.
- Slide it over a jar, bottle or cardboard tube about 4 in (10.2 cm) wide. If you don’t have one, use a rolled towel.
- Gently pull the mesh lengthwise until the tube measures 18.5 in (47.0 cm) from the bottom edge to the top rim.
- Use your fingers to square up each mesh opening so the tr columns run straight and the ch-2 bars run level.
- Flatten the top band so it measures 6 in (15.2 cm) across, and center the strap over the side folds.
- Let it dry completely before hanging and filling it.
Final Quality-Control Checklist
- The tube is 6 in (15.2 cm) wide flat and 18.5 in (47.0 cm) tall.
- The bottom band has 48 sts and 8 evenly spaced eyelets.
- There are 20 mesh rounds, each with 16 squares and no extra or missing columns.
- The top band has 48 sts, which is 24 per flattened side.
- The strap is 4 sts wide and 40 rows long, and is sewn exactly opposite its starting point.
- The drawstring closes the bottom to about 1.5 in (3.8 cm) and has knots at both ends.
- All ends are woven into the solid bands and are invisible from the outside.
Troubleshooting
The mesh columns slant or spiral. You’re probably working in continuous rounds or joining to the wrong chain. Join each round to the 4th ch of the beginning ch-6, and work each tr into the tr below.
The squares are tall and narrow. Your tr is too tall for your chain. Work the ch-2 a little looser, or switch to dc mesh as described in the gauge section.
The top band ruffles. You’ve added stitches. Recount Rnd 29: it should be 1 sc per tr and exactly 2 sc per ch-2 space, for 48 total.
The top band pulls in. You may have worked only 1 sc into some ch-2 spaces. Rework the round with exactly 2 sc in each space.
The drawstring keeps loosening. Tie a firm square knot after cinching, or add a 0.75 in (1.9 cm) wooden bead to slide and lock it.
The strap stretches. Work a row of sl st down each long edge, or use a 4.5 mm (US 7) hook for the strap only.
Care
Machine wash cotton on a gentle cold cycle inside a laundry bag, or hand wash. Reshape the holder over a jar and lay it flat to dry.
Final Notes
The whole design comes down to one number: 48 stitches. That’s 48 sc in the bottom band and 16 mesh squares × 3 sts = 48 in every mesh round. Converting back gives 16 + 32 = 48 sts in the top band, which is 24 per side. At 16 sc to 4 in (10.2 cm), that keeps the tube at 6 in (15.2 cm) wide from bottom to top. The heights stack the same way: 2 in (5.1 cm) of bottom band, then 15 in (38.1 cm) of mesh, then 1.5 in (3.8 cm) of top band, for 18.5 in (47.0 cm) in total. Check each step against these numbers and your holder will hang straight and hold plenty of bags.
Happy crocheting!