

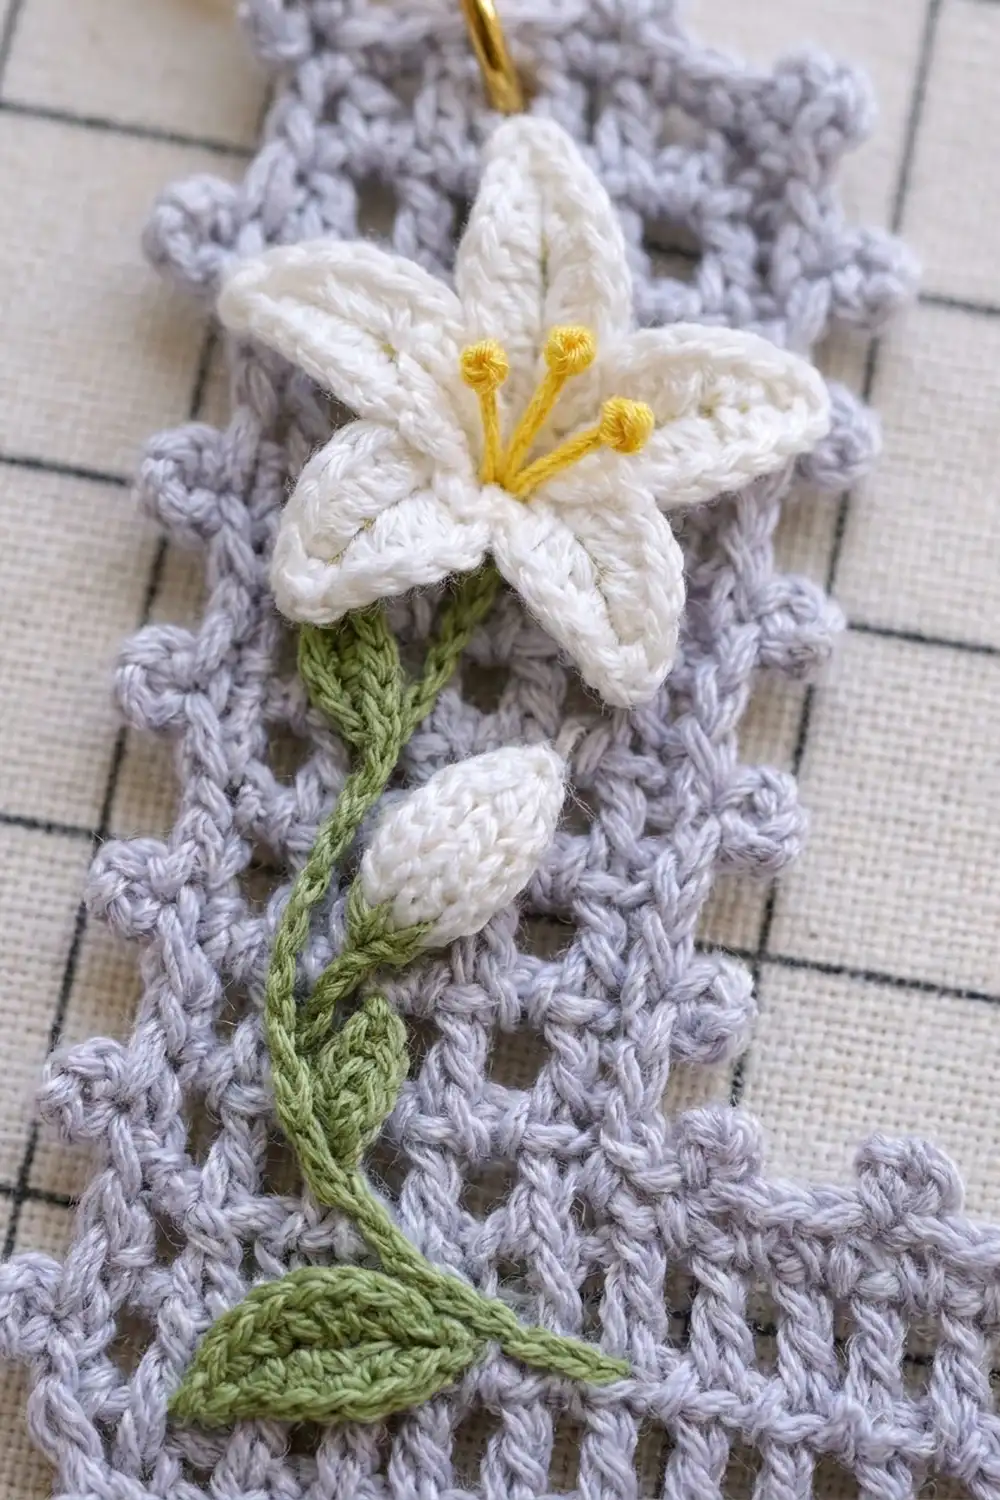
This little letter L is a soft, airy keychain worked in filet mesh. The open grid gives it a lacy look, a picot edge frames every side, and a small lily spray climbs the letter: two white lilies with yellow stamens, a closed bud, a curving green stem, and two leaves.
The palette is quiet and pretty: lavender-gray for the letter, white for the flowers and bud, green for the stem and leaves, and a touch of yellow for the stamens. A gold split ring at the top turns it into a keychain, bag charm, or gift tag.
The pattern uses US crochet terms. The finished letter measures 2.8 in (7.1 cm) wide and 3.7 in (9.4 cm) tall, not counting the ring. The upright bar is 1.6 in (4.1 cm) wide and the foot is 1.3 in (3.3 cm) tall, both including the border.
You will work the letter in one piece, in rows, starting at the foot and then carrying on up the upright bar. Next comes a two-round border: single crochet first, then picots. Last, you make the flowers, bud, leaves, and stem as separate appliqués and sew them on.
Finished Size and Construction
- Finished size: 2.8 in (7.1 cm) wide x 3.7 in (9.4 cm) tall
- Skill level: Intermediate
- Terminology: US
- Yarn weight: Fingering-weight cotton (size 3 crochet thread)
- Hook: 2.5 mm
- Number of pieces: 1 letter plus 6 small appliqués (2 lilies, 1 bud, 2 leaves, 1 stem)
- Layout: Single letter L, no joining
- Letter size before border: 2.4 in (6.1 cm) wide x 3.3 in (8.4 cm) tall
- Border depth: 0.2 in (0.5 cm) on every edge
Materials
Pick a smooth, mercerized fingering-weight cotton. It shows off the mesh clearly and keeps the picots crisp. Fuzzy or very soft yarns will blur the grid.
- Lavender-gray (letter and border): 5 g, about 17 m
- White (lilies and bud): 2 g, about 7 m
- Green (stem and leaves): 1 g, about 4 m
- Yellow embroidery floss (stamens): about 1 m
These quantities include a small safety margin.
Tools:
– 2.5 mm crochet hook
– Tapestry needle and a sharp sewing needle
– Gold split key ring, 1 in (2.5 cm), plus one 6 mm jump ring
– Two pairs of flat-nose pliers
– Rust-proof pins and a blocking board
– Spray bottle
– Ruler
Abbreviations (US Terms)
- ch – chain
- sl st – slip stitch
- sc – single crochet
- hdc – half double crochet
- dc – double crochet
- sk – skip
- sp – space
- st(s) – stitch(es)
- RS – right side
Picot: Ch 3, then sl st in the 3rd ch from the hook.
Mesh: One dc plus one ch-1 sp. A row of 8 mesh therefore has 9 dc and 8 ch-1 sps, which is 17 sts in total.
Gauge and Checkpoints
Gauge: In filet mesh, 5 mesh = 1.5 in (3.8 cm) wide and 5 rows = 1.5 in (3.8 cm) tall. That makes each square 0.3 in (0.8 cm) on a side.
The letter itself makes a good gauge test. Measure it at each checkpoint below before moving on.
- After Row 3: The foot is 2.4 in (6.1 cm) wide and 0.9 in (2.3 cm) tall.
- After Row 11: The upright bar is 1.2 in (3.0 cm) wide, and the whole letter is 3.3 in (8.4 cm) tall.
- After Border Round 1: About 2.6 in (6.6 cm) x 3.5 in (8.9 cm).
- After Border Round 2: 2.8 in (7.1 cm) x 3.7 in (9.4 cm).
If your piece is too big, go down to a 2.25 mm hook. If it is too small, go up to a 2.75 mm hook. The squares should come out square. If the rows are too tall, work your dc a little tighter, but don’t change the stitch counts.
Letter L
Use lavender-gray. You will work the foot first and then build the upright bar on one end of it.
Foundation: Ch 20.
Row 1: Dc in the 6th ch from the hook. The skipped chs count as dc, ch-1 sp, and one skipped ch. Ch 1, sk 1 ch, dc in next ch. Repeat from * to * 6 more times. Turn. (9 dc, 8 ch-1 sps = 17 sts, 8 mesh)
Row 2: Ch 4 (counts as dc and ch 1). Sk the first ch-1 sp and dc in the next dc. Ch 1, dc in next dc. Repeat from * to * across, placing the last dc in the top of the turning chain. Turn. (17 sts, 8 mesh)
Row 3: Repeat Row 2. Don’t turn yet. (17 sts, 8 mesh)
Checkpoint: the foot should measure 2.4 in (6.1 cm) x 0.9 in (2.3 cm).
Turn now.
Row 4 (upright bar begins): Ch 4 (counts as dc and ch 1). Sk the first ch-1 sp and dc in the next dc. (Ch 1, dc in next dc) 3 times. Leave the remaining 8 sts unworked. Turn. (5 dc, 4 ch-1 sps = 9 sts, 4 mesh)
Rows 5–11: Ch 4 (counts as dc and ch 1). Sk the first ch-1 sp and dc in the next dc. (Ch 1, dc in next dc) 2 times, ch 1, then dc in the top of the turning chain. Turn at the end of each row except Row 11. (9 sts, 4 mesh in each row)
Fasten off.
The finished letter has 11 rows: 3 for the foot and 8 for the upright bar. It is 3.3 in (8.4 cm) tall.
Choosing the RS: Lay the letter down so the upright bar is on the left and the foot runs off to the right. The side facing you is the RS. Filet mesh looks nearly the same on both sides, so pick whichever side has the neater turning chains.
Border
Border gauge: Along the top and bottom edges, every mesh square is 0.3 in (0.8 cm) wide and holds 2 sts, so you work 2 sc in each square. Along the side edges, every row is also 0.3 in (0.8 cm) tall, so you work 2 sc around each row-end post. Both directions get the same density of about 6.7 sc per inch, and that’s why the edge stays flat with no rippling or cupping.
The L has 5 outside corners. Call them C1 (bottom left), C2 (bottom right), C3 (top right of the foot), C4 (top right of the upright bar), and C5 (top left of the upright bar). Each one gets 3 sc. The inside corner, where the foot meets the bar, gets no extra sts.
Round 1 (RS): Hold the letter with the RS facing and the foundation edge at the bottom. Join lavender-gray with a standing sc in the bottom-left foundation ch (C1). Work 2 more sc in that same ch.
- Bottom edge: Working into the free loops of the foundation chain, sc in each of the next 15 chs, then 3 sc in the last ch (C2).
- Right end of the foot: Work 2 sc around each of the 3 row-end posts. (6 sc)
- C3: Work 3 sc in the top of the Row 3 turning chain.
- Top of the foot: Sc in each of the next 7 unworked sts of Row 3.
- Inside edge of the bar: Don’t add any sts at the inside corner. Work 2 sc around each of the 8 row-end posts of Rows 4–11. (16 sc)
- C4: Work 3 sc in the top of the Row 11 turning chain.
- Top of the bar: Sc in each of the next 7 sts.
- C5: Work 3 sc in the last dc of Row 11.
- Left side: Work 2 sc around each of the 11 row-end posts. (22 sc)
Sl st to the first sc. Then sl st into the next sc, which is the center sc of C1.
Round 1 count: 15 + 6 + 7 + 16 + 7 + 22 = 73 side sc, plus 5 corners x 3 sc = 15. Total: 88 sc.
Now count by corner centers instead. Between each pair of corner-center sts you have:
- C1 to C2: 17 sc
- C2 to C3: 8 sc
- C3 to C4: 25 sc
- C4 to C5: 9 sc
- C5 to C1: 24 sc
That’s 83 sc, plus the 5 corner centers, for 88 sc. Both counts match.
Round 2 (picot round): Ch 1. Sc in the same sc (C1 center), then picot.
- C1 to C2: Sc 3, picot, sc 4, picot, sc 3, picot, sc 4, picot, sc 3. (17 sc)
- C2: Sc, picot.
- C2 to C3: Sc 4, picot, sc 4. (8 sc)
- C3: Sc, picot.
- C3 to C4: Sc 4, picot, sc 7, picot, sc 4, picot, sc 3, picot, sc 4, picot, sc 3. (25 sc) The inside corner falls in the middle of the sc-7 group, and that keeps the inside corner from crowding.
- C4: Sc, picot.
- C4 to C5: Sc 3, picot, sc 3, picot, sc 3. (9 sc)
- C5: Sc, picot.
- C5 to C1: (Sc 4, picot) 5 times, sc 4. (24 sc)
Sl st to the first sc and fasten off.
Round 2 count: 88 sc and 22 picots. There are 5 corner picots plus 4 + 1 + 5 + 2 + 5 = 17 side picots.
The picots on each side are spaced every 3–4 sc, so they sit about 0.5 in (1.3 cm) apart all the way around. Checkpoint: the letter now measures 2.8 in (7.1 cm) x 3.7 in (9.4 cm).
Appliqués
Lily (make 2, white)
Round 1: Make a magic ring. Ch 1 and work 6 sc in the ring. Sl st to the first sc and pull the ring closed. (6 sc)
Round 2: Ch 5. Starting in the 2nd ch from the hook, sl st, sc, hdc, and dc, one st in each of the 4 chs. Sl st in the next sc of Round 1. Repeat from * to * 5 more times, ending with a sl st in the first sl st. (6 pointed petals)
Fasten off and leave a 10 in (25.4 cm) tail. Each lily is about 1.1 in (2.8 cm) across.
Stamens: Using yellow floss, make 5 straight stitches that fan out about 0.2 in (0.5 cm) from the center. Finish the tip of each one with a small French knot.
Bud (make 1, white)
Ch 5. Starting in the 2nd ch from the hook, work sc, hdc, and dc, then 5 dc in the last ch. Working along the other side of the chain, work dc, hdc, and sc, then sl st. (11 sts) Fasten off and leave a tail. The bud is about 0.5 in (1.3 cm) long.
Leaf (make 2, green)
Ch 6. Starting in the 2nd ch from the hook, work sc, hdc, dc, hdc, and sc. Ch 1 for the tip. Working along the other side of the chain, work sc, hdc, dc, hdc, and sc, then sl st. (10 sts plus the ch-1 tip) Each leaf is about 0.6 in (1.5 cm) long.
Stem (make 1, green)
Ch 14 and fasten off. It is about 1.8 in (4.6 cm) long.
Placement
Block the letter before you sew anything on (see below).
- Center the first lily on the upright bar over Rows 9–10. Let one or two petal tips overlap the left border a little.
- Start the stem just under that lily. Curve it gently down the middle of the bar to the inside corner, and tack it down every 2–3 chains.
- Sew the bud just to the right of the stem, around Rows 6–7, with its tip pointing up.
- Place the second lily at the inside corner so it straddles the bar and the foot, covering the lower end of the stem.
- Sew one leaf to the left of the lower lily and the other beside the stem under the upper lily.
Sew through the back of the mesh only, so your stitches don’t show on the RS.
Final Blocking
- Before adding the appliqués, spritz the letter until it is damp all the way through.
- Pin it RS up on the blocking board, measuring 2.8 in (7.1 cm) x 3.7 in (9.4 cm).
- Pin each of the 5 outside corners first, then pin the inside corner square.
- Pin each picot out into a small round point.
- Check that the upright bar is 1.6 in (4.1 cm) wide and the foot is 1.3 in (3.3 cm) tall.
- Leave it to dry completely, then attach the appliqués.
- Open the jump ring with the pliers. Pass it through the 5th sc of the top edge, the center sc between the two top picots. Add the split ring and close the jump ring tightly.
Final Quality-Control Checklist
- Rows 1–3 have 17 sts each, and Rows 4–11 have 9 sts each.
- Every mesh opening looks square.
- Round 1 has 88 sc, and Round 2 has 22 picots.
- The 5 outside corners are sharp and the inside corner lies flat.
- Each lily has 6 petals and 5 stamens.
- The appliqués are sewn securely and no stitches show on the RS.
- The jump ring is completely closed.
- Final size is 2.8 in (7.1 cm) x 3.7 in (9.4 cm).
Troubleshooting
- Mesh is leaning or rectangular: Your dc height doesn’t match your ch-1 width. Try a different hook size, or pull your dc up a little taller or shorter.
- Border ripples: You worked more than 2 sc per row end. Take it out and recount.
- Border cups: You worked fewer than the stated sts. Check each side against the counts in Round 1.
- Inside corner puckers: Block it hard with a pin pushed right into the corner.
- Petals curl: Steam them lightly and press them flat with your fingers.
- Ring tilts: You attached it off center. Move it to the 5th sc of the top edge.
Care
Hand wash in cool water and press flat in a towel to remove the water. Reshape the picots and let the keychain dry flat, away from heat.
Final Notes
Here is the full measurement chain. Each mesh square is 0.3 in (0.8 cm). Eight mesh make the 2.4 in (6.1 cm) foot, and 11 rows give 3.3 in (8.4 cm) of height. Two border rounds, with 88 sc and 22 picots, add 0.2 in (0.5 cm) on every edge, bringing the letter to 2.8 in (7.1 cm) x 3.7 in (9.4 cm).
If you check your gauge at each stage, your lily L will block neat and square every time.
Happy crocheting!