

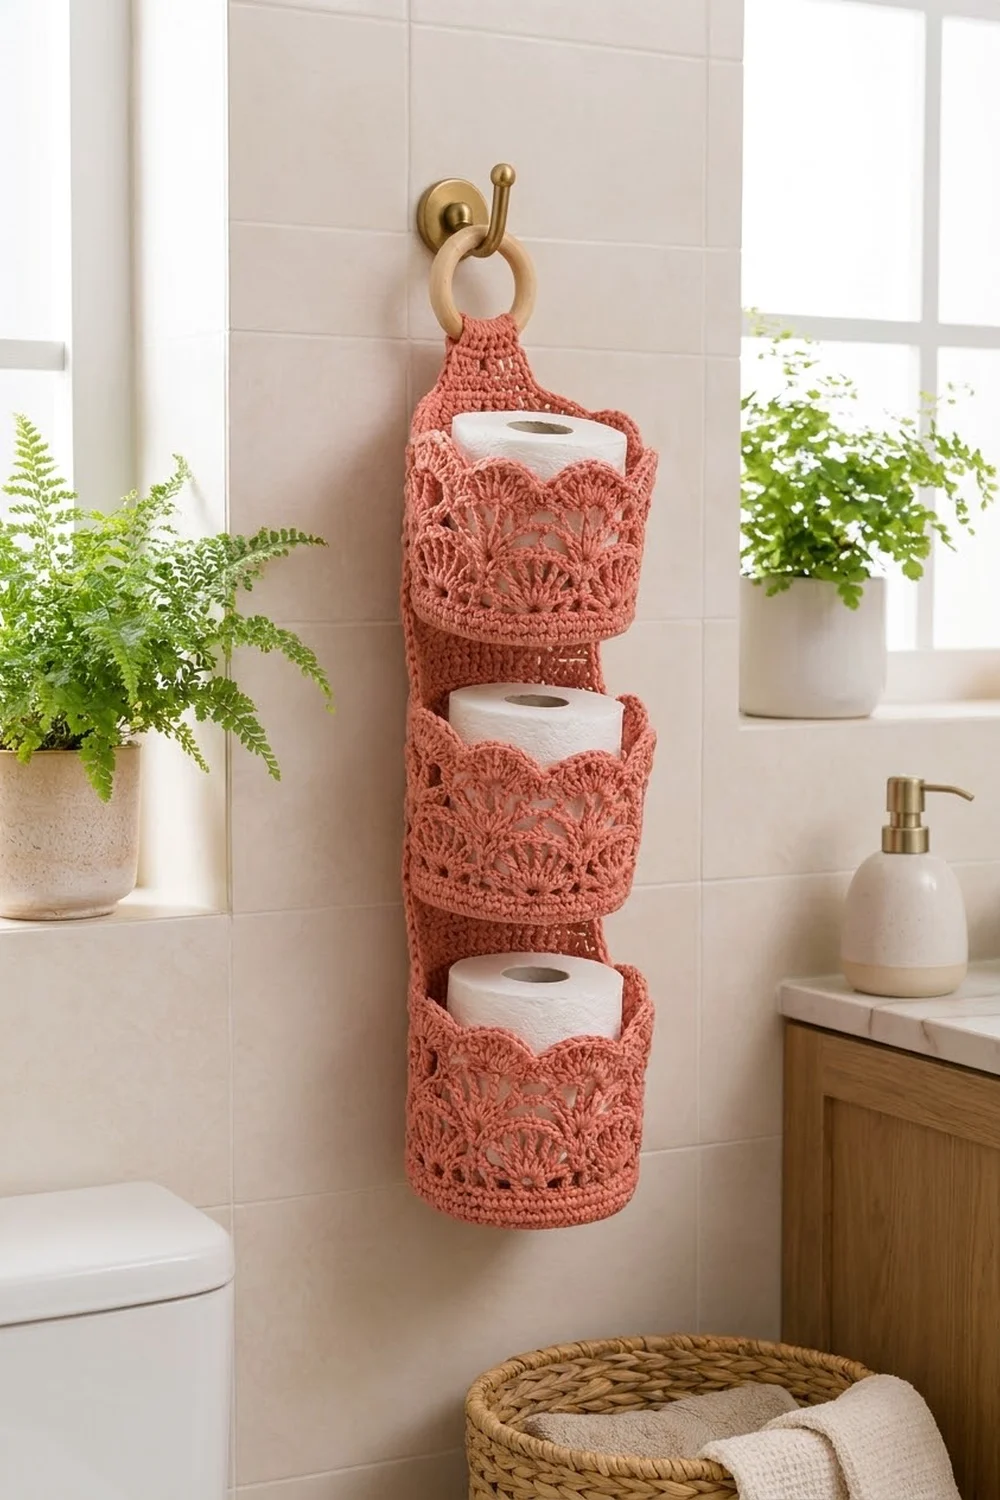
This hanging holder has three lacy pockets, each holding one spare roll. It hangs from a wooden ring, so it fits on a towel hook or a spare wall hook, and it keeps the rolls off the floor and within reach.
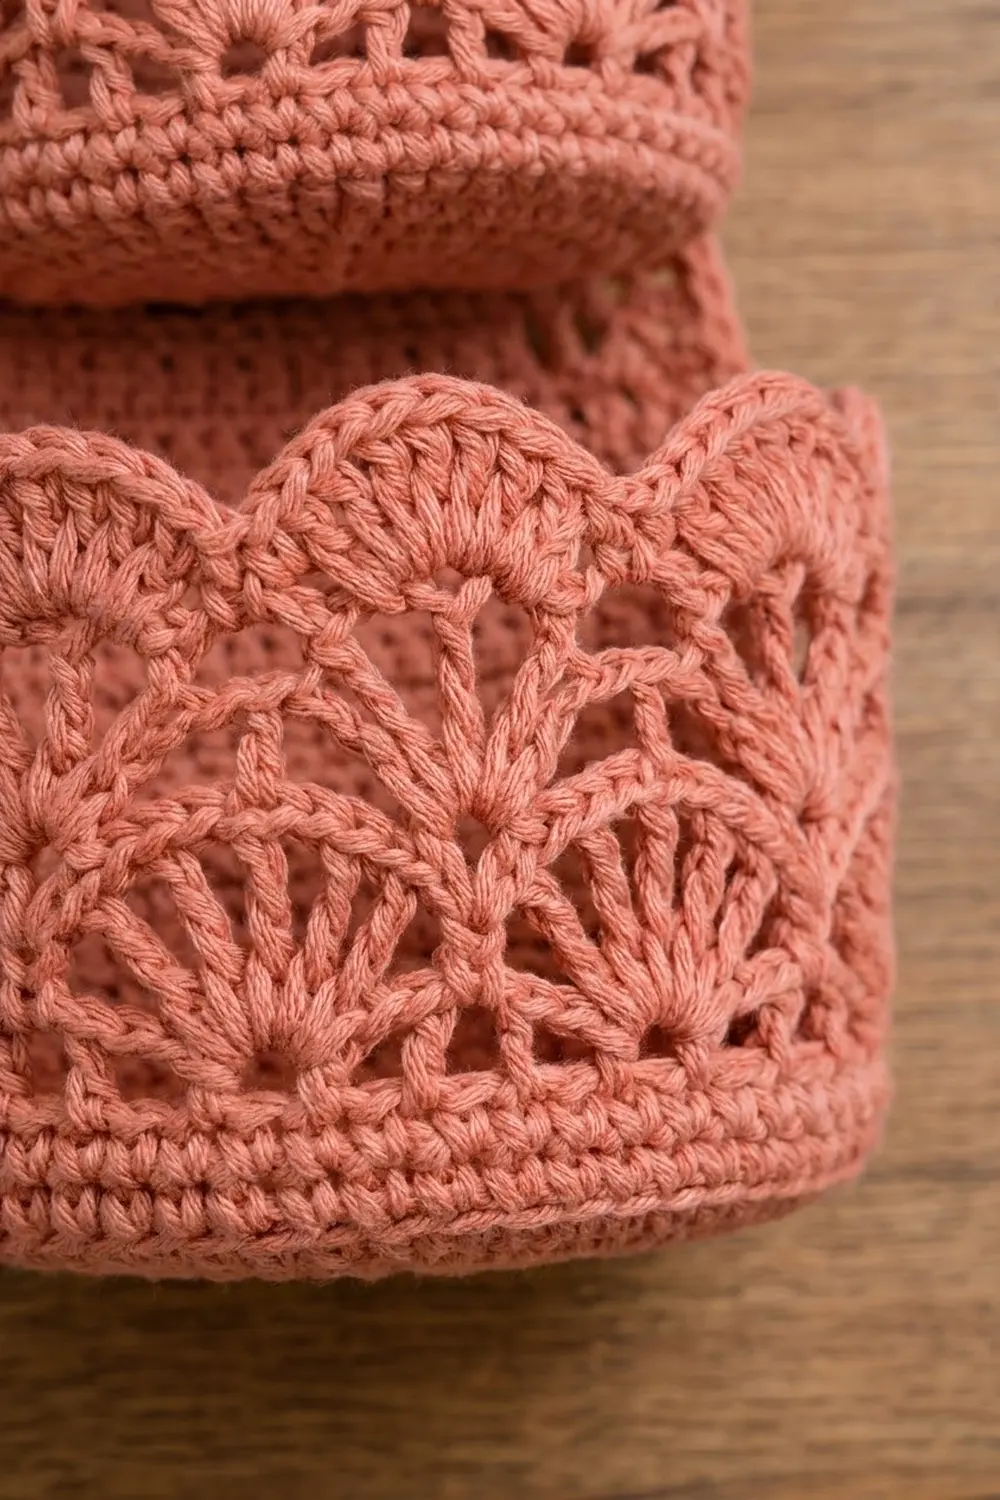
It is worked in one coral cotton. Each pocket has a solid single crochet base and band, two offset tiers of fans and a scalloped rim. The back panel is plain single crochet with a soft crab-stitch edge, so the pockets stand out.
This pattern uses US crochet terms. The finished holder is about 5.5 in (14.0 cm) wide and 18 in (45.7 cm) long, not counting the ring. Each pocket is 4.75 in (12.1 cm) across and 3.75 in (9.5 cm) tall at the scallop peaks.
Construction is simple. Each of the three pockets is worked in joined rounds, from the base up to the scallops. The back panel is worked flat in rows and narrows at the top into a strap. You sew the pockets to the panel, add a two-round border around the panel, and fold the strap through the ring.
Finished Size and Construction
- Finished size: 5.5 in x 18 in (14.0 cm x 45.7 cm), excluding ring
- Skill level: Intermediate
- Terminology: US
- Yarn weight: Worsted (#4) cotton
- Hook: 5.0 mm (H-8)
- Number of pieces: 4 (1 back panel, 3 pockets)
- Layout: 1 column x 3 pockets, stacked vertically
- Pocket size: 4.75 in (12.1 cm) base diameter, 3.75 in (9.5 cm) tall
- Panel before border: 4.5 in x 19 in (11.4 cm x 48.3 cm), strap unfolded
- Border depth: 0.5 in (1.3 cm) per edge
Materials
Use a smooth worsted-weight cotton or cotton blend. Cotton holds its shape and makes crisp fans, and it is washable, which matters in a bathroom. Avoid fuzzy or very stretchy yarn, because the pockets will sag under the weight of the rolls.
- Coral cotton, worsted weight: 350 g / 540 m (about 590 yd)
- Each pocket: about 65 g / 100 m
- Back panel plus border: about 97 g / 150 m
These amounts include a margin of about 15% for swatching and seaming.
Tools:
– 5.0 mm (H-8) crochet hook
– Wooden ring, 3 in (7.6 cm) diameter
– Tapestry needle
– 4 locking stitch markers
– Scissors and a tape measure
– Blocking mat and rust-proof pins
Abbreviations (US Terms)
- ch – chain
- sl st – slip stitch
- sc – single crochet
- hdc – half double crochet
- dc – double crochet
- sc2tog – single crochet 2 together
- BLO – back loop only
- sk – skip
- sp – space
- st(s) – stitch(es)
- rep – repeat
- rev sc – reverse single crochet (crab stitch)
Special stitch – V-st: (dc, ch 2, dc) all in the same stitch.
Rev sc: Work from left to right (right-handed). Insert the hook into the next stitch to the right, yarn over, pull up a loop, then yarn over and pull through both loops on the hook.
Gauge and Checkpoints
Gauge: 16 sc x 16 rows = 4 in (10.2 cm).
Chain 21 and work 20 rows of 20 sc. The swatch should measure 5 in (12.7 cm) square. Measure the center 4 in (10.2 cm). The stitch gauge and row gauge are the same, and the border math depends on that.
Test one pocket first. Make Pocket 1 and check it before making anything else.
Checkpoints:
– After Round 10: base is 4.75 in (12.1 cm) across. Anything from 4.5 to 5 in (11.4 to 12.7 cm) works.
– After Round 14: circumference is 15 in (38.1 cm) and the band is 1 in (2.5 cm) tall.
– After Round 20: pocket is 3.75 in (9.5 cm) tall at the peaks.
– Panel after Row 54: 4.5 in x 13.5 in (11.4 cm x 34.3 cm).
If your piece is too big, go down one hook size. If it is too small, go up one hook size. A standard roll is about 4.25 in (10.8 cm) across and 4 in (10.2 cm) tall, so it should drop into the pocket easily. If it is snug, go up a hook size.
Pockets (Make 3)
Work in joined rounds and don’t turn. Ch 1 at the start of a round does not count as a stitch.
Base
Round 1: Make a magic ring, ch 1, work 6 sc in the ring, then sl st to the first sc. (6 sts)
Round 2: Ch 1, 2 sc in each st around, then join. (12 sts)
Round 3: Ch 1, sc in the next st, 2 sc in the next st; rep around, then join. (18 sts)
Round 4: Ch 1, sc in the next 2 sts, 2 sc in the next st; rep around, then join. (24 sts)
Round 5: Ch 1, sc in the next 3 sts, 2 sc in the next st; rep around, then join. (30 sts)
Round 6: Ch 1, sc in the next 4 sts, 2 sc in the next st; rep around, then join. (36 sts)
Round 7: Ch 1, sc in the next 5 sts, 2 sc in the next st; rep around, then join. (42 sts)
Round 8: Ch 1, sc in the next 6 sts, 2 sc in the next st; rep around, then join. (48 sts)
Round 9: Ch 1, sc in the next 7 sts, 2 sc in the next st; rep around, then join. (54 sts)
Round 10: Ch 1, sc in the next 8 sts, 2 sc in the next st; rep around, then join. (60 sts)
Checkpoint: the base lies flat and measures 4.75 in (12.1 cm) across.
Solid Band
Round 11: Ch 1, sc in the BLO of each st around, then join. (60 sts) This makes a ridge that turns the base into the wall.
Rounds 12–14: Ch 1, sc in each st around, then join. (60 sts)
Checkpoint: the band is 1 in (2.5 cm) tall and the circumference is 15 in (38.1 cm).
Fan Lace
Round 15: Ch 1, sc in the next st, ch 4, sk the next 4 sts; rep 12 times, then join to the first sc. (12 sc, 12 ch-4 sps)
Round 16 (lower fans): Sl st into the first ch-4 sp, ch 1, sc in the same sp. Ch 3, work 7 dc in the next ch-4 sp, ch 3, sc in the next ch-4 sp; rep around, omitting the last sc, then join to the first sc. (6 sc, 6 fans of 7 dc = 48 sts, plus 12 ch-3 sps)
Round 17 (V-sts): Sl st into the next ch-3 sp, then sl st in each of the next 4 dc. You are now in the center dc of the first fan. Ch 1, sc in the same dc. Ch 4, V-st in the next sc, ch 4, sc in the center dc of the next fan; rep around, omitting the last sc, then join. (6 sc, 6 V-sts, 12 ch-4 sps)
Round 18 (upper fans): Ch 1, sc in the first sc. Ch 3, work 9 dc in the ch-2 sp of the next V-st, ch 3, sc in the next sc; rep around, omitting the last sc, then join. (6 sc + 54 dc = 60 sts, plus 12 ch-3 sps)
The upper fans sit between the lower fans, which gives the staggered look.
Checkpoint: Rounds 15–18 add about 2 in (5.1 cm) of height.
Scalloped Rim
Round 19 (trim): Ch 1. Sc in the next sc, 2 sc in the next ch-3 sp, sc in each of the next 9 dc, 2 sc in the next ch-3 sp; rep 6 times, then join. Count: 60 sts worked 1 per existing stitch + 24 sts added (2 in each of the 12 ch-3 sps) = 84 sts. Each 14-st repeat is centered over one upper fan.
Round 20 (scallops): Ch 1. Work this sequence 6 times around:
– sl st in the next st
– sk 1 st
– sc in the next st
– hdc in the next st
– dc in each of the next 3 sts
– 3 dc in the next st
– dc in each of the next 3 sts
– hdc in the next st
– sc in the next st
– sk 1 st
Join to the first sl st. (14 sts per repeat x 6 = 84 sts, 6 scallops)
The 3-dc group lands on the center stitch over each fan. The sl sts form the valleys between scallops. Fasten off, leaving a 24 in (61.0 cm) tail for sewing.
Checkpoint: the pocket is 3.75 in (9.5 cm) tall at the scallop peaks.
Back Panel
Work flat in rows. Ch 1 at the start of a row does not count as a stitch.
Foundation: Ch 19.
Row 1: Sc in the 2nd ch from the hook and in each ch across. (18 sts)
Rows 2–54: Ch 1, turn, sc in each st across. (18 sts)
Checkpoint: the panel is 4.5 in x 13.5 in (11.4 cm x 34.3 cm).
Shoulder Taper
Each row starts with ch 1 and turn, then sc2tog, sc across the middle, and ends with sc2tog.
- Row 55: sc2tog, sc in the next 14 sts, sc2tog. (16 sts)
- Row 56: sc2tog, sc in the next 12 sts, sc2tog. (14 sts)
- Row 57: sc2tog, sc in the next 10 sts, sc2tog. (12 sts)
- Row 58: sc2tog, sc in the next 8 sts, sc2tog. (10 sts)
- Row 59: sc2tog, sc in the next 6 sts, sc2tog. (8 sts)
- Row 60: sc2tog, sc in the next 4 sts, sc2tog. (6 sts)
The taper is 1.5 in (3.8 cm) tall.
Strap
Rows 61–76: Ch 1, turn, sc in each st across. (6 sts) Do not fasten off yet.
Checkpoint: the strap is 4 in (10.2 cm) long, and the whole panel is 19 in (48.3 cm) long.
Make All Pieces
- Coral pockets: 3
- Coral back panel: 1
Layout, as seen from the front:
Rows 61–76   [ strap → ring ]
Rows 55–60   [ shoulder taper ]
Rows 38–53   [ Pocket C ]
Rows 20–35   [ Pocket B ]
Rows 2–17    [ Pocket A ]
Row 1        [ bottom edge ]
There are 2 rows, or 0.5 in (1.3 cm), between the pockets.
Joining
Use a whipstitch and the matching tail.
Mark the back of each pocket. On Round 11, place markers on stitch 55 and stitch 6. The 12 stitches from 55 through 6 (55–60, then 1–6) are the back of the pocket. Keep the round’s join hidden against the panel.
Bottom seam: Lay the panel right side up. Whipstitch the 12 back loops of Round 11 to panel stitches 4–15, one stitch to one stitch. Pocket A goes on Row 2, Pocket B on Row 20, and Pocket C on Row 38. The 12 seam stitches cover 3 in (7.6 cm), which leaves a 0.75 in (1.9 cm) margin on each side for the border.
Side seams: At each end of the bottom seam, whipstitch straight up the pocket’s stitch column to Round 19. Catch one panel stitch per pocket round. Stitches 4 and 15 on the panel line up with the pocket’s marked stitches.
Tension: Keep the seams firm but not tight. If you pull too hard, the panel puckers. If the seams are too loose, the pocket tips forward when it holds a roll.
Size checkpoint: The panel should still lie flat at 4.5 in (11.4 cm) wide.
Border
Border gauge: 4 sc = 1 in (2.5 cm) along both stitches and row ends. Join the yarn at the strap and work around the whole panel. The pockets do not add any border stitches.
Round 1: Ch 1. Work the edges in this order:
– Strap top: sc in each of the 6 sts. (6)
– First side: work 1 sc in each row end from Row 76 down to Row 61 (16 sts). On the taper (Rows 60–55), work 2 sc in the row ends of Rows 59, 57 and 55, and 1 sc in the others (9 sts). Then work 1 sc in each row end from Row 54 down to Row 2 (53 sts). Side total: 78.
– Bottom: 3 sc in the first foundation st, sc in the next 16 sts, 3 sc in the last foundation st. (22)
– Second side: work up from Row 2 to Row 76 with the same counts as the first side. (78)
Join. Total: 6 + 78 + 22 + 78 = 184 sts.
Round 2: Ch 1, rev sc in each st around, then join. (184 sts) Fasten off.
Why the math works:
– The stitch gauge matches the row gauge, so 1 sc per row end keeps the long sides flat.
– The taper edges slant across about 2.1 in (5.3 cm), so they need 9 sts instead of 6.
– Bottom corners get 3 sc so the corners lie square.
– Each border round adds 0.25 in (0.6 cm) per edge. That makes the panel 5.5 in (14.0 cm) wide and 20 in (50.8 cm) long before folding.
Attach the ring: Pass the top 2 in (5.1 cm) of the strap through the ring. That is Rows 71–76 plus the border. Fold it to the back and whipstitch it down. The finished length is 18 in (45.7 cm).
Final Blocking
- Wet the holder thoroughly and press out the water in a towel. Don’t wring it.
- Pin the panel flat at 5.5 in x 18 in (14.0 cm x 45.7 cm).
- Stuff each pocket with a rolled towel about 4.75 in (12.1 cm) across.
- Pin each scallop peak to open up the fans.
- Let it dry completely, which takes 24–48 hours.
Final Quality-Control Checklist
- [ ] Each base is 4.75 in (12.1 cm) across and lies flat.
- [ ] Each pocket has 6 lower fans, 6 upper fans and 6 scallops.
- [ ] Each pocket has 84 sts in Rounds 19 and 20.
- [ ] Pockets are evenly spaced, with 0.5 in (1.3 cm) gaps.
- [ ] Border Round 1 has 184 sts, and the edges don’t ruffle.
- [ ] The strap is sewn securely, and the ring hangs straight.
- [ ] Each pocket holds a roll without sagging.
Troubleshooting
The base cups upward. Your stitches are too tight. Go up a hook size, or add an increase round.
The base ruffles. Go down a hook size.
The fans lean to one side. Check that the Round 17 V-sts sit exactly in the Round 16 sc.
The scallops are uneven. Recount Round 19. Every repeat must have exactly 14 sts.
The panel ripples along the sides. You worked extra stitches on the straight sides. Keep to 1 sc per row end.
The pockets droop. Tighten the side seams, or make the pockets one hook size smaller.
Care
Hand wash or machine wash cold on a gentle cycle, then reshape and dry flat. Don’t tumble dry, because heat can shrink cotton and distort the fans.
Final Notes
Each step in this pattern sets up the next one:
– The 4.75 in (12.1 cm) base sets the 60-stitch walls.
– The 60 stitches divide evenly into 6 fan repeats.
– Round 19 trims to 84 stitches for 6 scallops.
– The 18-stitch panel gives a 0.75 in (1.9 cm) margin on each side of the pockets.
– The matching stitch and row gauge keeps the 184-stitch border flat.
Check each measurement before you move on, and the holder will hang straight. Happy crocheting!