

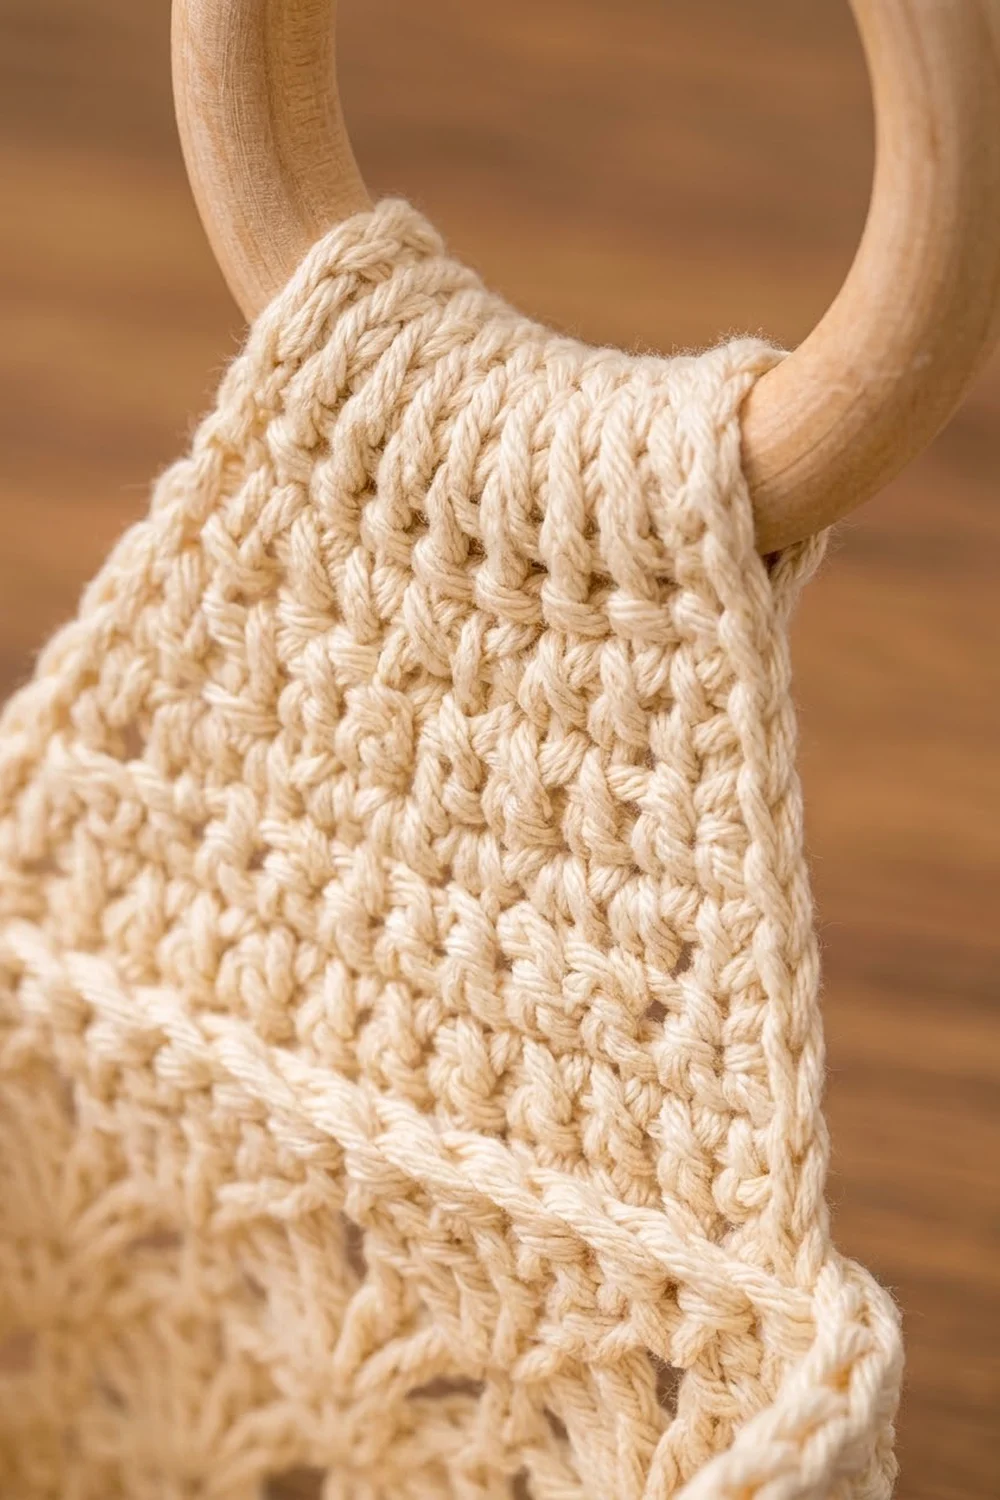
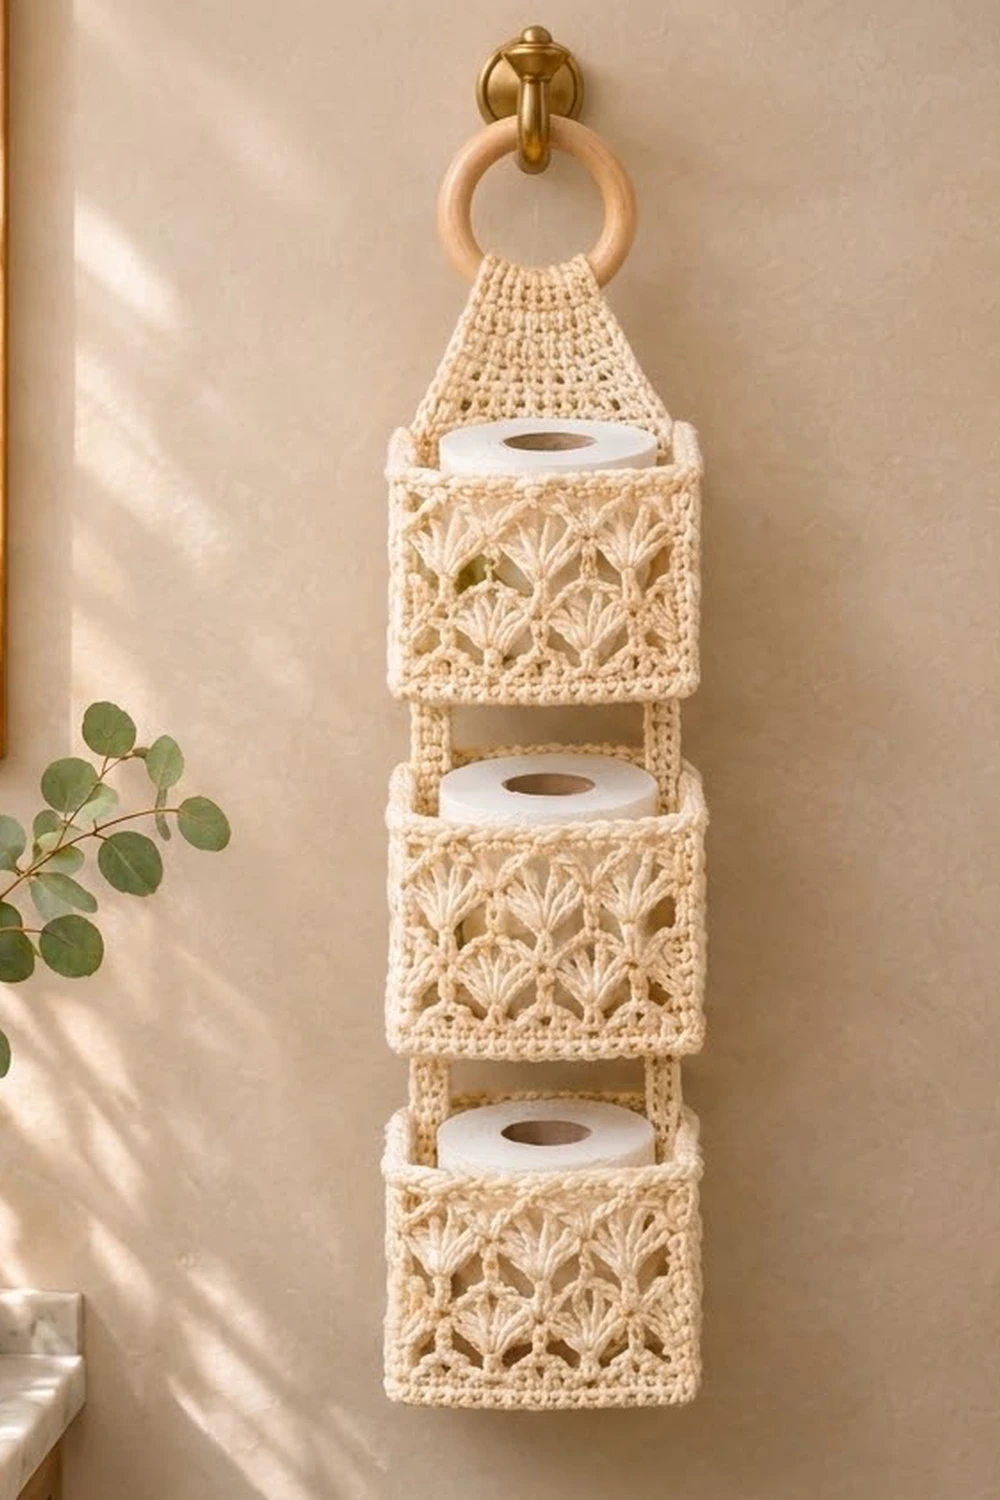
The Seashell Trellis holder is a three-tier wall organizer that keeps spare toilet rolls stacked and on display. Each basket has lacy fan-shell walls, a firm single crochet base and a corded rim. A solid tapered tab at the top wraps around a wooden ring so the holder hangs from any hook.
It’s made in one cream cotton yarn, which suits a warm, natural bathroom style alongside wood, brass and plants. The openwork shows the rolls through the walls, and the solid bands keep each basket square.
This pattern uses US crochet terms. The finished holder measures about 6 in (15.2 cm) wide and 24 in (61.0 cm) long, not counting the ring. Each basket is 6 in x 6 in x 5 in (15.2 cm x 15.2 cm x 12.7 cm).
Construction is simple. You crochet three baskets from the base up, make one top tab and four straps, and then sew everything together along the back walls.
Finished Size and Construction
- Finished size: 6 in (15.2 cm) wide x about 24 in (61.0 cm) long, ring excluded
- Skill level: Intermediate
- Terminology: US
- Yarn weight: Worsted (#4) cotton
- Hook: 5.0 mm (US H-8)
- Number of pieces: 8 (3 baskets, 1 top tab, 4 straps)
- Layout: 1 column of 3 baskets, with a tab on top and 2 straps in each gap
- Piece size: each basket is 6 in x 6 in x 5 in (15.2 cm x 15.2 cm x 12.7 cm)
- Size before border: each basket is 6 in x 6 in x 4.8 in (15.2 cm x 15.2 cm x 12.2 cm)
- Border depth: 0.2 in (0.5 cm) reverse single crochet rim
Materials
Use a smooth, firm worsted-weight cotton or cotton blend. Cotton holds the basket shape and handles bathroom humidity better than soft acrylic. Pick a yarn with good stitch definition so the fan shells show clearly.
- Cream: 300 g, about 510 m (558 yd)
Each basket uses roughly 70 g. The tab and straps use about 17 g together. The quantities above include a safety margin of about 25%.
Tools:
- 5.0 mm (US H-8) crochet hook
- Wooden ring, 2.5 in (6.4 cm) outer diameter
- Tapestry needle
- 4 stitch markers
- Measuring tape
- Scissors
- Optional: three 6 in (15.2 cm) squares of plastic canvas to stiffen the bases
Abbreviations (US Terms)
- ch – chain
- sl st – slip stitch
- sc – single crochet
- dc – double crochet
- sc2tog – single crochet 2 together
- BLO – back loop only
- sk – skip
- st(s) – stitch(es)
- rep – repeat
- Rnd – round
Special stitches:
- Shell: 5 dc in the same stitch.
- Reverse sc (crab stitch): working from left to right (right-handers), insert the hook into the next stitch to the right, yarn over, pull up a loop, then yarn over and pull through both loops on the hook.
Gauge and Checkpoints
Gauge:
- Single crochet: 16 sc x 18 rows = 4 in (10.2 cm)
- Shell pattern: 4 shell repeats (24 sts) = 6 in (15.2 cm), and 6 shell rounds = 4 in (10.2 cm)
Make one complete basket before starting the others. It works as your gauge test and shows whether a roll fits comfortably.
Checkpoints:
- After base Row 27: 6 in x 6 in (15.2 cm x 15.2 cm)
- After Rnd 2: the base edge measures 24 in (61.0 cm) around and lies flat
- After Rnd 8: the walls are about 4.25 in (10.8 cm) tall, measured from the BLO ridge
- After Rnd 11: the basket is 5 in (12.7 cm) tall
If your basket is too big, go down a half size to a 4.5 mm hook. If it’s too small, go up to a 5.5 mm hook. A standard roll is about 4.1 in (10.4 cm) across, so an undersized basket gets tight quickly.
Basket (Make 3)
Base
Ch 25.
Row 1: Sc in the 2nd ch from the hook and in each ch across, turn. (24 sc)
Rows 2–27: Ch 1, sc in each st across, turn. (24 sc)
The base now measures 6 in x 6 in (15.2 cm x 15.2 cm). Don’t fasten off.
Base Edge
Rnd 1: Ch 1. Do not turn. Work 24 sc down the row ends, skipping the 9th, 18th and 27th row ends. Work 24 sc across the foundation chain. Work 24 sc up the opposite row ends, skipping the same 3 row ends. Work 24 sc across the last row. Sl st to the first sc. (96 sc, 24 per side)
Place a marker in the first stitch of each side.
Rnd 2: Ch 1, sc in BLO of each st around, sl st to the first sc. (96 sc)
Working in the back loop pushes the front loops outward and creates the ridge that turns the walls up from the base.
Walls: Fan Shells
Rnd 3: Ch 1, sc in the first st. Sk 2, shell in the next st, sk 2, sc in the next st. Rep from * 15 more times, but leave out the final sc on the last repeat. Sl st to the first sc. (16 shells + 16 sc = 96 sts)
Each 6-stitch repeat contains 1 sc and 5 dc. That gives 4 repeats per side and a total of 96 stitches, the same as Rnd 2.
Rnd 4: Sl st in the next 3 sts, so that you land in the center dc of the first shell. Ch 1, sc in the same st. Sk 2 dc, shell in the next sc, sk 2 dc, sc in the center dc of the next shell. Rep from * around, leaving out the final sc on the last repeat. Sl st to the first sc. (16 shells + 16 sc = 96 sts)
Rnds 5–8: Rep Rnd 4. (96 sts in each round)
Each round puts its shells above the sc of the round below, so the fans alternate position. This makes the trellis look. You now have 6 shell rounds, and the walls are about 4.25 in (10.8 cm) tall.
Solid Band
Rnd 9 (conversion round): Ch 1, sc in each st around, sl st to the first sc. (96 sts worked 1 per existing stitch + 0 added = 96 sc)
Before you join, check that each side has 24 sc between the base-corner markers. Move the markers up to Rnd 9.
Rnd 10: Ch 1, sc in each st around, sl st to the first sc. (96 sc)
The basket is now 4.8 in (12.2 cm) tall. The rim border comes next and is described in the Border section below.
Top Tab (Make 1)
Ch 25.
Row 1: Sc in the 2nd ch from the hook and in each ch across, turn. (24 sc)
Row 2: Ch 1, sc2tog, sc in the next 20 sts, sc2tog, turn. (22 sc)
Row 3: Ch 1, sc in each st across, turn. (22 sc)
Rows 4–16: Rep Rows 2–3 six more times, then work Row 2 once more. Each decrease row has 2 fewer stitches: 20, 18, 16, 14, 12, 10, 8. (Row 16: 8 sc)
The trapezoid measures 6 in (15.2 cm) at the base, 2 in (5.1 cm) at the top and 3.6 in (9.1 cm) tall.
Rows 17–30: Ch 1, sc in each st across, turn. (8 sc)
This 14-row band is 3.1 in (7.9 cm) long. Fasten off and leave a 16 in (40.6 cm) tail.
Straps (Make 4)
Ch 5.
Row 1: Sc in the 2nd ch from the hook and in each ch across, turn. (4 sc)
Rows 2–16: Ch 1, sc in each st across, turn. (4 sc)
Each strap measures 1 in x 3.6 in (2.5 cm x 9.1 cm). Fasten off and leave a 14 in (35.6 cm) tail.
Make All Pieces
All pieces are Cream:
- Baskets: 3
- Top tabs: 1
- Straps: 4
Add the rim border to all 3 baskets before you start joining.
Layout (back view, top to bottom):
        [ RING ]
       /  TAB   \
   [   BASKET 1   ]
    |S|        |S|
   [   BASKET 2   ]
    |S|        |S|
   [   BASKET 3   ]
Joining
Use whipstitch with the Cream tails. Sew through both loops of each stitch, one stitch to one stitch.
Tab to Basket 1: Choose one side of the basket as the back wall. Lay Row 1 of the tab against the inside of that wall so that its 24 sts line up with the 24 sts of Rnd 9. Whipstitch them one to one, then tack the tab’s row ends to the wall down to Row 3. This 3-row overlap is 0.7 in (1.8 cm). Above it, the tab rises cleanly behind the corded rim.
Ring loop: Fold Rows 17–30 of the tab over the wooden ring toward the back. Whipstitch the 8 sts of Row 30 to the 8 sts of Row 16 on the wrong side, one to one.
Straps: Each gap gets 2 straps.
- On the back wall, the straps cover sts 2–5 and sts 20–23 of the 24 stitches. That puts each strap 1 st in from its corner.
- Lay the top 3 rows of each strap against the outside of the upper basket’s back wall, covering Rnds 1–3. Sew around the overlap: 4 sts across plus 3 row ends on each side.
- Lay the bottom 3 rows of each strap against the inside of the lower basket’s back wall, behind Rnds 9–10. Sew it the same way.
That leaves 10 rows of strap visible, which makes each gap 2.2 in (5.6 cm).
Tension: Keep the whipstitches snug but don’t pull them tight. If they’re too tight, the back wall puckers and the basket tilts forward.
Size checkpoint: Hang the holder from the ring. It should measure about 24 in (61.0 cm) from the top of the loop to the bottom of Basket 3. Both straps in each gap should be the same length, and all three rims should be level.
Border
The border is the corded rim worked around the top of each basket.
Border gauge: 16 reverse sc = 4 in (10.2 cm). This matches the sc gauge.
Rnd 11: Ch 1, then work reverse sc in each st around, working to the right. Sl st to the first st. Fasten off. (96 reverse sc: 24 per side)
Why the math works: Rnd 10 has 24 sts per side, and that count already includes the corner stitches. The rim takes exactly 1 stitch per stitch, with no extra corner stitches, so each side stays 6 in (15.2 cm) wide. Adding stitches at the corners would make the rim flare. The rim adds 0.2 in (0.5 cm), bringing the basket from 4.8 in (12.2 cm) to 5 in (12.7 cm).
Weave in all ends on the inside of the walls.
Final Blocking
- Dampen the whole holder with a spray bottle until it’s evenly moist but not dripping.
- Stuff each basket snugly with a roll wrapped in a plastic bag, or with a 6 in (15.2 cm) box, to square up the walls.
- Pinch each corner and the BLO ridge into crisp lines.
- Open each fan shell gently with your fingertips so the spaces show clearly.
- Lay the tab flat and pin it to 6 in (15.2 cm) at the base and 2 in (5.1 cm) at the top.
- Let it dry completely, at least 24 hours, before hanging.
- Optional: slide a plastic canvas square into each base.
Final Quality-Control Checklist
- Each basket is 6 in x 6 in x 5 in (15.2 cm x 15.2 cm x 12.7 cm)
- Each base has 24 sts per side, 96 in total
- Every shell round has 16 shells and 96 sts
- Rnds 9–11 each have 96 sts
- The tab tapers from 24 sts to 8 sts and the ring is sewn in securely
- The straps are 1 st in from the corners and the gaps are 2.2 in (5.6 cm)
- The holder hangs straight at about 24 in (61.0 cm)
- No ends show on the outside
Troubleshooting
- Walls flare outward: Your shells are too loose. Work the dc more tightly or go down a hook size for Rnds 3–8.
- Walls pull inward: Recount Rnd 3. You need 2 skipped sts on each side of every shell.
- Your shell count is off: Recheck your sl sts at the start of the round. You should land on the center (3rd) dc of a shell.
- Basket sags forward when hanging: Tack the tab and straps higher on the back wall, or add plastic canvas.
- Rim ripples: Check that Rnd 11 has 96 sts and no extra corner stitches.
- Roll is too tight: Go up a hook size for the base and walls.
- Holder leans to one side: Make sure both straps in each gap have the same visible length of 10 rows.
Care
Hand wash in cool water with mild soap, press out the water gently and dry flat with each basket stuffed so it holds its shape. Don’t tumble dry.
Final Notes
The measurements build on each other:
- 16 sc = 4 in (10.2 cm), so 24 sts make a 6 in (15.2 cm) side.
- The 6-st shell repeat fits 4 times per side, keeping 96 sts in every round.
- The solid band and rim add up to 5 in (12.7 cm) of height.
- The 24-st tab matches the back wall stitch for stitch.
- The straps leave 2.2 in (5.6 cm) gaps, which brings the hanger to about 24 in (61.0 cm).
Check gauge on the first basket, count the 96 sts at every checkpoint, and the rest of the holder will follow. Happy crocheting!