

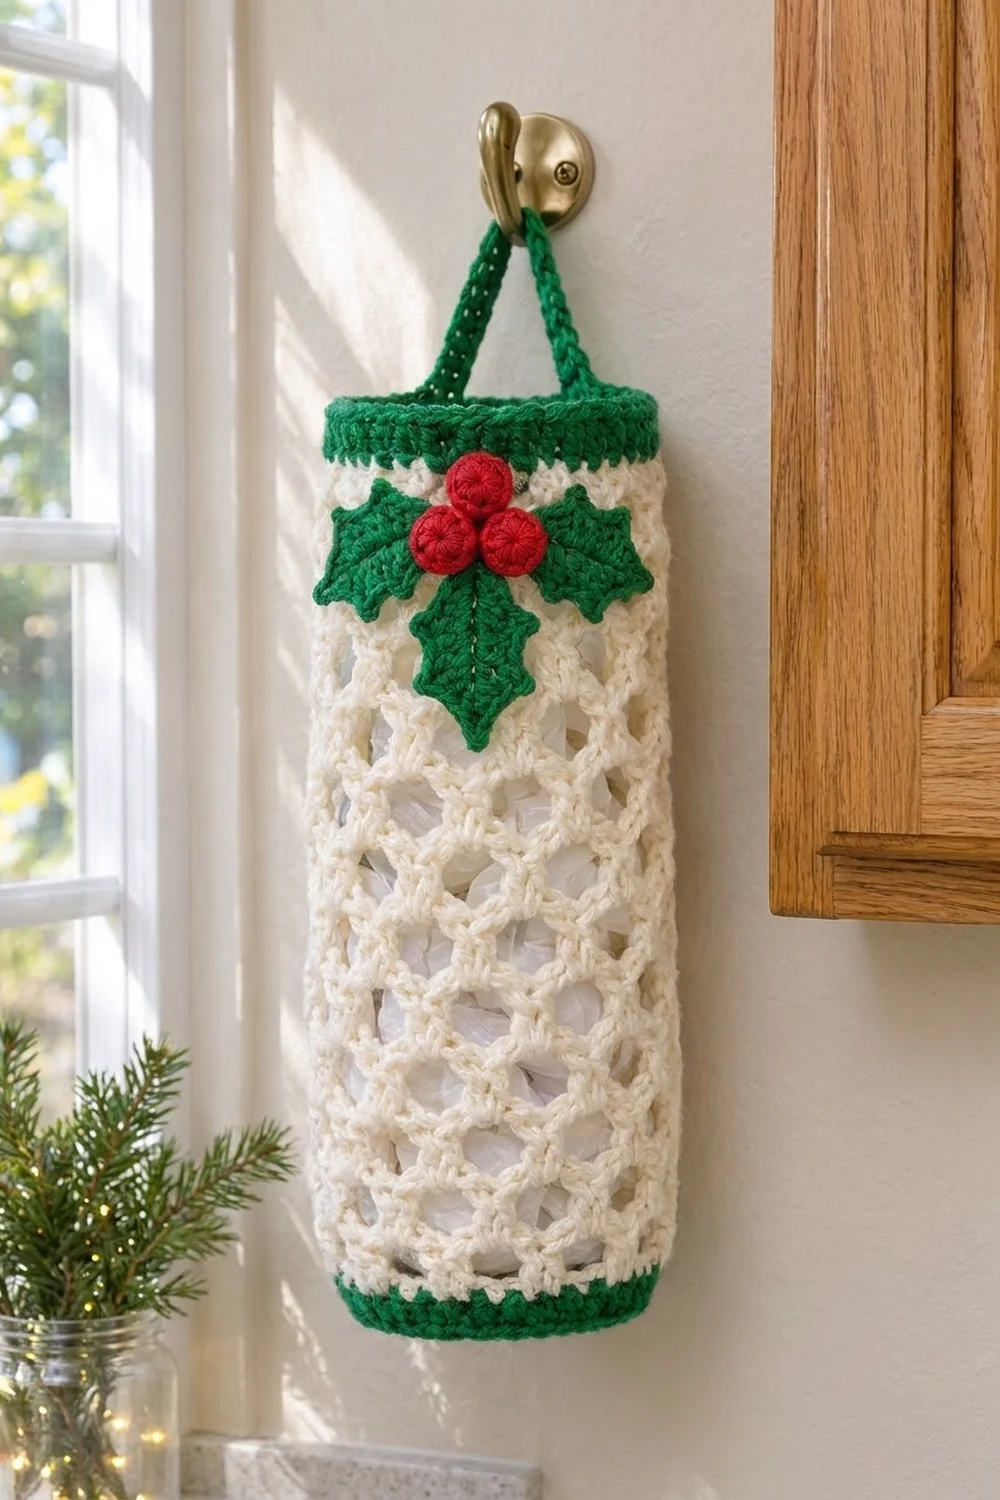
Plastic grocery bags have a way of multiplying under the sink. This festive bag holder gives them a tidy home: you stuff used bags in through the top and pull them out one at a time from the bottom. It hangs from a simple hook or cabinet knob and looks cheerful all season.
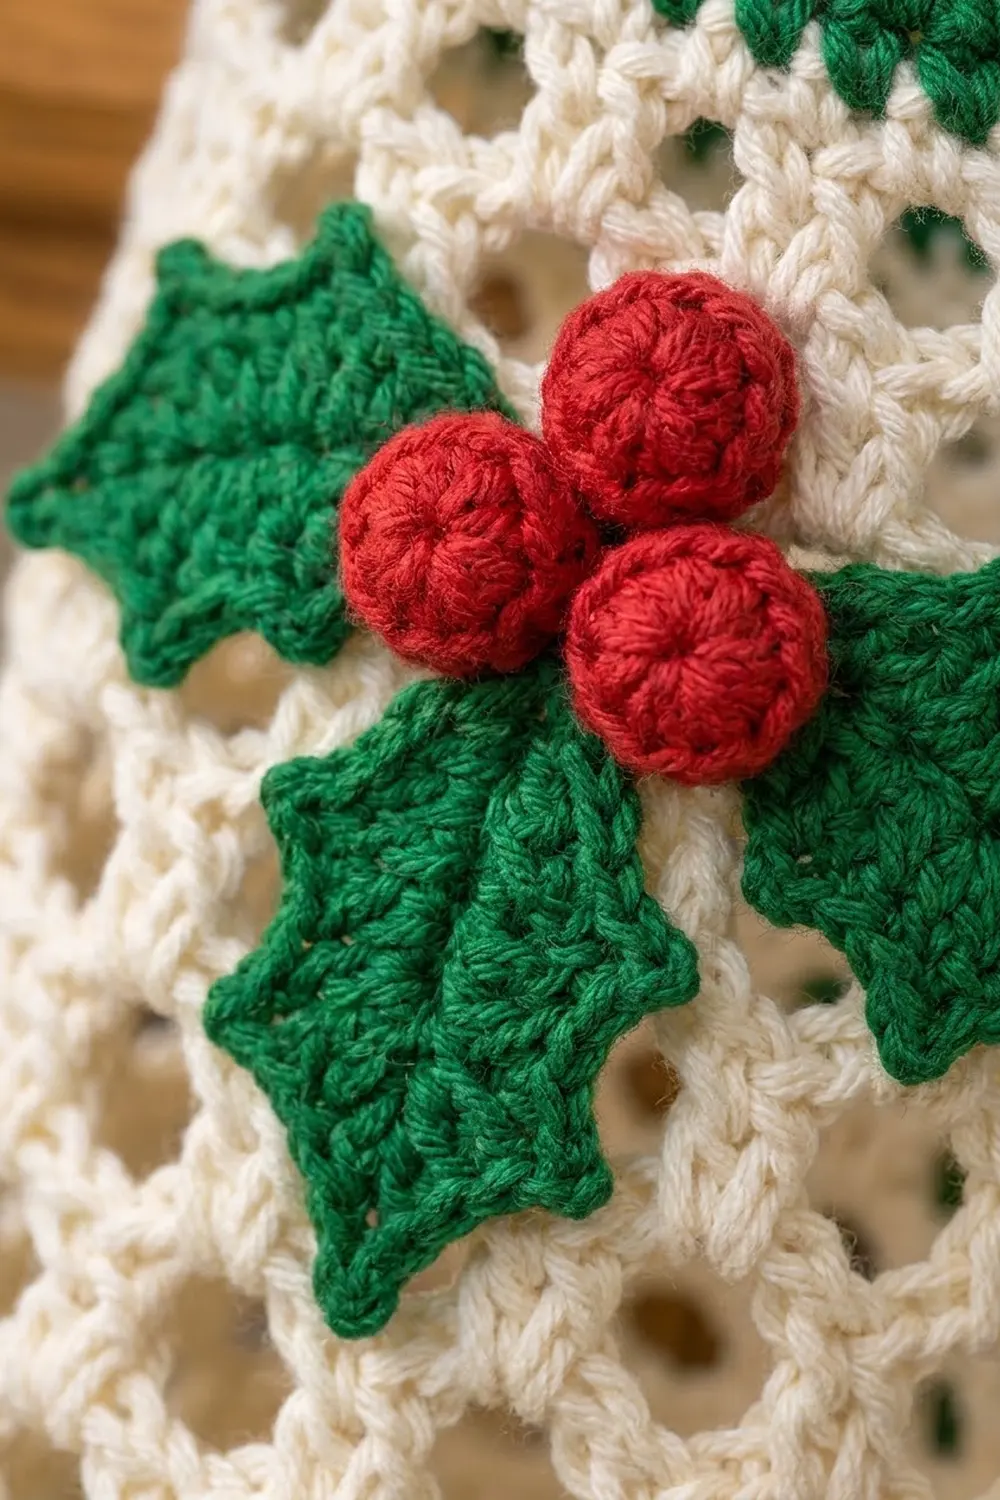
The design pairs a light, open cream honeycomb mesh with crisp green single-crochet bands at both openings. A small cluster of three holly leaves and three red berries sits on the front, just under the top band, and a slim green cord makes the hanging loop.
This pattern uses US crochet terms. The finished holder measures about 16 in (40.6 cm) tall and 6 in (15.2 cm) wide when laid flat. That is a 12 in (30.5 cm) circumference.
Construction is simple. You work the tube top down in one continuous piece: a green band, a cream mesh body, then a green bottom band that narrows slightly. The leaves, berries, and hanger are made separately and sewn on. The body itself has no seams.
Finished Size and Construction
- Finished size: 16 in (40.6 cm) tall x 6 in (15.2 cm) flat width
- Skill level: Easy / advanced beginner
- Terminology: US crochet terms
- Yarn weight: Worsted (#4), cotton or acrylic
- Hook: 5.0 mm (US H-8)
- Number of pieces: 1 main tube, plus 3 leaves, 3 berries, and 1 hanger cord sewn on
- Layout: Single tube worked in the round, appliqué centered on the front
- Tube circumference: 12 in (30.5 cm) at the top band and mesh body
- Size before bottom band: 15 in (38.1 cm) tall
- Band depth: 1 in (2.5 cm) at top and bottom; bottom opening 5 in (12.7 cm) flat
Materials
Choose a smooth worsted-weight yarn. Cotton holds the mesh shape well and washes easily. Acrylic is softer and a bit springier. Avoid fuzzy yarns, which blur the honeycomb.
- Cream (Color A): 60 g / about 120 m (131 yd)
- Green (Color B): 30 g / about 60 m (66 yd)
- Red (Color C): 5 g / about 10 m (11 yd)
Quantities are based on a yarn of roughly 200 m per 100 g and include a small safety margin.
Tools:
- 5.0 mm (US H-8) crochet hook
- Tapestry needle
- 2 stitch markers
- Scissors
- Measuring tape
- A pinch of fiberfill or yarn scraps for the berries
- Rustproof pins for blocking
Abbreviations (US Terms)
- ch – chain
- sl st – slip stitch
- sc – single crochet
- hdc – half double crochet
- dc – double crochet
- sc2tog – single crochet 2 together
- sp – space
- sk – skip
- st(s) – stitch(es)
- rnd – round
- MR – magic ring
Special stitch – Picot: ch 3, sl st in the 3rd ch from the hook. This makes the small spikes on the holly leaves.
Mesh loop: ch 5, sc in the next ch-5 sp. One loop per repeat.
Gauge and Checkpoints
Single crochet gauge: 16 sc and 16 rnds = 4 in (10.2 cm).
Mesh gauge: 4 ch-5 loops = 4 in (10.2 cm) across; 3 mesh rnds = 2 in (5.1 cm) tall.
Test before you commit. Work the top band (Rnds 1–4) first and lay the tube flat. It should measure 6 in (15.2 cm) across and 1 in (2.5 cm) tall. This band is your gauge swatch.
Checkpoints along the way:
- After Rnd 4 (top band): 1 in (2.5 cm) tall, 6 in (15.2 cm) flat
- After Rnd 10 (6 mesh rnds): 5 in (12.7 cm) total height
- After Rnd 16 (12 mesh rnds): 9 in (22.9 cm) total height
- After Rnd 25 (all 21 mesh rnds): 15 in (38.1 cm) total height
- After Rnd 29 (bottom band): 16 in (40.6 cm) total height
If your band is wider than 6 in (15.2 cm), go down a hook size (4.5 mm). If it is narrower, go up to 5.5 mm. If your mesh grows taller than 2 in (5.1 cm) per 3 rounds, keep the chains snug, or add or remove mesh rounds to reach 15 in (38.1 cm) before the bottom band.
Main Tube
Top Band (Color B, green)
Foundation: With B, ch 48. Sl st to the first ch to form a ring, taking care not to twist.
Rnd 1: Ch 1, sc in each ch around. Sl st to first sc. (48 sts)
Rnds 2–4: Ch 1, sc in each st around. Sl st to first sc. (48 sts each rnd)
Place a marker in st 1 and another in st 25. These mark the two sides where the hanger will go. Fasten off B.
Mesh Body (Color A, cream)
Rnd 5 (set-up): Join A in the first st of Rnd 4. Ch 1, sc in the same st, ch 5, sk 3 sts, sc in next st; repeat from * 10 more times, ch 2, sk last 3 sts, dc in first sc. (12 loops: 11 ch-5 loops + 1 ch-2/dc loop)
The ch-2 plus dc stands in for the last ch-5 loop. It leaves your hook at the center of that loop, ready for the next round, so the honeycomb stays staggered without slip-stitching across.
Check the math: 48 sts ÷ 4 sts per repeat (1 sc + 3 skipped) = 12 loops.
Rnd 6: Ch 1, sc around the post of the dc just made, ch 5, sc in next ch-5 sp; repeat from * 10 more times, ch 2, dc in first sc. (12 loops)
Rnds 7–24: Repeat Rnd 6. (12 loops each rnd)
Rnd 25: Ch 1, sc around the post of the dc, ch 5, sc in next ch-5 sp; repeat from * 10 more times, ch 5, sl st in first sc. (12 full ch-5 loops)
This last mesh round closes with a full ch-5 loop instead of the ch-2/dc, so the bottom band starts on a clean sc. You now have 21 mesh rounds (Rnds 5–25). That is about 14 in (35.6 cm) of mesh, for a total height of 15 in (38.1 cm). Fasten off A.
Bottom Band (Color B, green)
Rnd 26 (conversion): Join B in the sc where Rnd 25 joined. Ch 1, sc in the same sc, 3 sc in next ch-5 sp, sc in next sc, 3 sc in next ch-5 sp; repeat from * 10 more times. Sl st to first sc. (12 sc worked into existing sc + 36 sc worked into loops = 48 sts)
Rnd 27 (narrowing): Ch 1, sc in next 4 sts, sc2tog; repeat from * 7 more times. Sl st to first sc. (8 repeats x 5 sts = 40 sts)
Rnds 28–29: Ch 1, sc in each st around. Sl st to first sc. (40 sts each rnd)
Fasten off and weave in all ends. The bottom opening is now 10 in (25.4 cm) around, or 5 in (12.7 cm) flat. This slight narrowing holds the bags in but still lets you pull one out easily.
Holly Leaves (Make 3, Color B)
Each leaf is worked around both sides of a foundation chain.
Foundation: Ch 11. Skip the chain next to the hook. Number the other 10 chains from 1 (the second ch from the hook) to 10 (the first ch you made).
Side 1: Sl st in 2nd ch from hook (ch 1), sc in ch 2, hdc in ch 3, dc in ch 4, picot, dc in ch 5, dc in ch 6, dc in ch 7, picot, hdc in ch 8, sc in ch 9.
Tip: In ch 10, work (sc, picot, sc).
Side 2: Rotate and work into the free loops on the other side of the chain: sc in ch 9, hdc in ch 8, dc in ch 7, picot, dc in ch 6, dc in ch 5, dc in ch 4, picot, hdc in ch 3, sc in ch 2.
Base: In ch 1 (the same ch as the first sl st), work sc, picot. Sl st to the first sl st.
Count: 9 sts on Side 1 + 2 sts at the tip + 8 sts on Side 2 + 1 st at the base = 20 sts, plus 6 picots (2 per side, 1 at the tip, 1 at the base).
Each leaf measures about 2.5 in (6.4 cm) long and 1.25 in (3.2 cm) wide. Leave a 10 in (25.4 cm) tail for sewing. If you like, surface slip-stitch a center vein down the middle with a strand of B.
Berries (Make 3, Color C)
Rnd 1: In a MR, ch 1, 6 sc. Pull the ring closed. (6 sts)
Rnd 2: 2 sc in each st around. (12 sts)
Rnd 3: Sc in each st around. (12 sts)
Rnd 4: Sc2tog 6 times. (6 sts)
Before closing, push in a small pinch of fiberfill or red yarn scraps. Fasten off, thread the tail through the front loops of the last 6 sts, and pull tight. Each berry is about 0.75 in (1.9 cm) across. Keep the tail for sewing.
Hanger Cord (Color B)
Row 1: Ch 41, sc in 2nd ch from hook and in each ch across. (40 sts)
Row 2: Ch 1, turn, sl st in each st across. (40 sts)
The slip-stitch row firms up the cord so it doesn’t stretch under the weight of the bags. The cord measures about 10 in (25.4 cm). Leave long tails at both ends.
Border
In this design the green bands act as the border, so their counts are planned to fit the mesh exactly.
Border gauge: 16 sc = 4 in (10.2 cm), or 4 sc per 1 in (2.5 cm).
Top band: 48 sts around. Laid flat, that is 24 sts per side, which gives 6 in (15.2 cm) per side at 4 sc per inch. The tube has no corners, so you don’t add any corner stitches.
Bottom band, Rnd 26: 48 sts, or 24 per flat side. Each of the 12 mesh repeats gets 4 sc (1 into the sc + 3 into the loop), so 12 x 4 = 48. This matches the 48 sts at the top, so the mesh hangs straight instead of flaring or puckering.
Bottom band, Rnds 27–29: 40 sts, or 20 per flat side. At 4 sc per inch, that is 5 in (12.7 cm) per side.
Why the math works: The set-up round turns 48 sc into 12 loops (4 sts per loop). The conversion round turns those 12 loops back into 48 sc (4 sts per loop). Because the mesh starts and ends on the same count, the body stays a true 12 in (30.5 cm) tube from top to bottom. The decrease to 40 sts happens only after the band is solid.
Assembly
- Hanger: Fold the cord into an arch. Sew one end to the inside of the top band at the marker in st 1, overlapping 0.5 in (1.3 cm). Sew the other end at st 25 the same way. The loop rises about 4 in (10.2 cm) above the top edge.
- Front center: The front center sits halfway between the two hanger markers, around st 13 of the band.
- Leaves: Pin the first leaf pointing straight down, with its base about 0.5 in (1.3 cm) below the top band. Pin the second leaf pointing left and the third pointing right, so all three bases meet in the center.
- Berries: Arrange the three berries in a tight triangle over the spot where the leaf bases meet.
- Sew: Stitch each piece down with its tail, catching the cream mesh strands behind it. Sew around the outer edge of each leaf but not through the picots, so the points stay crisp. Weave in all ends on the inside.
Slip a rolled towel inside the tube while you sew so you don’t stitch the front to the back.
Final Blocking
- Lightly mist the holder with water. If it’s cotton, you can soak it and gently squeeze out the water instead.
- Slide a rolled towel or a 3.5 in (8.9 cm) diameter tube inside to hold the cylinder shape.
- Lay it flat and check the width: 6 in (15.2 cm) across the body and 5 in (12.7 cm) at the bottom band.
- Gently ease the length to 16 in (40.6 cm) and pin the ends.
- Shape the holly leaf points with your fingers and pin each picot outward.
- Let it dry completely before you remove the pins and hang it.
For acrylic, hold a steam iron above the piece without touching it, then let it cool in place.
Final Quality-Control Checklist
- 48 sts in each round of the top band
- 12 loops in every mesh round
- Honeycomb loops evenly staggered, with no slanting seam
- 48 sts in Rnd 26 and 40 sts in Rnds 27–29
- Total height 16 in (40.6 cm); flat width 6 in (15.2 cm)
- Hanger sewn at opposite sides and holds firm when tugged
- Three leaves meeting at the center, three berries on top
- All ends woven in on the inside
Troubleshooting
The mesh slants in a spiral. Make sure each round starts with the sc around the dc post. Skipping this step shifts the loops.
The bottom is too loose and bags fall out. Work one more decrease round in the bottom band, such as (sc 3, sc2tog) around, to reach 32 sts.
The mesh is too short. Add mesh rounds before Rnd 25. Each extra round adds about 0.67 in (1.7 cm).
The bottom band ruffles. You may have worked 4 sc into a loop. Recount Rnd 26 for 48 sts.
Leaf points curl. Pin and block the picots, or tighten your picot chains.
Berries look flat. Add a bit more stuffing before closing Rnd 4.
Care
Hand wash in cool water and lay flat to dry, reshaping over a rolled towel. Cotton versions can go through a gentle machine cycle in a mesh laundry bag.
Final Notes
The measurement chain is simple. At 4 sc per inch, 48 sts make a 12 in (30.5 cm) tube, or 6 in (15.2 cm) flat. Twelve loops carry that width through 21 mesh rounds to 15 in (38.1 cm). The conversion round goes back to 48 sts, and the bottom band narrows to 40 sts. That gives a 5 in (12.7 cm) opening and a finished height of 16 in (40.6 cm). Check those numbers at each stage, and your holder will hang straight and hold plenty of bags.
Happy crocheting!