

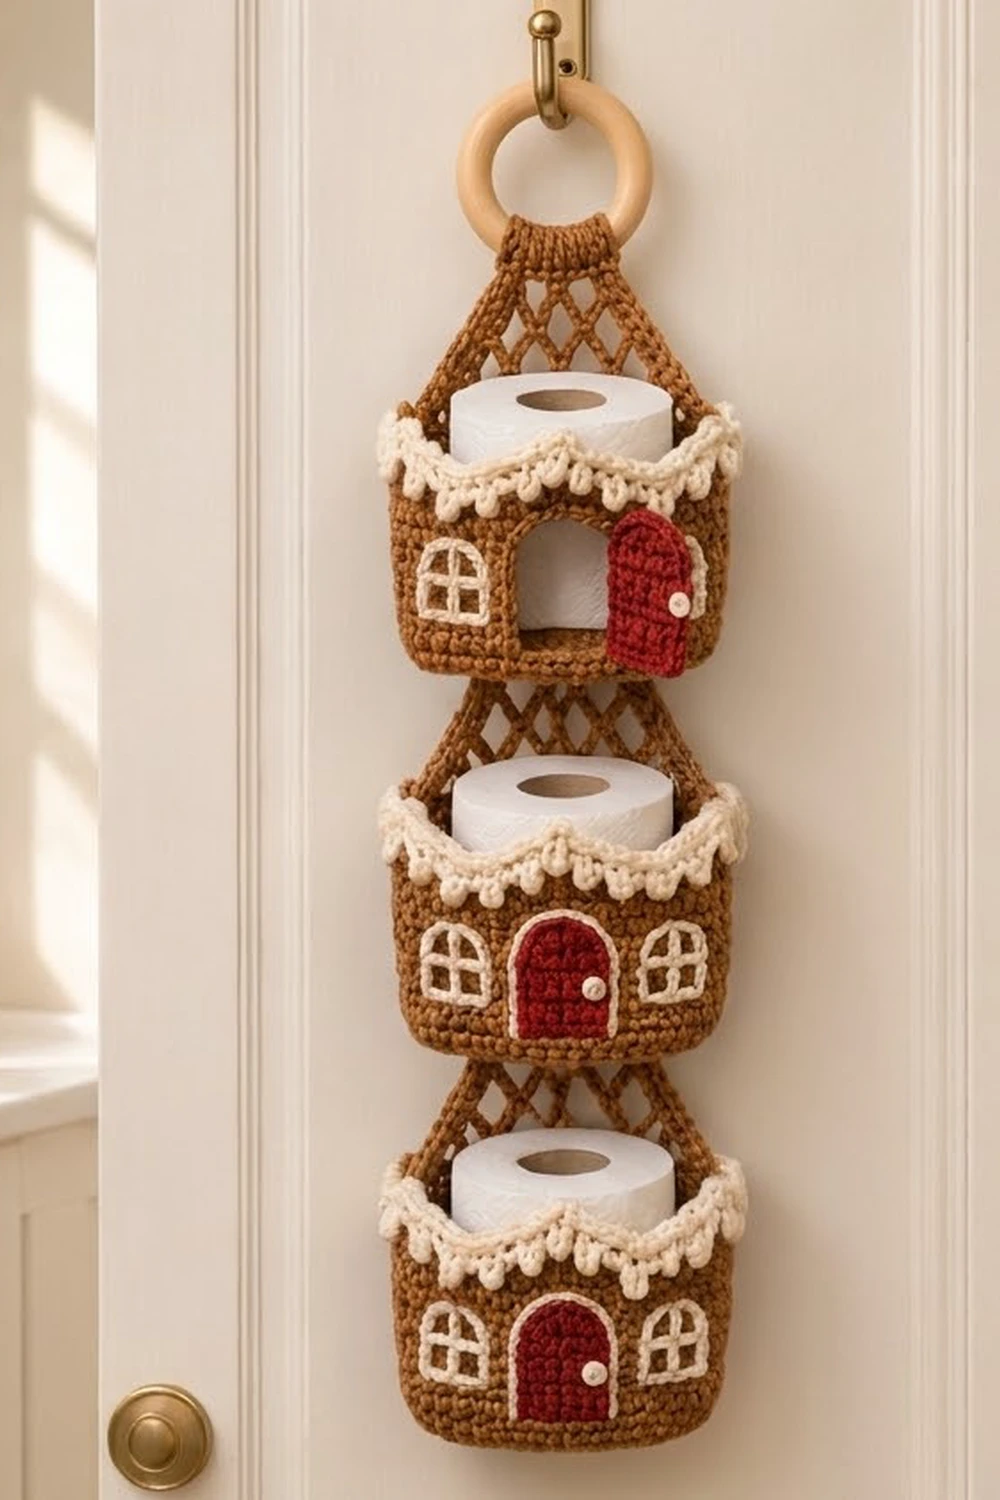
This hanging holder stacks three little gingerbread houses, and each one holds a single roll of toilet paper. Every house is a round brown basket with a scalloped cream icing rim and dripping icing beads. Each one also has cream four-pane windows and a red arched door with a cream knob.
A diamond mesh “roof” rises from the back of each basket and connects it to the house above. The top roof wraps around a wooden ring that hangs from a door hook. The top house has a working door: its arched doorway is left open, and the red door is sewn on along one side so it swings.
The pattern uses US crochet terms. The finished holder measures about 5.5 in (14.0 cm) wide and 22 in (55.9 cm) long, ring included. Each basket is 5.25 in (13.3 cm) across the base and 3.5 in (8.9 cm) tall.
Here is the order of work:
- Crochet each basket as a flat single crochet circle, then work the walls in joined, turned rounds.
- Add a two-round icing edge.
- Work the mesh roof in rows from the back of the rim.
- Add the windows in surface slip stitch and sew on the doors.
- Stitch the three units together.
Finished Size and Construction
- Finished size: 5.5 in (14.0 cm) wide x 22 in (55.9 cm) long
- Skill level: Intermediate
- Terminology: US terms
- Yarn weight: Worsted (#4)
- Hook: 4.5 mm (US 7)
- Number of pieces: 3 basket units (basket + mesh roof + tab), 3 doors, 1 wooden ring
- Layout: 1 column of 3 baskets, hung vertically
- Piece size: each basket is 5.25 in (13.3 cm) across the base x 3.5 in (8.9 cm) tall
- Size before border: basket wall is 3 in (7.6 cm) tall above the base ridge
- Border (icing) depth: 0.5 in (1.3 cm)
Materials
Use a smooth worsted yarn with good stitch definition. Cotton or a cotton blend gives a firmer basket. Acrylic is softer but still holds its shape at this gauge. Avoid fuzzy yarns, because the mesh and the window lines need to stay crisp.
- Brown (main): 170 g / 311 m (340 yd)
- Cream (icing, windows, knobs): 35 g / 64 m (70 yd)
- Red (doors): 12 g / 22 m (24 yd)
These quantities include about a 10% margin for swatching and for differences between yarns.
Tools:
- 4.5 mm (US 7) crochet hook
- Wooden ring, 3 in (7.6 cm) outer diameter
- Tapestry needle
- 6 locking stitch markers
- Scissors and a measuring tape
- One standard roll of toilet paper, for fitting and blocking
Abbreviations (US Terms)
- ch: chain
- sl st: slip stitch
- sc: single crochet
- hdc: half double crochet
- dc: double crochet
- sc2tog: single crochet 2 together
- BLO: back loop only
- MR: magic ring
- st(s): stitch(es)
- sp: space
- Rnd: round
Drip stitch (drip):
- Yo, insert your hook into the next stitch 2 rounds below (Rnd 24), and pull up a loop to working height.
- Repeat step 1 two more times in the same stitch. You now have 7 loops on your hook.
- Yo and pull through all 7 loops.
- Skip the Rnd 25 stitch behind the drip.
The drip counts as 1 stitch.
Surface slip stitch: Hold the yarn behind the work. Insert your hook from front to back between stitches, pull up a loop, and draw it through the loop on your hook.
Gauge and Checkpoints
Gauge: 16 sc x 18 rnds = 4 in (10.2 cm), worked firmly.
Make one complete basket first and test it with a roll before you make the other two. Check these measurements as you go:
- After Rnd 6 (36 sts): 2.75 in (7.0 cm) across
- After Rnd 11 (66 sts): 5.25 in (13.3 cm) across
- After Rnd 25: wall is 3 in (7.6 cm) tall above the ridge
- After Rnd 27: basket is 3.5 in (8.9 cm) tall
- After mesh Row 8: roof is 4 in (10.2 cm) tall above the rim
If your basket comes out too big, go down a hook size. A loose basket sags under the weight of a roll. If it’s too small and a roll won’t drop in easily, go up half a size.
If the base ruffles, your increases are too loose. If it cups, they’re too tight.
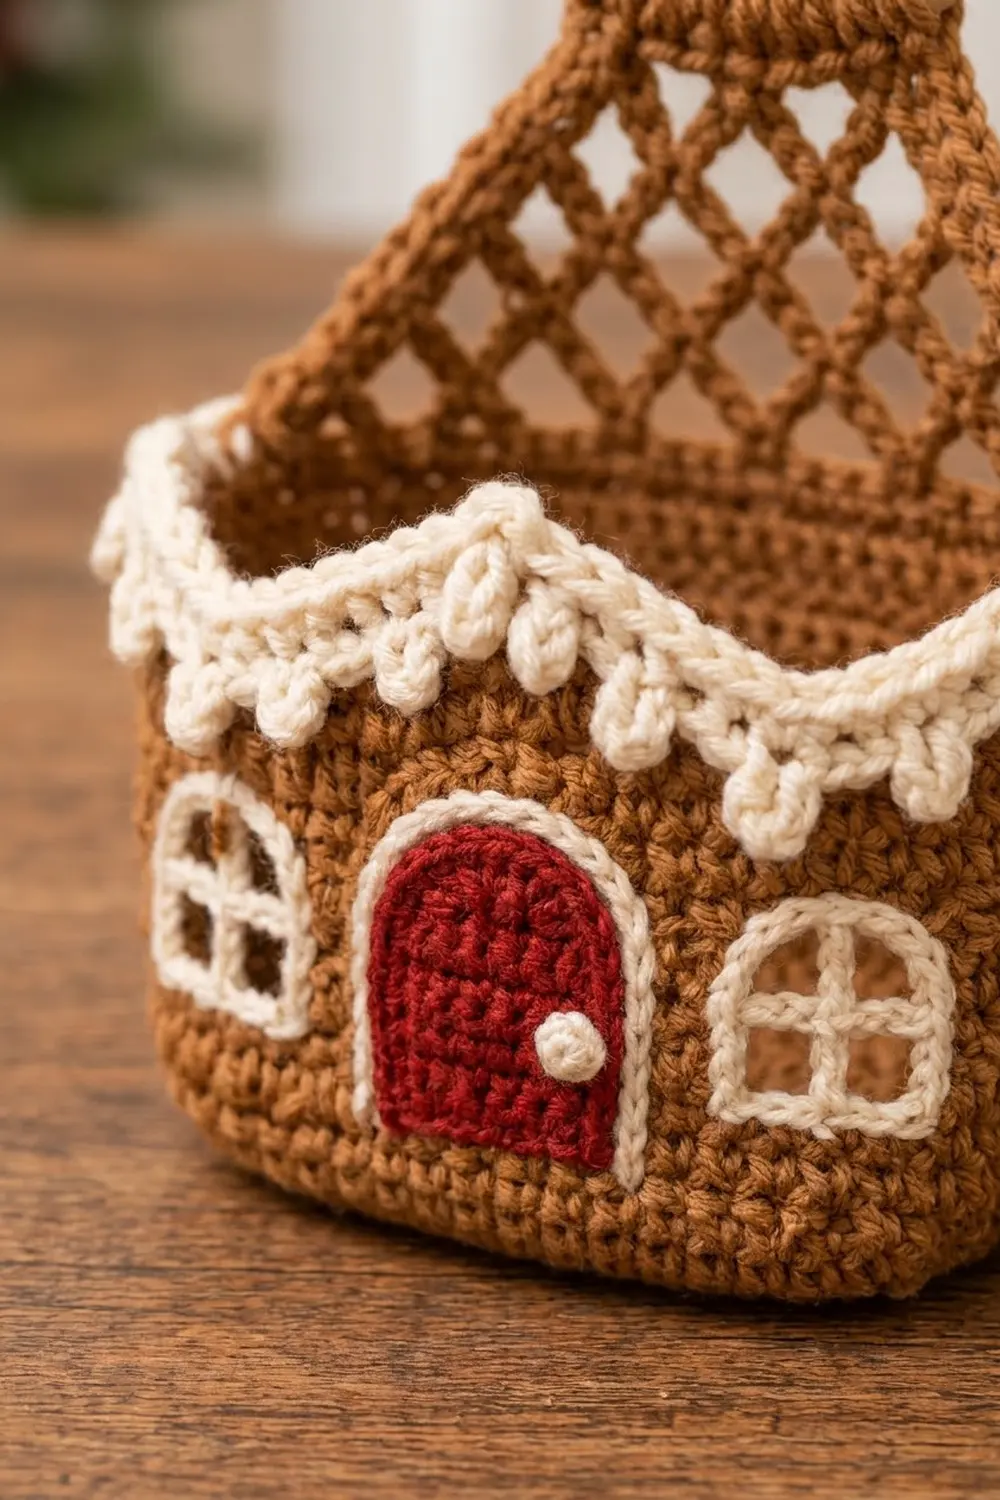
Basket (Make 3)
Work the base in brown, in joined rounds. Do not turn.
Rnd 1: 6 sc in MR, sl st to the first sc. (6)
Rnd 2: Ch 1, 2 sc in each st, join. (12)
Rnd 3: Ch 1, sc 1, 2 sc in next 6 times, join. (18)
Rnd 4: Ch 1, sc 2, 2 sc in next 6 times, join. (24)
Rnd 5: Ch 1, sc 3, 2 sc in next 6 times, join. (30)
Rnd 6: Ch 1, sc 4, 2 sc in next 6 times, join. (36)
Rnd 7: Ch 1, sc 5, 2 sc in next 6 times, join. (42)
Rnd 8: Ch 1, sc 6, 2 sc in next 6 times, join. (48)
Rnd 9: Ch 1, sc 7, 2 sc in next 6 times, join. (54)
Rnd 10: Ch 1, sc 8, 2 sc in next 6 times, join. (60)
Rnd 11: Ch 1, sc 9, 2 sc in next 6 times, join. (66)
Walls
Rnd 12: Ch 1, do not turn. Sc in BLO of each st around, join. (66) This round makes the ridge at the base edge.
From Rnd 13 on, end each round with a sl st join, ch 1, and turn. Odd rounds are worked with the inside facing you, and even rounds with the outside facing you. Turning every round keeps the wall texture the same as the flat rows around the top basket’s doorway.
Baskets 2 and 3 (middle and bottom):
Rnds 13–25: Ch 1, turn, sc in each st around, join. (66)
Basket 1 (top, with doorway):
Rnds 13–14: Ch 1, turn, sc in each st around, join. (66)
Row 15: Ch 1, turn, sc in the next 60 sts. Leave the last 6 sts unworked for the doorway. (60)
Rows 16–23: Ch 1, turn, sc in each st across. (60)
Rnd 24: Ch 1, turn, sc in each st across, ch 6, sl st to the first sc of this round. (60 sc + ch-6)
Rnd 25: Ch 1, turn, sc in each sc and in each ch around, join. (60 + 6 = 66)
The doorway is 6 sts (1.5 in / 3.8 cm) wide and 9 rows (2 in / 5.1 cm) tall. With brown, work a loose round of surface slip stitch around the opening. Ease the two top corners as you go so the opening reads as an arch.
Icing Edge
Change to cream. Rnd 26 is worked with the outside facing you.
Rnd 26: Ch 1, turn, sc 2, drip, sc 3 11 times, join. (66)
On the top basket, any drip that falls over the doorway is worked into the ch-6 from Rnd 24.
Rnd 27 (scallops): Ch 1, turn. Work in the inner loops only, which are the front loops while the inside faces you.
Sc in next st, sl st in next, sc in next (this one sits above the drip), hdc in next, 3 dc in next, hdc in next 11 times, join. Fasten off.
Count: 66 sts worked 1 per stitch + 22 extra from the 3-dc groups = 88.
The outer loops of Rnd 26 are left free for the roof.
Mesh Roof
Flatten the basket. On the top basket, center the doorway at the front; on the others, choose any spot as the front. Mark the 33 sts of Rnd 26 that sit directly opposite the front center. Join brown in the free outer loop of the first marked st.
Row 1: Ch 1, sc in the same st, ch 5, skip 3, sc in next 8 times. (1 + 8 x 4 = 33 sts used; 8 ch-5 sps)
Row 2: Turn, ch 1, sc in the first ch-5 sp, ch 5, sc in next ch-5 sp 7 times. (7 ch-5 sps)
Rows 3–8: Work as Row 2. Each row has 1 fewer ch-5 sp than the row before: 6, 5, 4, 3, 2, 1.
Row 9: Turn, ch 1, 7 sc in the ch-5 sp. (7)
Each mesh row adds about 0.5 in (1.3 cm). The diamonds taper into a peaked gable.
Tab for Basket 1 (top): Rows 10–21: ch 1, turn, sc 7. (7) This makes 12 rows, about 2.75 in (7.0 cm).
Tab for Baskets 2 and 3: Rows 10–13: ch 1, turn, sc 7. (7)
Fasten off, leaving a 12 in (30.5 cm) tail.
Windows and Doors
Windows (cream, surface slip stitch): Each window is 6 sts wide x 6 rnds tall, about 1.5 in (3.8 cm) x 1.25 in (3.2 cm).
- Work the square outline over Rnds 16–21.
- Work a vertical bar between the 3rd and 4th columns.
- Work a horizontal bar between Rnds 18 and 19.
The brown wall shows through as four panes.
Door (Make 3, red):
Row 1: Ch 6, sc in the 2nd ch from hook and in each ch across. (5)
Rows 2–7: Ch 1, turn, sc 5. (5)
Row 8: Ch 1, turn, sc2tog, sc 1, sc2tog. (3)
Edging: Ch 1. Work 2 sc in the first st, sc 1, 2 sc in the last st (5). Work 8 sc down the row ends, 3 sc in the first ch, sc 3, 3 sc in the last ch (9), then 8 sc up the row ends. Join. (5 + 8 + 9 + 8 = 30)
The finished door is 1.75 in (4.4 cm) x 2.25 in (5.7 cm). For the knob, add a cream French knot 0.5 in (1.3 cm) in from one side, at mid-height.
Make All Pieces
- Brown: 3 baskets with roofs (1 with a doorway and a long tab, 2 with short tabs)
- Red: 3 doors
- Cream: 3 icing edges, 5 windows (1 on the top basket, 2 each on the middle and bottom), 3 knobs
        [ ring ]
     /  mesh roof  \
 [ W ][door-open]       <- Basket 1 (top)
     /  mesh roof  \
 [ W ][ door ][ W ]     <- Basket 2 (middle)
     /  mesh roof  \
 [ W ][ door ][ W ]     <- Basket 3 (bottom)
Middle and bottom baskets: The 33 front sts are laid out as 4 sts, window (6), 3 sts, door (7), 3 sts, window (6), 4 sts = 33. Sew the doors with their lower edge on Rnd 13.
Top basket: Place the window 3 sts to the left of the doorway. Sew the door’s right edge along the right side of the opening to make a hinge, so it swings shut over the doorway.
Joining
Top ring: Pass the top tab over the wooden ring from front to back. Fold the tab down and whipstitch Row 21 to Row 9, 7 sts to 7 sts. Keep the wrap snug so the ring can’t slide inside it.
Stacking the baskets: Lay the middle basket face down. Place the bottom basket’s tab on its back wall, centered over the 7 back columns. Row 9 of the tab should sit on Rnd 21 (2 in / 5.1 cm above the ridge), with Rows 10–13 running up to Rnd 25.
Whipstitch each of the 7 top tab sts to its matching wall column. Then sew each tab row-end to the wall round beside it, and tack the Row 8 loop at its center. Join the middle basket to the top basket the same way.
Tension: Pull each stitch only until the tab lies flat. If you sew too tightly, the back wall puckers and the basket tilts forward.
Size checkpoint: About 2 in (5.1 cm) of mesh should show between each rim and the base above it. Measured from the top of the ring, the holder should be 22 in (55.9 cm) long.
Border
The icing rounds (Rnds 26–27) are the border on each basket.
Border gauge: Rnd 26 matches the body gauge of 4 sts per inch. Each scallop covers 6 base sts, or 1.5 in (3.8 cm).
Rnd 26: 66 sts total: 33 on the front half and 33 on the back half. This is exactly 1 basket’s wall count, with nothing added.
Rnd 27: 88 sts total: 44 on the front half and 44 on the back half. That gives 11 scallops and 11 drips.
Why the math works:
- 66 divides evenly by the 6-st repeat, so the last scallop closes cleanly.
- The 33 back sts work out to 1 + 8 x 4, which gives exactly 8 mesh loops with no leftover stitch.
- Rnd 27’s 22 extra sts flare the icing so it curls over the wall.
Final Blocking
- Put a roll of toilet paper inside each basket.
- Steam lightly from 1 in (2.5 cm) away. Never press the iron onto the work.
- Pinch each scallop into a point and nudge each drip downward.
- Pin the roofs flat and open each diamond evenly.
- Hang the holder empty to dry so the mesh relaxes to its full length.
- Re-measure: 5.25 in (13.3 cm) across each base and 22 in (55.9 cm) long overall.
Final Quality-Control Checklist
- Bases are flat and 5.25 in (13.3 cm) across, with a visible ridge.
- Walls are 3 in (7.6 cm) tall before the icing.
- Each basket has 11 drips and 11 even scallops.
- Each roof has 8 mesh rows and a centered 7-st tab.
- Windows are square, with straight crossbars.
- Doors lie flat and the knobs are secure.
- The top door swings freely and covers the doorway.
- All ends are woven in and the seams can’t be seen from the front.
Troubleshooting
- Basket leans forward: The tab was sewn too low or too tightly. Re-sew it with Row 9 on Rnd 21.
- Base ruffles: Use a smaller hook for Rnds 1–11 only.
- Drips lean sideways: Keep all 3 loops the same height and pull through firmly.
- Mesh is lopsided: Start each row in the first ch-5 sp, not in a sc.
- Doorway puckers: Rework the ch-6 more loosely.
- Roll is too snug: Remake the basket with a hook half a size larger.
Care
Hand wash in cool water, reshape each basket around a roll, and hang to dry. Don’t tumble dry.
Final Notes
Each measurement builds on the one before it:
- A gauge of 16 sc = 4 in (10.2 cm) gives a 66-st base of 5.25 in (13.3 cm).
- The walls are 3 in (7.6 cm) tall, and the icing adds 0.5 in (1.3 cm), for a 3.5 in (8.9 cm) basket.
- Each roof is 4 in (10.2 cm) tall, with 2 in (5.1 cm) tucked behind the house above.
- Three houses plus the ring hang 22 in (55.9 cm) long.
If you hit every checkpoint, the holder will hang straight and hold three rolls.
Happy crocheting!