

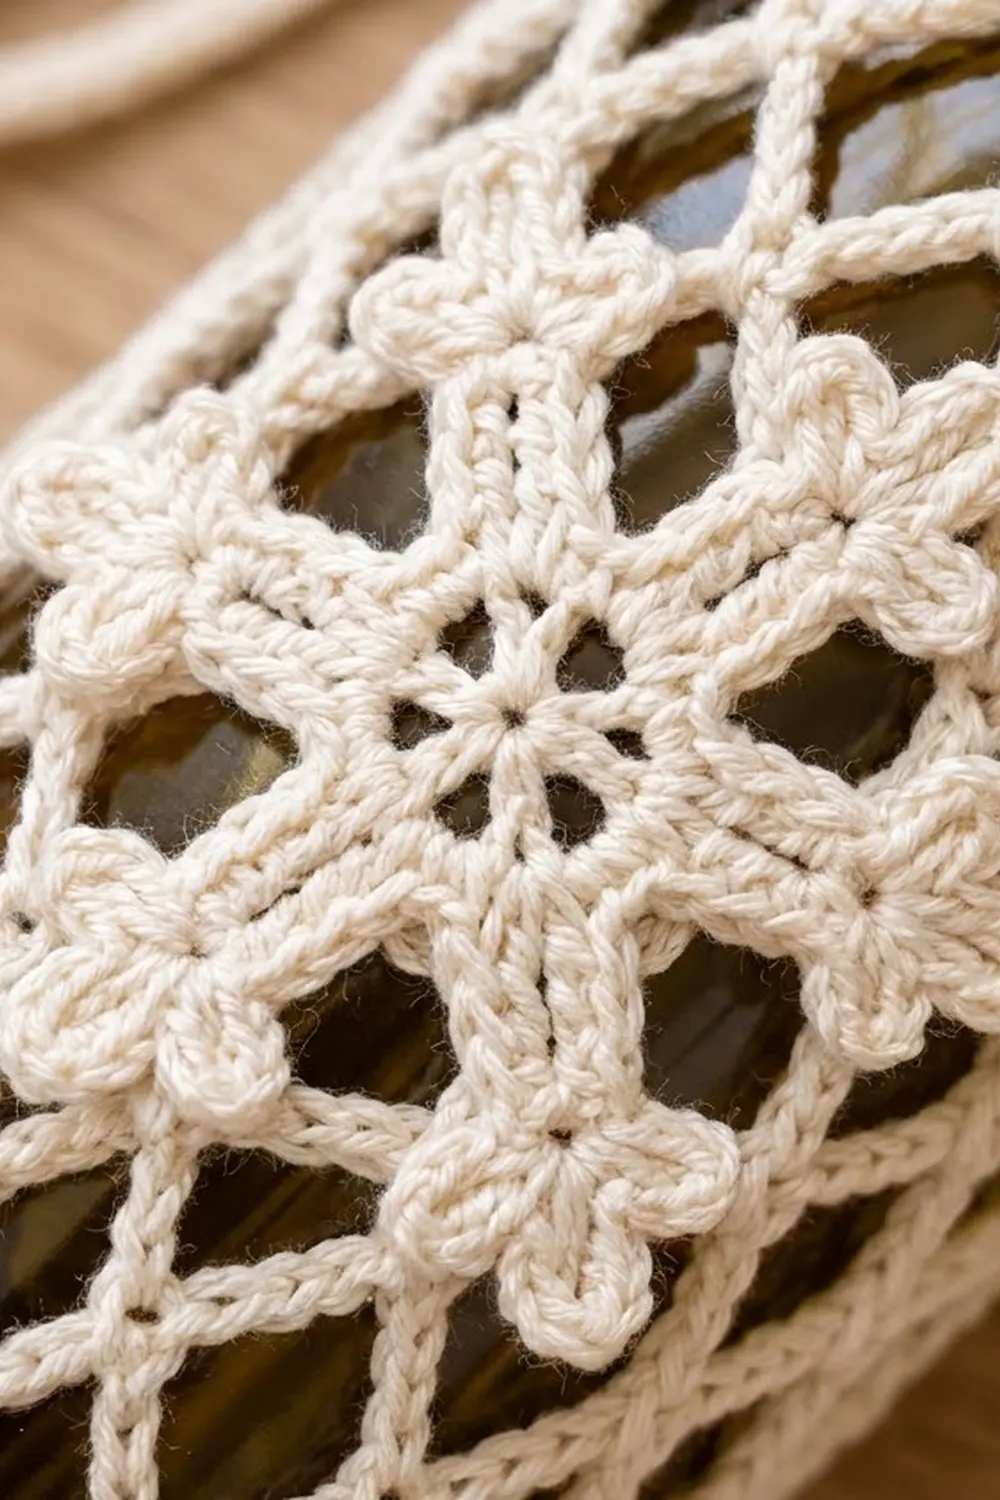
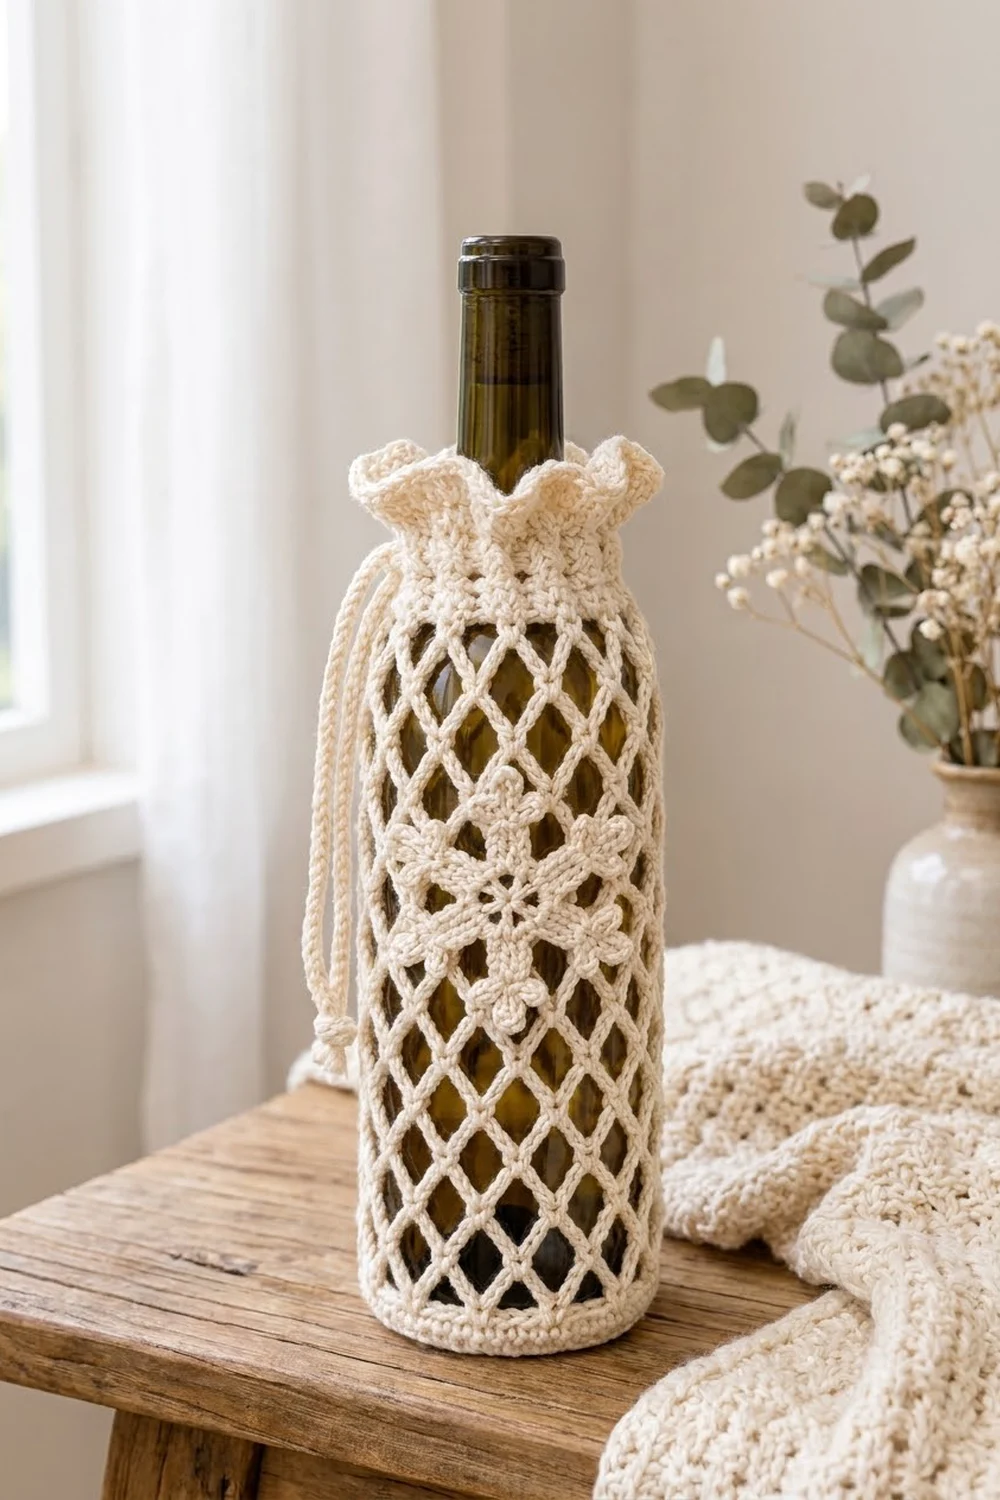
The Frosted Lattice Wine Bottle Bag is a lacy cream gift cover that slips over a standard 750 ml bottle. A solid round base supports an open diamond mesh body. A firm band at the neck carries a drawstring, and a soft ruffle finishes the top edge. A six-armed snowflake appliqué sits on the front.
Everything is worked in one creamy cotton, so the texture does the work. The open lattice lets the glass show through, while the snowflake and ruffle add a quiet, wintry detail. It suits hostess gifts, winter weddings, or a simple thank-you bottle.
This pattern uses US crochet terms. The finished bag measures about 10.6 in (26.9 cm) tall and 4.7 in (11.9 cm) wide laid flat. The base is 3 in (7.6 cm) across, and the circumference is about 9.3 in (23.6 cm). The snowflake measures 3.5 in (8.9 cm) tip to tip.
You work the base in joined rounds, turn the wall up with a back-loop round, and build the mesh from chain loops. A solid band, an eyelet round, and a two-round ruffle finish the top. You crochet the snowflake and drawstring separately. Then you sew the snowflake on and weave the cord through the eyelets.
Finished Size and Construction
- Finished size: 10.6 in (26.9 cm) tall x 4.7 in (11.9 cm) flat width
- Skill level: Easy / Intermediate
- Terminology: US crochet terms
- Yarn weight: Worsted (#4) cotton
- Hook: 4.0 mm (G-6)
- Number of pieces: 3 – bag body, snowflake appliqué, drawstring cord
- Layout: snowflake centered on the front, its center 4.5 in (11.4 cm) above the base
- Piece size: base 3 in (7.6 cm) diameter; circumference 9.3 in (23.6 cm); snowflake 3.5 in (8.9 cm)
- Size before border: 8.6 in (21.8 cm) tall (base wall plus mesh)
- Border depth: 2 in (5.1 cm) – top band 1.4 in (3.6 cm) plus ruffle 0.6 in (1.5 cm)
Materials
Choose a smooth mercerized or soft combed cotton in worsted weight. Cotton holds the lattice shape, shows stitches clearly, and won’t stretch out on the glass. Avoid fuzzy or splitty yarns, because the mesh and snowflake need crisp stitch definition.
Yarn (one color):
- Cream: 75 g, about 143 m (156 yd) of worsted cotton (approximately 190 m / 208 yd per 100 g)
This covers the bag body (about 55 g), the snowflake (about 6 g), and the drawstring (about 6 g). The quantities include a margin of roughly 10% for your swatch and for weaving in ends.
Tools:
- 4.0 mm (G-6) crochet hook
- Tapestry needle
- 2 stitch markers
- Scissors and tape measure
- Rustproof pins and a blocking mat or folded towel
- A 750 ml wine bottle for fitting
Abbreviations (US Terms)
- ch – chain
- sl st – slip stitch
- sc – single crochet
- hdc – half double crochet
- dc – double crochet
- BLO – back loop only
- sk – skip
- st(s) – stitch(es)
- sp – space
- rnd(s) – round(s)
- rep – repeat
Special stitch – Trefoil tip: Ch 4, sl st in 4th ch from hook (first lobe made). [Ch 4, sl st in the same ch] 2 times. You now have three small lobes coming out of one point.
Gauge and Checkpoints
Gauge: 18 sc and 20 rnds = 4 in (10.2 cm) with a 4.0 mm hook.
Mesh gauge: one mesh round = 0.5 in (1.3 cm) tall. Two rounds make one full diamond, about 1 in (2.5 cm) tall.
Test one piece first: make the base through Round 7 and measure it before starting the mesh. Every number in this pattern builds on the base.
Checkpoints:
- After Round 4 (24 sts): diameter 1.7 in (4.3 cm)
- After Round 7 (42 sts): diameter 3 in (7.6 cm)
- After Round 10: base wall 0.6 in (1.5 cm) tall
- After Mesh Round 16: total height 8.6 in (21.8 cm)
- After the band: 10 in (25.4 cm); after the ruffle: 10.6 in (26.9 cm)
- Snowflake after Round 1: 1.2 in (3.0 cm); finished: 3.5 in (8.9 cm)
If your base is too big, change to a 3.5 mm hook and start again. If it is too small, change to a 4.5 mm hook. An error of 0.25 in (0.6 cm) in the diameter changes the circumference by almost 0.8 in (2.0 cm), so don’t skip this check.
If your mesh rounds come out taller than 0.5 in (1.3 cm), work 15 mesh rounds instead of 16. If they come out shorter, work 17. Keep all stitch counts the same.
Pattern
Part 1: Base
Work in joined rounds without turning. The beginning ch 1 does not count as a stitch. Place a marker in the first stitch of each round so the joins stay in a neat line up the back.
Rnd 1: Make a magic ring. Ch 1, 6 sc in ring. Sl st to first sc. (6 sts)
Rnd 2: Ch 1, 2 sc in each st around. Join. (12 sts)
Rnd 3: Ch 1, sc in next st, 2 sc in next st 6 times. Join. (18 sts)
Rnd 4: Ch 1, sc in next 2 sts, 2 sc in next st 6 times. Join. (24 sts)
Rnd 5: Ch 1, sc in next 3 sts, 2 sc in next st 6 times. Join. (30 sts)
Rnd 6: Ch 1, sc in next 4 sts, 2 sc in next st 6 times. Join. (36 sts)
Rnd 7: Ch 1, sc in next 5 sts, 2 sc in next st 6 times. Join. (42 sts)
Pull the ring tight and check that the disc is 3 in (7.6 cm) across. It should lie flat without ruffling or cupping.
Rnd 8 (turning round): Ch 1, sc BLO in each st around. Join. (42 sts)
The unworked front loops form a crisp ridge, and the work turns upward into a shallow cup.
Rnds 9–10: Ch 1, sc in each st around. Join. (42 sts)
The solid wall now measures 0.6 in (1.5 cm) tall.
Part 2: Diamond Mesh Body
Every mesh round has 14 ch-5 loops. Each round ends with ch 2 and a dc. Together these equal one ch-5 loop and leave your hook in the center of that loop, ready for the next round.
Mesh Rnd 1: Ch 1, sc in first st, ch 5, sk 2 sts, sc in next st 13 times, ch 2, sk last 2 sts, dc in first sc. (14 loops)
Check: 1 sc + 13 repeats of 3 sts = 40 sts used. The final 2 skipped sts make up the full 42.
Mesh Rnds 2–15: Ch 1, sc in the loop formed by the joining dc, ch 5, sc in next ch-5 loop 13 times, ch 2, dc in first sc. (14 loops)
Mesh Rnd 16: Ch 1, sc in the loop formed by the joining dc, ch 5, sc in next ch-5 loop 13 times, ch 5, sl st in first sc. (14 full ch-5 loops)
This round closes with a full loop so the band starts evenly. Slip the bag over the bottle. The mesh should open into clear diamonds and reach the bottle’s shoulder, at a total height of 8.6 in (21.8 cm).
Keep your chains even. Loose chains make the lattice droop, and tight chains pull the diamonds into narrow slits. Each sc should sit at the center of the loop below so the diamonds stack straight.
Part 3: Snowflake Appliqué
Rnd 1: Make a magic ring. Ch 3 (counts as dc), 11 dc in ring. Sl st to top of ch-3. (12 dc)
Pull the ring closed until the center shows a small, neat hole. The motif should measure 1.2 in (3.0 cm) across.
Rnd 2 (arms): Ch 1, sc in same st as join. Ch 5 (stem), Trefoil tip, then work back down the stem: hdc in each of the 5 ch. Sk next dc of Rnd 1, sc in next dc. Rep from * 5 more times, leaving out the final sc on the last repeat. Sl st to first sc. (6 arms; each arm = 5 hdc + 3 lobes; 6 sc between arms)
Check: each arm uses 2 dc of Round 1 (one sc and one skipped). Since 6 x 2 = 12, the arms are evenly spaced.
Fasten off, leaving a 12 in (30.5 cm) tail for sewing. Pin the snowflake flat and spread each trefoil like a small fan. It should measure 3.5 in (8.9 cm) tip to tip.
Part 4: Drawstring Cord
Cord: Ch 96. Sl st in the back bump of 2nd ch from hook and in each ch across. (95 sl sts)
Fasten off. The cord should measure about 24 in (61.0 cm). Tie an overhand knot 0.5 in (1.3 cm) from each end and trim the tails close to the knots.
Border: Top Band and Ruffle
You work the border directly onto Mesh Round 16. Its gauge matches the base: 18 sc = 4 in (10.2 cm). Sc rounds are 0.2 in (0.5 cm) tall and dc rounds are 0.4 in (1.0 cm) tall.
Band Rnd 1 (conversion): Ch 1, 3 sc in next ch-5 loop, sk sc around. Join. (14 loops x 3 sc = 42 sts)
Band Rnds 2–3: Ch 1, sc in each st around. Join. (42 sts)
Band Rnd 4 (eyelets): Ch 5 (counts as dc + ch 2), sk 2 sts, dc in next st, ch 2, sk 2 sts 13 times. Sl st to 3rd ch of beginning ch-5. (14 dc + 14 ch-2 sps = 42 sts)
Band Rnd 5: Ch 1, sc in next dc, 2 sc in next ch-2 sp 14 times. Join. (14 sc + 28 sc = 42 sts)
Band Rnd 6: Ch 1, sc in each st around. Join. (42 sts)
The band measures 1.4 in (3.6 cm) tall, and the bag is now 10 in (25.4 cm) tall overall.
Ruffle Rnd 1 (growth): Ch 3 (counts as dc), dc in same st, 2 dc in each st around. Sl st to top of ch-3. (42 worked 1-per-st + 42 extra = 84 dc)
Ruffle Rnd 2: Ch 1, sc in each st around. Join. (84 sc)
Fasten off and weave in the end. Doubling the stitch count makes the edge fold into soft waves. The ruffle adds 0.6 in (1.5 cm), for a finished height of 10.6 in (26.9 cm).
Why the math works: The base ends at 42 sts. The mesh divides those 42 into 14 groups of 3, so Band Round 1 puts back exactly 3 sc per loop and returns to 42. The eyelet round again uses 14 groups of 3 (1 dc + 2 ch), so Band Round 5 brings the count back to 42. Because the band matches the base, the walls stay straight from base to neck, and only the ruffle flares.
Attaching the Snowflake
Lay the bag flat with the round joins at the back. Center the snowflake on the front, with its middle 4.5 in (11.4 cm) above the base, over Mesh Round 8. Pin the center ring and each arm tip to the mesh strands underneath.
Thread the tail onto the tapestry needle. Whipstitch around the center ring, then tack each trefoil tip and the midpoint of each stem with 2 to 3 small stitches. Sew only into the mesh strands, never across an open diamond. Weave in the ends on the inside.
Threading the Drawstring
Number the 14 eyelets, starting at center front. Push one end of the cord from the inside to the outside through Eyelet 1. Pass it over the next dc and in through Eyelet 2, then out through Eyelet 3, and keep alternating. After Eyelet 14, pass behind the last dc and bring the cord out through Eyelet 1 again. Both knotted ends now hang from the same eyelet, about 6 in (15.2 cm) each.
Final Blocking
Blocking sets the diamonds and relaxes the snowflake, so don’t skip it even for cotton.
- Mist the bag and snowflake with water, or soak them in cool water and press out the excess in a towel.
- Slip the bag over a clean 750 ml bottle, or over a rolled towel 9.3 in (23.6 cm) around.
- Smooth the mesh so every diamond sits square and the rounds are level.
- Press the base flat so the turning ridge sits at the bottom edge.
- Shape the ruffle into even waves with your fingers.
- Straighten the snowflake arms and open the lobes.
- Let everything dry completely, for at least 12 hours, before drawing up the cord.
Final Quality-Control Checklist
- The base is 3 in (7.6 cm) across and lies flat.
- Every mesh round has exactly 14 loops.
- The diamonds line up vertically without spiraling.
- The bag measures 8.6 in (21.8 cm) before the band and 10.6 in (26.9 cm) finished.
- Band Rounds 1, 5, and 6 have 42 sts, and the eyelet round has 14 eyelets.
- The ruffle has 84 sts and waves evenly.
- The snowflake measures 3.5 in (8.9 cm) with 6 evenly spaced arms.
- The snowflake is centered 4.5 in (11.4 cm) above the base and firmly tacked.
- The drawstring is 24 in (61.0 cm), knotted at both ends, and slides smoothly.
- All ends are woven in on the inside.
Troubleshooting
The base cups before Round 8. Your increases are too tight. Go up a hook size for the base, or rework Round 7 more loosely.
The mesh spirals. You have skipped or doubled a loop. Count 14 loops every round, and always start in the loop formed by the joining dc.
The mesh sags. Work ch 4 instead of ch 5 for every loop. The loop count stays at 14, so the band still converts to 42.
The bag is too short. Add one or two mesh rounds before Mesh Round 16. Each one adds 0.5 in (1.3 cm).
The ruffle is flat. Check that you worked 2 dc in every stitch, for 84 sts total.
The snowflake curls. Work the hdc stems more loosely and block the motif flat before sewing.
The eyelets are too tight for the cord. Work Band Round 4 with a 4.5 mm hook, then switch back for Round 5.
The drawstring won’t slide. Make sure the cord passes through each eyelet only once, alternating in and out.
Care
Hand wash in cool water with mild soap, press out the water in a towel, and dry the bag flat or on a bottle. Avoid tumble drying, which can shrink the cotton and distort the mesh.
Final Notes
The bag rests on a short measurement chain. A gauge of 18 sc to 4 in (10.2 cm) gives a 3 in (7.6 cm) base of 42 sts. Those 42 sts become 14 mesh loops, and sixteen 0.5 in (1.3 cm) rounds bring the bag to 8.6 in (21.8 cm). The 42-st band and 84-st ruffle add 2 in (5.1 cm), for a finished height of 10.6 in (26.9 cm). The 3.5 in (8.9 cm) snowflake and the 24 in (61.0 cm) drawstring complete the look. Check each number as you go, and the bag will fit the bottle every time.
Happy crocheting!