

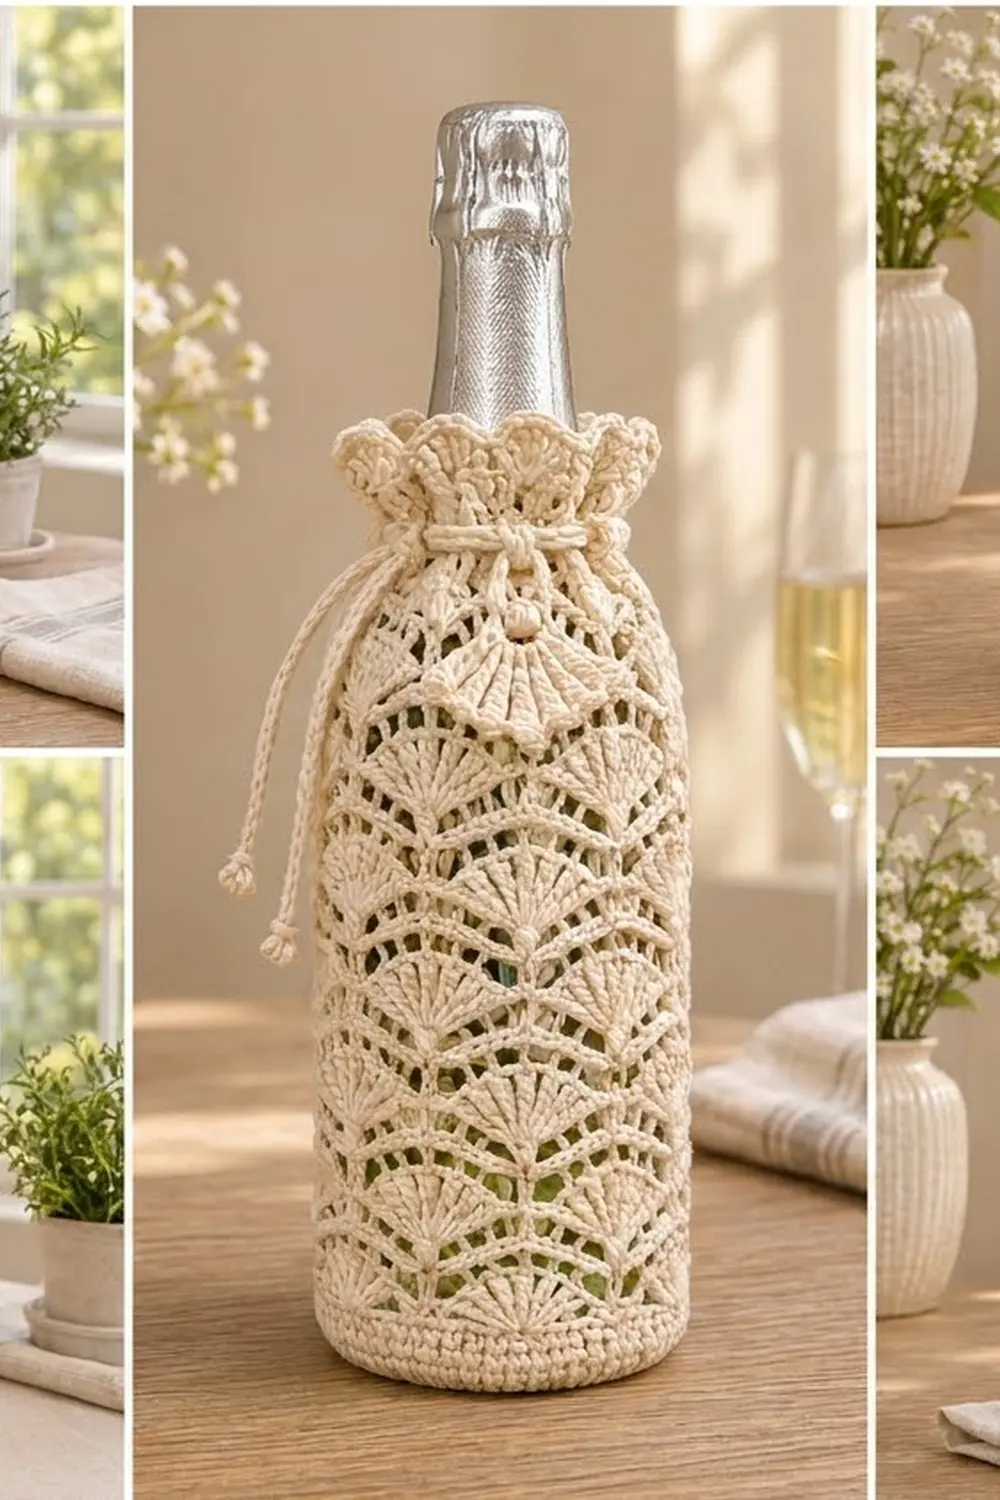
This lacy bottle cover wraps a standard champagne or sparkling wine bottle in rows of open, staggered fans. It uses just one creamy ivory color, so the stitch texture does the work: a flat round base, a short solid band, seven tiers of fans with airy arches between them, and a ruffled scalloped top gathered with a drawstring.
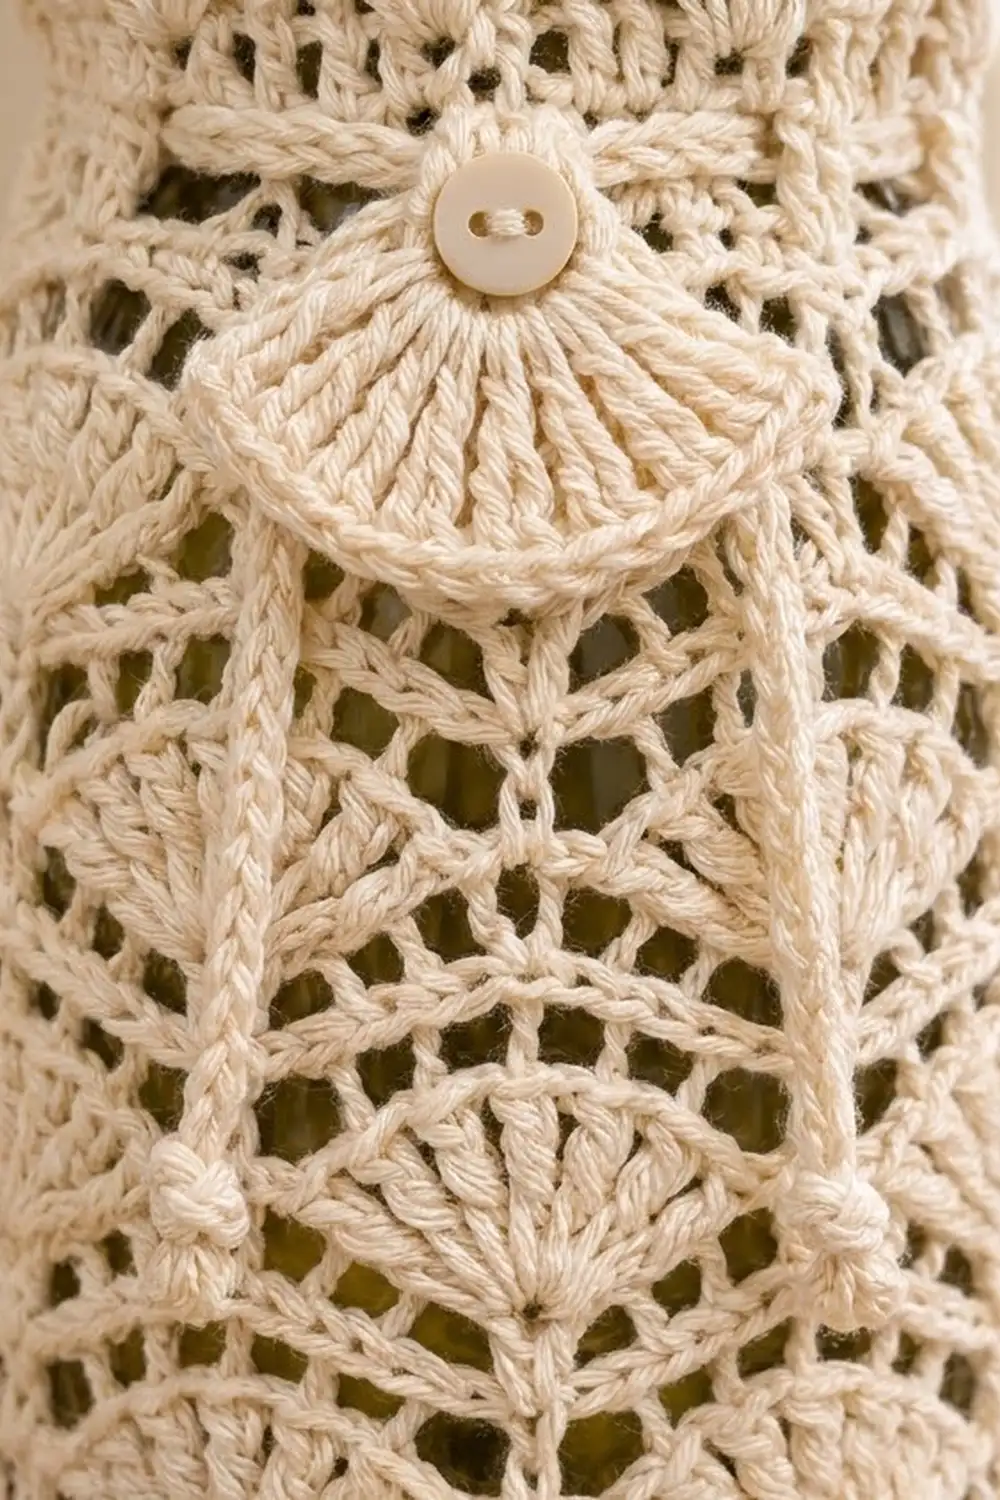
A small crocheted fan and a tiny round button sit at the front where the cord ties, repeating the main lace. The cord ends finish in neat knots that hang down the front. It makes a lovely gift wrap for a celebration bottle.
The pattern uses US crochet terms. The finished cover has a base 3.4 in (8.6 cm) across and a relaxed lace circumference of 10.7 in (27.2 cm). That stretches to fit a bottle 3.5 in (8.9 cm) across. The sides are 8.8 in (22.4 cm) tall from the base fold to the picot edge.
The cover has no seams. You crochet the base in joined rounds and fold up the walls with a back-loop round. Then you work the fan lace in the round and add an eyelet round and a scalloped edge. Last, you thread a chain cord through the eyelets and sew on the small fan trim.
Finished Size and Construction
- Finished size: base 3.4 in (8.6 cm) across; side height 8.8 in (22.4 cm); lace circumference 10.7 in (27.2 cm) relaxed
- Fits: a 750 ml champagne-style bottle about 3.5 in (8.9 cm) across and 11 in (27.9 cm) around
- Skill level: Intermediate
- Terminology: US crochet terms
- Yarn weight: DK / light (#3) cotton
- Hook: 3.5 mm (E-4)
- Number of pieces: 1 main cover, plus 1 drawstring cord and 1 small fan trim with button
- Layout: one seamless tube with a closed round base
- Piece size: 3.4 in (8.6 cm) base; sides 8.8 in (22.4 cm) tall
- Size before border: 7.3 in (18.5 cm) of side height after the last fan round
- Border depth: 1.5 in (3.8 cm) for the eyelet band and scalloped edge
Materials
Choose a smooth mercerized cotton or cotton blend in DK weight. Cotton holds the fan shapes crisply and blocks well. Avoid fuzzy or very stretchy yarns, which blur the lace and let the cover sag.
- Ivory / cream: 70 g, about 165 m (180 yd)
The yarn amount includes about 15% extra for swatching and weaving in ends.
Tools:
- 3.5 mm (E-4) crochet hook
- Locking stitch marker
- Tapestry needle
- Scissors
- Measuring tape
- A 750 ml bottle for fitting and blocking
- Spray bottle with water
Abbreviations (US Terms)
- ch – chain
- sl st – slip stitch
- sc – single crochet
- dc – double crochet
- BLO – back loop only
- sk – skip
- st(s) – stitch(es)
- sp(s) – space(s)
- rep – repeat
- Rnd – round
Special stitches:
- Fan: 7 dc in the same stitch.
- Picot: ch 3, sl st in the top of the sc just made.
Gauge and Checkpoints
Gauge: 18 sts = 4 in (10.2 cm) in sc or dc. In the solid band, 5 sc rnds = 1 in (2.5 cm). In the lace, 2 rnds (one arch round plus one fan round) = 1 in (2.5 cm).
Make the base first and use it as your swatch. It tells you right away whether the cover will fit.
Checkpoints:
- After Rnd 2: base 1.7 in (4.3 cm) across
- After Rnd 3: base 2.6 in (6.6 cm) across
- After Rnd 4: base 3.4 in (8.6 cm) across
- After Rnd 8: side height 0.8 in (2.0 cm)
- After Rnd 13: side height 3.3 in (8.4 cm)
- After Rnd 17: side height 5.3 in (13.5 cm)
- After Rnd 21: side height 7.3 in (18.5 cm)
- After Rnd 23: side height 8.0 in (20.3 cm)
- Finished: side height 8.8 in (22.4 cm)
If your base is larger than 3.5 in (8.9 cm), go down a hook size and start again. If it is smaller than 3.3 in (8.4 cm), go up a hook size. A slightly small base is fine because the lace stretches. A base that is too large leaves the cover loose at the bottom.
You can change the height in the lace section by adding or removing one 4-round repeat. Each repeat adds or removes 2 in (5.1 cm).
Pattern
Base
Work in joined rounds with the right side facing. Do not turn. In the base, the beginning ch 3 counts as a dc.
Rnd 1: Make a magic ring. Ch 3, 11 dc in ring, sl st to top of ch-3. Pull the ring closed. (12 sts)
Rnd 2: Ch 3, dc in same st, 2 dc in each st around, sl st to top of ch-3. (24 sts)
Rnd 3: Ch 3, dc in same st, dc in next st, 2 dc in next st, dc in next st; rep from * around, sl st to top of ch-3. (36 sts)*
Rnd 4: Ch 3, dc in same st, dc in next 2 sts, 2 dc in next st, dc in next 2 sts; rep from * around, sl st to top of ch-3. (48 sts)*
Check that the base lies flat and measures 3.4 in (8.6 cm) across.
Solid Band
Rnd 5: Ch 1, sc in BLO of each st around, sl st to first sc. (48 sc) The unused front loops form a ridge that gives the base a crisp fold.
Rnds 6–8: Ch 1, sc in each st around, sl st to first sc. (48 sc)
The band now stands up like a short cup, 0.8 in (2.0 cm) tall.
Fan Lace Body
The lace repeats over 6 base stitches, so 48 sts gives exactly 8 fans per round. Each fan sits on a dc of the arch round below it. Each sc of an arch round sits at the center of a fan. The two arch rounds alternate, so each tier of fans shifts by half a repeat and the fans overlap like scales.
In the arch and fan rounds, never work into the ch-2 spaces. Work only into the sc and dc.
Rnd 9 (Foundation Fan Rnd): Ch 1, sc in first st, sk 2 sts, Fan in next st, sk 2 sts, sc in next st; rep from * 6 more times, sk 2 sts, Fan in next st, sk 2 sts, sl st to first sc. (8 fans + 8 sc = 64 sts)*
Rnd 10 (Arch Rnd A): Ch 5 (counts as dc + ch 2), sc in 4th dc of next fan, ch 2, dc in next sc, ch 2, sc in 4th dc of next fan, ch 2; rep from * 6 more times, sl st to 3rd ch of beg ch-5. (8 dc, 8 sc, 16 ch-2 sps)*
Rnd 11 (Fan Rnd B): Ch 3 (counts as dc), 3 dc in same st, sc in next sc, Fan in next dc; rep from * 6 more times, sc in next sc, 3 dc in base of beg ch-3, sl st to top of ch-3. (8 fans + 8 sc = 64 sts)*
The ch-3 and 3 dc at the start plus the 3 dc at the end form one complete 7-st fan. The beginning ch-3 sits at its center.
Rnd 12 (Arch Rnd B): Ch 1, sc in top of beg ch-3, ch 2, sk next 3 dc, dc in next sc, ch 2, sc in 4th dc of next fan, ch 2, dc in next sc, ch 2; rep from * 6 more times, sl st to first sc. (8 sc, 8 dc, 16 ch-2 sps)*
Rnd 13 (Fan Rnd A): Ch 1, sc in first sc, Fan in next dc, sc in next sc; rep from * 6 more times, Fan in next dc, sl st to first sc. (8 fans + 8 sc = 64 sts)*
Rnd 13 lines up exactly like Rnd 9, so the next round is Arch Rnd A again.
Rnds 14–17: Rep Rnds 10–13. (64 sts after Rnd 17)
Rnds 18–21: Rep Rnds 10–13. (64 sts after Rnd 21)
You now have 7 tiers of fans (Rnds 9, 11, 13, 15, 17, 19 and 21). Slide the cover onto the bottle. The lace should fit the body snugly, and the side height should be 7.3 in (18.5 cm).
Top Border: Eyelet Band and Scalloped Edge
Border gauge: the eyelet round works to 18 sts = 4 in (10.2 cm), so its 64 sts measure about 14.2 in (36.1 cm) around before gathering. The extra width is on purpose. It forms the soft ruffle above the drawstring when you pull the cord in around the neck.
The cover is a tube, so there are no sides or corners. All counts below are per round and per repeat.
Rnd 22 (Eyelet Rnd): Ch 4 (counts as dc + ch 1), sk next st, dc in next st, ch 1, sk next st; rep from * 30 more times, sl st to 3rd ch of beg ch-4. (32 dc + 32 ch-1 sps = 64 sts)*
Rnd 23: Ch 1, sc in each dc and each ch-1 sp around, sl st to first sc. (32 + 32 = 64 sc) This is a trim round: 1 sc per existing stitch or space, with 0 stitches added.
Rnd 24 (Scallop Rnd): Ch 1, sc in first st, sk 1 st, 5 dc in next st, sk 1 st, sc in next st; rep from * 14 more times, sk 1 st, 5 dc in next st, sk 1 st, sl st to first sc. (16 scallops: 16 sc + 80 dc = 96 sts)*
Rnd 25 (Picot Edge): Sl st in sc (on the first repeat, use the sc you just joined into), sc in next 2 dc, (sc, Picot) in next dc, sc in next 2 dc; rep from * 15 more times, sl st to first sl st. Fasten off. (16 sl sts, 80 sc, 16 picots)*
Why the math works: 64 is divisible by 2, which gives exactly 32 eyelets for the cord. It is also divisible by 4. Each scallop uses 4 sts (sc, sk 1, 5 dc in 1, sk 1), so you get exactly 16 scallops with nothing left over. Rnd 25 works 1 st into each of the 96 sts of Rnd 24 (16 sl sts + 80 sc) and adds 16 picots on top.
The border adds 0.5 in (1.3 cm) for Rnd 22, 0.2 in (0.5 cm) for Rnd 23, and 0.8 in (2.0 cm) for Rnds 24–25 together, for a total of 1.5 in (3.8 cm).
Drawstring Cord
Ch 100, about 22 in (55.9 cm). Sl st in the back bump of 2nd ch from hook and in each ch across. (99 sl sts) Fasten off, leaving short tails.
Start at the center front and weave the cord in and out around the dc posts of Rnd 22, through each ch-1 space. Both ends should come out through neighboring spaces at the center front. Tie a firm overhand knot 0.5 in (1.3 cm) from each end, trim the tails, and tuck them into the knot. The knots add a little weight so the ends hang straight.
Small Fan Trim
Row 1: Ch 4, 6 dc in 4th ch from hook. Turn. (7 sts, counting the skipped ch as a dc)
Row 2: Ch 3 (counts as dc), dc in same st, 2 dc in each st across. Turn. (14 dc)
Row 3: Ch 1, (sc, ch 2) in each of first 13 sts, sc in last st. Fasten off, leaving a 10 in (25.4 cm) tail. (14 sc, 13 ch-2 loops)
The fan measures about 1.75 in (4.4 cm) wide and 1.25 in (3.2 cm) tall.
Button: Make a magic ring, ch 1, 6 sc in ring, sl st to first sc. Fasten off, leaving a tail. (6 sc)
Sew the fan to the center front with its point just below Rnd 22, between the two cord exits. Its curved edge should face down over the top tier of fans. Sew the button over the fan point, where the cord ends come out.
Final Blocking
- Weave in all ends through solid stitches on the wrong side, never through the open arches.
- Slip the cover onto a clean, dry bottle of the size you plan to gift.
- Ease each fan into an even half-circle and line up the tiers so they run straight around the bottle.
- Smooth the base fold so the ridge sits at the bottom edge.
- Spray the cover lightly until damp, not dripping.
- Shape each scallop and picot with your fingers.
- Leave it on the bottle until fully dry, then check the side height: 8.8 in (22.4 cm).
- Pull the cord to gather the top around the neck and tie a bow.
Final Quality-Control Checklist
- Base measures 3.4 in (8.6 cm) across and lies flat
- 48 sts at the end of Rnd 4 and in Rnds 5–8
- 8 fans and 64 sts in every fan round
- 8 dc, 8 sc and 16 ch-2 spaces in every arch round
- Each fan tier is offset from the one below
- 32 eyelets in Rnd 22 and 64 sc in Rnd 23
- 16 even scallops and 16 picots at the top
- Side height 8.8 in (22.4 cm) after blocking
- Cord comes out at center front, with fan and button centered between the exits
- All ends secure and hidden
Troubleshooting
Fans are stacking instead of staggering. Make sure you alternate Arch Rnd A and Arch Rnd B. Two arch rounds of the same type in a row line the fans up.
Wrong fan count. Recount the previous arch round. Each dc becomes one fan, and each sc stays one sc in the next round.
Cover is loose on the bottle. Go down a hook size for the lace rounds. The cord still closes the top.
Cover is too tight to slide on. Go up a hook size for the lace rounds only.
Fans curl or cup. Your arch chains may be too tight. Work each ch-2 a little looser, then block firmly on the bottle.
Scallops look uneven. Count 4 sts per scallop in Rnd 23 before you start, marking every 4th st if needed.
Care
Hand wash in cool water with mild soap and press out the water in a towel. Dry it on a bottle to keep the shape, and do not tumble dry.
Final Notes
The fit depends on a short chain of measurements. A 3.4 in (8.6 cm) base gives 48 sts. Those 48 sts give 8 fans and a lace circumference of 10.7 in (27.2 cm), which stretches to fit a 3.5 in (8.9 cm) bottle. The band adds 0.8 in (2.0 cm), and seven fan tiers bring the side height to 7.3 in (18.5 cm). The eyelet and scallop border finishes the cover at 8.8 in (22.4 cm). Check your base, count your fans, and the rest will follow.
Happy crocheting!