

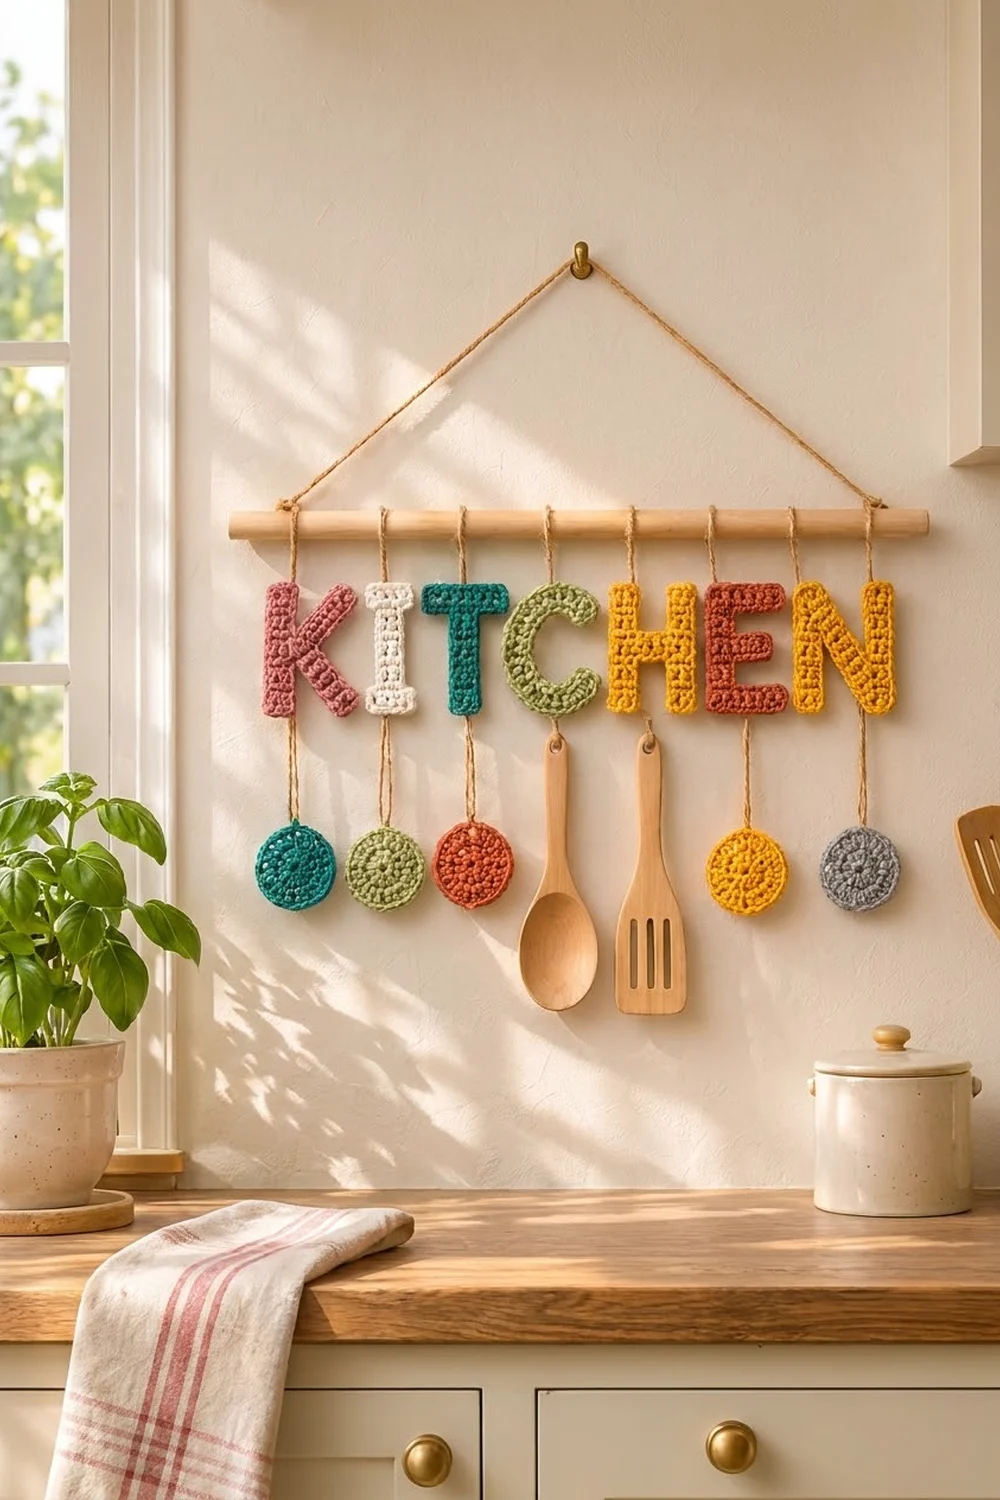
This cheerful wall hanging spells KITCHEN in chunky block letters, with little crochet circles and two wooden utensils hanging below. It’s an easy way to add warm color to a kitchen wall, and it uses up small amounts of yarn.
The palette is earthy: dusty rose, cream, teal, sage, mustard, rust and soft gray. Each letter is worked flat in firm single crochet, so the shapes stay crisp. One round of edging gives each letter a smooth outline.
This pattern uses US crochet terms. Each finished letter is 4.5 in (11.4 cm) tall. Letters are 2.5 to 4 in (6.4 to 10.2 cm) wide, and each circle is 2.25 in (5.7 cm) across. With the letters spaced out, the word spans 24.5 in (62.2 cm) on a 26 in (66.0 cm) dowel.
Construction: You work each letter bottom to top in rows, building separate legs and then joining them where the letter needs it. Next you add one edging round to each letter and make five circles in the round. Finally, you hang all pieces from the dowel with jute twine.
Finished Size and Construction
- Finished hanging: 26 in (66.0 cm) wide, about 11.75 in (29.8 cm) from dowel to the bottom of the circles
- Skill level: Intermediate (shaping and joining sections)
- Terminology: US
- Yarn weight: Worsted (#4) cotton
- Hook: 4.5 mm (US 7)
- Number of pieces: 12 crocheted pieces (7 letters + 5 circles)
- Layout: One row of 7 letters, with one dangle under each letter
- Letter size: 4.5 in (11.4 cm) tall
- Size before edging: 4 in (10.2 cm) tall (18 rows)
- Edging depth: 0.25 in (0.6 cm) on every side
Materials
Use a smooth, mercerized or matte worsted cotton. Cotton holds sharp edges and doesn’t fuzz in a kitchen.
- Dusty rose: 10 g / 17 m (K)
- Cream: 8 g / 14 m (I)
- Teal: 12 g / 20 m (T + 1 circle)
- Sage green: 12 g / 20 m (C + 1 circle)
- Mustard: 25 g / 43 m (H, N + 1 circle)
- Rust: 14 g / 24 m (E + 1 circle)
- Gray: 5 g / 9 m (1 circle)
These quantities include a margin of about 15%.
Tools and extras:
- 4.5 mm (US 7) hook
- Tapestry needle
- Scissors and stitch markers
- Jute twine, about 4 m
- Wooden dowel, 26 in (66.0 cm) long and 0.5 in (1.3 cm) thick
- 2 small wooden utensils (spoon and slotted spatula), about 8 in (20.3 cm) long, with hanging holes
- Blocking mat and pins
Abbreviations (US Terms)
- ch: chain
- sc: single crochet
- dc: double crochet
- sl st: slip stitch
- st(s): stitch(es)
- sc2tog: single crochet 2 together (decrease)
- sc3tog: single crochet 3 together (decrease)
- standing sc: start with a loop on your hook, insert the hook, yarn over, pull up a loop, then yarn over and pull through 2 loops
Special stitch: sc-ext (single crochet extension). Insert the hook into the base (the “chain”) of the sc you just made. Yarn over and pull up a loop. Yarn over and pull through 1 loop to form the new base. Yarn over and pull through 2 loops. This adds one stitch at the end of a row without a separate chain.
Single crochet fabric looks the same on both sides. If a letter comes out mirrored, just flip it over.
Gauge and Checkpoints
Gauge: 16 sc and 18 rows = 4 in (10.2 cm). That means 4 sts = 1 in (2.5 cm) and 9 rows = 2 in (5.1 cm).
Make the T first as your test piece. Check it at these points:
- After Row 9: the stem is 1 in (2.5 cm) wide and 2 in (5.1 cm) tall.
- After Row 18: the T is 3 in (7.6 cm) wide and 4 in (10.2 cm) tall.
- After edging: it’s 3.5 in (8.9 cm) wide and 4.5 in (11.4 cm) tall.
If the T is too big, go down half a hook size. If it’s too small, go up half a size. Change the hook, never the stitch counts, because all edging counts depend on them.
Letters
Start every letter with the given chain, then sc in the 2nd ch from the hook and in each ch across. On every following row, ch 1 and turn, then sc in each st across unless told otherwise.
Letter I (cream): 8 sts wide
- Row 1: ch 9, then sc across (8).
- Rows 2–4: sc across (8).
- Row 5: sl st in the first 2 sts, ch 1, sc in the next 4 sts, and leave 2 sts unworked (4).
- Rows 6–14: sc across (4).
- Row 15: ch 3, turn. Sc in the 2nd ch from the hook and in the next ch (2), sc in the 4 sts (6), then sc-ext twice (8).
- Rows 16–18: sc across (8). Fasten off.
Letter T (teal): 12 sts wide
- Row 1: ch 5, then sc across (4).
- Rows 2–14: sc across (4).
- Row 15: ch 5, turn. Sc in the 2nd ch from the hook and in the next 3 ch (4), sc in the 4 sts (8), then sc-ext 4 times (12).
- Rows 16–18: sc across (12). Fasten off.
Letter H (mustard): 12 sts wide
- Lower legs (make 2): ch 5, then sc across (4). Work Rows 2–7 in sc (4). Fasten off the first leg only.
- Row 8: on the second leg, sc in the 4 sts, ch 4, then sc in the 4 sts of the first leg (12 sts: 8 sc + 4 ch).
- Rows 9–11: sc in each sc and ch (12). Fasten off.
- Upper legs (make 2): Row 12: join with a standing sc in the first st at one outer edge, then sc in the next 3 sts (4). Work Rows 13–18 in sc (4) and fasten off. Repeat at the other outer edge.
This gives 7 + 4 + 7 = 18 rows.
Letter E (rust): 10 sts wide
- Row 1: ch 11, then sc across (10).
- Rows 2–4: sc across (10).
- Row 5: sc in the first 4 sts only (4). This is the stem.
- Rows 6–7: sc across (4).
- Row 8: ch 5, turn. Sc in the 2nd ch from the hook and in the next 3 ch, then sc in the 4 sts (8).
- Rows 9–11: sc across (8).
- Row 12: sl st in the first 4 sts, ch 1, then sc in the next 4 sts (4).
- Rows 13–14: sc across (4).
- Row 15: sc in the 4 sts, then sc-ext 6 times (10).
- Rows 16–18: sc across (10). Fasten off.
The middle arm is 2 sts shorter than the top and bottom bars, as shown.
Letter C (sage): 10 sts wide, rounded outer corners
- Row 1: ch 9, then sc across (8).
- Row 2: 2 sc in the first st, then sc across (9).
- Row 3: sc across to the last st, then 2 sc in the last st (10).
- Row 4: sc across (10).
- Row 5: sl st in the first 6 sts, ch 1, then sc in the next 4 sts (4).
- Rows 6–14: sc across (4).
- Row 15: ch 7, turn. Sc in the 2nd ch from the hook and in the next 5 ch (6), then sc in the 4 sts (10).
- Row 16: sc across (10).
- Row 17: sc across to the last 2 sts, then sc2tog (9).
- Row 18: sc2tog, then sc across (8). Fasten off.
The increases and decreases all fall on the stem side, which rounds both outer corners.
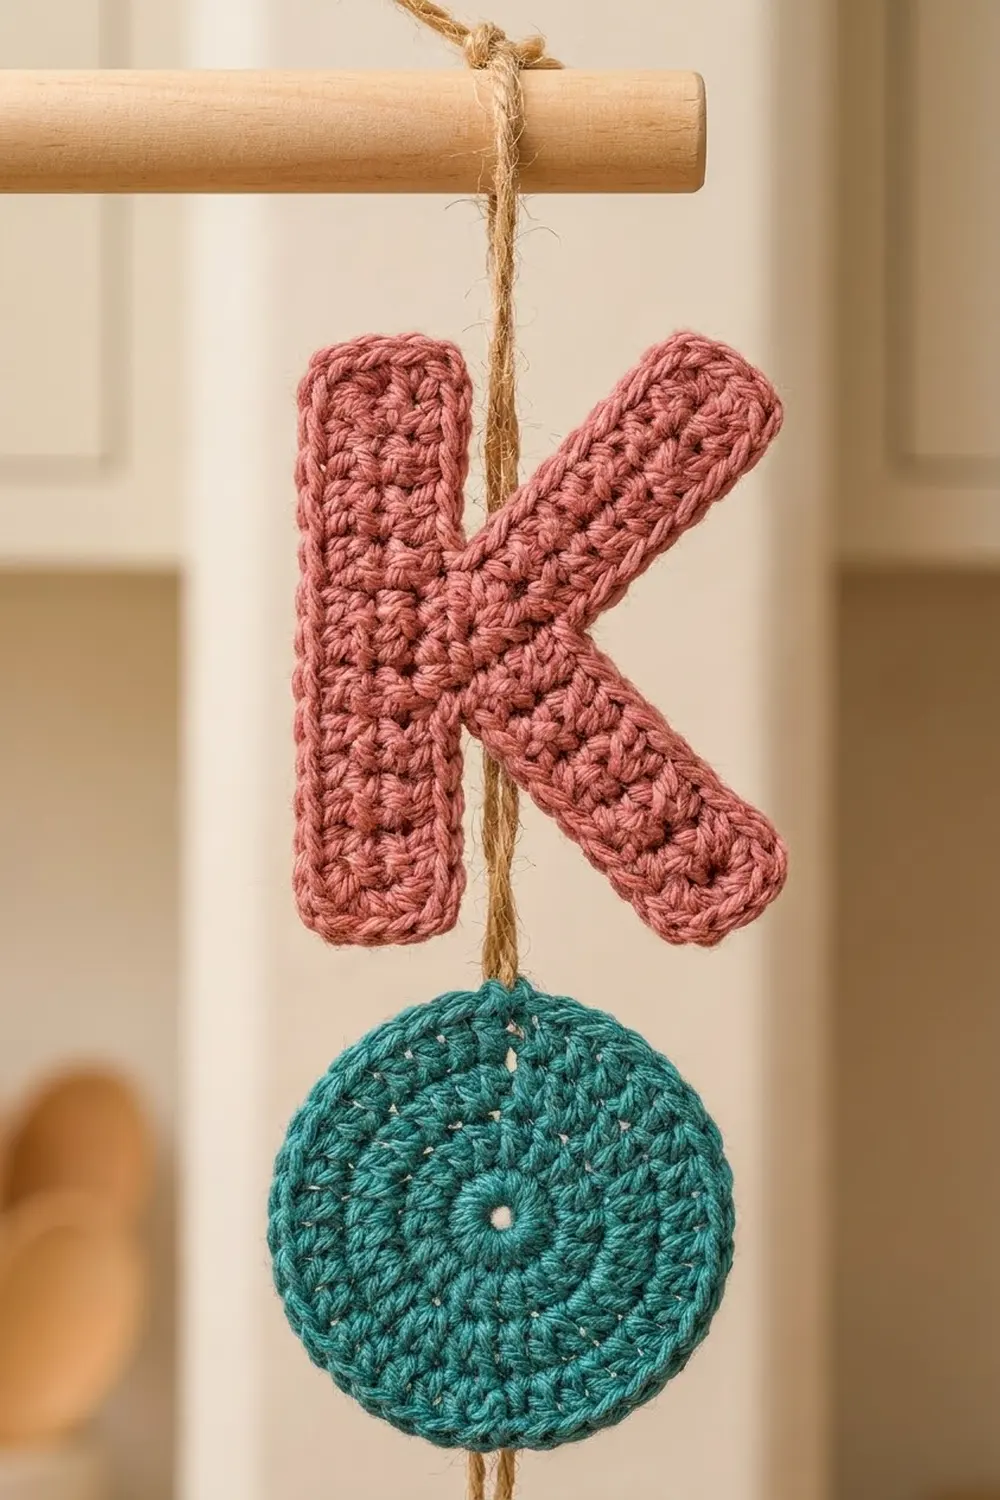
Letter K (dusty rose): 12 sts wide
- Stem: ch 5, then sc across (4). Work Rows 2–7 in sc (4). Fasten off.
- Leg, Row 1: ch 5, then sc across (4).
- Row 2: sc across (4).
- Row 3: 2 sc in the first st, sc in the next st, then sc2tog (4).
- Row 4: sc2tog, sc in the next st, then 2 sc in the last st (4).
- Rows 5–6: repeat Rows 3–4 (4).
- Row 7: sc across (4).
The leg moves 1 st toward the edge with the 2-sc increases on every row from 3 to 6, for 4 sts total. That edge is the stem side.
- Row 8: lay the stem beside the leg. Sc in the 4 leg sts, then sc in the 4 stem sts (8).
- Rows 9–11: sc across (8). Fasten off.
- Upper stem: Row 12: join with a standing sc in the first stem-side st at the outer edge, then sc in the next 3 sts (4). Work Rows 13–18 in sc (4) and fasten off.
- Upper arm: Row 12: join with a standing sc at the arm’s outer edge, then sc in the next 3 sts (4).
- Row 13: sc across (4).
- Row 14: 2 sc in the first st, sc in the next st, then sc2tog (4).
- Row 15: sc2tog, sc in the next st, then 2 sc in the last st (4).
- Rows 16–17: repeat Rows 14–15 (4).
- Row 18: sc across (4). Fasten off.
The leg sits against the stem on Rows 6–7, and the arm touches it on Rows 12–13. Close each 2-row slit with two whipstitches.
Letter N (mustard): 14 sts wide
- Left leg: ch 5, then sc across (4). Work Rows 2–8 in sc (4). Fasten off.
- Right block, Row 1: ch 7, then sc across (6).
- Row 2: sc across (6).
- Row 3: sc across to the last st, then 2 sc in the last st (7).
- Row 4: sc across (7).
- Row 5: repeat Row 3 (8).
- Row 6: sc across (8).
- Row 7: repeat Row 3 (9).
- Row 8: sc across (9).
The edge where you increase is the inner, or gap, edge.
- Row 9: sc in the 9 sts, ch 1, then sc in the 4 sts of the left leg (14 sts: 13 sc + 1 ch).
- Row 10: sc in each sc and ch (14).
- Right leg: Row 11: sc in the first 4 sts (4). Work Rows 12–18 in sc (4) and fasten off.
- Left block: Row 11: skip 1 st after the right leg. Join with a standing sc in the next st, then sc in the remaining 8 sts (9).
- Row 12: sc across (9).
- Row 13: sc2tog, then sc across (8).
- Row 14: sc across (8).
- Row 15: repeat Row 13 (7).
- Row 16: sc across (7).
- Row 17: repeat Row 13 (6).
- Row 18: sc across (6). Fasten off.
The slanted edges form the two triangular notches of the N.
Circles (Make 5)
- Rnd 1: in a magic ring, ch 3 (counts as dc), then work 11 dc. Pull the ring snug, leaving a small eye, and sl st to the top of the ch-3 (12).
- Rnd 2: ch 3, dc in the same st, then 2 dc in each st around. Sl st to join (24).
- Rnd 3 (edging): ch 1, then work sc in the next 2 sts, 2 sc in the next st around. Sl st to join. Total: 24 sts worked once + 8 extra = 32.
Checkpoints: the circle is 1.75 in (4.4 cm) across after Rnd 2 and 2.25 in (5.7 cm) after Rnd 3.
Make All Pieces
- Dusty rose: K
- Cream: I
- Teal: T + 1 circle
- Sage: C + 1 circle
- Mustard: H, N + 1 circle
- Rust: E + 1 circle
- Gray: 1 circle
Layout:
[ dowel 26 in / 66.0 cm ]
   K      I      T      C      H        E      N
 teal   sage   rust   spoon  spatula  mustard  gray
Joining (Hanging Assembly)
The pieces aren’t stitched together. Each one hangs on its own twine.
- Top ties: For each letter, cut 6 in (15.2 cm) of twine. Pinch the top edging and let the letter hang to find its balance point. Thread the twine through 2 edging sts there, then knot it around the dowel so the letter hangs 2 in (5.1 cm) below it.
- Bottom dangles: For each letter, cut 8 in (20.3 cm) of twine. Thread it through 2 bottom edging sts directly below the top tie. Tie a circle or utensil so it hangs 3 in (7.6 cm) below the letter. Thread the circle’s twine through 2 Rnd 3 sts.
- Tension: Pull each knot snug but don’t stretch the edging. Check that the letter tops line up level before trimming the twine.
- Spacing checkpoint: The seven letters measure 23 in (58.4 cm) wide in total. Add six 0.25 in (0.6 cm) gaps and the word spans 24.5 in (62.2 cm). That leaves 0.75 in (1.9 cm) of dowel at each end.
- Hanger: Tie 36 in (91.4 cm) of twine to both ends of the dowel to make the triangle.
Border (Letter Edging)
Edging gauge: Work 1 sc per stitch along top and bottom edges and 1 sc per row-end along side and slanted edges. Each letter gets one round in its own color. Join with a standing sc near a bottom corner, work around, and sl st to the first sc.
Corner rules:
- Sharp outer corner: 3 sc in the corner st (+2).
- Rounded corner on the C: 2 sc (+1).
- Inner corner: sc2tog over the last unit before the corner and the first unit after it (−1).
- Notch tip on the K and N: sc3tog over a row-end, the 1-st tip and a row-end (−2).
| Letter | Edge sts | Row-ends | Outer corners | Inner | Total |
|---|---|---|---|---|---|
| I | 24 | 36 (18 per side) | 8 (+16) | 4 (−4) | 72 |
| T | 24 | 36 (18 per side) | 6 (+12) | 2 (−2) | 70 |
| H | 24 | 64 | 8 (+16) | 4 (−4) | 100 |
| E | 40 | 36 (18 per side) | 8 (+16) | 4 (−4) | 88 |
| C | 28 | 36 (18 per side) | 4 (+8), 2 rounded (+2) | 2 (−2) | 72 |
| K | 18 | 56 | 8 (+16) | 2 tips (−4) | 86 |
| N | 22 | 68 | 8 (+16) | 2 tips (−4) | 102 |
Example (T):
- Bottom: 4 sts.
- Top: 12 sts.
- Undersides of the crossbar: 4 + 4 sts.
- Each side: 14 stem row-ends + 4 bar row-ends = 18.
That’s 24 + 36 = 60, plus 12 for the corners and minus 2 for the inner corners, for 70 sts.
Why the math works: At 18 rows to 16 sts, sc rows are almost as tall as the stitches are wide. That makes 1 sc per row-end lie flat, and the tiny extra eases slanted edges. The extra sts at corners let the edging turn without cupping, and the inner decreases stop it from rippling. The round adds 0.25 in (0.6 cm) on every side.
Final Blocking
- Weave in all ends along the edging, using matching colors.
- Spray each piece until it’s damp.
- Pin the letters to 4.5 in (11.4 cm) tall, keeping the stems straight and bars square.
- Pin the circles round to 2.25 in (5.7 cm).
- Let everything dry completely before hanging.
Final Quality-Control Checklist
- All letters are 4.5 in (11.4 cm) tall.
- The edging counts match the table.
- The K slits are closed.
- The N notches are clean triangles.
- The circles lie flat at 32 sts.
- The letter tops line up level, with 0.25 in (0.6 cm) gaps.
- The dangles hang straight below their letters.
Troubleshooting
- Letter too tall: Your rows are too tall. Check your row count and gauge.
- Edging ruffles: Skip the extra stitch at one sharp corner, or go down a hook size for the edging.
- Edging pulls tight: Check that you worked 3 sc at every outer corner.
- K leg slants the wrong way: Flip the leg over before Row 8.
- Circle cups: Loosen your tension on Rnd 3.
- Letter tilts on the wall: Move the top tie 1 st toward the heavier side.
Care
Dust the hanging gently or shake it out. If you need to wash the cotton pieces, hand-wash them in cool water, then reshape them and lay them flat to dry.
Final Notes
Here’s the measurement chain:
- Gauge: 16 sts and 18 rows = 4 in (10.2 cm).
- Each letter is 18 rows, or 4 in (10.2 cm), tall.
- One edging round brings it to 4.5 in (11.4 cm).
- The seven letters total 23 in (58.4 cm) wide, and spaced out they span 24.5 in (62.2 cm) on a 26 in (66.0 cm) dowel.
- Each circle is 2.25 in (5.7 cm) across.
If your test T hits its checkpoints, every other piece will fit.
Happy crocheting!