

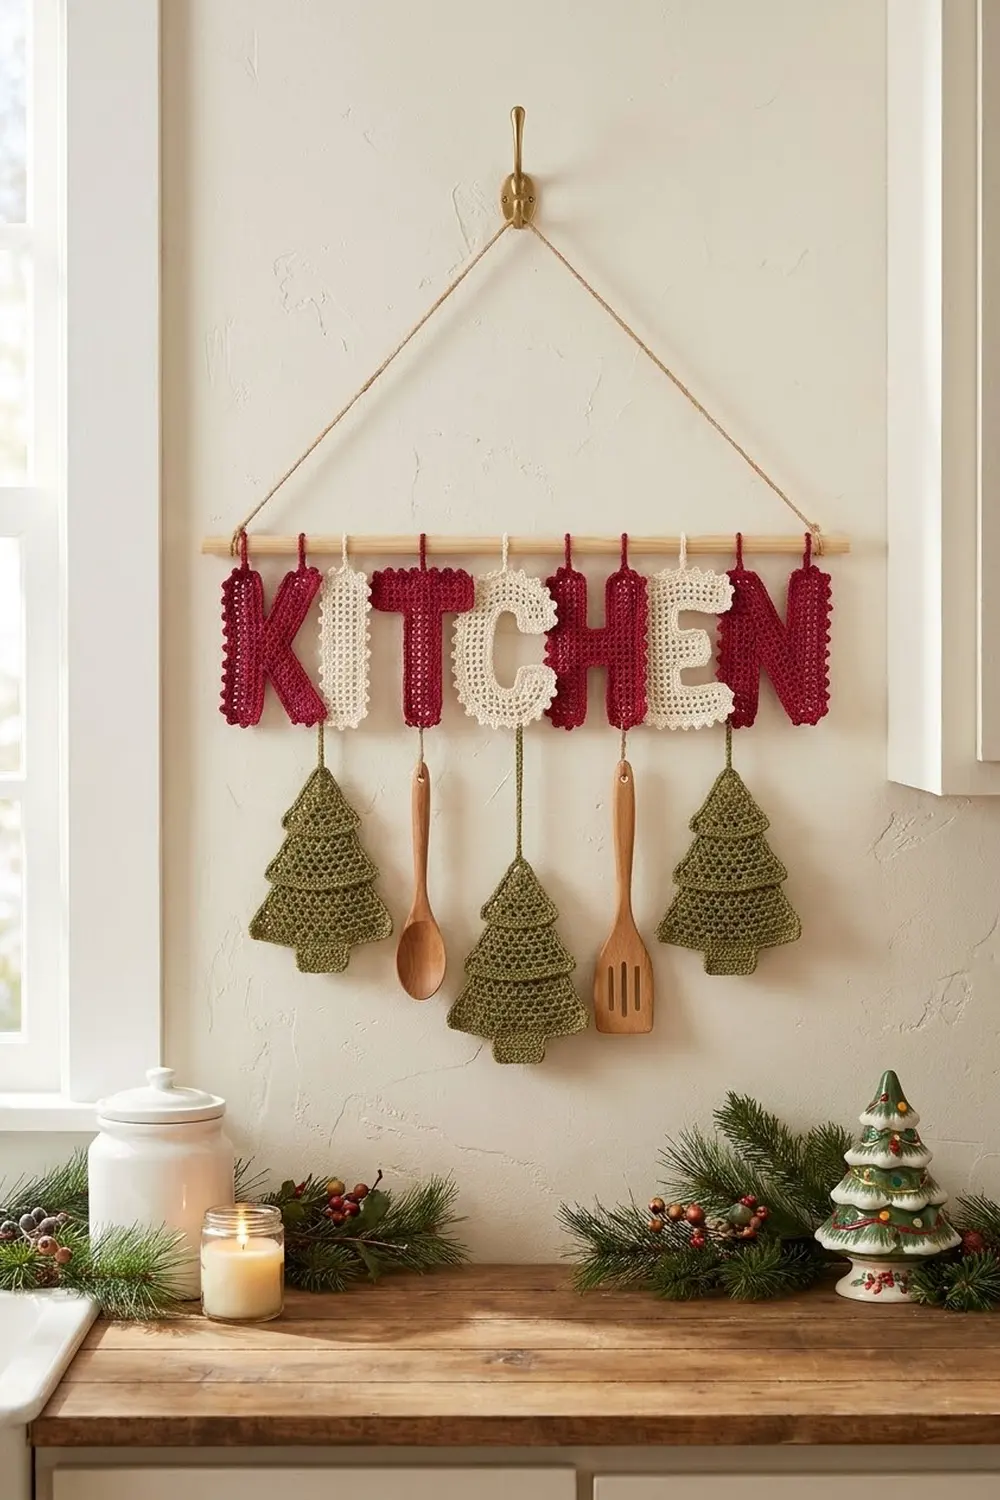
This cheerful holiday sign spells KITCHEN in openwork crochet letters, with three small Christmas trees and two wooden utensils hanging below. Everything hangs from a plain wooden dowel on rustic jute twine. It’s cozy and farmhouse in style, and it makes a good last-minute handmade gift.
The letters alternate cranberry red and cream: K, T, H and N are red, and I, C and E are cream. The trees are olive green. Every piece is built from airy square mesh, so rows of round holes run through each stroke. A picot edge gives every outline its soft, bumpy look.
The pattern uses US crochet terms. Each letter measures 2.3 x 3.5 in (5.8 x 8.9 cm), and each tree measures 3.5 x 4.7 in (8.9 x 11.9 cm), including the trunk. The full hanging is 20 in (50.8 cm) wide.
Here’s how it comes together. You crochet short mesh “ladders,” one hole wide, and sew them into letter shapes. Then you work one picot round around each letter. The trees are worked in tiered filet rows, then edged. Finally, you tie everything to the dowel with twine.
Finished Size and Construction
- Letter size: 2.3 x 3.5 in (5.8 x 8.9 cm)
- Tree size: 3.5 x 4.7 in (8.9 x 11.9 cm), including the trunk
- Full hanging: 20 in (50.8 cm) wide x about 10.7 in (27.2 cm) from the dowel to the tree tips
- Skill level: Advanced beginner
- Terminology: US
- Yarn weight: Worsted (#4) cotton
- Hook: 4.0 mm (G-6)
- Number of pieces: 10 (7 letters and 3 trees)
- Layout: All 7 letters in one row, with trees under K, C and N
- Basic unit: 1 mesh cell = 0.6 x 0.6 in (1.5 x 1.5 cm)
- Letter size before edging: 1.8 x 3.0 in (4.6 x 7.6 cm), a grid 3 cells wide and 5 cells tall
- Tree size before edging: 3.0 x 3.6 in (7.6 x 9.1 cm)
- Edging depth: 0.25 in (0.6 cm) on every side
Materials
Use a smooth, firm cotton or cotton blend. It shows the mesh holes clearly and won’t stretch out of shape as it hangs. The quantities below assume about 85 m per 50 g.
- Color A, cranberry red: 30 g (about 51 m), for 4 letters
- Color B, cream: 25 g (about 43 m), for 3 letters
- Color C, olive green: 30 g (about 51 m), for 3 trees
All quantities include a safety margin of about 20 percent.
Tools and extras:
– 4.0 mm (G-6) crochet hook
– Tapestry needle and scissors
– Wooden dowel, 20 in (50.8 cm) long and 3/8 in (1.0 cm) thick
– Jute twine, 144 in (365.8 cm)
– Small wooden spoon and slotted spatula, about 7 in (17.8 cm) long, each with a hole drilled near the top
– Rust-proof pins, a blocking mat and a spray bottle
Abbreviations (US Terms)
- ch – chain
- sl st – slip stitch
- sc – single crochet
- dc – double crochet
- sk – skip
- sp – space
- RS – right side
Special stitches:
– Picot: Ch 3, then sl st in the 3rd ch from the hook.
– Mesh cell: A square made of 2 dc posts with a ch-2 space at the top and bottom. A cell measures 0.6 in (1.5 cm) on each side.
– Cell edge: One side of a mesh cell, 0.6 in (1.5 cm) long, that lies on the outside of the piece.
Gauge and Checkpoints
Make a test piece first: one 5-cell ladder (L5, see below). It should measure 0.6 x 3.0 in (1.5 x 7.6 cm) after a light steam.
- If it’s taller than 3.0 in (7.6 cm), go down to a 3.5 mm hook.
- If it’s shorter than 2.8 in (7.1 cm), go up to a 4.5 mm hook.
- If only the width is off, change how tightly you pull up your chains, not the hook.
Checkpoints:
– L1 = 0.6 in (1.5 cm)
– L2 = 1.2 in (3.0 cm)
– L3 = 1.8 in (4.6 cm)
– L4 = 2.4 in (6.1 cm)
– L5 = 3.0 in (7.6 cm)
– Assembled letter before edging: 1.8 x 3.0 in (4.6 x 7.6 cm)
– Edged letter: 2.3 x 3.5 in (5.8 x 8.9 cm)
– Tree before edging: 3.0 x 3.6 in (7.6 x 9.1 cm)
– Edged tree without trunk: 3.5 x 4.1 in (8.9 x 10.4 cm)
The Ladder Strip (Basic Unit)
A ladder is a strip of mesh cells, 1 cell wide, worked in rows. Each row adds one cell.
Row 1: Ch 8, dc in the 8th ch from the hook. (1 cell: 2 posts and 1 ch-2 sp)
Row 2: Ch 5 (counts as dc and ch 2), turn, dc in the 3rd ch of the beginning ch-8. (1 cell)
Rows 3 to L: Ch 5, turn, dc in the 3rd ch of the turning ch-5. (1 cell per row)
Fasten off, leaving an 8 in (20.3 cm) tail for sewing. A ladder with L rows has L cells and is 0.6 in (1.5 cm) x L times 0.6 in (1.5 cm). An L1 is Row 1 only.
Letters
Picture each letter on a grid 3 cells wide (columns 1 to 3, left to right) and 5 cells tall (rows 1 to 5, bottom to top). Sew the ladders together edge to edge with the tail, using a whipstitch through the matching posts and chains. Keep every ladder RS facing you. To use a ladder as a horizontal bar, turn it sideways.
K (Color A): One L5 and two L3.
– The L5 is the upright in column 1.
– Sew one L3 so it angles up and to the right from the upright’s right side at row 3. Its outer corner reaches the top right of the grid.
– Sew the second L3 so it angles down and to the right from the same spot to the bottom right corner.
– The inner ends of the arm and leg meet where they join the upright.
I (Color B): Three L3.
– Use one L3 as a horizontal bar across row 1 and one across row 5.
– Sew the third L3 upright in column 2, rows 2 to 4. Center it between the bars.
T (Color A): One L3 and one L4.
– Use the L3 as a horizontal bar across row 5.
– Sew the L4 upright in column 2, rows 1 to 4, under the center of the bar.
C (Color B): Three L3.
– Use two L3 as horizontal bars across rows 1 and 5.
– Sew the third L3 upright in column 1, rows 2 to 4, so the right side stays open.
H (Color A): Two L5 and one L1.
– Sew the L5s upright in columns 1 and 3.
– Sew the L1 into column 2 at row 3, joining it on both sides.
E (Color B): One L5 and three L2.
– The L5 is the upright in column 1.
– Sew one L2 to the upright’s right side at row 1, one at row 3 and one at row 5. Each L2 runs horizontally across columns 2 and 3.
N (Color A): Two L5 and one L3.
– Sew the L5s upright in columns 1 and 3.
– Sew the L3 diagonally from the top inside corner of column 1 to the bottom inside corner of column 3. Overlap each end onto the upright by about half a cell.
Checkpoint: Each assembled letter should measure 1.8 x 3.0 in (4.6 x 7.6 cm).
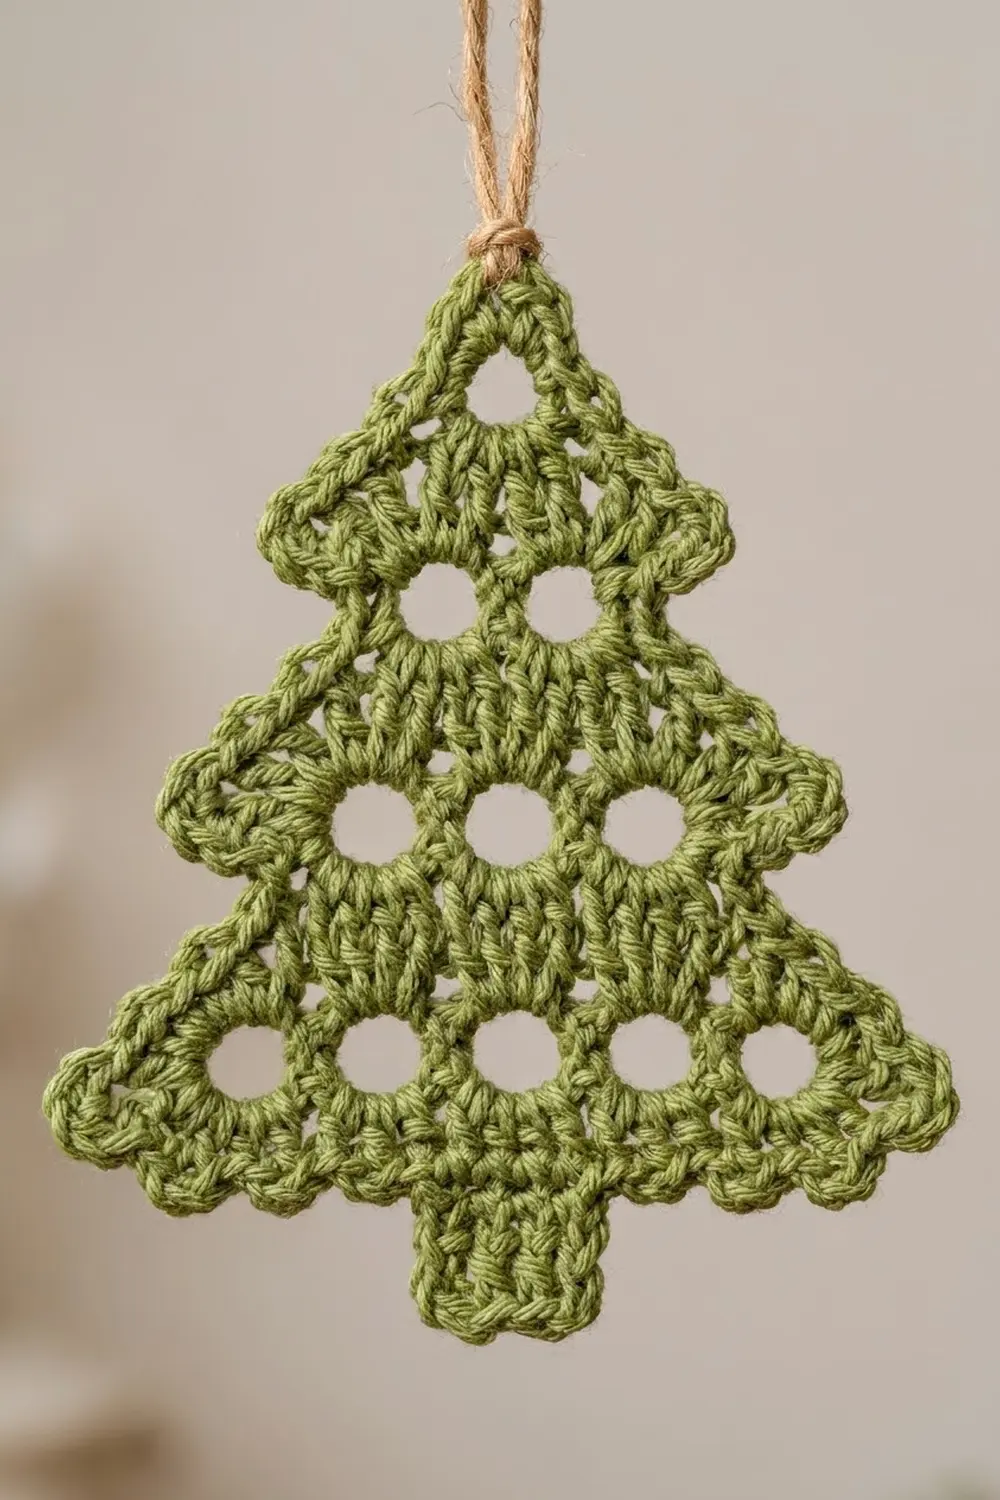
Trees (Make 3 in Color C)
Row 1: Ch 20, dc in the 8th ch from the hook, *ch 2, sk 2 ch, dc in the next ch; repeat from * 3 more times. (5 cells, 6 dc posts)
Row 2: Ch 5, turn, dc in the next dc, *ch 2, dc in the next dc; repeat from * 2 more times, ch 2, dc in the 3rd ch of the beginning ch-8. (5 cells)
Row 3: Turn without chaining. Sl st in each of the next 2 ch and in the next dc. Ch 5, dc in the next dc, ch 2, dc in the next dc, ch 2, dc in the next dc. Leave the last cell unworked. (3 cells)
Row 4: Ch 5, turn, dc in the next dc, ch 2, dc in the next dc, ch 2, dc in the 3rd ch of the turning ch-5. (3 cells)
Row 5: Turn without chaining. Sl st in each of the next 2 ch and in the next dc. Ch 5, dc in the next dc. (1 cell)
Row 6: Ch 5, turn, dc in the 3rd ch of the turning ch-5. (1 cell)
Fasten off. The tree is 18 cells, with tiers 5, 3 and 1 cells wide, and steps in by 1 cell on each side at each tier.
Checkpoint: 3.0 x 3.6 in (7.6 x 9.1 cm).
Joining: Assembling the Hanging
The pieces are never sewn to each other. Each one hangs from its own length of twine.
- Letter hangers: Cut 7 lengths of twine, each 6 in (15.2 cm). Thread one through the edging at the top center of each letter and tie it in a loop over the dowel. Each letter top should sit 1.5 in (3.8 cm) below the dowel.
- Spacing: Leave 0.25 in (0.6 cm) between letters. The 7 letters span 7 x 2.3 in plus 6 x 0.25 in = 17.6 in (44.7 cm). That leaves 1.2 in (3.0 cm) of bare dowel at each end of the 20 in (50.8 cm) dowel.
- Tree hangers: Cut 3 lengths of twine, each 5 in (12.7 cm). Tie each one from a tree’s ch-6 top loop to the bottom center edging of K, C and N, leaving a 1 in (2.5 cm) gap.
- Utensils: Cut 2 lengths of twine, each 5 in (12.7 cm). Hang the spoon below T and the spatula below H.
- Wall hanger: Tie 24 in (61.0 cm) of twine to the dowel ends to make the hanging triangle.
Tension advice: Tie square knots without cinching them tight against the crochet. Check that all letter tops sit level before trimming the twine ends to 0.5 in (1.3 cm).
Checkpoint: The hanging is 20 in (50.8 cm) wide and about 10.7 in (27.2 cm) tall from the dowel to the tree tips.
Border: Picot Edging
Border gauge: 3 sc per cell edge, which works out to 5 sc per 1 in (2.5 cm).
Each piece gets its own edging round. Because the pieces aren’t joined into a larger panel, nothing is added at seams. The count is simply 3 sc for every exposed cell edge.
Edging round (letters): With RS facing, join the matching color in any outer corner. Around the whole outline, work this pattern on each exposed cell edge: sc, sc, picot, sc.
– Along the long sides of a ladder, work the sc around the posts.
– Across the ends of a ladder, work the sc into the ch-2 sps.
– At outer corners, ch 1 between edges. The ch-1 is not counted as a stitch.
– At inner corners, go straight on with no chain.
– Sl st to the first sc to join, then fasten off.
Counts per letter (exposed edges = sc / picots):
– K: 21 edges = 63 sc / 21 picots. The upright has 9 exposed edges: 5 left, 1 top, 1 bottom, and 2 on the right (rows 1 and 5). The arm and leg have 6 exposed edges each: 3 on the outer side, 2 on the inner side and 1 at the end.
– I: 20 edges = 60 sc / 20 picots
– T: 16 edges = 48 sc / 16 picots
– C: 20 edges = 60 sc / 20 picots
– H: 24 edges = 72 sc / 24 picots
– E: 24 edges = 72 sc / 24 picots
– N: 24 edges = 72 sc / 24 picots. Each upright has 10 exposed edges: 5 outer, 1 top, 1 bottom and 3 inner. The diagonal has 4 exposed edges, 2 on each long side.
Edging round (trees): Work the round the same way as for the letters, with 2 changes:
– On the top edge of the top cell, work a ch-6 loop instead of the picot.
– On the bottom edge of the center cell in Row 1, work 3 sc with no picot.
That gives 22 edges = 66 sc, 20 picots and 1 loop.
Trunk: With RS facing, join Color C in the first of the 3 plain sc on the bottom center edge.
– Row 1: Ch 1, sc in the same st and in the next 2 sc. (3 sc)
– Rows 2 and 3: Ch 1, turn, sc in each sc. (3 sc)
Fasten off. The trunk adds 0.6 in (1.5 cm) to the height.
Why the math works: Each cell edge is 0.6 in (1.5 cm) long and gets exactly 3 sc at 5 sc per inch, so the edging lies flat without ruffling or cupping. You can check the edge counts against each shape’s outline. T fits a 3 x 5 box, so its outline is 2 x (3 + 5) = 16 edges. The notches in H, E and N add 8 edges each, for 24. The open sides of I and C add 4 each, for 20. The stepped tree outline is 2 x (5 + 6) = 22 edges.
Final Blocking
- Weave in all ends along the posts of the same color.
- Spritz each piece lightly until it’s damp, not soaked.
- Pin each letter to 2.3 x 3.5 in (5.8 x 8.9 cm), with one pin in every mesh hole along the edges.
- Pin each tree to 3.5 x 4.1 in (8.9 x 10.4 cm), not counting the trunk.
- Pull each picot outward so it stands clear of the edge.
- Let everything dry completely before assembling.
Final Quality-Control Checklist
- [ ] Every mesh hole is open and square
- [ ] All letters are the same height: 3.5 in (8.9 cm)
- [ ] The edging counts match the letter list above
- [ ] The trees are identical, with the trunks centered
- [ ] The letters read KITCHEN, alternating red and cream
- [ ] All letters hang level, 0.25 in (0.6 cm) apart
- [ ] The knots are secure and the twine ends are trimmed
Troubleshooting
- The ladders twist. Make sure you always dc into the 3rd ch of the turning chain, not the 1st.
- The edging ruffles. You’ve worked more than 3 sc per edge. Count again.
- The edging pulls tight. You’ve worked fewer than 3 sc per edge, or skipped the ch-1 at outer corners.
- The diagonals gape. Add 2 extra whipstitches where each diagonal meets the upright.
- The trees lean. Make sure Rows 3 and 5 step in exactly 1 cell on each side.
- The letters hang crooked. Move the twine to the true top center of the letter.
Care
Dust gently, or spot-clean with a damp cloth. To wash, remove the crochet pieces from the hanging, hand-wash them in cool water and reblock them flat.
Final Notes
The measurements build on each other: 1 cell = 0.6 in (1.5 cm). An assembled letter is 3 x 5 cells, or 1.8 x 3.0 in (4.6 x 7.6 cm). The edging adds 0.25 in (0.6 cm) on each side, so the finished letter is 2.3 x 3.5 in (5.8 x 8.9 cm). Seven letters with small gaps span 17.6 in (44.7 cm) on a 20 in (50.8 cm) dowel. If your test ladder matches the gauge, every later checkpoint will fall into place.
Happy crocheting!