

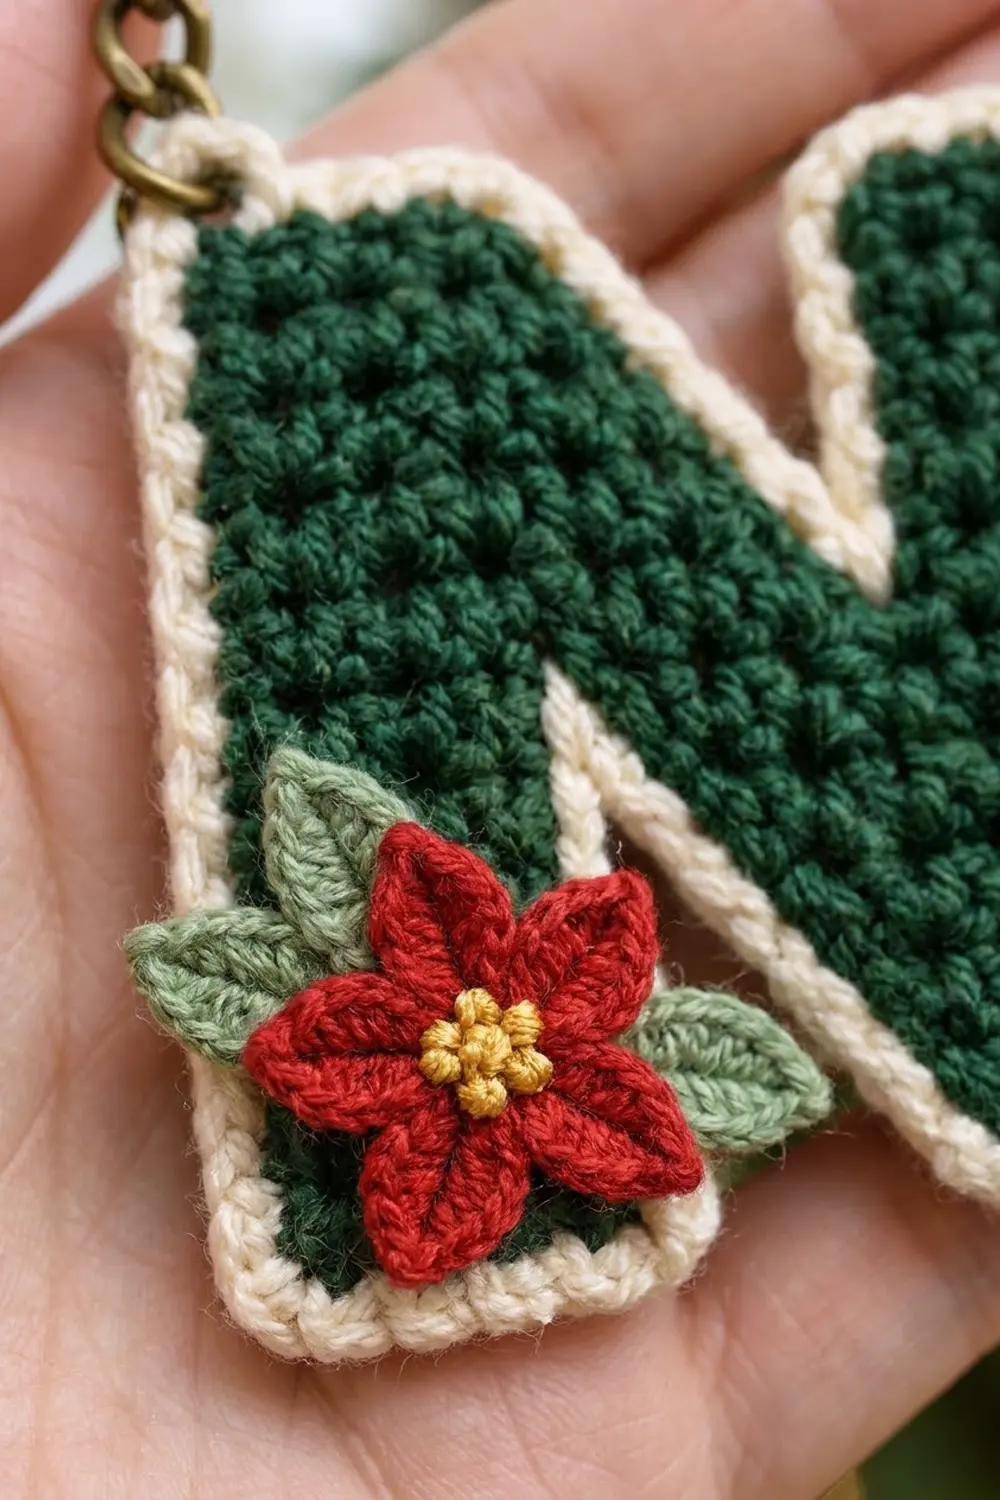
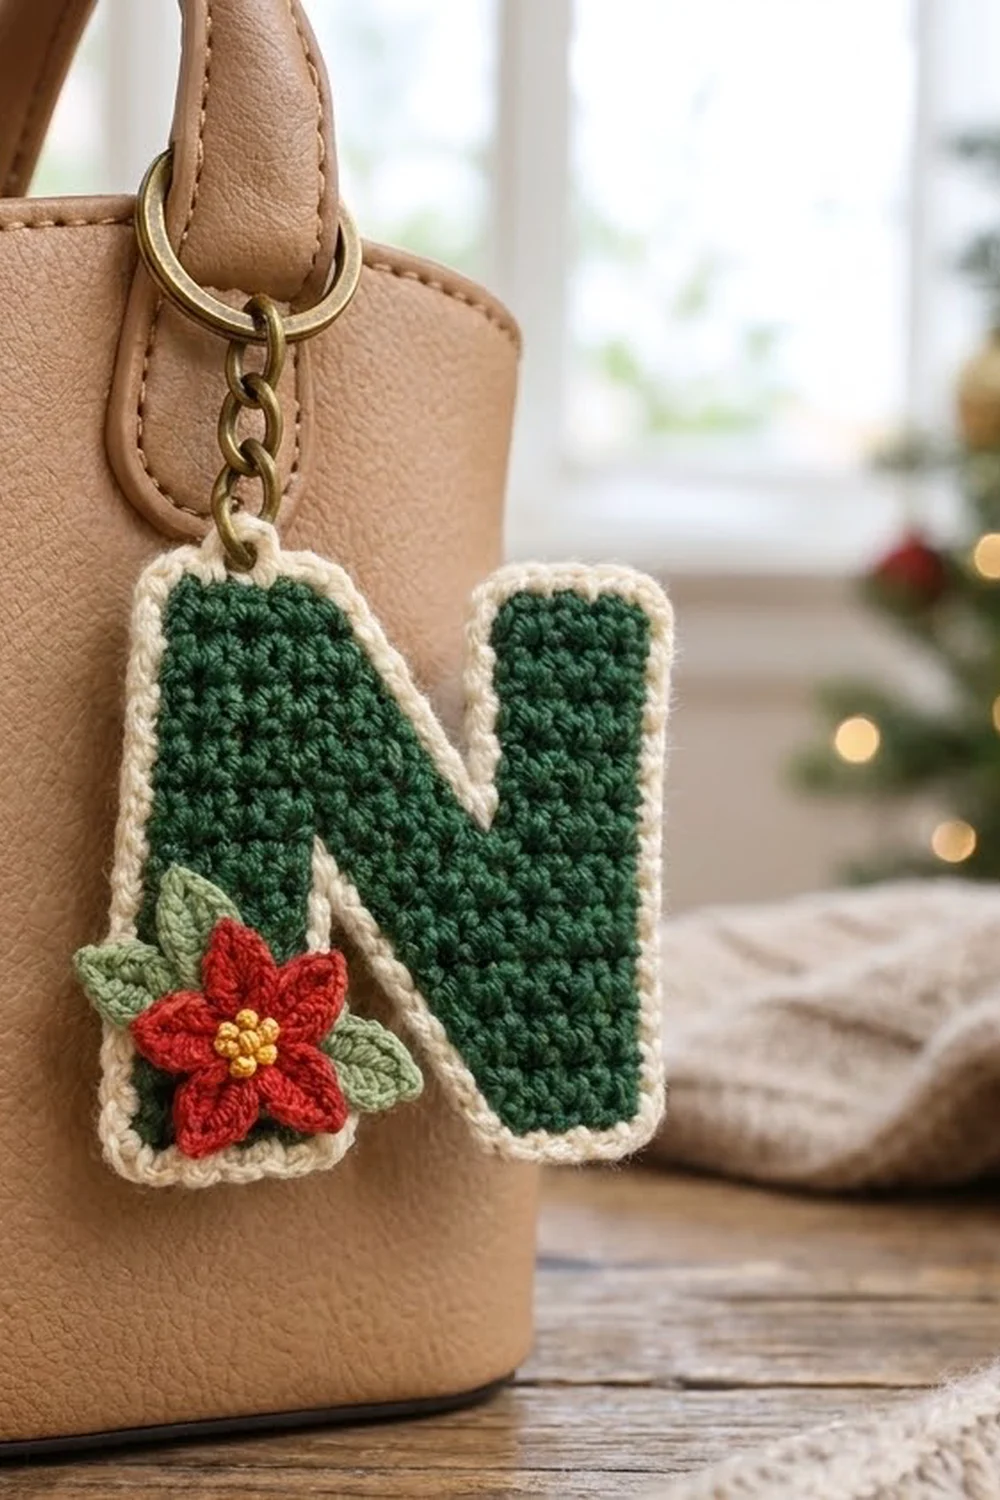
This little keychain is a bold capital “N” in deep forest green with a crisp cream outline. A bright red poinsettia with two sage leaves is tucked into the lower-left corner. It makes a quick personal gift, a stocking stuffer, or a holiday tag for your own bag.
The letter is dense single crochet in cotton, so it holds its shape on a key ring. The colors are classic Christmas: forest green, cream, poinsettia red, sage, and gold.
This pattern uses US crochet terms. The finished keychain is about 3.4 in (8.6 cm) tall and 2.73 in (6.9 cm) wide, not counting the hardware.
You crochet the letter sideways in one piece, column by column: left leg, then the diagonal, then the right leg. Then you work one round of cream border all the way around, make a small flower and two leaves, sew them on, and add the key ring.
Finished Size and Construction
- Finished size: 3.4 in (8.6 cm) tall × 2.73 in (6.9 cm) wide
- Skill level: Advanced beginner
- Terminology: US crochet terms
- Yarn weight: Sport weight (#2) cotton
- Hook: 2.75 mm (US C-2)
- Number of pieces: 1 letter body, plus 1 flower and 2 leaves sewn on as appliqué
- Layout: Single letter; no joining
- Letter size before border: 3 in (7.6 cm) tall × 2.33 in (5.9 cm) wide
- Border depth: about 0.2 in (0.5 cm) per side, 1 round
- Flower: about 1.25 in (3.2 cm) across
- Leaf: about 0.7 in (1.8 cm) long
Materials
Use a smooth mercerized cotton or cotton blend. It gives clear stitch definition and a firm fabric that won’t stretch on a key ring. Avoid fuzzy or very stretchy yarns, because the stepped diagonal edges will lose their crispness.
- Forest green (letter): 5 g, about 15 m
- Cream (border): 2 g, about 6 m
- Red (poinsettia): 2 g, about 6 m
- Sage green (leaves): 1 g, about 3 m
- Golden yellow (flower center): 1 g, about 3 m
All quantities include a generous margin for your gauge swatch and weaving in ends.
Tools:
- 2.75 mm (US C-2) crochet hook
- Tapestry needle and a sharp embroidery needle
- 1 in (2.5 cm) antique-bronze split key ring with a short chain
- 1 small jump ring and 2 pairs of flat-nose pliers
- Rustproof pins and a foam blocking mat
- Small scissors, a ruler, and a stitch marker
Abbreviations (US Terms)
- ch – chain
- sl st – slip stitch
- sc – single crochet
- hdc – half double crochet
- dc – double crochet
- sc2tog – single crochet 2 together
- st(s) – stitch(es)
- RS / WS – right side / wrong side
Special stitch – foundation single crochet extension (fsc): At the end of a row, after the last sc, insert hook into the “chain” at the base of the sc you just made, yarn over and pull up a loop, yarn over and pull through 1 loop (this makes the new chain), yarn over and pull through 2 loops. That’s 1 fsc. For the next one, work into the base chain of the fsc you just made. Each fsc adds 1 st to the end of the row, in line with the row.
Gauge and Checkpoints
Gauge: 6 sc and 6 rows = 1 in (2.5 cm) in sc, worked firmly.
The square gauge is important. Your rows become the letter’s width and your stitches become its height, so a square gauge keeps the “N” in proportion and lets the border work 1 sc per stitch or row-end.
Treat the letter as your test piece. You can also make a quick swatch of 12 sc × 12 rows, which should measure 2 in (5.1 cm) square.
Checkpoints:
- After Row 4: the strip is 3 in (7.6 cm) tall and 0.67 in (1.7 cm) wide.
- After Row 10: the piece is 1.67 in (4.2 cm) wide.
- After Row 14: the letter is 3 in (7.6 cm) tall and 2.33 in (5.9 cm) wide.
- After the border: 3.4 in (8.6 cm) × 2.73 in (6.9 cm).
If your piece is too big, go down to a 2.5 mm hook. If it’s too small, go up to a 3 mm hook. If only the width is off, adjust the tension of your turning chains, not the stitch counts.
Letter Body
Orientation: You work sideways. Each row is one vertical column of the letter. Stitch positions in a column are numbered 1 (bottom) to 18 (top). Rows 1–4 form the left leg, Rows 5–10 form the diagonal, and Rows 11–14 form the right leg.
With forest green:
Foundation: Ch 19. The slip-knot end is the bottom of the letter.
Row 1: Sc in 2nd ch from hook and in each ch across, working from the top down to the bottom. Turn. (18 sc)
Row 2: Ch 1, sc in each st across, working up. Turn. (18 sc)
Row 3: Ch 1, sc in each st across, working down. Turn. (18 sc)
Row 4: Ch 1, sc in each st across, working up. Turn. (18 sc)
You end at the top of the left leg. Checkpoint: 3 in (7.6 cm) × 0.67 in (1.7 cm).
Diagonal
Every diagonal row has exactly 8 sc and moves the block down by 2 positions. Rows worked upward add 2 sts at the bottom and leave 2 sts unworked at the top. Rows worked downward skip 2 sts at the top and add 2 fsc at the bottom.
Row 5 (down): Ch 1, sc in the first 8 sts (positions 18–11). Leave the remaining 10 sts unworked. Turn. (8 sc)
Row 6 (up): Ch 3, sc in 2nd ch from hook and in next ch (positions 9–10), sc in the next 6 sts (positions 11–16). Leave the last 2 sts unworked. Turn. (8 sc: 2 sc in chains + 6 sc in sts)
Row 7 (down): Sl st in the first 2 sts, ch 1, sc in the next 6 sts (positions 14–9), then 2 fsc (positions 8–7). Turn. (8 sc: 6 sc + 2 fsc)
Row 8 (up): Ch 3, sc in 2nd ch from hook and in next ch (positions 5–6), sc in the next 6 sts (positions 7–12). Leave the last 2 sts unworked. Turn. (8 sc)
Row 9 (down): Sl st in the first 2 sts, ch 1, sc in the next 6 sts (positions 10–5), then 2 fsc (positions 4–3). Turn. (8 sc)
Row 10 (up): Ch 3, sc in 2nd ch from hook and in next ch (positions 1–2), sc in the next 6 sts (positions 3–8). Leave the last 2 sts unworked. Do not turn yet.
Row 10 sits flush with the bottom of the letter. The upper edge of the diagonal steps from position 18 down to 8, and the lower edge from 11 down to 1. Checkpoint: 1.67 in (4.2 cm) wide.
Right Leg
Row 11 (down): Turn, ch 11, sc in 2nd ch from hook and in the next 9 ch (positions 18–9), then sc in the 8 sts of Row 10 (positions 8–1). Turn. (18 sc: 10 sc in chains + 8 sc in sts)
Row 12 (up): Ch 1, sc in each st across. Turn. (18 sc)
Row 13 (down): Ch 1, sc in each st across. Turn. (18 sc)
Row 14 (up): Ch 1, sc in each st across. Fasten off. (18 sc)
Letter total: 4 × 18 + 6 × 8 + 4 × 18 = 192 sts.
Single crochet looks the same on both sides. Mark the side where the letter reads “N” (not a mirrored “И”) as the RS, and weave in the ends on the WS.
Checkpoint: 3 in (7.6 cm) tall × 2.33 in (5.9 cm) wide.
Border
Border gauge: Same as the body: 1 sc per stitch top, row-end, or foundation chain. One round of sc adds about 0.2 in (0.5 cm) on every side.
Corner rules:
- Outer (convex) corners: 3 sc in the corner stitch.
- Inner (concave) corners: 1 sc2tog across the corner, taking 1 loop from each side.
With RS facing, join cream with a sc in the foundation-chain loop at position 2 on the left edge, just above the bottom-left corner. Work around clockwise:
- Left edge: sc in the next 15 foundation loops, for 16 sc including the joining sc (positions 2–17).
- Top-left corner: 3 sc in the top foundation st.
- Top of left leg: 1 sc in each top row-end of Rows 2–4. (3 sc)
- Diagonal top corner: 3 sc in the top st of Row 5.
- Upper diagonal: 2 sc per step down the 5 steps to the top of Row 10. (10 sc)
- Inner top notch: sc2tog over the top of Row 10 and the side of Row 11 at position 9. (1 st)
- Inner edge of right leg: 1 sc in each side of Row 11, positions 10–17. (8 sc)
- Top of right leg, left corner: 3 sc in position 18 of Row 11.
- Top of right leg: 1 sc in each top row-end of Rows 12–13. (2 sc)
- Top-right corner: 3 sc in the top st of Row 14.
- Right edge: sc in Row 14, positions 17–2. (16 sc)
- Bottom-right corner: 3 sc in position 1 of Row 14.
- Bottom of right leg: 1 sc in each bottom row-end of Rows 13–11. (3 sc)
- Diagonal bottom corner: 3 sc in the bottom st of Row 10.
- Lower diagonal: 2 sc per step up the 5 steps to the bottom of Row 5. (10 sc)
- Inner bottom notch: sc2tog over the bottom of Row 5 and the side of Row 4 at position 10. (1 st)
- Inner edge of left leg: 1 sc in each side of Row 4, positions 9–2. (8 sc)
- Bottom of left leg, right corner: 3 sc in position 1 of Row 4.
- Bottom of left leg: 1 sc in each bottom row-end of Rows 3–2. (2 sc)
- Bottom-left corner: 3 sc in the bottom foundation st.
Join with a sl st to the first sc. Fasten off. (104 sts)
Why the math works:
- Straight edges: 16 + 3 + 8 + 2 + 16 + 3 + 8 + 2 = 58 sc.
- Diagonals: 2 × 10 = 20 sc.
- Outer corners: 8 × 3 = 24 sc.
- Inner corners: 2 sc2tog = 2 sts.
- Total: 58 + 20 + 24 + 2 = 104.
Each diagonal is about 1.86 in (4.7 cm) long, which is roughly 11 stitch-widths. The 10 sc, plus the extra stitches from the corners, fill it without cupping or rippling.
Poinsettia and Leaves
Poinsettia (red):
- Rnd 1: Make a magic ring, ch 1, 5 sc in ring. Pull the ring tight and join with sl st to the first sc. (5 sc)
- Rnd 2: Ch 6, sl st in 2nd ch from hook, sc in next ch, hdc in next ch, dc in next 2 ch, sl st in next sc of Rnd 1. Repeat from * 4 more times. (5 pointed petals)
Fasten off and leave a 10 in (25.4 cm) tail. The flower measures about 1.25 in (3.2 cm) across.
Center: With golden yellow, make 3 French knots tightly clustered over the magic ring.
Leaves (make 2 in sage):
- Ch 6. Sc in 2nd ch from hook, hdc in next ch, dc in next ch, hdc in next ch, 3 sc in last ch to round the tip.
- Working along the opposite side of the chain: hdc in next ch, dc in next ch, hdc in next ch, sc in last ch.
- Sl st to the first sc. Fasten off and leave a 6 in (15.2 cm) tail. (11 sts)
Each leaf is about 0.7 in (1.8 cm) long.
Assembly:
- Pin one leaf pointing up and to the left, and the other pointing to the right. Place both so their bases meet at the bottom of the left leg, about 0.5 in (1.3 cm) above the bottom border.
- Lay the flower on top so its center covers the leaf bases. Let one or two petals overlap the cream border on the left edge.
- With the leaf tails, tack each leaf down at its base.
- With the red tail, stitch around Rnd 1 and tack each petal tip with one small stitch.
- Bring all tails through to the WS and weave them in.
Key Ring
Twist the jump ring open sideways with the pliers. Thread it around the center sc of the top-left 3-sc corner and through the last link of the key-ring chain, then twist it closed until the ends meet flush.
Final Blocking
- Lightly mist the keychain, or soak it for 5 minutes and press it dry in a towel.
- Lay it RS up on the blocking mat.
- Pin the 8 outer corners first, to 3.4 in (8.6 cm) tall × 2.73 in (6.9 cm) wide.
- Pin each inner notch so it points cleanly.
- Smooth the diagonals with your fingertip so the steps settle into a straight slope.
- Keep pins off the poinsettia. Fluff its petals and shape the tips into points.
- Let it dry completely, about 6–8 hours.
Final Quality-Control Checklist
- The letter reads “N” on the RS, not mirrored.
- Each leg has 4 columns of 18 sc, and the diagonal has 6 columns of 8 sc.
- The border count is 104 sts, with no gaps at the inner notches.
- The size is 3.4 in (8.6 cm) × 2.73 in (6.9 cm).
- The leaves sit behind the flower, and every petal tip is tacked.
- The yellow knots are firm and centered.
- The jump ring is fully closed, and the ring hangs from the top-left corner.
- All ends are woven in on the WS.
Troubleshooting
- Diagonal looks jagged: Keep the sl sts in Rows 7 and 9 loose. When you work the border, make exactly 2 sc per step.
- Letter too wide for its height: Your rows are taller than your stitches are wide. Tighten your turning chains, or go down a hook size for the body only.
- Border ruffles: You’re making too many sc on the diagonals. Use exactly 10, or go down a hook size for the border.
- Border cups: Check that you worked 3 sc at all 8 outer corners.
- Holes at inner notches: Make the sc2tog firmly. Close any gap with a stitch of cream on the WS.
- Flower curls up: Block it flat and tack down the middle of each petal.
Care
Hand wash in cool water with mild soap, press dry in a towel, and lay flat to dry. Take off the key ring if you’ll be soaking it for long, so the metal doesn’t tarnish.
Final Notes
The measurement chain is simple:
- Gauge: 6 sc × 6 rows = 1 in (2.5 cm)
- Letter body: 18 sts tall = 3 in (7.6 cm); 14 rows wide = 2.33 in (5.9 cm)
- Border: 1 round, 104 sts, adding 0.2 in (0.5 cm) per side
- Finished size: 3.4 in (8.6 cm) × 2.73 in (6.9 cm)
Check the size at each checkpoint, and your keychain will come out crisp and well proportioned.
Happy crocheting!