

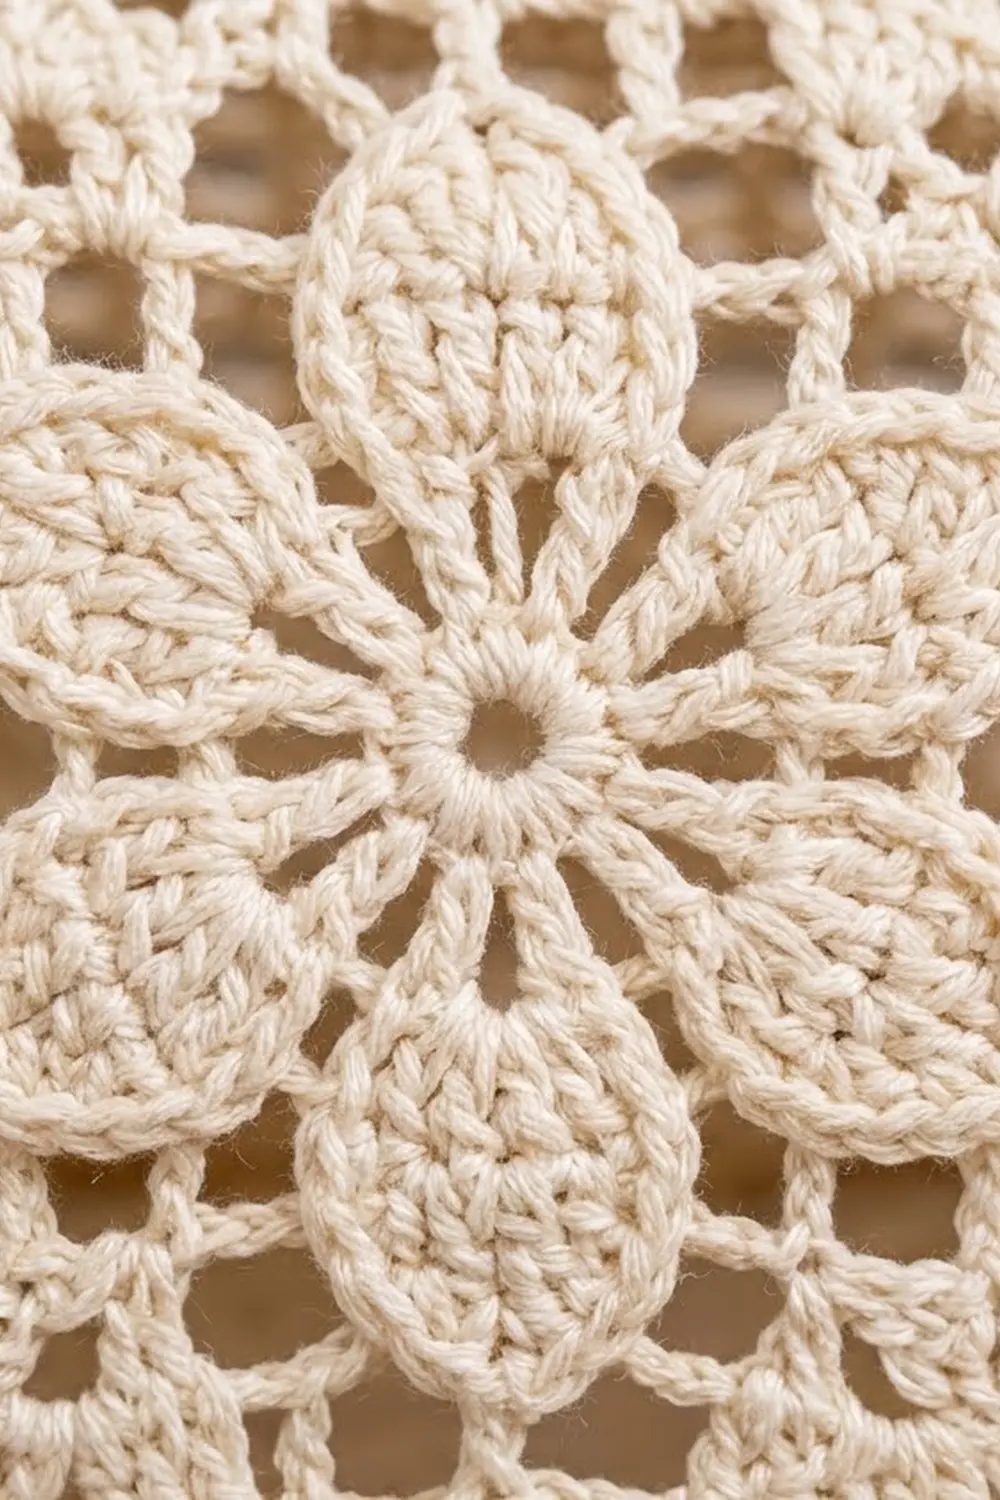
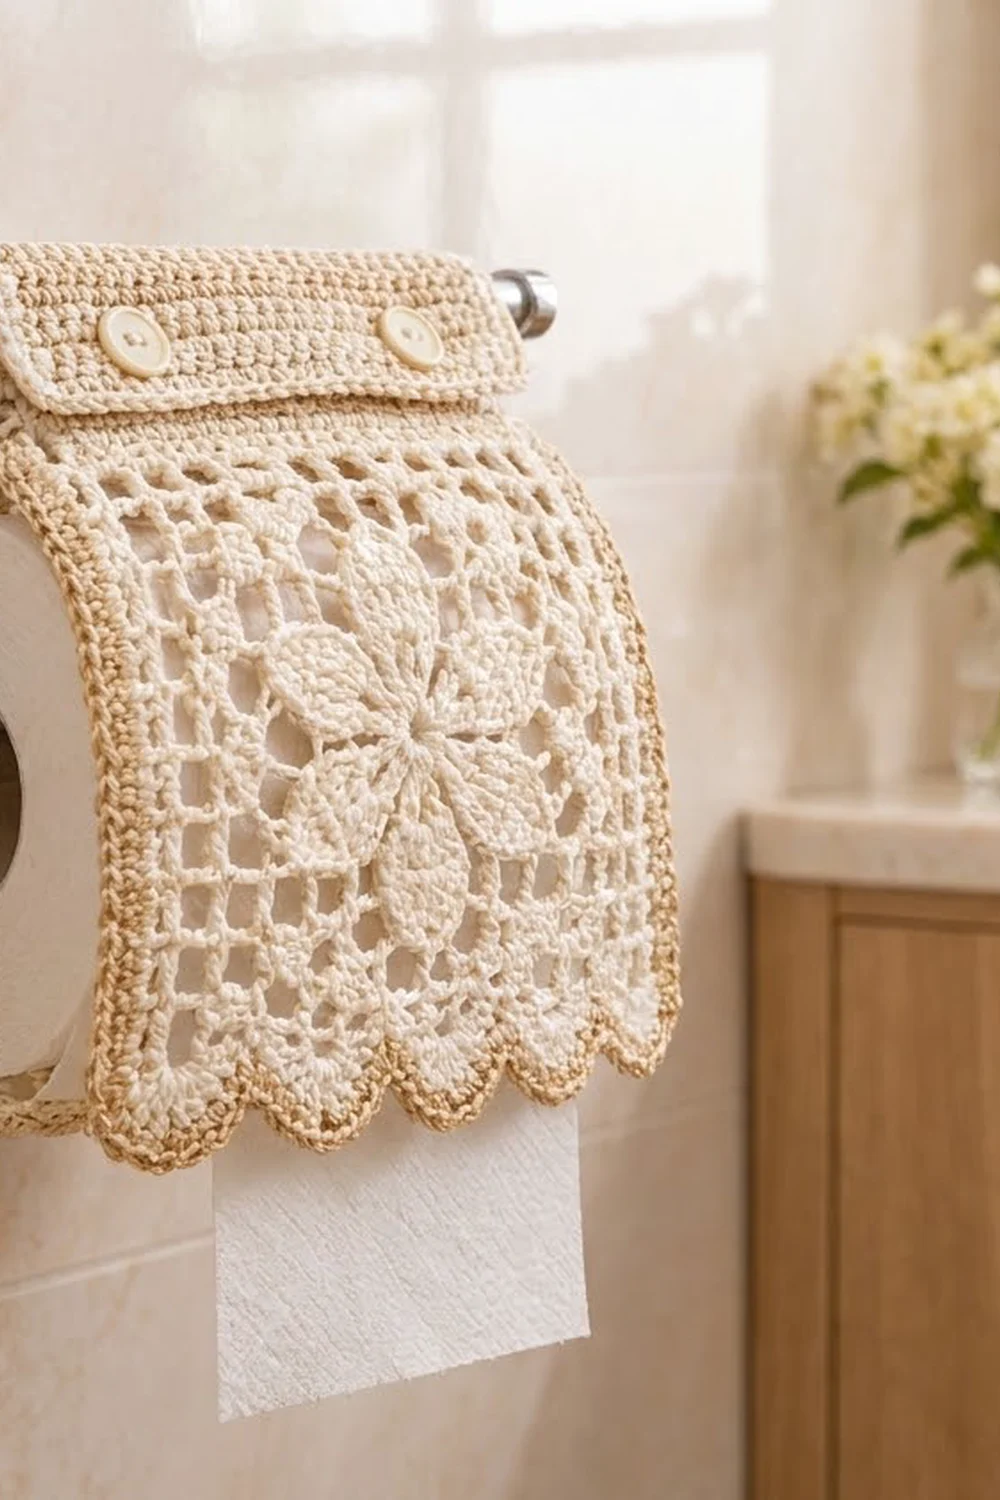
The Ivory Blossom cover is a lace panel that drapes over a spare toilet paper roll on a wall-mounted holder. A square filet mesh forms the background. A raised six-petal flower sits in the center, and a row of rounded scallops finishes the lower edge. A solid single crochet band at the top wraps around the holder bar and fastens with two buttons.
The palette is soft. The panel and flower are in ivory cotton, and one round of light tan single crochet outlines the whole piece. The tan line runs around the scallops and gives the edge a warm, defined finish. The style is vintage cottage lace, so it suits a cream, wood, and brass bathroom.
This pattern uses US crochet terms. The finished cover measures 6.5 in (16.5 cm) wide and 11.5 in (29.2 cm) long when laid flat. When it is buttoned onto the bar, about 2.5 in (6.4 cm) of band is used up in the loop, and the rest drapes over the roll.
Construction is top-down in one panel. You work the button band in single crochet rows, then a solid double crochet row, the filet mesh, a second solid row, and the scallop row. Then you crochet the flower separately, sew it to the mesh, add the tan border, and sew on the buttons.
Finished Size and Construction
- Finished size: 6.5 in x 11.5 in (16.5 cm x 29.2 cm), flat
- Skill level: Easy intermediate
- Terminology: US
- Yarn weight: Sport (#2) cotton
- Hook: 3.25 mm (US D-3)
- Number of pieces: 1 panel + 1 appliqué flower, sewn into one finished piece
- Layout: Single rectangular panel; the flower is centered on the mesh
- Panel size before border: 6 in x 11 in (15.2 cm x 27.9 cm)
- Border depth: 0.25 in (0.6 cm) on every edge
- Fits: Standard rolls up to 4.5 in (11.4 cm) wide; holder bars up to 0.75 in (1.9 cm) thick
Materials
Choose a smooth, mercerized sport-weight cotton. It shows the mesh clearly, keeps the petals crisp, and holds up to the humidity of a bathroom. Acrylic will work, but the lace will be softer and the scallops won’t hold their shape as well.
- Color A, Ivory: 35 g, about 110 m (120 yd)
- Color B, Light Tan: 8 g, about 25 m (27 yd)
- 3.25 mm (US D-3) crochet hook
- 2 shank or flat buttons, 0.5 in (1.3 cm), ivory
- Tapestry needle
- Sewing needle and ivory thread for the buttons
- Stitch markers
- Rust-proof pins, blocking mat, and a spray bottle
- Ruler or tape measure
These quantities include a margin of about 15% for swatching and weaving in ends.
Abbreviations (US Terms)
- ch – chain
- sl st – slip stitch
- sc – single crochet
- hdc – half double crochet
- dc – double crochet
- tr – treble crochet
- sk – skip
- sp – space
- st(s) – stitch(es)
- RS / WS – right side / wrong side
Special stitch – Mesh: ch 2, sk 2 sts (or the next ch-2 sp), dc in next dc. One mesh is 3 sts wide.
Special stitch – Shell: 7 dc in the same st.
Gauge and Checkpoints
Filet mesh gauge: 2 meshes and 2 rows = 1 in (2.5 cm). Each mesh square is 0.5 in (1.3 cm) wide and tall.
Single crochet gauge: about 6 sc and 6 rows = 1 in (2.5 cm).
Before you start the panel, test one piece: work the first 6 rows of the band (37 sc wide). It should measure 6 in (15.2 cm) wide and 1 in (2.5 cm) tall. If you can’t hit the width, your mesh won’t hit it either, so adjust now.
Checkpoints:
- After Row 18 (band): 6 in x 3 in (15.2 cm x 7.6 cm)
- After Row 33 (body): 6 in x 10.5 in (15.2 cm x 26.7 cm)
- After Row 34 (scallops): 6 in x 11 in (15.2 cm x 27.9 cm)
- Flower: 3.5 in (8.9 cm) across, tip to tip
- After border: 6.5 in x 11.5 in (16.5 cm x 29.2 cm)
Too big? Go down 0.25 mm in hook size. Too small? Go up 0.25 mm. If only the mesh rows are too short, pull up the loops of your dc a little taller rather than changing hooks.
Panel
Button Band (Color A)
With Color A, ch 38.
Row 1: Sc in 2nd ch from hook and in each ch across, turn. (37 sc)
Row 2 (buttonholes): Ch 1, sc in first 8 sts, ch 3, sk 3, sc in next 15 sts, ch 3, sk 3, sc in last 8 sts, turn. (31 sc + 2 ch-3 sps)
Row 3: Ch 1, sc in each sc and 3 sc in each ch-3 sp across, turn. (31 sc worked 1-per-stitch + 6 sc in spaces = 37 sc)
Rows 4–18: Ch 1, sc in each st across, turn. (37 sc)
Checkpoint: the band is 6 in x 3 in (15.2 cm x 7.6 cm). The buttonholes sit over sts 9–11 and 27–29, so their centers are st 10 and st 28.
Body
Row 19 (solid row): Ch 3 (counts as dc here and throughout), dc in each st across, turn. (37 sts)
Row 20 (first mesh row): Ch 5 (counts as dc + ch 2), sk next 2 sts, dc in next st, ch 2, sk 2, dc in next st; repeat from * 10 more times, working the last dc in the top of the turning ch, turn. (12 meshes: 13 dc + 12 ch-2 sps = 37 sts)
Rows 21–32: Ch 5, sk first ch-2 sp, dc in next dc, ch 2, sk ch-2 sp, dc in next dc; repeat from * across, working the last dc in the 3rd ch of the turning ch-5, turn. (12 meshes, 37 sts)
That makes 13 mesh rows in total (Rows 20–32), 6.5 in (16.5 cm) tall.
Row 33 (solid row): Ch 3, 2 dc in next ch-2 sp, dc in next dc; repeat from * 11 more times, working the last dc in the 3rd ch of the turning ch-5, turn. (13 dc worked 1-per-dc + 24 dc in spaces = 37 sts)
Checkpoint: 6 in x 10.5 in (15.2 cm x 26.7 cm). The mesh squares should look square, not tall.
Scallop Row
Row 34: Ch 1, sc in first st, sk 2 sts, shell in next st, sk 2 sts, sc in next st; repeat from * 5 more times, ending with the last sc in the top of the turning ch. (6 shells + 7 sc; 49 sts made)
The math: 1 starting sc + 6 repeats x 6 sts = 37. Each repeat covers 1 in (2.5 cm), so the six scallops fill the 6 in (15.2 cm) edge exactly. Fasten off.
Checkpoint: 6 in x 11 in (15.2 cm x 27.9 cm). Each scallop rises about 0.5 in (1.3 cm).
Six-Petal Flower Appliqué (Color A)
Rnd 1: Ch 4, sl st in first ch to form a ring. Ch 1, 12 sc in ring, join with sl st to first sc. (12 sc)
Rnd 2: Ch 1, sc in same st, ch 4, sk next st, sc in next st, ch 4, sk next st; repeat from * 4 more times, join to first sc. (6 sc + 6 ch-4 sps)
These ch-4 loops make the open spokes that radiate from the center.
Rnd 3 (petals): Sl st into first ch-4 sp. In each ch-4 sp work (sc, hdc, 2 dc, tr, ch 2, tr, 2 dc, hdc, sc). Join to first sc. (6 petals, each 10 sts + 1 ch-2 tip)
The ch-2 between the two treble stitches makes the pointed tip and the faint center vein on each petal.
Rnd 4 (petal outline): Ch 1, sc in each of next 5 sts, (sc, ch 2, sc) in ch-2 tip, sc in each of next 5 sts; repeat from * 5 more times, join to first sc. (72 sc + 6 ch-2 tips; 12 sc per petal)
Fasten off, leaving a 16 in (40.6 cm) tail for sewing. Checkpoint: 3.5 in (8.9 cm) across, tip to tip.
Attaching the Flower
With RS facing, find Row 26, the middle mesh row. Find the 7th dc post, which sits between mesh 6 and mesh 7. Center the flower ring over that post and pin the six tips so one petal points straight up toward the band.
The flower spans about 7 meshes. That leaves about 1.5 in (3.8 cm) of open mesh above and below it, and 1.25 in (3.2 cm) on each side.
With the tail, whipstitch the outer loops of Rnd 4 to the mesh, catching a dc post or chain wherever the edge crosses one. Add three small stitches through Rnd 1 to anchor the center. Keep the stitches loose enough that the flower lies flat without puckering the mesh.
Border (Color B)
Border gauge: 6 sc per inch (2.5 cm) along every edge. That matches the band gauge, so the border lies flat without ruffling or pulling.
With RS facing, join Color B in the first foundation ch at the top right corner.
Rnd 1:
- Top edge: 3 sc in the corner ch, sc in each of the next 35 foundation chs, 3 sc in the last ch (corner). (35 sc between corners)
- Left side: Work down the row ends. Work 1 sc in each sc row-end (Rows 18–1 of the band: 18 sc) and 3 sc in each dc row-end (Rows 19–33: 45 sc). (63 sc between corners)
- Bottom corner: 3 sc in the end sc of Row 34.
- Bottom edge: Sc in each of first 3 dc of shell, 3 sc in 4th (center) dc, sc in each of last 3 dc, sc in next sc; repeat across. Skip the last sc because it is the next corner. (6 shells x 9 sc + 5 inner sc = 59 sc between corners)
- Bottom corner: 3 sc in the end sc of Row 34.
- Right side: Repeat the left side going upward. (63 sc between corners)
- Join with sl st to the first sc. Fasten off.
Total: 35 + 63 + 59 + 63 = 220 sc along the sides, plus 4 corners x 3 sc = 12. (232 sc)
Why the math works: The top has 37 foundation stitches. The 2 end chs become corners, so 35 single sc remain between them, which is 6 sc per inch over 6 in. The side is 3 in of sc rows at 6 rows per inch (18 sc) plus 7.5 in of dc rows at 0.5 in per row. Three sc per dc row also gives 6 sc per inch (45 sc). The 3-sc peak on each shell eases the tan line around the curve so the scallops stay rounded.
Checkpoint: 6.5 in x 11.5 in (16.5 cm x 29.2 cm).
Buttons
With sewing thread, sew one button to Row 17 below st 10, and one below st 28. These line up with the buttonhole centers. Buttonholes (Row 2) and buttons (Row 17) are 15 rows apart, which is 2.5 in (6.4 cm). That makes a loop large enough for a 0.75 in (1.9 cm) bar with room to spare.
Final Blocking
- Weave in all ends along the border or inside the solid rows. Don’t weave across open mesh.
- Pin the cover RS up on a blocking mat at 6.5 in x 11.5 in (16.5 cm x 29.2 cm).
- Pin the side edges in straight lines and check that each mesh square is square.
- Pin each scallop at its peak and its two low points so all six match in height.
- Pin the six flower tips outward so the petals lie flat.
- Spray until damp, not soaked. Press the flower gently with your palm.
- Let dry completely, at least 6 hours, before you unpin.
- Button the band around the bar of the holder, with the buttons on the outside, and settle the panel over a spare roll.
Final Quality-Control Checklist
- The panel measures 6.5 in x 11.5 in (16.5 cm x 29.2 cm).
- The body has 12 meshes across and 13 mesh rows.
- There are six equal scallops, each about 1 in (2.5 cm) wide.
- The flower is centered left to right and top to bottom on the mesh.
- No puckering shows around the flower edge.
- The tan border is even all round, with crisp corners.
- Both buttons pass through the buttonholes easily and stay fastened.
- The cover clears the paper roll so the sheets pull freely.
Troubleshooting
Mesh squares look tall. Your dc are taller than your mesh is wide. Try a half size smaller hook for the body rows, or keep the chain-2s looser.
The panel slants. You probably missed the last dc in the turning chain. Count 13 dc posts on every mesh row.
Scallops don’t fit. Recount Row 33. It must have 37 sts, because the scallop repeat needs 6 x 6 + 1.
Flower cups or ruffles. Rnd 4 may be too tight or too loose. Rework it with a hook one size up or down, or steam-block the flower on its own first.
Sides wave after the border. You have too many sc per row-end. Use 2 sc per dc row instead of 3 on the next attempt.
Buttons won’t close around the bar. Move the buttons one or two rows lower on the band.
Care
Hand-wash in cool water with mild soap, roll it in a towel to remove the water, and dry it flat, re-pinning the scallops if needed. Avoid bleach so the ivory and tan stay distinct.
Final Notes
The measurement chain is short. The 37-stitch foundation gives a 6 in (15.2 cm) width. The 18-row band adds 3 in (7.6 cm), and the 15 dc rows add 7.5 in (19.1 cm). The scallops bring the panel to 11 in (27.9 cm), and the 0.25 in (0.6 cm) tan border finishes it at 6.5 in x 11.5 in (16.5 cm x 29.2 cm). If you check each stage against these numbers, the flower, scallops, and buttons will all line up.
Happy crocheting!