

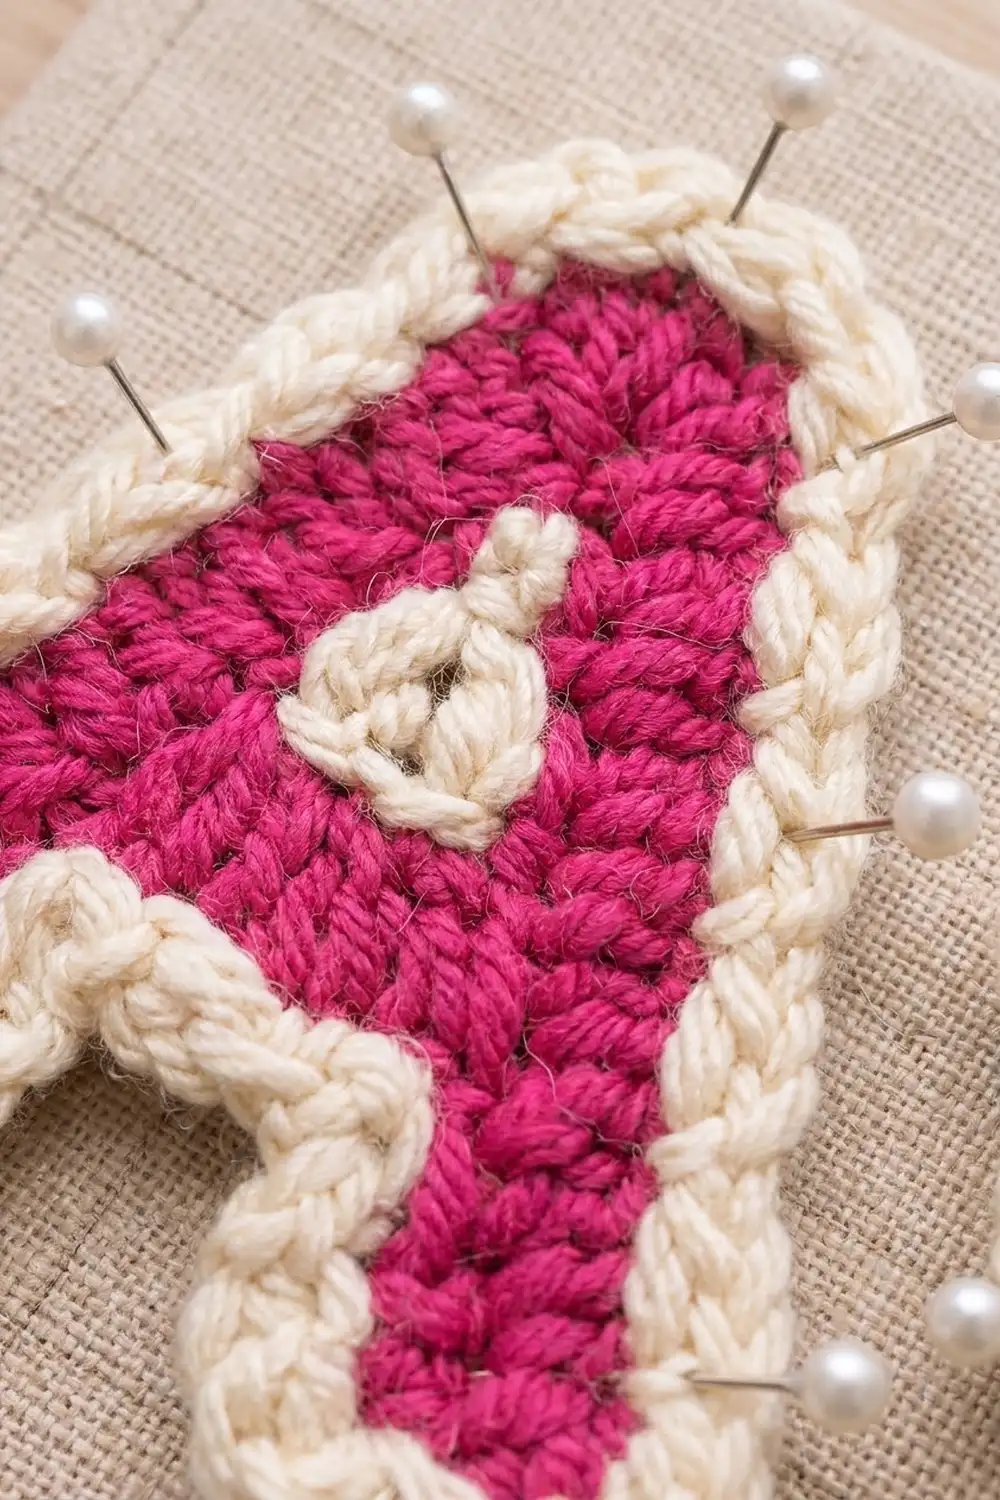
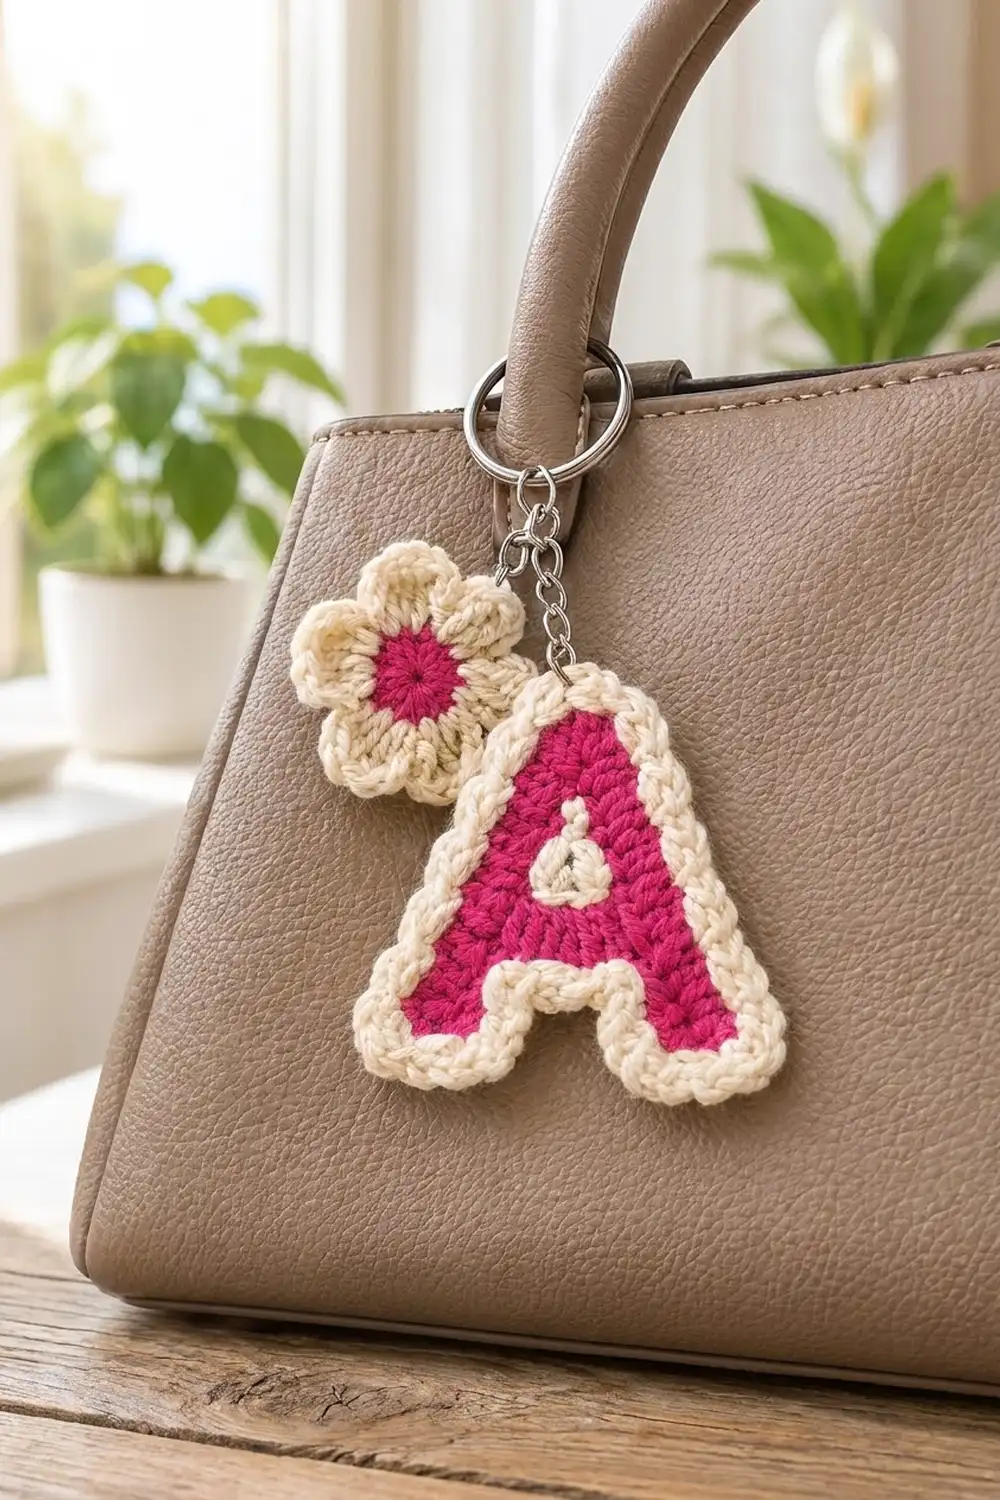
The Petal Pop Initial is a bright, chunky letter “A” keychain with a five-petal flower charm. The letter is solid magenta with a raised cream border that looks like piped icing. A small triangle above the crossbar is outlined in cream too, which keeps the letter easy to read from across a room.
The flower has a solid magenta center and five rounded cream petals, so it echoes the letter’s colors in reverse. Each piece hangs from its own short chain on one split key ring, which lets them swing and overlap the way they do on a bag handle.
This pattern uses US crochet terms. The finished letter is 3 in (7.6 cm) tall and 2.5 in (6.4 cm) wide, and the flower is 1.75 in (4.4 cm) across.
You work the letter flat in single crochet rows, starting with two separate legs and joining them with a chained crossbar. Then you shape the upper half to a point, leaving a small opening as you go. A two-round cream border finishes the edge. The flower is worked in the round, and then both pieces go onto the key ring with jump rings.
Finished Size and Construction
- Finished letter size: 3 in (7.6 cm) tall x 2.5 in (6.4 cm) wide
- Finished flower size: 1.75 in (4.4 cm) across, petal tip to petal tip
- Skill level: Easy-intermediate (simple shaping, reverse single crochet)
- Terminology: US
- Yarn weight: DK (#3), cotton or cotton blend
- Hook: 3.5 mm (E-4)
- Number of pieces: 2 (1 letter, 1 flower), not joined to each other
- Layout: Both pieces hang side by side from a single key ring on separate chains
- Letter size before border: 2.5 in (6.4 cm) tall x 2 in (5.1 cm) wide
- Border depth: 0.25 in (0.6 cm) on every edge (2 rounds)
Materials
Use a smooth, tightly plied cotton DK. Cotton gives crisp stitch definition, holds the letter’s shape and stands up to everyday handling. Acrylic works too, but it will feel softer and may need firmer blocking.
- Magenta: 6 g / 14 m (letter body and flower center)
- Cream: 7 g / 16 m (letter border, opening edge, flower petals)
These quantities include a margin of about 25% for swatching and weaving in ends.
Tools:
– 3.5 mm (E-4) crochet hook
– Tapestry needle
– Split key ring, 1 in (2.5 cm) diameter
– 2 pieces of metal curb chain: 1.25 in (3.2 cm) for the letter and 0.75 in (1.9 cm) for the flower
– 4 jump rings, 6 mm
– 2 pairs of flat- or chain-nose pliers
– Scissors, stitch markers, rust-proof pins, blocking board, spray bottle
Abbreviations (US Terms)
- ch – chain
- sl st – slip stitch
- sc – single crochet
- hdc – half double crochet
- dc – double crochet
- sc2tog – single crochet 2 together
- sc3tog – single crochet 3 together
- sk – skip
- sp – space
- RS – right side
- rev sc – reverse single crochet (crab stitch)
Special stitch – Reverse single crochet (rev sc): Without turning, insert the hook into the next stitch to the right (left-handers: to the left). Yarn over and pull up a loop, then yarn over and pull through both loops. Each rev sc makes a twisted, cord-like edge, which is where the border gets its raised, rope-like look.
Gauge and Checkpoints
Gauge: 5 sc and 6 rows = 1 in (2.5 cm) in sc rows.
The letter is your gauge swatch. Make it first and measure at each checkpoint below before you start the flower.
- After Row 6 (one leg): 0.6 in (1.5 cm) wide x 1 in (2.5 cm) tall
- After Row 9 (crossbar complete): 2 in (5.1 cm) wide x 1.5 in (3.8 cm) tall
- After Row 15 (body complete): 2.5 in (6.4 cm) tall
- After border: 3 in (7.6 cm) tall x 2.5 in (6.4 cm) wide
If the piece is too big: go down a hook size, to 3.25 mm (D-3). If it’s too small: go up to 3.75 mm (F-5). Stitch counts don’t change, so you only need to fix the hook size. If the stitches look loose or you can see gaps, go down a hook size even if the size checks out, because a keychain needs a dense fabric.
Letter A Body (Magenta)
Left Leg
With magenta, ch 4.
Row 1: Sc in 2nd ch from hook and in each ch across. (3 sc)
Rows 2–6: Ch 1, turn, sc in each sc across. (3 sc)
Fasten off. The leg should measure 0.6 in (1.5 cm) wide x 1 in (2.5 cm) tall.
Right Leg
Rows 1–6: Work exactly as for the Left Leg. (3 sc) Don’t fasten off.
Crossbar
Lay both legs side by side with the RS facing you. Place the Right Leg so its working yarn is at its outer (right) edge. Place the Left Leg to its left, with a 0.8 in (2.0 cm) gap between them.
Row 7 (joining row): Ch 1, turn, sc in each of the 3 sts of the Right Leg, ending at its inner edge. Ch 4. Starting at the inner edge of the Left Leg, sc in each of its 3 sts. (6 sc + 4 ch = 10 sts)
Row 8: Ch 1, turn, sc in 3 sc, sc in the back bump of each of the 4 ch, sc in 3 sc. (10 sc)
Row 9: Ch 1, turn, sc in each sc across. (10 sc)
Checkpoint: 2 in (5.1 cm) wide x 1.5 in (3.8 cm) tall. The opening between the legs is 4 sts wide and 6 rows tall.
Upper Point and Opening
Row 10 (opening row): Ch 1, turn, sc2tog, sc in next 2 sts, ch 2, sk next 2 sts, sc in next 2 sts, sc2tog. (6 sc + ch-2 sp)
Stitch logic: 2 + 2 + 2 skipped + 2 + 2 = all 10 sts of Row 9 used.
Row 11: Ch 1, turn, sc2tog, sc in next sc, sc in ch-2 sp, sc in next sc, sc2tog. (5 sc)
The single sc worked into the ch-2 sp draws the chain up to a point. This turns the opening into a small triangle, wide at the base and pointed at the top.
Row 12: Ch 1, turn, sc in each sc across. (5 sc)
Row 13: Ch 1, turn, sc2tog, sc in next sc, sc2tog. (3 sc)
Row 14: Ch 1, turn, sc in each sc across. (3 sc)
Row 15: Ch 1, turn, sc3tog. (1 sc)
Fasten off and weave in all magenta ends on the wrong side.
Checkpoint: 2.5 in (6.4 cm) tall x 2 in (5.1 cm) wide at the base.
Opening Edge (Cream)
Join cream with a sl st in the bottom right corner of the triangular opening.
Round 1: Ch 1. Work 6 sc evenly around the opening: 2 sc along the base (into the 2 skipped sts of Row 9), 2 sc up the left side, and 2 sc down the right side. Join with a sl st to the first sc. (6 sc)
Fasten off, leaving a 4 in (10.2 cm) tail. Thread the tail through the front loops of all 6 sc and pull gently so the cream ring lies flat. Weave in the end.
Flower (Magenta and Cream)
Round 1 (magenta): Make a magic ring, ch 1, work 10 sc into the ring. Pull the ring closed and join with a sl st to the first sc. (10 sc)
Round 2 (magenta): Ch 1, 2 sc in each st around. Join. (20 sc)
Checkpoint: 0.6 in (1.5 cm) across. Fasten off magenta.
Round 3 (cream): Join cream in any st. Ch 1, sc in each st around. Join. (20 sc)
Checkpoint: 0.9 in (2.3 cm) across.
Round 4 (petals): *Sl st in next st, (hdc, 2 dc) in next st, (2 dc, hdc) in next st, sl st in next st; repeat from * 4 more times. Join with a sl st to the first sl st. (5 petals; 40 sts: 10 sl st, 20 dc, 10 hdc)
Stitch logic: each petal uses 4 sts of Round 3, and 5 x 4 = 20.
Fasten off and weave in the ends. Checkpoint: 1.75 in (4.4 cm) across.
Make All Pieces
You need one of each piece:
- Letter A: 1 piece (magenta body, cream opening edge, cream border)
- Flower: 1 piece (magenta Rounds 1–2, cream Rounds 3–4)
Layout on the key ring, as seen from the front:
        [ KEY RING ]
        /          \
  [short chain]  [long chain]
       |              |
   [FLOWER]       [LETTER A]
   (upper left)   (lower right)
The flower hangs higher and to the left, and the letter hangs lower and to the right, so the two pieces overlap slightly at the flower’s lower petal.
Joining: Assembling the Keychain
Do this step last, after the Border and Final Blocking are finished. The two crocheted pieces aren’t joined to each other. Each one is attached to its own chain, and both chains go onto the same key ring.
- Letter: Open a jump ring with two pairs of pliers by twisting the ends sideways, not apart. Pass it through the center rev sc at the apex of the letter’s border, going under both strands of that stitch. Add one end link of the 1.25 in (3.2 cm) chain and close the ring.
- Flower: Choose a petal and pick the dc closest to the tip. Attach a jump ring under both loops of that dc, add the 0.75 in (1.9 cm) chain, and close the ring.
- Key ring: Join the free end of each chain to a jump ring, and then thread both jump rings onto the split key ring.
Tension advice: Always catch both loops of a stitch with the jump ring, never a single loop or a strand between stitches. A single strand stretches and lets the piece tilt.
Size checkpoint: When the keychain hangs freely, the bottom of the letter should sit about 4.75 in (12.1 cm) below the key ring.
Border (Letter A, Cream)
Border gauge: Work 1 sc per stitch along stitch edges and 1 sc per row-end along side edges. A row is slightly shorter than a stitch is wide (6 rows vs 5 sts per inch). Round 2’s rev sc pulls the edge in a little, which takes up that small extra length so the border lies flat.
Join cream with a sl st in the top st of Row 15 (the apex).
Round 1: Ch 1, then work these segments in order:
- Apex: 3 sc in the apex st. (3)
- Right outer side: 1 sc in each row-end from Row 14 down to Row 1. (14)
- Right leg base: 3 sc in the first foundation ch, 1 sc in the middle ch, 3 sc in the last ch. (7)
- Inner gap: 1 sc in each row-end up the inner edge of the leg (6), 1 sc in the underside of each of the 4 crossbar ch (4), 1 sc in each row-end down the other inner leg edge (6). (16)
- Left leg base: 3 sc in the first ch, 1 sc in the middle ch, 3 sc in the last ch. (7)
- Left outer side: 1 sc in each row-end from Row 1 up to Row 14. (14)
Join with a sl st to the first sc. Total: 3 + 14 + 7 + 16 + 7 + 14 = 61 sc.
Round 2: Ch 1, don’t turn. Rev sc in each sc around. Join with a sl st to the first rev sc. (61 rev sc)
Fasten off and weave in the ends.
Why the math works: The outer sides have exactly 14 row-ends each (Rows 1–14), and Row 15’s single stitch is covered by the apex group. Each leg base has 3 foundation ch, and the 2 extra sc at each end turn the outside corners. The inner gap gets no increases because those corners are concave. Adding stitches there would make the edge ruffle. Round 2 works one rev sc in each sc, so the count stays at 61. The two rounds add 0.25 in (0.6 cm) on every edge, which brings the body from 2.5 in x 2 in (6.4 cm x 5.1 cm) to 3 in x 2.5 in (7.6 cm x 6.4 cm).
Final Blocking
- Lightly mist both pieces with water until they’re damp but not dripping.
- Lay the letter on a blocking board RS up. Pin the apex, the 4 outer corners of the legs, and the 2 inner corners where the legs meet the crossbar.
- Measure: the letter should be 3 in (7.6 cm) tall and 2.5 in (6.4 cm) wide. Adjust the pins to get those numbers.
- Push the cream rev sc border outward with a fingertip so it stands proud and rounded.
- Pin the flower with one pin at each of the 5 petal tips. Space the petals evenly and check that it measures 1.75 in (4.4 cm) across.
- Leave both pieces until they’re completely dry, at least 6 hours.
- Remove the pins. Then attach the hardware as described in the Joining section.
Final Quality-Control Checklist
- Letter Row 15 ends in 1 st, and the body measures 2.5 in (6.4 cm) tall.
- The triangular opening is closed into a point and fully ringed in cream.
- Border Round 1 has 61 sc, and Round 2 has 61 rev sc.
- The finished letter is 3 in x 2.5 in (7.6 cm x 6.4 cm).
- The flower has 5 even petals and 40 sts in Round 4, and measures 1.75 in (4.4 cm).
- No magenta shows through the cream border.
- Every end is woven in on the wrong side and trimmed.
- Each jump ring is fully closed and catches both loops of a stitch.
Troubleshooting
Legs are different heights: Count the rows. Each leg needs exactly 6 rows before you join the crossbar.
Crossbar puckers: The ch-4 was too tight. Redo it with looser chains, or chain with a hook one size larger.
Opening closed up or vanished: Check Row 10. You need ch 2 and you must skip 2 sts. Working into those sts by mistake fills the gap.
Border ruffles: You probably added extra sc in the inner gap or worked 2 sc in some row-ends. Go back to exactly 61 sc.
Border cups or pulls in: Work Round 2 more loosely, or use a hook one size larger for the rev sc only.
Petals uneven: Make sure every petal sits over exactly 4 sts of Round 3. Place a marker every 4 sts before you start Round 4.
Letter twists on the chain: Move the jump ring to the center rev sc at the apex.
Care
Hand wash in cool water with mild soap and press out the water with a towel. Reshape the piece and dry it flat, and take it off the key ring first so the metal doesn’t mark the yarn.
Final Notes
The measurement chain is simple. Each leg is 3 sc wide and 6 rows tall, 0.6 in x 1 in (1.5 cm x 2.5 cm). The crossbar brings the body to 10 sts and 2 in (5.1 cm) wide. The shaped point brings the body to 15 rows and 2.5 in (6.4 cm) tall. Then the 61-stitch, two-round border adds 0.25 in (0.6 cm) on every edge, for a finished letter 3 in x 2.5 in (7.6 cm x 6.4 cm). The 40-stitch flower finishes at 1.75 in (4.4 cm). If your gauge matches at each checkpoint, the finished keychain will match too.
Happy crocheting!