

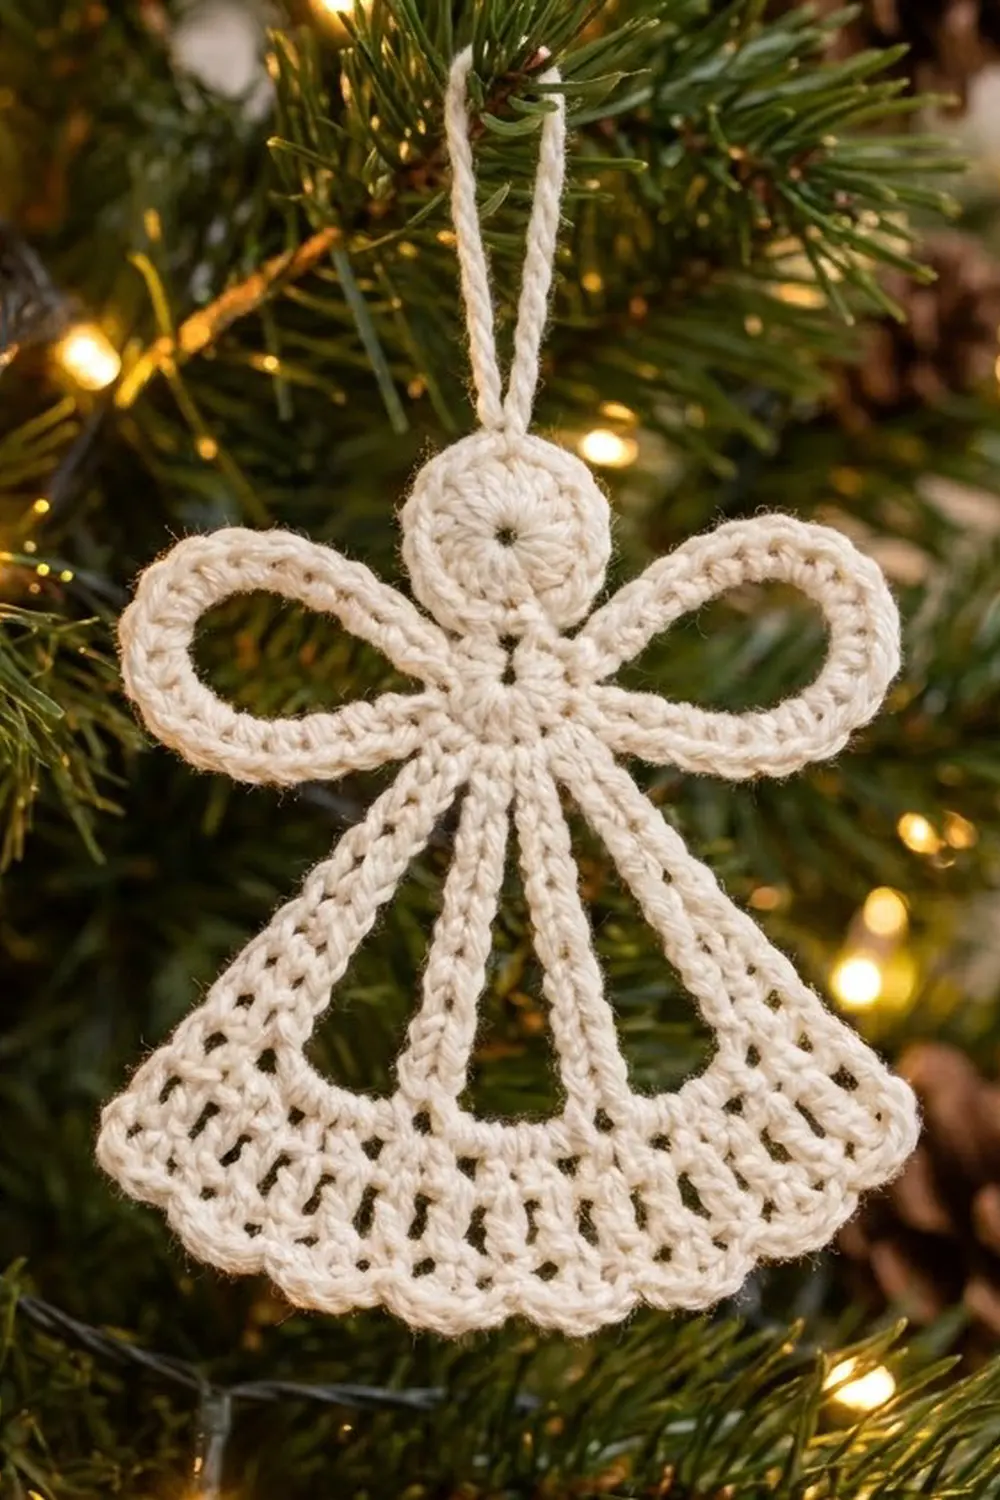
The Snowlace Angel is a small, airy ornament worked in one soft cream yarn. She has a neat round head, two open loop wings, and a skirt built from four corded bars that fan out into a lacy band with a scalloped hem. Set against a dark tree or a wood mantel, the open spaces are what make her stand out.
The style is classic heirloom lace with a simple, modern outline. Because there is only one color and no sewing between parts, she works well as a gift-tag topper, a tree ornament, or a quick bazaar make.
This pattern uses US crochet terms. The finished angel measures about 4.5 in (11.4 cm) wide at the hem and 5 in (12.7 cm) tall, plus a 1 in (2.5 cm) hanging loop, for 6 in (15.2 cm) overall.
You’ll crochet her as one continuous piece. First comes the head in the round, then the hanging loop, wings, and four spokes worked straight off the head’s edge. Last, you join the spoke tips with a foundation row and work the skirt band and scalloped hem in rows.
Finished Size and Construction
- Finished size: 4.5 in (11.4 cm) wide at hem × 5 in (12.7 cm) tall, plus 1 in (2.5 cm) loop
- Wingspan: about 4.25 in (10.8 cm)
- Skill level: Easy–Intermediate
- Terminology: US
- Yarn weight: DK / light worsted cotton (CYC 3)
- Hook: 3.5 mm (E-4)
- Number of pieces: 1 (single motif, no joining)
- Layout: head at top, wings at the sides, four-spoke skirt below
- Head diameter: 1.25 in (3.2 cm)
- Size before border: about 4 in (10.2 cm) wide × 4.5 in (11.4 cm) tall
- Border depth: about 0.5 in (1.3 cm), scalloped hem plus side edging
Materials
Yarn: A smooth, mercerized or combed cotton in DK weight gives the crisp, corded look shown. Cotton holds the open wings and spokes in shape after blocking much better than acrylic.
- Cream / Ivory: 15 g, about 36 m (39 yd)
One angel uses about 10 g. The quantity above includes a margin for your gauge swatch and for tension differences.
Tools:
– 3.5 mm (E-4) crochet hook
– Tapestry needle
– Scissors
– Stitch markers (4–6)
– Blocking mat and rust-proof pins
– Spray bottle; optional fabric stiffener or spray starch
Abbreviations (US Terms)
- ch: chain
- sl st: slip stitch
- sc: single crochet
- dc: double crochet
- sk: skip
- sp: space
- st(s): stitch(es)
- RS / WS: right side / wrong side
- BLO: back loop only
Special stitch: Covered loop. Make the stated chain and sl st into the same stitch it started from to close the loop. Then work the stated number of sc into the loop (around the chain, not into individual chains), pushing them together so the chain is completely hidden. Finish with a sl st into the starting stitch.
Shell: 5 dc worked into the same space.
Gauge and Checkpoints
Gauge: 10 sc = 2 in (5.1 cm), and 5 rows of sc = 1 in (2.5 cm).
This is a single small piece, so use the head as your test. Work Rounds 1–2 and measure before going on. The head sets the spacing of everything that follows.
Checkpoints:
– Head Round 1: 0.9 in (2.3 cm) across
– Head Round 2: 1.25 in (3.2 cm) across
– Each wing: about 1.5 in (3.8 cm) long from head to tip
– Each spoke: 2.4 in (6.1 cm) long
– Skirt Row 2: 3.2 in (8.1 cm) wide
– Skirt Row 4: about 4 in (10.2 cm) wide
– Finished hem after border: 4.5 in (11.4 cm) wide
Too big? Go down to a 3.25 mm (D-3) hook. Too small? Go up to a 3.75 mm (F-5) hook. If only the spokes come out long, tighten your foundation chains, since loose chains are the usual cause.
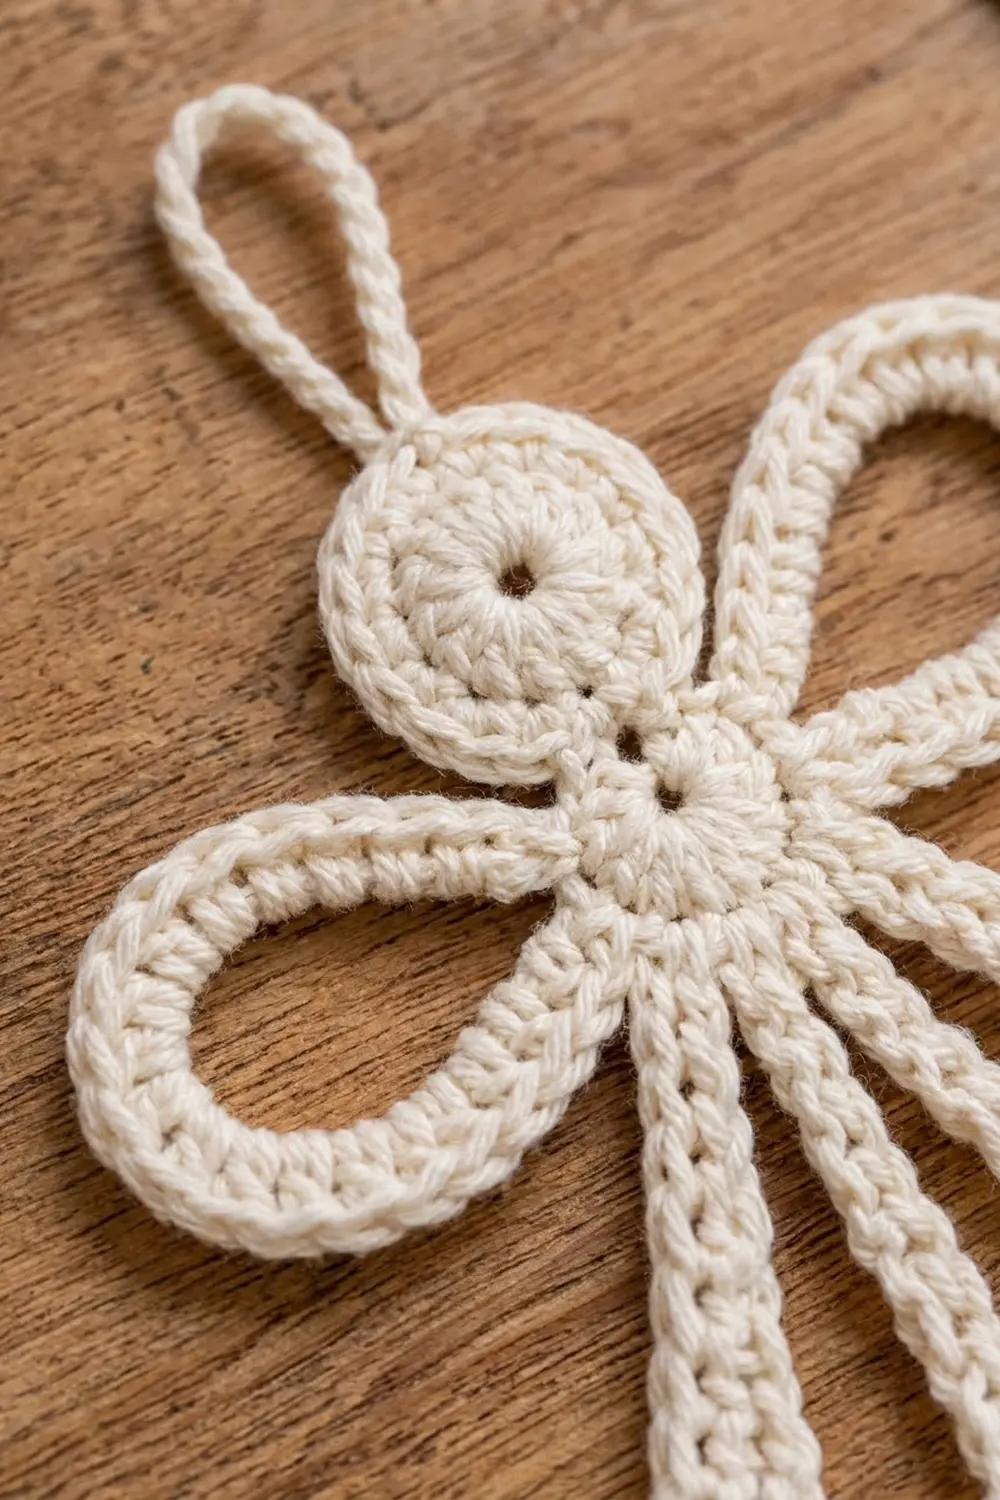
Head
Make a magic ring.
Round 1: Ch 3 (counts as dc), 11 dc in ring. Pull ring closed and sl st to top of beginning ch-3. (12 dc)
Checkpoint: 0.9 in (2.3 cm) across.
Round 2: Ch 1, 2 sc in each st around. Sl st to first sc. (24 sc)
Checkpoint: 1.25 in (3.2 cm) across, lying flat.
Do not fasten off. Number the Round 2 stitches 1–24, counting the first sc as st 1. St 1 is the top of the head, and st 13 is the bottom center. Working in your normal direction, sts 2–12 run down one side of the head and sts 14–24 run up the other. Place markers in sts 7, 10, 16, and 19.
Hanging Loop, Wings, and Spokes
All of these are worked off the head’s Round 2 in one pass. Work the connecting sl sts in BLO and loosely, so the head’s sc edge stays smooth and flat.
Hanging loop (st 1): You are at st 1. Ch 12 and sl st in st 1 to close the loop. Work 16 sc into the loop, then sl st in st 1. The loop measures about 1 in (2.5 cm).
Travel: Sl st in BLO of sts 2–7.
First wing (st 7): Ch 18 and sl st in st 7 to close the loop. Work 24 sc into the loop, then sl st in st 7. The 24 sc fill the loop fully, so it turns into a firm, rounded teardrop about 1.5 in (3.8 cm) long.
Travel: Sl st in BLO of sts 8–10.
Spoke 1 (st 10): Ch 13. Sc in 2nd ch from hook and in each remaining ch, then sl st in st 10. (12 sc) Leave the skipped chain at the tip free, because you’ll use it later.
Travel: Sl st in BLO of sts 11–12.
Spoke 2 (st 12): Ch 13, sc in 2nd ch from hook and each remaining ch, sl st in st 12. (12 sc)
Travel: Sl st in BLO of sts 13–14.
Spoke 3 (st 14): Work as Spoke 2, finishing with a sl st in st 14. (12 sc)
Travel: Sl st in BLO of sts 15–16.
Spoke 4 (st 16): Work as Spoke 2, finishing with a sl st in st 16. (12 sc)
Travel: Sl st in BLO of sts 17–19.
Second wing (st 19): Work as the first wing. (24 sc in loop)
Finish: Sl st in BLO of sts 20–24, sl st in st 1. Fasten off and weave in the end.
The setup is symmetrical around the bottom center (st 13). The wings sit 6 sts from st 13 on each side, and the spokes sit 1 and 3 sts away on each side. Each spoke is 2.4 in (6.1 cm) long.
Skirt Band
The spokes now hang loose. This row joins their tips and sets the fan shape. Lay the angel RS up with the spokes pointing down. Spoke 4 is the rightmost spoke if you crochet right-handed.
Row 1 (RS): Join yarn with a sc in the free chain at the tip of Spoke 4. Ch 4 and sc in the tip of Spoke 3. Ch 4 and sc in the tip of Spoke 2. Ch 4 and sc in the tip of Spoke 1. (4 sc + 12 ch = 16 sts)
Before you continue, lay the piece flat. The two outer spokes should splay out evenly, and the inner spokes should leave three open triangular windows. With 0.6 in (1.5 cm) of head stitches at the top and 3.2 in (8.1 cm) at the bottom, each 2.4 in (6.1 cm) spoke drops about 2 in (5.1 cm) vertically. That’s what gives the gentle bell shape.
Row 2 (WS): Ch 1, turn. Sc in each sc and each ch across. (16 sc)
Checkpoint: 3.2 in (8.1 cm) wide.
Row 3 (RS): Ch 3 (counts as dc), turn. Dc in next st, then ch 1, dc in next 2 sts; repeat from * 6 more times. (16 dc in 8 pairs + 7 ch-1 sps = 23 sts)*
The 7 ch-1 sps are added width. They are the only increases in the band, and they start the gentle flare.
Row 4 (WS): Ch 3 (counts as dc), turn. Dc in next dc, then ch 1, sk ch-1 sp, dc in next 2 dc; repeat from * 6 more times, working the last dc in the top of the turning ch. (16 dc in 8 pairs + 7 ch-1 sps = 23 sts)*
Because each ch-1 sits over the ch-1 below, you get seven small stacked windows. That is the eyelet texture in the band.
Checkpoint (size before border): about 4 in (10.2 cm) wide × 4.5 in (11.4 cm) tall, not counting the hanging loop.
Do not fasten off.
Border: Scalloped Hem and Side Edging
Border gauge: One shell is 5 dc in a ch-1 sp, and each shell spans about 0.6 in (1.5 cm) at its widest. Seven shells sit edge to edge, and their outward curve opens the hem to 4.5 in (11.4 cm).
Row 5 (RS, scallops): Ch 1, turn. Sc in first dc, sk next dc, then work 5 dc in the next ch-1 sp. *Sc in the gap between the 2 dc of the next pair, then work 5 dc in the next ch-1 sp; repeat from * 5 more times. Sk next dc, sc in top of turning ch.
Count: 7 shells × 5 dc = 35 dc, plus 1 + 6 + 1 = 8 sc. (43 sts, 7 scallops)
Side edging, first side: Do not turn. Ch 1 and work sc evenly up the side of the band as follows:
– 2 sc in the end of Row 4
– 2 sc in the end of Row 3
– 1 sc in the end of Row 2
– 1 sc in the end of Row 1
Sl st into the base of the outer spoke and fasten off. (6 sc)
Side edging, second side: With RS facing, join yarn at the bottom corner of the other side, at the end of Row 5. Work the same 6 sc up to Row 1, sl st into the base of the outer spoke, and fasten off. (6 sc)
Why the math works: The 16 sts of Row 2 divide into 8 dc pairs, which leaves exactly 7 gaps between them. Each gap becomes one ch-1 sp in Rows 3–4 and one shell in Row 5. A sc anchors each pair, plus the two ends (6 + 2 = 8 sc), so the hem is symmetrical with a sc at each corner. The side edging uses 1 sc per sc row end and 2 per dc row end, which matches the row heights, so the band sides lie flat without ruffling or pulling.
Checkpoint: hem 4.5 in (11.4 cm) wide. Total height is 5 in (12.7 cm) without the loop and 6 in (15.2 cm) with it.
Weave in all ends along the back of the spokes and band, where they hide easily.
Final Blocking
- Soak the angel in cool water for 5 minutes, then press out the water in a towel. Don’t wring it.
- Lay it RS up on the blocking mat.
- Pin the head into a circle 1.25 in (3.2 cm) across.
- Pin each wing into a rounded teardrop, with the tips 4.25 in (10.8 cm) apart.
- Pin the outer spokes straight and the inner spokes so that the three triangular windows match, with the center one slightly wider.
- Pin the band edge straight at 4 in (10.2 cm). Then pin each scallop point so the hem measures 4.5 in (11.4 cm).
- Check that the height is 5 in (12.7 cm) from the top of the head to the bottom of the scallops.
- Pin the hanging loop straight up.
- For a crisper ornament, mist with spray starch or brush on diluted fabric stiffener.
- Let it dry completely, usually 12–24 hours, before unpinning.
Final Quality-Control Checklist
- [ ] Head is flat and round: 12 dc in Round 1, 24 sc in Round 2
- [ ] Hanging loop sits at st 1, directly above bottom center
- [ ] Wings are at sts 7 and 19, the same size, with no chain showing through the sc
- [ ] Four spokes at sts 10, 12, 14, and 16, each with 12 sc
- [ ] Three open triangular windows, center slightly wider
- [ ] Row 2 has 16 sc
- [ ] Rows 3 and 4 each have 16 dc and 7 ch-1 sps, with the windows stacked
- [ ] Row 5 has 7 scallops (43 sts)
- [ ] Each side edging has 6 sc
- [ ] Finished size is 4.5 in (11.4 cm) × 5 in (12.7 cm), plus a 1 in (2.5 cm) loop
- [ ] All ends are woven in securely on the back
Troubleshooting
Head cups or ruffles: For cupping, loosen your Round 2 tension. For ruffling, check you have 12 dc in Round 1, not 13.
Chain shows through the wings: Add 1–2 sc to the loop, or squeeze the sc closer together as you go.
Spokes twist: Make sure each sc went into the back bump or the same side of the chain on every spoke. Light blocking with stiffener fixes a small twist.
Skirt too narrow or bell too steep: Check that Row 1 has ch 4 between tips, not ch 3.
Hem flares and waves: You may have worked more than 5 dc per shell, or your dc tension is loose. Try a hook one size smaller for Row 5 only.
Band sides pull in: Make sure you worked 2 sc into each dc row end in the side edging.
Angel leans to one side: Recount the travel sl sts. The spokes must sit at sts 10, 12, 14, and 16.
Care
Hand wash in cool water with mild soap, press dry in a towel, and reshape flat. Re-starch after washing if you want a firm ornament.
Final Notes
Everything in this angel builds on one measurement chain:
- Gauge of 10 sc = 2 in (5.1 cm)
- Head of 24 sc, 1.25 in (3.2 cm) across
- Four 12-sc spokes, 2.4 in (6.1 cm) long
- 16-st band, 3.2 in (8.1 cm) wide
- 23-st lace rows, about 4 in (10.2 cm) wide
- 7-shell hem, 4.5 in (11.4 cm) wide and 5 in (12.7 cm) tall
Check your size at each step and the angel will come out symmetrical and ready to hang.
Happy crocheting!