

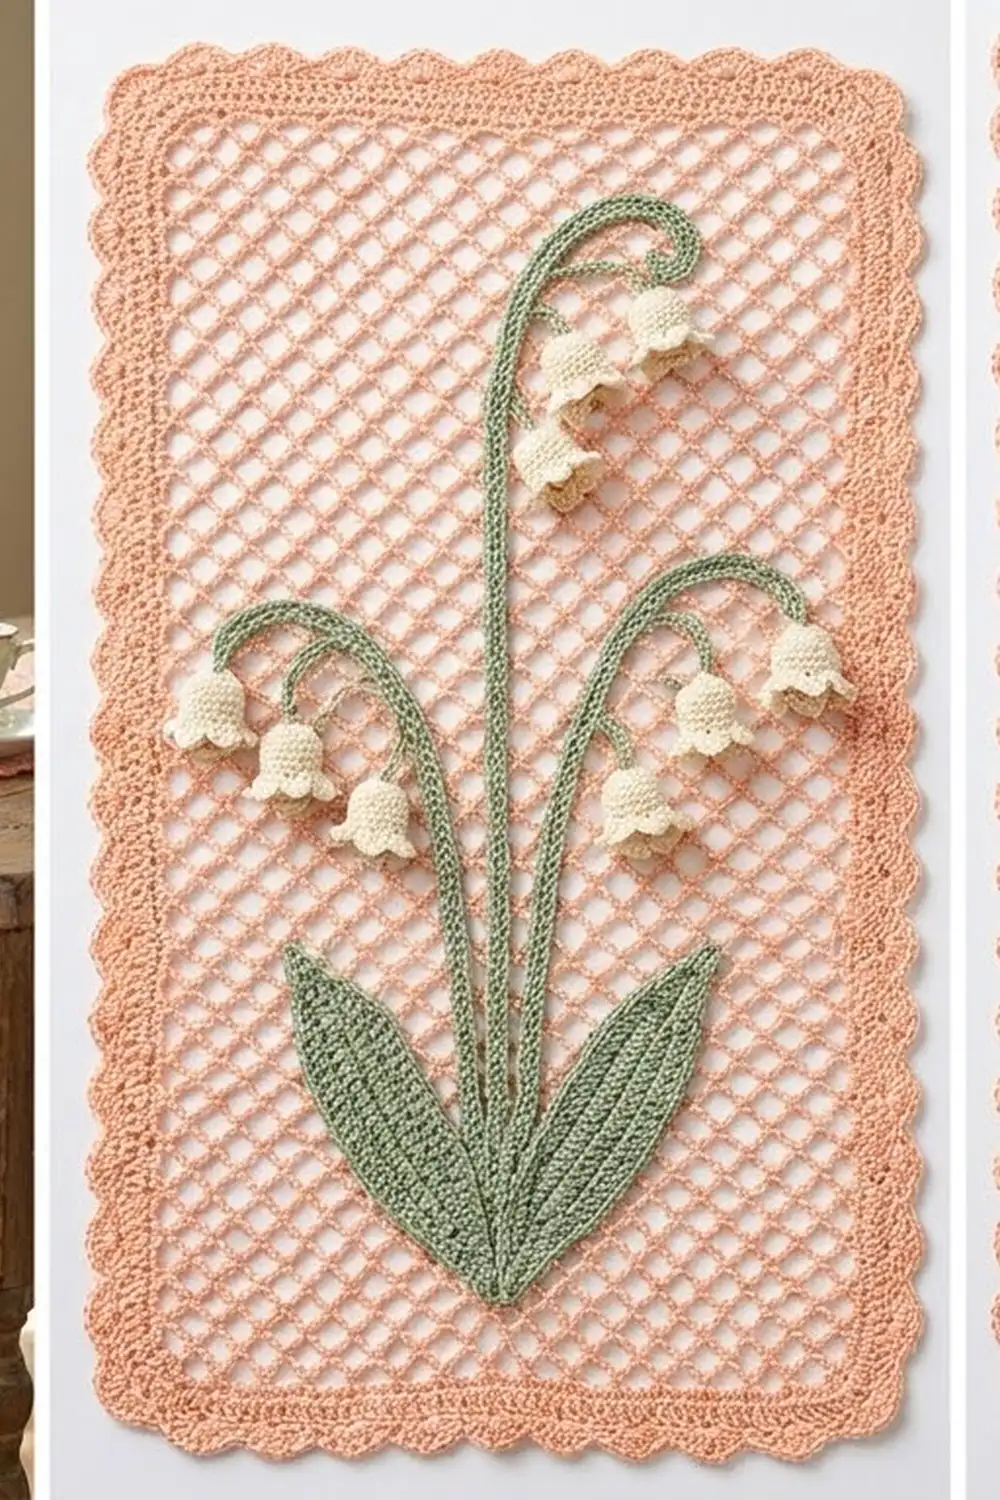
This panel pairs a light, airy peach net with three lily-of-the-valley sprays in sage green and cream. The mesh gives you an open, lacy background, and the flowers sit on top as raised appliqué, so they cast soft little shadows and read clearly from across the room.
The palette is gentle and vintage: peach for the mesh and border, sage green for the stems and leaves, and cream for the bells. The style is cottage-garden and a little romantic, but the construction is straightforward and very measurable.
This pattern uses US crochet terms. The finished panel measures 12 x 18 in (30.5 x 45.7 cm) after blocking.
You will work the mesh in rows from the bottom up, finish it with a top row of single crochet, and add a three-round scalloped border. Then you make the stems, leaves, and bells separately and sew them onto the mesh following a measured placement plan.
Finished Size and Construction
- Finished size: 12 x 18 in (30.5 x 45.7 cm)
- Skill level: Intermediate
- Terminology: US crochet terms
- Yarn weight: DK (light worsted, #3), cotton or cotton blend
- Hook: 4.0 mm (G-6)
- Number of pieces: 1 mesh panel, plus sewn-on appliqué (3 stems, 6 branches, 6 leaves, 21 bells)
- Layout: 3 vertical lily sprays, evenly spaced, all arching to the right
- Mesh size before border: 10.5 x 16.5 in (26.7 x 41.9 cm)
- Border depth: 0.75 in (1.9 cm) on each side
Materials
Choose a smooth cotton DK, either mercerized or matte. Cotton keeps the mesh crisp and helps the bells hold their shape. Avoid fuzzy yarns, because they blur the net.
- Peach (mesh and border): 90 g, about 200 m
- Sage green (stems, branches, leaves): 20 g, about 44 m
- Cream (bells): 25 g, about 55 m
These amounts include about 15% extra, so you have enough for a test swatch and small corrections.
Tools:
– 4.0 mm (G-6) crochet hook
– Tapestry needle
– Stitch markers (at least 10)
– Rust-proof pins
– Measuring tape or ruler
– Blocking mats
– Spray bottle
– Scissors
Abbreviations (US Terms)
- ch – chain
- sl st – slip stitch
- sc – single crochet
- hdc – half double crochet
- dc – double crochet
- sk – skip
- st(s) – stitch(es)
- sp – space
- rep – repeat
- Rnd – round
Special technique – back-bump slip stitch cord: Make the stated chain. Turn it over so the bumps on the back face you. Starting in the 2nd ch from hook, sl st into the back bump of each ch to the end. This gives a firm, slightly twisted cord that looks like a plant stem.
Gauge and Checkpoints
Mesh gauge: 4 ch-5 loops wide x 8 rows tall = 3 x 3 in (7.6 x 7.6 cm), measured after gentle blocking.
Cord gauge: 5 sl sts = 1 in (2.5 cm) along a back-bump cord.
Make a test swatch first: ch 18 and work Rows 1–8 of the mesh (4 loops). Block it lightly and measure. If the swatch is wider than 3 in (7.6 cm), go down a half size in hook. If it is narrower, go up a half size.
Checkpoints during the panel:
– After Row 8: 3 in (7.6 cm) tall
– After Row 16: 6 in (15.2 cm) tall
– After Row 22: 8.25 in (21.0 cm) tall
– After Row 43: 16 1/8 in (41.0 cm) tall
– After Row 44: 10.5 x 16.5 in (26.7 x 41.9 cm)
If the panel is too long but the width is right, your loops are drooping, so tighten your chains slightly. If it is too short, loosen your chains rather than changing hooks, so the width stays on target.
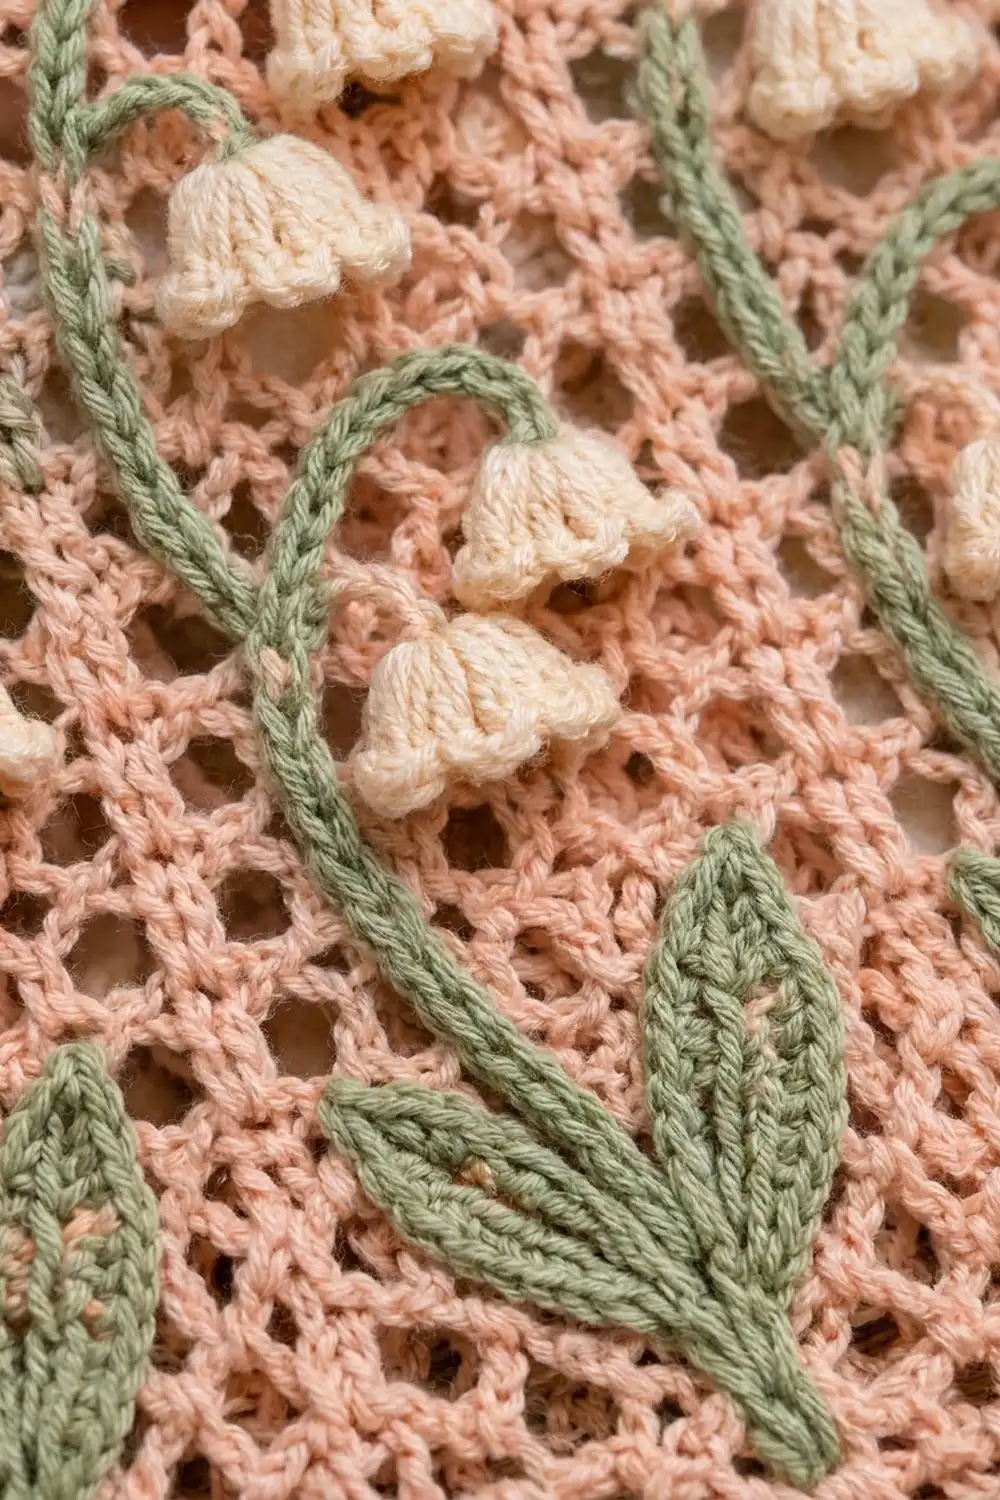
Mesh Panel
With peach, ch 58.
Row 1: Sc in 2nd ch from hook, *ch 5, sk 3 ch, sc in next ch; rep from * across. (15 sc, 14 ch-5 loops)
Row 2: Ch 5 (counts as dc + ch 2), turn, sc in first ch-5 loop, *ch 5, sc in next ch-5 loop; rep from * 12 more times, ch 2, dc in last sc. (14 sc, 13 full ch-5 loops, 2 half loops)
Row 3: Ch 1, turn, sc in first dc, *ch 5, sc in next ch-5 loop; rep from * 12 more times, ch 5, sc in 3rd ch of turning ch-5. (15 sc, 14 ch-5 loops)
Rows 4–43: Rep Rows 2 and 3 twenty more times. Row 43 is worked like Row 3, so the top edge has 14 full loops. (15 sc, 14 ch-5 loops)
Row 44 (top edge row): Ch 1, turn, sc in first sc, *3 sc in next ch-5 loop, sc in next sc; rep from * across. (57 sc: 15 worked into existing sc + 42 worked into the loops)
Fasten off. The bottom edge has 57 foundation ch to work into (58 ch minus the one skipped), matching the 57 sc across the top.
Stems and Branches
With sage green, make all cords using the back-bump slip stitch cord.
Main stem (make 3): Ch 71, sl st in back bump of 2nd ch from hook and each ch across. (70 sl sts, 14 in / 35.6 cm)
Side branch (make 6): Ch 21, sl st in back bump of 2nd ch from hook and each ch across. (20 sl sts, 4 in / 10.2 cm)
Leave a 12 in (30.5 cm) tail on each cord for sewing.
Leaves (make 6)
With sage green, ch 16. The foundation chain becomes the visible midrib.
Rnd 1: Working in the 15 ch after the hook end: sl st in 2nd ch from hook, sc in next 2 ch, hdc in next 3 ch, dc in next 5 ch, hdc in next 2 ch, sc in next ch, 3 sc in last ch (rounded base); working on the opposite side of the foundation ch: sc in next ch, hdc in next 2 ch, dc in next 5 ch, hdc in next 3 ch, sc in next 2 ch, sl st in last ch. Join with sl st to the first sl st. (31 sts: 14 + 3 + 14)
The skipped ch at the start forms the pointed tip. Each leaf measures about 3 in (7.6 cm) long and 1 in (2.5 cm) wide. Fasten off with a long tail.
Bells (make 21)
With cream, make a magic ring. Work Rnds 1–4 in a spiral and mark the first stitch.
Rnd 1: 6 sc in ring. (6 sc) Pull ring closed.
Rnd 2: *Sc in next st, 2 sc in next st; rep from * 3 times. (9 sc)
Rnd 3: *Sc in next 2 sts, 2 sc in next st; rep from * 3 times. (12 sc)
Rnd 4: Sc in each st around. (12 sc)
Rnd 5 (lobed rim): *Sl st in next st, 3 hdc in next st; rep from * 6 times. (24 sts: 6 sl sts + 18 hdc, 6 lobes)
Join and fasten off, weaving the end in on the inside. Leave the starting tail long; it comes out of the closed top of the bell and is used to sew it on. Each bell is about 0.75 x 0.75 in (1.9 x 1.9 cm) with the rim slightly flared.
Border
Border gauge: about 5.25–5.5 sc per inch (2.1–2.2 sc per cm) along every edge. This matches the mesh and keeps the panel flat.
Each “per side” count below is the number of stitches between two corner spaces. Corners are ch spaces, not stitches, so nothing is counted twice.
Rnd 1: With RS facing, join peach in the first sc of Row 44. Ch 1, sc in each of the 57 sc across the top, ch 2 (corner). Down the side: 1 sc in the row end of Row 44, then 2 sc in each row end of Rows 43 to 1 (87 sc), ch 2 (corner). Along the bottom: sc in each of the 57 foundation ch, ch 2 (corner). Up the side: 87 sc as before, ch 2 (corner). Join with sl st to first sc.
(Top 57, bottom 57, sides 87 each = 288 sc + 4 corner ch-2 sps)
Rnd 2: Ch 1, sc in first sc, *ch 3, sk 1 sc, sc in next sc; rep from * to end of side. At the corner: ch 3, sc in corner ch-2 sp, ch 3. Start the next side with sc in its first sc and rep around. Join to first sc.
(Top and bottom: 29 sc + 28 loops each; sides: 44 sc + 43 loops each; corners: 1 sc + 2 loops each; total 150 sc + 150 ch-3 loops)
Rnd 3: *Sl st in next sc, (sc, hdc, dc, hdc, sc) in next ch-3 loop; rep from * around. Join to first sl st. (150 scallops, 900 sts: 150 sl sts + 750 scallop sts)
Why the math works: Every side in Rnd 1 has an odd count (57 and 87). An odd count is 1 plus 2 times a whole number, so the ch-3 loops of Rnd 2 start and end on a sc on every side, and each corner gets its own sc plus two loops. That puts two scallops at each corner, which gives the softly rounded corners. The three rounds add 0.75 in (1.9 cm) per side: 10.5 + 1.5 = 12 in (30.5 cm) wide and 16.5 + 1.5 = 18 in (45.7 cm) tall.
Appliqué Placement and Assembly
Block the panel lightly before sewing (see Final Blocking) so your measurements are accurate. All positions are measured on the mesh, inside the border.
Stem lines: Mark three vertical lines at 1.5 in (3.8 cm), 5 in (12.7 cm), and 8.5 in (21.6 cm) from the left mesh edge. The lines are 3.5 in (8.9 cm) apart. Each spray’s arches extend about 1.5 in (3.8 cm) to the right, so the last one ends at 10 in (25.4 cm), inside the 10.5 in (26.7 cm) mesh.
Main stems: Place the bottom of each stem 2 in (5.1 cm) above the bottom mesh edge. Run it straight up for 12 in (30.5 cm), to 14 in (35.6 cm) above the bottom edge, then curve the last 2 in (5.1 cm) over to the right in a hook shape. Pin it, then whipstitch with the green tail through the back of the cord and the mesh sc and chains underneath.
Side branches: Attach one branch at 6 in (15.2 cm) and one at 10 in (25.4 cm) above the bottom edge on each stem. Let each branch angle away from the stem and arch over to the right, like a smaller version of the top hook.
Leaves: Sew 2 leaves to the base of each stem in a V shape, with the rounded bases touching the bottom of the stem and the tips pointing up and outward. The leaves reach down to about 0.5 in (1.3 cm) above the bottom mesh edge.
Bells: Sew 3 bells under each top hook and 2 bells under each branch arch (7 per spray, 21 total). Stitch through the closed top of each bell so it hangs mouth-down, spaced about 0.75 in (1.9 cm) apart along the arch.
Final Blocking
- Weave in all remaining ends on the wrong side, through solid stitches rather than open chains.
- Pin the panel face up to 12 x 18 in (30.5 x 45.7 cm) on blocking mats, pinning each corner first and then the middle of each side.
- Add pins every 1 in (2.5 cm) along the border. For a crisp edge, put a pin in each scallop point.
- Spray the panel until damp, without soaking the bells.
- Gently open the mesh with your fingers so the diamonds are even.
- Shape each bell with a fingertip so the rim flares evenly.
- Let it dry completely before unpinning.
Final Quality-Control Checklist
- Panel measures 12 x 18 in (30.5 x 45.7 cm)
- Mesh is 14 loops wide and 43 net rows plus 1 sc row tall
- Border Rnd 1: 57 sc top and bottom, 87 sc each side
- 150 scallops, with two at each corner
- 3 stems, 6 branches, 6 leaves, 21 bells, all securely sewn
- All three sprays arch in the same direction
- No ends visible on the right side
Troubleshooting
Mesh is wider at the top than the bottom: Your chains loosened as you relaxed into the work. Count the ch-5s and keep your tension steady.
Edges ripple: You worked too many sc along the sides in Rnd 1. Check that you worked 2 sc per row end, not 3.
Edges pull in: Your sc are too tight. Go up a half hook size for the border only.
Bells look flat: You missed increases in Rnd 3. Count 12 sc before starting Rnd 4.
Stems pucker the mesh: You are pulling the sewing yarn too tight. Sew with the panel pinned flat.
Leaves curl: Steam lightly and pin flat while drying.
Care
Hand wash in cool water with mild soap and dry flat, reshaping the bells while damp. Don’t wring it or tumble dry it.
Final Notes
Every measurement in this panel builds on the gauge. 4 loops and 8 rows give 3 in (7.6 cm), so 14 loops and 44 rows give 10.5 x 16.5 in (26.7 x 41.9 cm). The border adds 0.75 in (1.9 cm) per side for a finished 12 x 18 in (30.5 x 45.7 cm), and the sprays sit on measured lines inside the mesh. Check your gauge first and count at each checkpoint, and the flowers will land exactly where they belong.
Happy crocheting!