

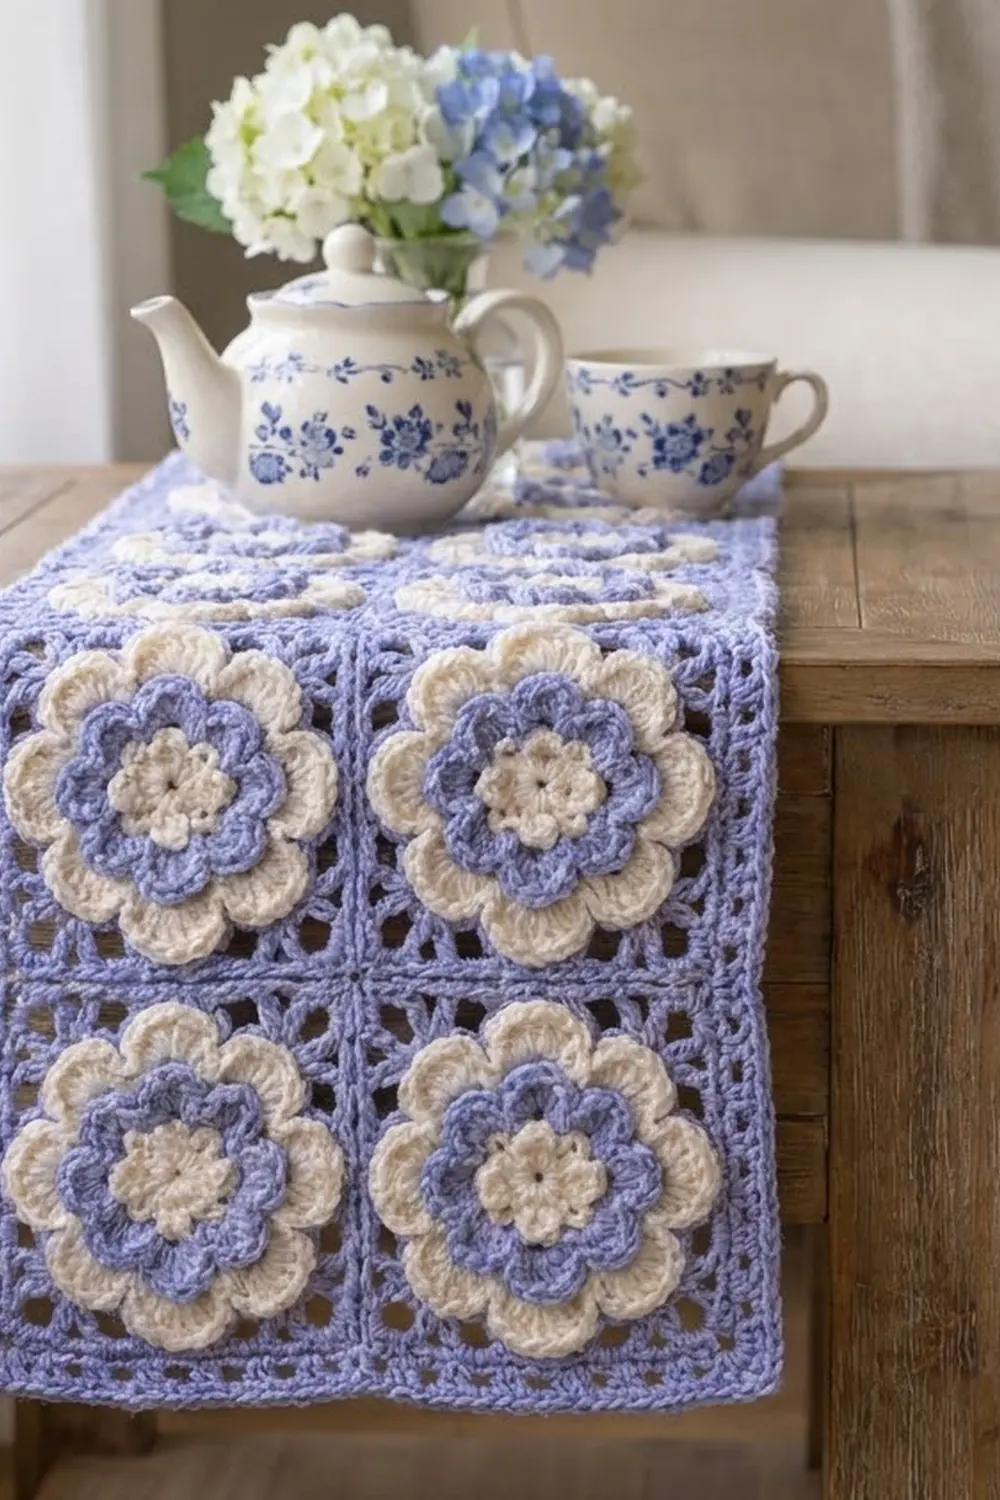
The Hydrangea Bloom Panel is a flat rectangle made of six layered flower squares, joined two across and three down and finished with an airy periwinkle border. Each square holds a three-layer flower: a small cream center, a ring of eight periwinkle petals, and a larger ring of eight cream petals behind it.
The colors are soft and cottage-style. Periwinkle blue is used for the inner petals, the open mesh frame, the seams, and the border. Cream is used for the flower center and the outer petals. The open mesh lets the raised petals stand out, and the seams form neat periwinkle ridges between the squares.
This pattern uses US crochet terms. After blocking, the panel measures 12.5 x 18 in (31.8 x 45.7 cm).
You make six identical squares in the round, join them with single crochet seams, and then work a three-round border straight onto the joined panel.
Finished Size and Construction
- Finished size: 12.5 x 18 in (31.8 x 45.7 cm)
- Skill level: Intermediate (back-post stitches, layered petals, color changes)
- Terminology: US crochet terms
- Yarn weight: Worsted (#4)
- Hook: 5.0 mm (H-8)
- Number of pieces: 6 squares
- Layout: 2 squares wide x 3 squares tall
- Size of one square: 5.5 x 5.5 in (14.0 x 14.0 cm)
- Size before border: 11 x 16.5 in (27.9 x 41.9 cm)
- Border depth: 0.75 in (1.9 cm) on every side
Materials
Choose a smooth worsted-weight yarn with clear stitch definition. A cotton or cotton-acrylic blend gives crisp petals and a mesh that holds its shape. The amounts below assume a yarn of about 170 m per 100 g.
- Color A, Periwinkle: 110 g (about 187 m)
- Color B, Cream: 50 g (about 85 m)
Tools:
- 5.0 mm (H-8) crochet hook
- Tapestry needle
- Scissors
- Stitch markers (4 or more)
- Rust-proof pins and a blocking mat
- Tape measure
- Spray bottle with cool water
All yarn amounts include a margin of about 15 percent for swatching, joining, and weaving in ends.
Abbreviations (US Terms)
- ch: chain
- sl st: slip stitch
- sc: single crochet
- hdc: half double crochet
- dc: double crochet
- tr: treble crochet
- sk: skip
- sp(s): space(s)
- st(s): stitch(es)
- RS / WS: right side / wrong side
Special stitches:
- BPsc (back-post single crochet): Working from the back of the piece, insert the hook from back to front to back around the post of the stitch named. Yarn over, pull up a loop, yarn over, and draw through both loops on the hook. This stitch anchors a new round behind the petals.
- V-st (V-stitch): Work (dc, ch 1, dc) in the same stitch.
Gauge and Checkpoints
Make one complete square before you start the other five. The most important gauge is at the end of Round 10: the square should measure 5.5 in (14.0 cm) with 21 sts per side.
Measure each checkpoint flat, without stretching:
- After Round 1: the center disc is 1.25 in (3.2 cm) across
- After Round 3: the small periwinkle flower is 2.5 in (6.4 cm) across
- After Round 5: the cream flower is 4 in (10.2 cm) across, tip to tip
- After Round 8: the square is 4.75 in (12.1 cm) across
- After Round 10: the square is 5.5 in (14.0 cm) across, with 21 sts per side
If your square is too big, switch to a 4.5 mm hook. If it is too small, switch to a 5.5 mm hook. Change only the hook, never the stitch counts, because the border math depends on exactly 21 sts per side.
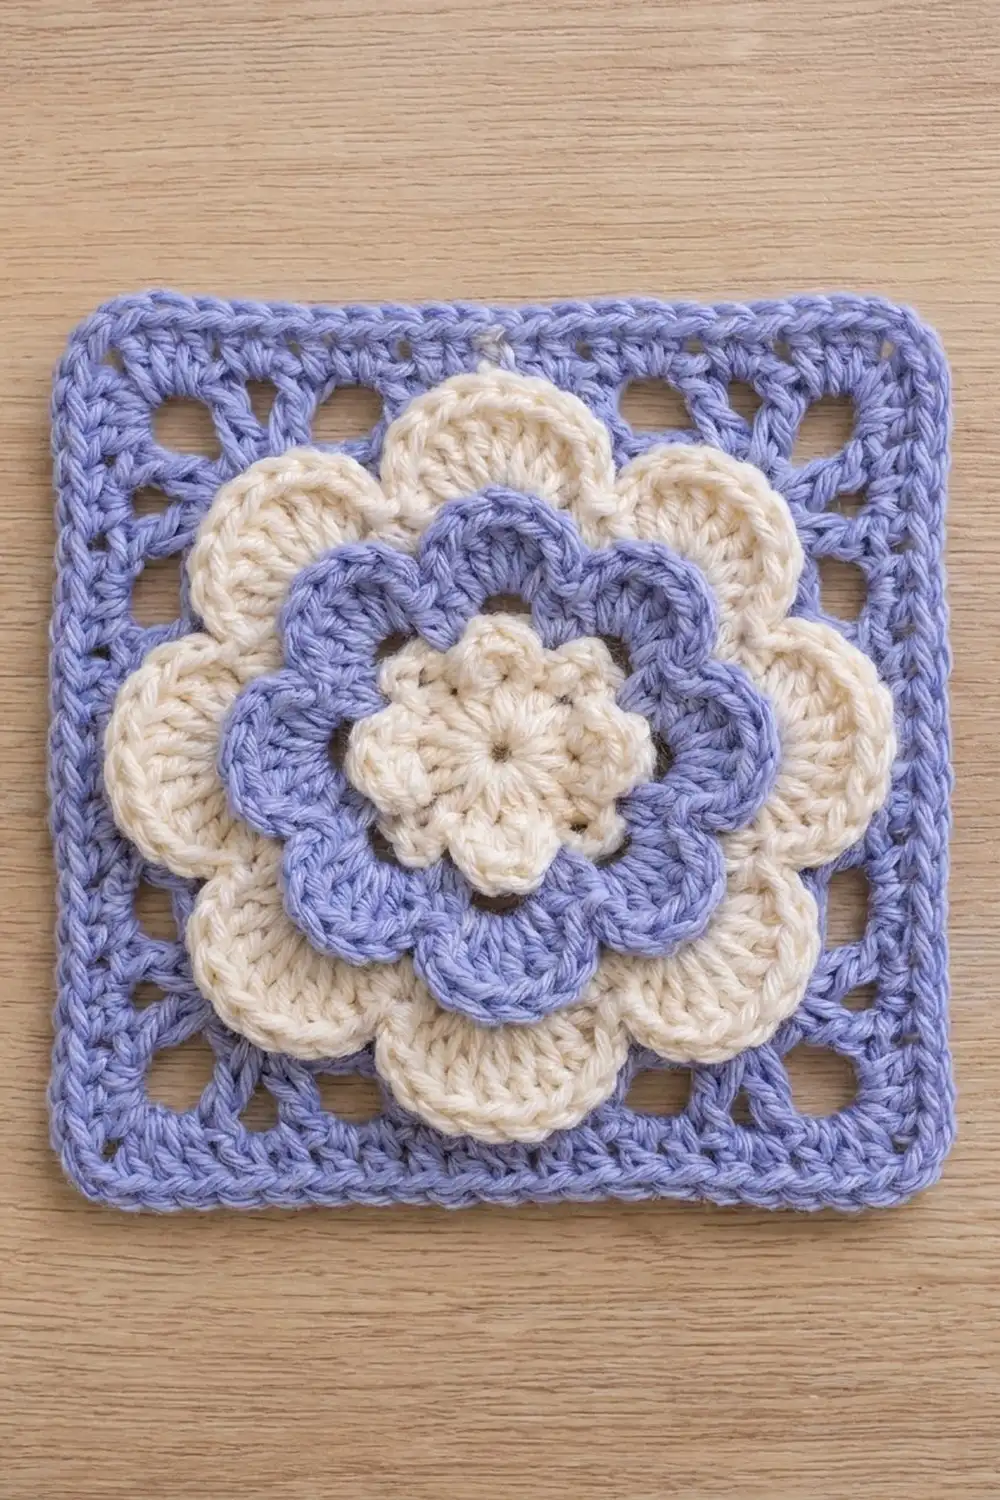
Flower Square (Make 6)
Work every round with the RS facing you. Do not turn.
Flower Center
Round 1 (Color B): Make a magic ring. Ch 2 (does not count as a st), then work 16 hdc in the ring. Pull the ring closed and join with a sl st to the first hdc. Fasten off. (16 hdc)
Small Periwinkle Petals
Round 2 (Color A): Join Color A in any hdc. Ch 1, sc in the same st, ch 3, sk 1, sc in next st, ch 3, sk 1; repeat from * to * 6 more times. Join with a sl st to the first sc. (8 sc, 8 ch-3 sps)
Round 3: Sl st into the first ch-3 sp. In each ch-3 sp, work (sc, hdc, 3 dc, hdc, sc). Join with a sl st to the first sc. Fasten off. (8 petals, 56 sts, 7 sts per petal)
Large Cream Petals
Round 4 (Color B): Fold the small petals toward you so you can see the Round 2 sc behind them. Join Color B with a BPsc around any Round 2 sc. Ch 5, BPsc around the next Round 2 sc, ch 5; repeat from * to * 6 more times. Join with a sl st to the first BPsc. (8 BPsc, 8 ch-5 loops)
These loops sit behind the periwinkle petals, so the next round adds a second, larger layer of petals behind the first.
Round 5: Sl st into the first ch-5 loop. In each ch-5 loop, work (sc, hdc, 2 dc, 3 tr, 2 dc, hdc, sc). Join with a sl st to the first sc. Fasten off. (8 petals, 88 sts, 11 sts per petal)
Squaring the Frame
Round 6 (Color A): Fold the cream petals forward. Join Color A with a BPsc around any Round 4 BPsc. Ch 6, BPsc around the next Round 4 BPsc, ch 6; repeat from * to * 6 more times. Join with a sl st to the first BPsc. (8 BPsc, 8 ch-6 loops)
Round 7: Sl st into the first ch-6 loop, which is a corner loop. Ch 3 (counts as dc), then work (2 dc, ch 2, 3 dc) in the same loop. Work 5 hdc in the next loop, which is a side loop. Work (3 dc, ch 2, 3 dc) in the next corner loop, then 5 hdc in the next side loop; repeat from * to * 2 more times. Join with a sl st to the top of the beginning ch-3.
(44 sts: 24 dc + 20 hdc, plus 4 corner ch-2 sps. Each side has 11 sts: 3 dc + 5 hdc + 3 dc.)
Round 8: Sl st in the next 2 dc and into the corner ch-2 sp. Ch 3 (counts as dc), then work (dc, ch 2, 2 dc) in the same sp. Dc in each of the next 11 sts. Work (2 dc, ch 2, 2 dc) in the corner sp, then dc in each of the next 11 sts; repeat from * to * 2 more times. Join with a sl st to the top of the beginning ch-3.
(60 dc, plus 4 corner ch-2 sps. Each side has 15 dc: 2 + 11 + 2.)
Round 9 (open mesh): Sl st in the next dc and into the corner ch-2 sp. Ch 3 (counts as dc), then work (ch 3, dc) in the same sp. [Ch 1, sk 1, dc in next st] 7 times, ch 1, sk 1, then work (dc, ch 3, dc) in the corner sp; repeat from * to * 2 more times. To finish the last side, work [ch 1, sk 1, dc in next st] 7 times, ch 1, sk 1. Join with a sl st to the top of the beginning ch-3.
Each side uses all 15 sts below it: 7 repeats of 2 sts each, plus 1 last skipped st.
(36 dc and 32 ch-1 sps, plus 4 corner ch-3 sps. Each side has 9 dc and 8 ch-1 sps, counted from corner dc to corner dc.)
Round 10: Ch 1. Sc in each dc and in each ch-1 sp around, working 3 sc in each corner ch-3 sp. Join with a sl st to the first sc. Fasten off.
(80 sc: 68 side sc + 12 corner sc. Each side has 21 sts, including both corner center sts.)
Place a marker in the center sc of each 3-sc corner group. The square should measure 5.5 x 5.5 in (14.0 x 14.0 cm).
Make All Pieces
Make 6 identical Flower Squares and weave in all ends. Each square uses about 12 g of Color A and 7 g of Color B. All six use about 72 g of Color A and 42 g of Color B. The rest of Color A is for joining and the border.
Layout grid (2 columns x 3 rows):
+-----+-----+
|  1  |  2  |
+-----+-----+
|  3  |  4  |
+-----+-----+
|  5  |  6  |
+-----+-----+
Joining
Join the squares with single crochet seams in Color A. Hold two squares with the WS together, so the seam forms a raised periwinkle ridge on the RS.
Stitch-to-stitch logic: Each square edge has 21 sts, from corner center st to corner center st. Line up the two edges stitch for stitch, then work 1 sc through both loops of both layers in each matching pair. That gives 21 sc per square edge, with no extra stitches at the seams.
Horizontal seams (2 seams):
- Hold Squares 1 and 3 with the WS together. Join Color A in the matching corner center sts.
- Work 21 sc through both layers along the edge.
- Continue straight onto Squares 2 and 4 with 21 more sc. (42 sc)
- Fasten off. Repeat the same steps for Squares 3/5 and 4/6.
Vertical seam (1 seam): Hold the left column (1, 3, 5) and the right column (2, 4, 6) with the WS together. Work 21 sc along each pair of squares, for 63 sc total. Where the seams cross, work over the existing ridge, not into it.
Tension: Make the seam stitches the same height as the Round 10 sc. If the seam puckers, use a 5.5 mm hook for joining only.
Size checkpoint: The joined panel should measure 11 x 16.5 in (27.9 x 41.9 cm). The short outer edges now have 2 x 21 = 42 sts each, and the long outer edges have 3 x 21 = 63 sts each, including the square corner sts at each seam.
Border
Border gauge: 42 sts over 11 in (27.9 cm) is about 3.8 sts per inch (1.5 sts per cm). The border keeps this rate so the edges lie flat.
Border Round 1 (conversion round): With the RS facing, join Color A in any outer panel corner st. Ch 1, then sc in each st around the panel, working 3 sc in each of the 4 outer corner sts. Join with a sl st to the first sc.
(210 sc worked 1 per existing st + 8 extra corner sc = 218 sts.) Counting both corner center sts, each short side has 44 sts and each long side has 65. Between the corner center sts, there are 42 sts on each short side and 63 on each long side.
Border Round 2 (V-stitch mesh): Sl st to the next corner center st. Ch 3 (counts as dc), then work (ch 3, dc) in the same st. Along each side: [sk 1, V-st in next st, sk 1] across to the next corner center st, then work (dc, ch 3, dc) in that corner center st. Repeat around and join to the top of the beginning ch-3.
- Short sides: 42 sts ÷ 3 = 14 V-sts
- Long sides: 63 sts ÷ 3 = 21 V-sts
(70 V-sts + 8 corner dc = 148 dc, plus 70 ch-1 sps and 4 corner ch-3 sps.)
Border Round 3: Sl st into the corner ch-3 sp. Ch 1, then work 3 sc in the same sp. Sc in each dc and each ch-1 sp along the sides, and work 3 sc in each corner ch-3 sp. Join with a sl st to the first sc and fasten off.
- Short sides: 1 corner dc + (14 V-sts x 3) + 1 corner dc = 44 sc. Adding the corner groups gives 48 sts per side, including the corner center sts.
- Long sides: 1 + 63 + 1 = 65 sc. Adding the corner groups gives 69 sts per side, including the corner center sts.
(148 dc + 70 ch-1 sps + 12 corner sc = 230 sc.)
Why the math works: Each square edge has 21 sts, and 21 is a multiple of 3, so 42 and 63 are multiples of 3 too. That means the 3-st V-stitch repeat fits every side exactly. At about 3.8 sts per inch, 48 sts covers 12.5 in (31.8 cm) and 69 sts covers 18 in (45.7 cm).
Final Blocking
- Weave in any remaining ends through stitches of the same color.
- Lay the panel RS up on a blocking mat.
- Pin the four corners to a 12.5 x 18 in (31.8 x 45.7 cm) rectangle.
- Pin along each edge every 1 in (2.5 cm), keeping the V-stitch mesh straight.
- Lift each petal layer gently with your fingertips.
- Mist with cool water until damp, not soaked.
- Let the panel dry completely, at least 12 hours, before you unpin it.
Final Quality-Control Checklist
- [ ] All 6 squares measure 5.5 in (14.0 cm), with 21 sts per side.
- [ ] Each flower has 8 periwinkle petals in front of 8 cream petals.
- [ ] The seams are raised on the RS and lie flat.
- [ ] Before the border, the panel measured 11 x 16.5 in (27.9 x 41.9 cm).
- [ ] Border Round 1 has 218 sts and Border Round 3 has 230 sts.
- [ ] The finished panel measures 12.5 x 18 in (31.8 x 45.7 cm).
Troubleshooting
Small petals flop and hide the center: The Round 2 loops are too long. Chain more tightly.
Cream petals don’t sit behind the periwinkle petals: Work the Round 4 BPsc around the Round 2 sc from the back, not into the tops of the Round 3 stitches.
Square cups: The Round 6 loops are too tight. Chain more loosely, or work Round 7 with a hook one size larger.
Square ruffles: The loops in Rounds 4 and 6 are too long. Chain more firmly.
Border waves: Recount Border Round 1. You should have 42 sts between the short-side corners and 63 between the long-side corners.
Care
Hand wash in cool water with a mild soap, then press the water out in a towel. Dry flat, shaping the petals while they are still damp.
Final Notes
The whole panel follows one chain of measurements. Each square measures 5.5 in (14.0 cm) with 21 sts per side. Two squares across and three down give 11 x 16.5 in (27.9 x 41.9 cm). The outer edges then have 42 and 63 sts, which become 14 and 21 V-stitches. The 0.75 in (1.9 cm) border brings the panel to 12.5 x 18 in (31.8 x 45.7 cm). If your first square matches the checkpoints, the rest will follow.
Happy crocheting!