

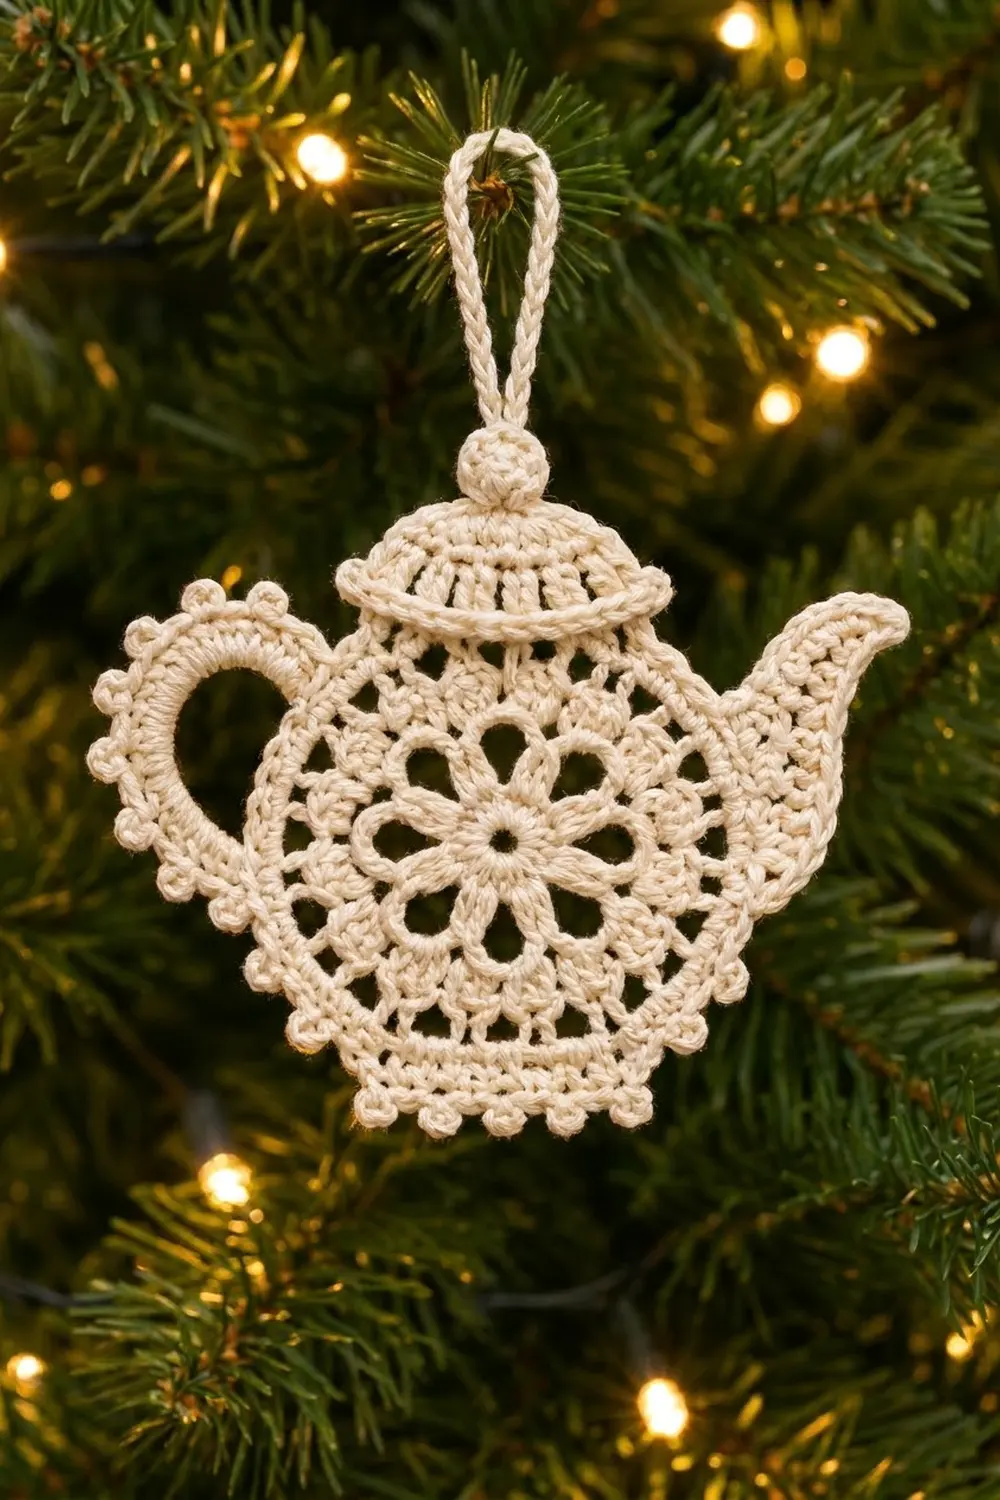
This little teapot ornament is pure vintage charm. It has a round lace body with an eight-petal flower at its heart, a ribbed lid with a round knob, a curved spout and an open handle trimmed with tiny picots. It looks lovely hanging on a tree or tied onto a gift for a tea lover.
The ornament is made in one color: a soft cream cotton thread that shows off the lace. The look is traditional and delicate, like a doily that became a teapot. All instructions use US crochet terms.
The finished ornament measures about 4.5 in (11.4 cm) wide and 3.75 in (9.5 cm) tall, not counting the hanging loop. The loop adds about 1.5 in (3.8 cm).
Construction is simple and seamless. You crochet a round body motif, then work the lid, handle, foot and spout straight onto marked sections of its last round. A single picot edging row finishes the lower outline. There is nothing to sew and only a few ends to weave in.
Finished Size and Construction
- Finished size: 4.5 in (11.4 cm) wide x 3.75 in (9.5 cm) tall, plus a 1.5 in (3.8 cm) loop
- Skill level: Intermediate (thread work, simple shaping in rows)
- Terminology: US crochet terms
- Yarn weight: Size 10 cotton crochet thread (lace weight, 0)
- Hook: 1.75 mm steel hook
- Number of pieces: 1 (all parts worked onto the body)
- Layout: Single ornament, no assembly
- Body motif size: 2.75 in (7.0 cm) across after Round 7
- Size before edging: about 4.25 in (10.8 cm) wide x 3.5 in (8.9 cm) tall
- Edging depth: about 0.125 in (0.3 cm) of picots
Materials
Yarn: Use mercerized cotton size 10 thread. It holds crisp stitch definition and takes starch well. Choose a cream, ivory or ecru shade for the antique look in the photo.
- Cream: about 8 g / 70 m
Tools:
- 1.75 mm steel crochet hook
- 4 locking stitch markers
- Fine tapestry needle
- Scissors
- Blocking board or foam mat, plus rust-proof pins
- Liquid fabric stiffener or spray starch
The yarn quantity includes a margin of roughly 20% for a gauge swatch and weaving in ends.
Abbreviations (US Terms)
- ch – chain
- sl st – slip stitch
- sc – single crochet
- hdc – half double crochet
- dc – double crochet
- tr – treble crochet
- sc2tog – single crochet 2 together
- dc2tog – double crochet 2 together
- BLO – back loop only
- sk – skip
- sp – space
- st(s) – stitch(es)
- RS / WS – right side / wrong side
Special stitches
- Picot: Ch 3, sl st in the 3rd ch from the hook.
- Popcorn knob: Ch 3 (this counts as the first dc), then work 8 dc in the same st. Drop the loop from your hook, insert the hook from front to back into the top of the ch-3, pick up the dropped loop and pull it through. Ch 1 to lock.
Gauge and Checkpoints
Gauge: 10 dc = 1 in (2.5 cm) with size 10 thread and a 1.75 mm hook.
Make one body motif (Rounds 1–7) first and measure it before going any further. Gauge matters more here than usual, because the lid, spout and handle stitch counts all depend on the body’s 84-stitch final round lying flat.
Checkpoints:
- After Round 1: about 0.5 in (1.3 cm) across
- After Round 3 (petals): about 1.5 in (3.8 cm) across
- After Round 5: about 2.25 in (5.7 cm) across
- After Round 7: 2.75 in (7.0 cm) across, lying flat with no ruffling or cupping
- After the lid, foot, spout and handle: about 4.25 in (10.8 cm) x 3.5 in (8.9 cm)
- After edging and blocking: 4.5 in (11.4 cm) x 3.75 in (9.5 cm)
Too big? Go down to a 1.5 mm hook. Too small? Go up to a 2.0 mm hook. If the motif ruffles, your chains are too loose: tighten the ch-5 and ch-7 loops. If it cups, loosen your dc rounds slightly.
Body Motif
Work in joined rounds with the RS facing throughout. Do not turn.
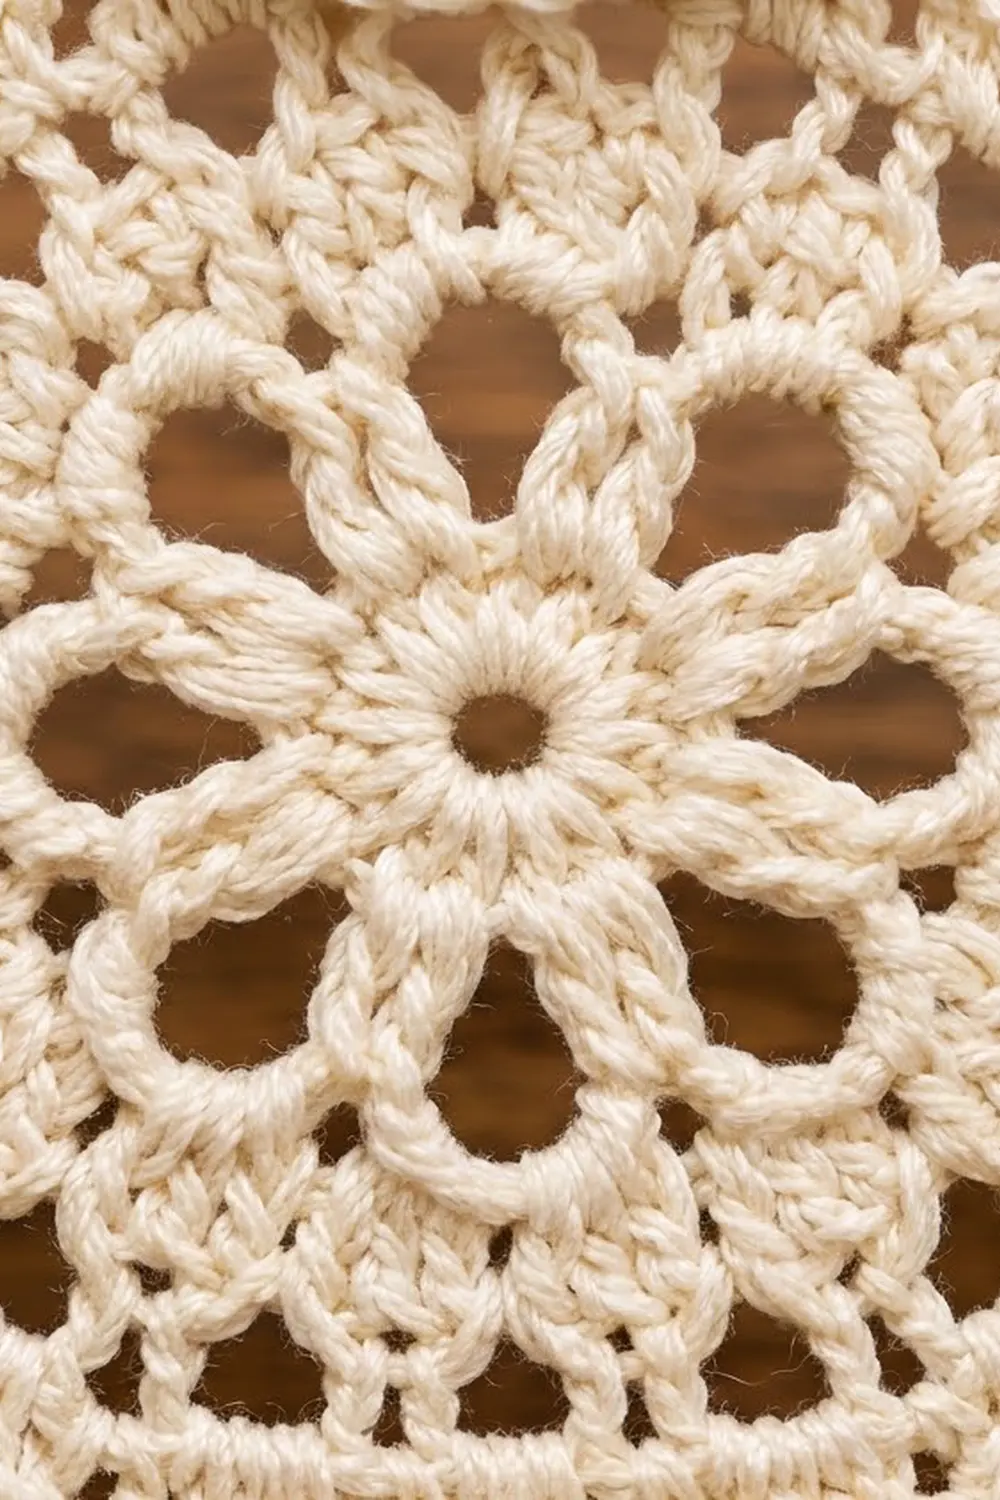
Round 1: Make a magic ring. Ch 3 (counts as dc), then work 15 dc in the ring. Pull the ring closed and sl st to the top of the ch-3. (16 dc)
Round 2: Ch 1, sc in the same st. Ch 5, sk 1 st, sc in the next st. Repeat from * 6 more times. Ch 5, sk the last st and sl st to the first sc. (8 sc, 8 ch-5 sps)
Round 3 (petals): Sl st into the first ch-5 sp. In each ch-5 sp around, work (sc, hdc, 2 dc, tr, 2 dc, hdc, sc). Sl st to the first sc. (8 petals of 9 sts = 72 sts)
Each petal is solid and rounded, with its tr at the tip.
Round 4 (openings): Sl st across to the tr of the first petal. Ch 1, sc in that tr. Ch 7, sc in the tr of the next petal. Repeat from * 6 more times. Ch 7 and sl st to the first sc. (8 sc, 8 ch-7 sps)
The chain arches link the petal tips. This leaves an open, petal-shaped window between each pair of petals.
Round 5: Ch 3 (counts as dc). Work 8 dc in the next ch-7 sp. Dc in the next sc, 8 dc in the next ch-7 sp. Repeat from * around and sl st to the top of the ch-3. (8 x 1 + 8 x 8 = 72 dc)
Checkpoint: 2.25 in (5.7 cm) across.
Round 6 (mesh): Ch 4 (counts as dc + ch 1), sk the next dc. Dc in the next dc, ch 1, sk the next dc. Repeat from * 34 more times. Sl st to the 3rd ch of the ch-4. (36 dc, 36 ch-1 sps)
Round 7 (conversion round): Ch 1. Sc in the next dc, sc in the next ch-1 sp, sc in the next dc, sc in the next ch-1 sp, sc in the next dc, 2 sc in the next ch-1 sp. Repeat from * 11 more times. Sl st to the first sc.
Count: one sc in each of the 72 existing dc and ch-1 sps, plus 12 extra sc = 84 sc. Checkpoint: 2.75 in (7.0 cm) across. Fasten off.
Marking the Sections
Lay the motif flat with the RS up. Call the joining sc st 1, and place it at 12 o’clock. Counting forward in the direction you worked the round, mark these sections:
- Sts 1–16: lid (16 sts)
- Sts 17–23: upper-left gap (7 sts)
- Sts 24–35: handle (12 sts)
- Sts 36–42: lower-left gap (7 sts)
- Sts 43–58: foot (16 sts)
- Sts 59–65: lower-right gap (7 sts)
- Sts 66–77: spout (12 sts)
- Sts 78–84: upper-right gap (7 sts)
Check the total: 16 + 7 + 12 + 7 + 16 + 7 + 12 + 7 = 84. Left-handed crocheters will get a mirror image, with the spout on the left. That is perfectly fine.
Lid
The lid is worked in rows on sts 1–16.
Row 1 (RS): Join the thread in st 1. Ch 1, sc in the same st and in each st through st 16. Turn. (16 sc)
Row 2 (brim): Ch 1, 2 sc in the first st, sc in the next 14 sts, 2 sc in the last st. Turn. (18 sc)
This row creates the slightly flared brim.
Row 3 (ribbed dome): Work this row in BLO. Ch 3 (counts as dc), dc2tog, dc in the next 12 sts, dc2tog, dc in the last st. Turn. (1 + 1 + 12 + 1 + 1 = 16 sts)
The BLO ridges and the tall dc posts give the lid its ribbed look.
Row 4: Ch 1, sc2tog, sc in the next 12 sts, sc2tog. Turn. (14 sts)
Row 5: Ch 1, sc2tog, sc in the next 10 sts, sc2tog. Do not turn. (12 sts)
Knob and loop:
- Turn and sl st in each of the first 6 sts of Row 5.
- Work a popcorn knob in the 6th st, so it sits at the center of the lid top.
- Ch 36. Sl st into the ch-1 that locked the knob, forming a chain ring.
- Work 48 sc over the chain ring, wrapping the sc around it to make a firm, cord-like loop.
- Sl st into the base of the knob and fasten off.
The lid adds about 0.6 in (1.5 cm) of height plus the knob.
Foot
The foot is worked in rows on sts 43–58.
Row 1 (RS): Join the thread in st 43. Ch 1, sc in the same st and in each st through st 58. Turn. (16 sc)
Row 2: Ch 1, 2 sc in the first st, sc in the next 14 sts, 2 sc in the last st. (18 sc)
Fasten off. The foot band is about 0.25 in (0.6 cm) deep.
Spout
The spout is worked in rows on sts 66–77. Row 1 runs from the bottom to the top of the spout. Every following row puts its taller stitches at the lower edge. That makes the lower edge longer, so the spout curves upward as it tapers.
Row 1 (RS, bottom to top): Join the thread in st 66. Ch 1, sc in the same st and in each st through st 77. Turn. (12 sts)
Row 2 (top to bottom): Ch 1, sc2tog, sc in the next 2 sts, hdc in the next 3, dc in the next 3, dc2tog. Turn. (1 + 2 + 3 + 3 + 1 = 10 sts)
Row 3: Ch 3 (counts as dc), dc in the next 2 sts, hdc in the next 2, sc in the next 3, sc2tog. Turn. (1 + 2 + 2 + 3 + 1 = 9 sts)
Row 4: Ch 1, sc2tog, sc in the next 2 sts, hdc in the next 2, dc in the next 2, dc in the last st. Turn. (1 + 2 + 2 + 2 + 1 = 8 sts)
Row 5: Ch 3 (counts as dc), dc in the next st, hdc in the next 2, sc in the next 2, sc2tog. Turn. (1 + 1 + 2 + 2 + 1 = 7 sts)
Row 6: Ch 1, sc2tog, sc in the next st, hdc in the next st, dc in the next 2, tr in the last st. Turn. (1 + 1 + 1 + 2 + 1 = 6 sts)
Row 7: Ch 3 (counts as dc), dc in the next st, hdc in the next, sc in the next, sc2tog. Turn. (1 + 1 + 1 + 1 + 1 = 5 sts)
Row 8: Ch 1, sc2tog, hdc in the next st, dc in the next st, tr in the last st. Turn. (4 sts)
Row 9: Ch 1, sc2tog twice. Turn. (2 sts)
Row 10: Ch 1, sc2tog. Ch 2 to form the point. (1 st)
Fasten off. The spout reaches about 1 in (2.5 cm) beyond the body.
Handle
Step 1: With the RS facing, join the thread with a sl st in st 24. Ch 24, sk sts 25–34, and sl st in st 35. Turn.
Step 2: Work 34 sc over the ch-24 arch, wrapping each sc around the chain rather than working into individual chains. Sl st in st 24. (34 sc)
Fasten off. The skipped sts 25–34 stay as the inside edge of the handle opening. The handle sticks out about 0.75 in (1.9 cm) from the body.
Picot Edging
Edging gauge: One picot every 2–3 sc, with each picot standing about 0.125 in (0.3 cm) above the edge.
The edging is worked as one RS row around the lower outline, from the upper-left gap to the spout. The lid, spout and upper-right gap stay smooth, as in the photo.
- Upper-left gap (sts 17–23): With the RS facing, join the thread in st 17. Ch 1, sc in the same st. Picot, sc in the next 2 sts. Repeat from * 2 more times. (7 sc, 3 picots)
- Handle (34 sc): Sc in the first sc of the handle. Picot, sc in the next 3 sc. Repeat from * 10 more times. (1 + 33 = 34 sc, 11 picots)
- Lower-left gap (sts 36–42): Sc in st 36. Picot, sc in the next 2 sts. Repeat from * 2 more times. (7 sc, 3 picots)
- Foot side: Work 2 sc evenly along the row ends of the foot (1 per row).
- Foot (18 sts): Sc in the first st. Picot, sc in the next 2 sts. Repeat from * 7 more times. Picot, sc in the last st. (1 + 16 + 1 = 18 sc, 9 picots)
- Foot side: Work 2 sc along the row ends at the other end of the foot.
- Lower-right gap (sts 59–65): Sc in st 59. Picot, sc in the next 2 sts. Repeat from * 2 more times. (7 sc, 3 picots)
- Sl st into the first row end of the spout and fasten off.
Totals: 7 + 34 + 7 + 2 + 18 + 2 + 7 = 77 sc and 3 + 11 + 3 + 9 + 3 = 29 picots.
Why the math works: Each section’s sc count matches its stitches exactly, one sc per stitch. Nothing is added or skipped, so the edging adds no ruffles or pulls. The 7-stitch gaps split cleanly as 1 + (2 x 3). The 34-sc handle splits as 1 + (3 x 11). The 18-st foot splits as 1 + (2 x 8) + 1. Every repeat comes out even, so the picots are evenly spaced and the edge stays flat.
Final Blocking
- Weave in all ends along stitches of the same height, inside the solid areas.
- Soak the ornament in fabric stiffener, or dampen it and use starch.
- Gently squeeze out the excess. Do not wring.
- Lay it on the blocking board with the RS up. Pin the body into a true circle 2.75 in (7.0 cm) across.
- Pin the outer width to 4.5 in (11.4 cm) and the height to 3.75 in (9.5 cm), not counting the loop.
- Pin each petal tip and each Round 4 opening so the windows sit open and even.
- Pin each picot outward. Curve the spout upward and round the handle into a smooth C-shape.
- Pin the lid brim straight and shape the loop into a neat oval.
- Let it dry completely, about 12–24 hours, before unpinning.
Final Quality-Control Checklist
- The body measures 2.75 in (7.0 cm) and lies flat.
- There are 8 petals and 8 open windows, all even in size.
- Round 7 has exactly 84 sc.
- Section counts are 16 / 7 / 12 / 7 / 16 / 7 / 12 / 7.
- The lid ribs are visible and the knob is centered.
- The spout curves up and ends in a neat point.
- The handle arch has exactly 34 sc.
- There are 29 picots, evenly spaced.
- The finished ornament measures 4.5 in (11.4 cm) x 3.75 in (9.5 cm).
- All ends are secure and invisible from the front.
Troubleshooting
- The body ruffles: Your chain loops are too loose. Redo Rounds 2 and 4 with tighter chains, or go down a hook size.
- The body cups: Your dc are too tight. Loosen Round 5, or check that the Round 7 increases are in place.
- The spout points straight out: Make sure the tall stitches are at the bottom edge on every row. Re-pin it upward while blocking.
- The lid sits off-center: Recount from st 1. The lid must start exactly at the joining sc.
- The handle buckles: Too many sc over the arch. Keep it to exactly 34 and wrap them firmly.
- The picots lean: Pull each sl st snug, then pin each picot straight out while blocking.
- The knob looks flat: Pull the dropped loop through firmly and lock it with the ch 1.
Care
Hand wash in cool water with mild soap, then reshape and re-starch if needed. Store flat or hang it away from heat and humidity.
Final Notes
The measurement chain is short and easy to check. A 72-dc Round 5 should measure 2.25 in (5.7 cm). The 84-sc Round 7 brings the body to 2.75 in (7.0 cm). The lid, foot, spout and handle bring it to 4.25 in (10.8 cm) x 3.5 in (8.9 cm). The picot edging and blocking finish it at 4.5 in (11.4 cm) x 3.75 in (9.5 cm). Hit each checkpoint and your teapot will come out balanced and ready for the tree.
Happy crocheting!