

This little letter D keychain is soft, chunky and full of texture. You work the letter in creamy cotton, with rows of tiny bobbles that pop up across the front. A smooth single crochet rim outlines both the outside and the inside of the letter.
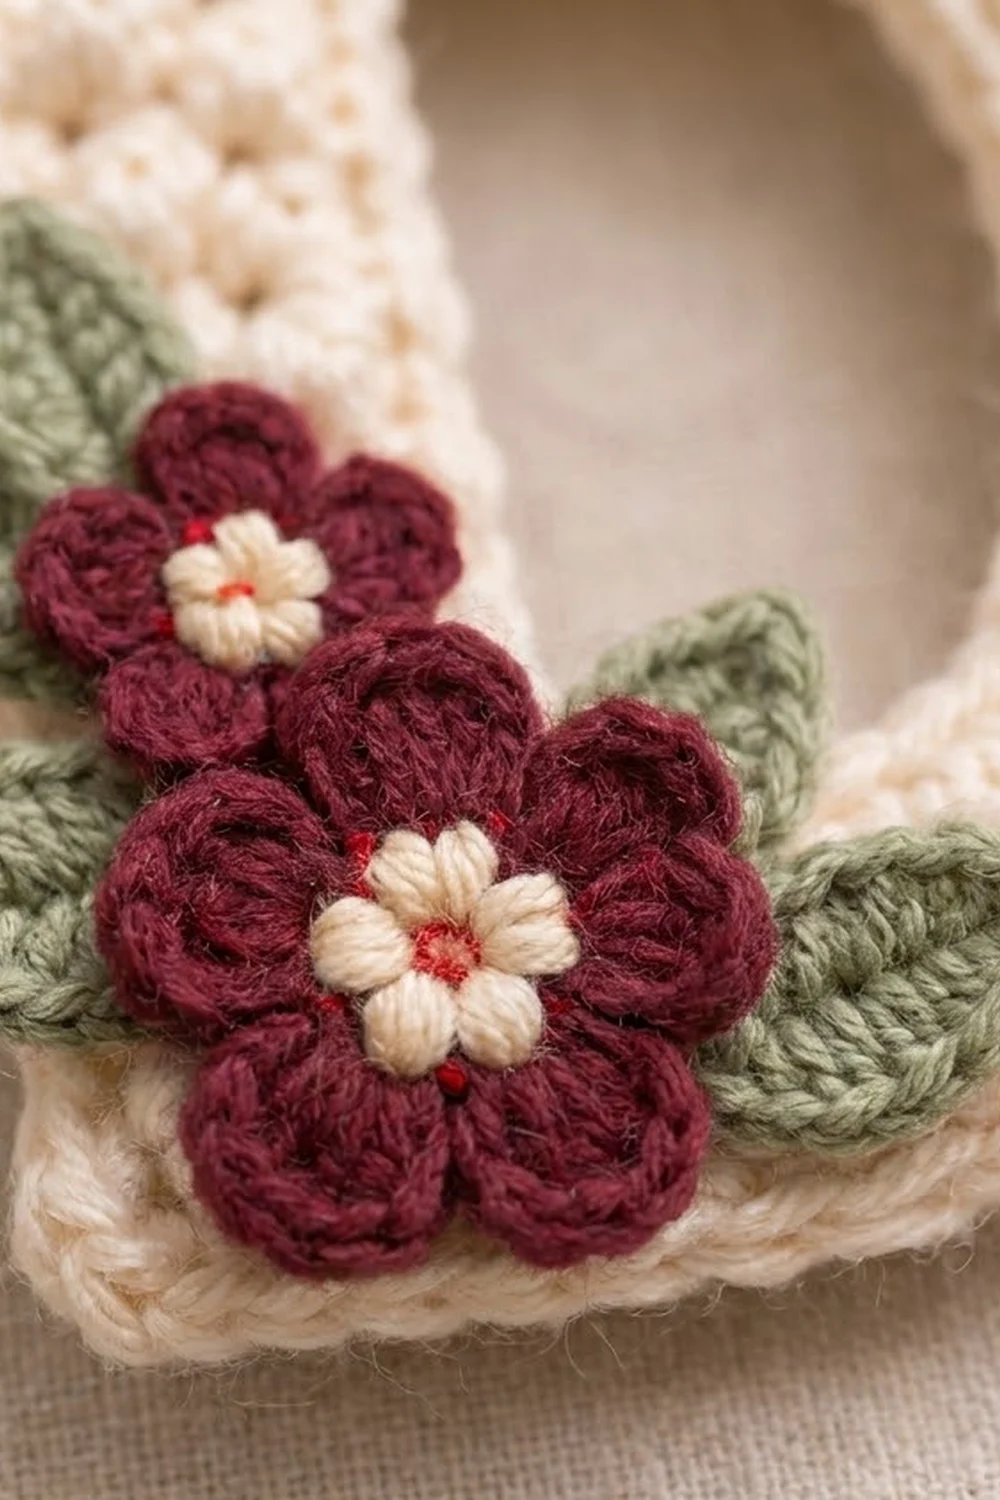
A small posy sits on the lower left of the straight stem: two burgundy five-petal flowers with cream centers, tucked between three sage green leaves. A gold split ring on a short chain hangs from the top-left corner, so the letter can go on a bag handle, a set of keys or a zipper pull.
The pattern uses US crochet terms. The finished letter measures 3.4 in (8.6 cm) wide and 3.8 in (9.7 cm) tall, including the edging.
The letter is one flat piece worked in rows from the bottom up. You work a full-width bottom bar, split into a stem and a bowl on either side of the opening, then rejoin them with a chain bridge for the top bar. Increases and decreases at the right edge create the curve of the D. A round of single crochet tidies the outside and the inside. Then you make the flowers and leaves separately and sew them on.
Finished Size and Construction
- Finished size: 3.4 in (8.6 cm) wide x 3.8 in (9.7 cm) tall
- Skill level: Easy to intermediate (bobbles, simple shaping, working in two sections)
- Terminology: US crochet terms
- Yarn weight: DK / light worsted (weight 3) cotton or cotton blend
- Hook: 3.5 mm (E-4)
- Number of pieces: 1 letter base, plus 5 small appliqués (2 flowers, 3 leaves) sewn on
- Layout: Single letter; no joining of motifs
- Letter size before edging: 3.0 in (7.6 cm) wide x 3.4 in (8.6 cm) tall
- Opening (counter) before edging: 1.0 in (2.5 cm) wide x 1.4 in (3.6 cm) tall
- Edging depth: 0.2 in (0.5 cm) on each side
Materials
Choose a smooth, combed or mercerized cotton in DK weight. Cotton shows the bobbles crisply and keeps the letter flat without stretching. Acrylic also works, but the letter will be softer and slightly puffier.
- Cream (main color): 10 g, about 23 m
- Burgundy (flowers): 3 g, about 7 m
- Sage green (leaves): 2 g, about 5 m
These amounts include a comfortable margin for checking gauge and for sewing tails.
Tools:
- 3.5 mm (E-4) crochet hook
- Tapestry needle
- Scissors
- Stitch marker
- Gold split key ring, 1 in (2.5 cm), with a short chain, 0.75 in (1.9 cm), and a jump ring
- Two pairs of flat pliers (for opening the jump ring)
- Blocking mat and rust-proof pins
- Spray bottle with water
Abbreviations (US Terms)
- ch – chain
- sl st – slip stitch
- sc – single crochet
- hdc – half double crochet
- dc – double crochet
- sc2tog – single crochet 2 together
- st(s) – stitch(es)
- RS / WS – right side / wrong side
- rep – repeat
Special stitch – Bobble (bob): Yarn over, insert hook in the stitch, yarn over and pull up a loop, yarn over and pull through 2 loops (2 loops remain). Repeat 2 more times in the same stitch (4 loops on hook). Yarn over and pull through all 4 loops. A bobble counts as 1 stitch.
Work bobbles only on WS rows. They bulge away from you, so they pop out on the RS of the letter.
Gauge and Checkpoints
Gauge: 5 sts and 5 rows = 1 in (2.5 cm) in bobble pattern (alternating 1 sc row and 1 bobble row).
The letter is small, so it works as its own swatch. Work Rows 1–5 and measure before you continue.
- After Row 5: 15 sts = 3.0 in (7.6 cm) wide; height = 1.0 in (2.5 cm)
- After Row 12: height = 2.4 in (6.1 cm); opening = 1.0 in (2.5 cm) wide
- After Row 17: 3.0 in (7.6 cm) wide x 3.4 in (8.6 cm) tall
- After edging: 3.4 in (8.6 cm) wide x 3.8 in (9.7 cm) tall
If your piece is too big: Change to a 3.25 mm hook and start again. Loose bobbles also add width, so pull the final yarn over snug.
If your piece is too small: Change to a 3.75 mm (F-5) hook. Keep the sc rows relaxed so the bobble rows can sit flat.
A difference of 0.1 in (0.3 cm) is fine. If you’re off by more than 0.2 in (0.5 cm), change hooks.
Letter Base
Work the letter flat in rows, from bottom to top. The ch 1 at the beginning of a row does not count as a stitch. Odd-numbered rows are RS sc rows, and even-numbered rows are WS bobble rows.
With the RS facing you, each RS row begins at the right edge of the letter (the curved bowl side). The left edge (the straight stem) stays straight throughout.
Bottom Bar
Row 1 (RS): With cream, ch 12. Sc in 2nd ch from hook and in each ch across. Turn. (11 sts)
Row 2 (WS): Ch 1, sc in first st, bob in next st, sc in next st; rep from * across. Turn. (11 sts: 5 bobbles, 6 sc)*
Row 3 (RS): Ch 1, 2 sc in each of first 2 sts, sc in each st across. Turn. (13 sts)
Row 4 (WS): Ch 1, sc in first st, bob in next st, sc in next st; rep from * across. Turn. (13 sts: 6 bobbles, 7 sc)*
Row 5 (RS): Ch 1, 2 sc in each of first 2 sts, sc in each st across. Turn. (15 sts)
Rows 3 and 5 add width only at the right edge, which rounds the bottom of the bowl.
Checkpoint: The 15 sts measure 3.0 in (7.6 cm), and the piece is 1.0 in (2.5 cm) tall.
Stem (Left Side)
Row 6 begins at the left edge. Number the Row 5 stitches starting from the right edge. The stem uses sts 15 to 11, the opening skips sts 10 to 6, and the bowl uses sts 5 to 1.
Row 6 (WS): Ch 1, sc in first st, bob in next st, sc in next st, bob in next st, sc in next st. Turn, leaving the remaining 10 sts unworked. (5 sts: 2 bobbles, 3 sc)
Row 7 (RS): Ch 1, sc in each st across. Turn. (5 sts)
Rows 8–12: Rep Rows 6 and 7 twice, then work Row 6 once more. (5 sts)
Fasten off at the end of Row 12. The stem has 7 rows.
Bowl (Right Side)
Row 6 (WS): With WS facing, skip the 5 unworked sts of Row 5 next to the stem; these form the bottom of the opening. Join cream in the next st (st 5, counting from the right edge). Ch 1, sc in same st, bob in next st, sc in next st, bob in next st, sc in last st. Turn. (5 sts: 2 bobbles, 3 sc)
Rows 7–12: Work as for stem Rows 7–12. (5 sts) Do not fasten off.
Checkpoint: The piece is 2.4 in (6.1 cm) tall. The gap between the stem and the bowl is 1.0 in (2.5 cm) wide and 1.4 in (3.6 cm) tall.
Top Bar
Row 13 (RS): Ch 1, sc in each of 5 bowl sts, ch 5, sc in each of 5 stem sts. Turn. (15 sts: 10 sc + 5 ch)
The 5 chains bridge the opening and count as stitches from now on.
Row 14 (WS): Ch 1, sc in first st, bob in next st, sc in next st; rep from * across, working into the chains as stitches. Turn. (15 sts: 7 bobbles, 8 sc)*
Row 15 (RS): Ch 1, (sc2tog) twice, sc in each st across. Turn. (13 sts)
Row 16 (WS): Ch 1, sc in first st, bob in next st, sc in next st; rep from * across. Turn. (13 sts: 6 bobbles, 7 sc)*
Row 17 (RS): Ch 1, (sc2tog) twice, sc in each st across. (11 sts) Fasten off.
Checkpoint: The letter is 3.0 in (7.6 cm) wide at its widest point and 3.4 in (8.6 cm) tall. These decreases mirror the increases at the bottom, so the right side forms a smooth D curve.
Flowers and Leaves
Large Flower (make 1)
Rnd 1: With cream, make a magic ring, ch 1, work 5 sc in the ring. Pull the ring closed and sl st to first sc. Fasten off. (5 sts)
Rnd 2: Join burgundy in any st. Ch 1, 2 sc in each st around, sl st to first sc. (10 sts)
Rnd 3: Sl st in next st, (hdc, dc, hdc) in next st; rep from * 4 more times, sl st to first sl st. (5 petals)*
Fasten off, leaving a 10 in (25.4 cm) tail for sewing. The flower is about 1.1 in (2.8 cm) across.
Small Flower (make 1)
Rnd 1: Work as for the large flower. (5 sts)
Rnd 2: Join burgundy in any st. (Sl st, hdc, dc, hdc, sl st) in next st; rep from * 4 more times, sl st to first sl st. (5 petals)*
Fasten off, leaving a 10 in (25.4 cm) tail. The flower is about 0.8 in (2.0 cm) across.
With burgundy, embroider one small French knot in the middle of each cream center.
Leaf (make 3)
With sage green, ch 7.
Leaf: Sl st in 2nd ch from hook, sc in next ch, hdc in next ch, dc in next ch, hdc in next ch, (sc, ch 2, sc) in last ch for the tip. Working along the other side of the chain: hdc in next ch, dc in next ch, hdc in next ch, sc in next ch, sl st in last ch.
Fasten off, leaving an 8 in (20.3 cm) tail. Each leaf is about 1.0 in (2.5 cm) long. The chain spine down the middle looks like a center vein.
Edging (Border)
Border gauge: Work 1 sc in each stitch along the top and bottom, and 1 sc in each row end along the sides. The gauge is the same 5 per 1 in (2.5 cm) for stitches and rows, so one sc per row end matches the stitch width exactly. That keeps the edges flat, with no ruffling or cupping.
Outer Edging
With RS facing, join cream in the first st of Row 17 (top-right corner).
Rnd 1 (RS):
- Top edge: Ch 1, 2 sc in first st, sc in next 9 sts, 3 sc in last st (top-left corner). (14 sc)
- Left edge: Sc in the row end of each of Rows 16 down to 2. (15 sc)
- Bottom edge: Working into the foundation chain, 3 sc in first ch (bottom-left corner), sc in next 9 ch, 2 sc in last ch (bottom-right corner). (14 sc)
- Right edge: Sc in the row end of each of Rows 2 up to 16. (15 sc)
Sl st to first sc. (58 sc total: 14 + 15 + 14 + 15) Fasten off and weave in the end.
The left corners get 3 sc for a crisp, square corner on the stem. The right corners get only 2 sc, so they stay rounded with the bowl. Along the curved edge, one sc per row end smooths out the small steps left by the increases and decreases.
Inner Edging
With RS facing, join cream in the first unworked st of Row 5 at the bottom of the opening.
Rnd 1: Ch 1, sc in each of the 5 unworked Row 5 sts, then sc in the row end of each of bowl Rows 6–12. Sc in the underside of each of the 5 ch of Row 13, then sc in the row end of each of stem Rows 12–6. Sl st to first sc. (24 sc: 5 + 7 + 5 + 7)
Don’t add extra stitches in the inner corners; this keeps the opening from flaring. Fasten off and weave in the end.
Checkpoint: The letter measures 3.4 in (8.6 cm) wide x 3.8 in (9.7 cm) tall. The 0.2 in (0.5 cm) edging on each side adds 0.4 in (1.0 cm) to both the width and the height.
Attaching the Appliqués and Hardware
Lay the letter RS up. Arrange the posy on the lower half of the stem, slightly overlapping the left edge:
- Large flower on the lower left, centered about 0.8 in (2.0 cm) above the bottom edge
- Small flower just above it, touching or slightly overlapping the large flower
- One leaf at the upper left of the small flower, one on the left between the two flowers, and one at the lower right of the large flower
Tuck the leaf bases behind the petals. Pin everything in place, then sew each leaf down with small stitches along its spine. Sew each flower around its cream center and at each petal tip so nothing can catch.
Open the jump ring sideways with the pliers. Pass it through the center sc of the 3-sc group at the top-left corner, add the chain and split ring, and close the jump ring fully.
Final Blocking
- Weave in all ends before blocking.
- Lay the letter RS up on the blocking mat.
- Pin the four corners first, to 3.4 in (8.6 cm) across and 3.8 in (9.7 cm) tall.
- Pin the bowl into an even curve, then pin the opening square.
- Mist with water until damp, not soaked. Avoid soaking the flowers.
- Press the bobbles gently with your fingertips so they sit evenly, without flattening them.
- Let the letter dry completely before unpinning.
Final Quality-Control Checklist
- The letter measures 3.4 in (8.6 cm) x 3.8 in (9.7 cm)
- All bobbles pop to the RS
- The left edge is straight and the right edge is a smooth curve
- The outer edging has 58 sc and the inner edging has 24 sc
- The opening is centered and measured about 1.0 in (2.5 cm) wide before edging
- The flowers and leaves are sewn flat, with no loose petal tips
- The jump ring is fully closed, with no gap
- All ends are woven in and trimmed
Troubleshooting
Bobbles show on the wrong side: You worked them on an RS row. Bobbles go only on even-numbered (WS) rows.
Edges ripple: The edging has too many sc. Recount to 58 sc on the outer edging and 24 sc on the inner edging.
Edges pull in or cup: The edging is too tight. Redo it with looser tension or a hook 0.25 mm larger.
The opening is lopsided: You joined the bowl in the wrong stitch. Check that you skipped exactly 5 sts on Row 5.
The curve looks stepped: Check that the increases and decreases are only at the right edge, then block firmly.
The letter feels floppy: Use a hook one size smaller or a firmer cotton.
Care
Hand wash in cool water with mild soap and lay flat to dry. Remove the metal ring first to protect its finish.

Final Notes
The measurements build in a simple chain. At 5 sts and 5 rows per inch, 15 sts and 17 rows give a 3.0 in (7.6 cm) x 3.4 in (8.6 cm) letter. The edging adds 0.2 in (0.5 cm) on every side, for a finished keychain of 3.4 in (8.6 cm) x 3.8 in (9.7 cm). Measure at Rows 5, 12 and 17, and your D will come out right every time.
Happy crocheting!