

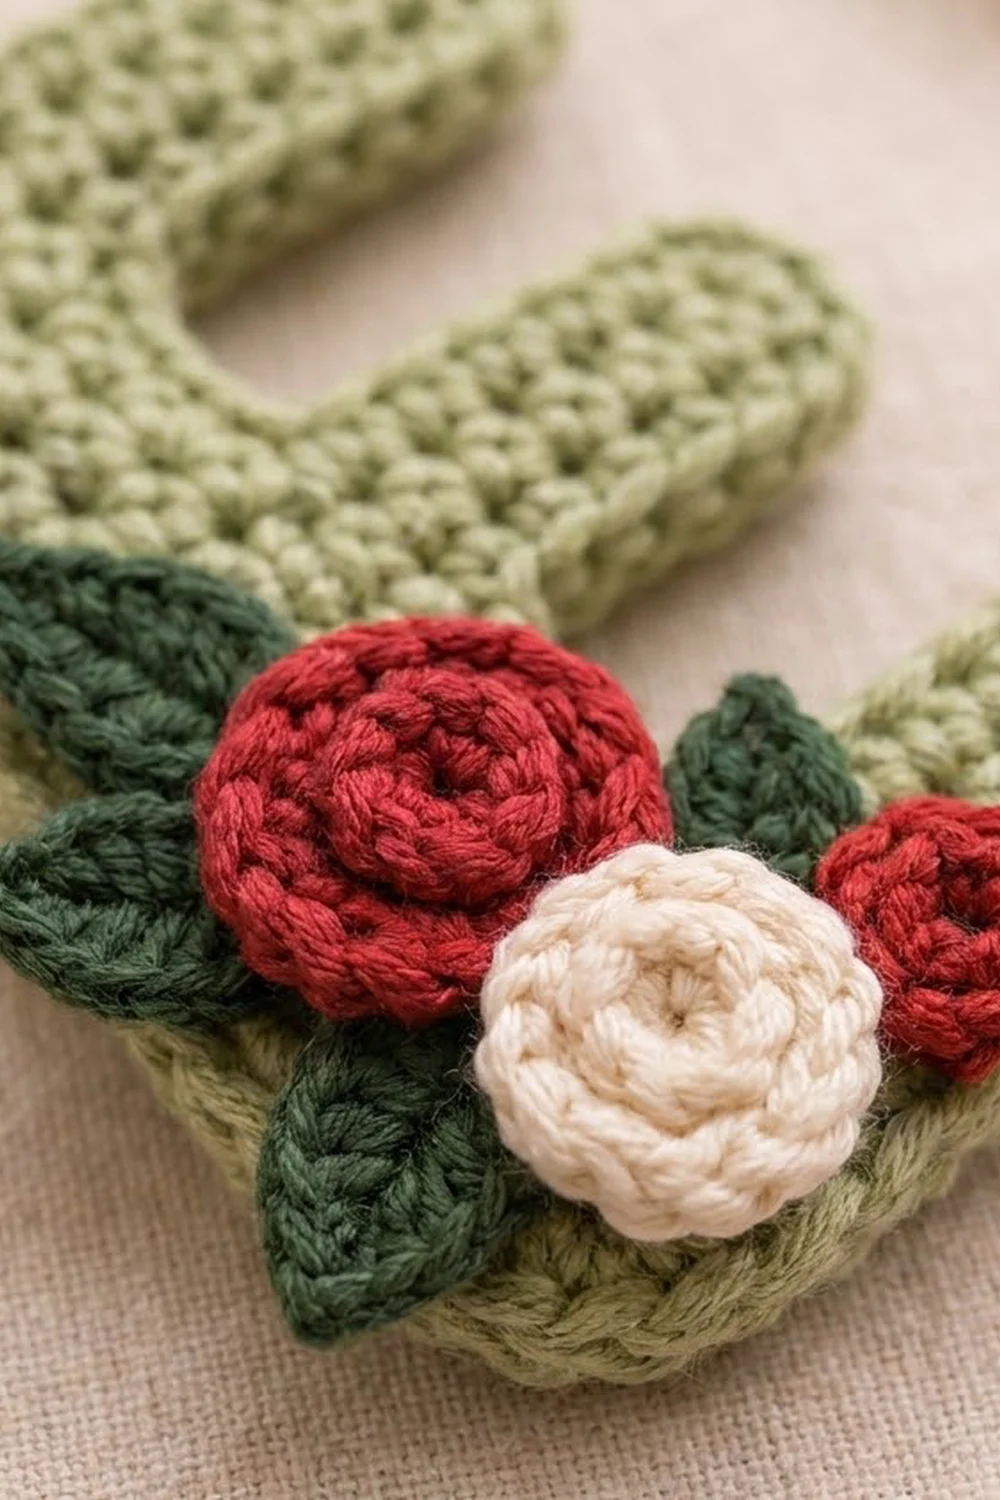
This small keychain is a capital “E” worked in soft sage-green single crochet and trimmed with a cluster of rolled roses. A large deep-red rose, a cream rose and a tiny red rose sit at the lower-left corner of the letter with three dark-green leaves behind them. It’s a quiet, cozy design that works as a stocking stuffer, a bag charm or a gift tag.
The pattern uses US crochet terms. The finished letter measures about 3.4 in (8.6 cm) wide by 3.9 in (9.9 cm) tall, not counting the key ring.
You make the letter flat in rows of single crochet, starting at the bottom arm and building up through the spine. The middle and top arms are added with chains as you go. One round of single crochet edging then outlines the whole shape and rounds off the corners. The roses are short strips that you roll up, and the leaves are worked around a small chain. Everything is sewn on at the end, and a jump ring attaches the key ring.
Finished Size and Construction
- Finished size: 3.4 in (8.6 cm) wide × 3.9 in (9.9 cm) tall
- Skill level: Easy to intermediate
- Terminology: US crochet terms
- Yarn weight: DK (light worsted, #3)
- Hook: 3.25 mm (US D-3)
- Number of pieces: 1 letter base plus 6 small appliqués (3 roses, 3 leaves), sewn into one keychain
- Layout: Single letter “E”; flower cluster at the lower left
- Letter size before edging: 3 in (7.6 cm) wide × 3.5 in (8.9 cm) tall
- Edging depth: about 0.2 in (0.5 cm) on every side
Materials
Use a smooth, mercerized or matte cotton (or cotton blend) in DK weight. Cotton gives crisp stitches and holds the letter shape well. Avoid fuzzy yarns, because they blur the edges and the spiral lines of the roses.
- Sage green (letter): 7 g, 15 m (16.4 yd)
- Deep red (2 roses): 3 g, 5 m (5.5 yd)
- Cream (1 rose): 2 g, 4 m (4.4 yd)
- Dark green (leaves): 2 g, 4 m (4.4 yd)
Tools:
- 3.25 mm (US D-3) crochet hook
- Tapestry needle
- One gold split key ring, 1 in (2.5 cm)
- One gold jump ring, 8 mm, and 2 pairs of flat-nose pliers
- Stitch marker
- Blocking board, rust-proof pins and a spray bottle
- Scissors
All the quantities include a small margin for swatching and sewing tails.
Abbreviations (US Terms)
- ch – chain
- sl st – slip stitch
- sc – single crochet
- hdc – half double crochet
- dc – double crochet
- sc2tog – single crochet 2 together
- st(s) – stitch(es)
- RS – right side
Special stitch – corner sc2tog: Insert the hook in the first location (a stitch top or row end), yarn over and pull up a loop. Insert the hook in the second location (the next row end or chain loop around the inner corner), yarn over and pull up a loop. Yarn over and pull through all 3 loops. This turns an inner corner neatly without leaving a gap.
Gauge and Checkpoints
Gauge: 10 sc × 12 rows = 2 in (5.1 cm) square, worked in rows and lightly blocked.
The letter is small, so the letter itself works as your gauge test. Check it at each stage below.
- After Row 5: 3 in (7.6 cm) wide, about 0.8 in (2.0 cm) tall
- After Row 13: the middle arm is 2.4 in (6.1 cm) long including the spine; total height is about 2.2 in (5.6 cm)
- After Row 21: 3 in (7.6 cm) × 3.5 in (8.9 cm)
- After the edging: 3.4 in (8.6 cm) × 3.9 in (9.9 cm)
If your piece is too big, go down to a 3 mm hook. If it’s too small, go up to a 3.5 mm hook. Small differences won’t spoil a keychain, but the arm-to-gap proportions look best when you stay on gauge.
The Letter E
The letter has 15 stitches across its full width and 21 rows from bottom to top. The spine is the 6 stitches on the left. The arms extend to the right.
Rows end on alternating sides. Every odd row ends at the left (spine) edge, and every even row ends at the right edge. This is what makes the chain-on arms work.
With sage green:
Foundation: Ch 16.
Row 1 (RS): Sc in 2nd ch from hook and in each ch across. (15 sc)
Rows 2–5: Ch 1, turn, sc in each st across. (15 sc)
Row 5 ends at the left edge. This completes the bottom arm.
Row 6: Ch 1, turn, sc in the first 6 sts. Leave the remaining 9 sts unworked. (6 sc)
Rows 7–8: Ch 1, turn, sc in each of the 6 sts. (6 sc)
Row 8 ends at the inner (right) edge of the spine.
Middle arm: At the end of Row 8, ch 7.
Row 9: Turn, sc in 2nd ch from hook and in the next 5 ch, then sc in each of the 6 spine sts. (12 sc: 6 on the new chain + 6 on the spine)
Rows 10–13: Ch 1, turn, sc in each st across. (12 sc)
Row 13 ends at the left edge.
Row 14: Ch 1, turn, sc in the first 6 sts. Leave the remaining 6 sts unworked. (6 sc)
Rows 15–16: Ch 1, turn, sc in each of the 6 sts. (6 sc)
Row 16 ends at the inner edge of the spine.
Top arm: At the end of Row 16, ch 10.
Row 17: Turn, sc in 2nd ch from hook and in the next 8 ch, then sc in each of the 6 spine sts. (15 sc: 9 on the new chain + 6 on the spine)
Rows 18–21: Ch 1, turn, sc in each st across. (15 sc)
Fasten off and weave in the tails on the wrong side.
Checkpoint: 3 in (7.6 cm) wide × 3.5 in (8.9 cm) tall. The bottom and top arms are each 5 rows deep, about 0.8 in (2.0 cm). Each gap is 3 rows, 0.5 in (1.3 cm). The spine is 6 sts wide, 1.2 in (3.0 cm). The middle arm is 3 sts shorter than the top and bottom arms.
Rosettes and Leaves
Large Red Rose (make 1)
With deep red, ch 31.
Row 1: Sc in 2nd ch from hook and in each ch across. (30 sc)
Row 2: Ch 1, turn, sc in each st across. (30 sc)
Fasten off, leaving a 10 in (25.4 cm) tail. Starting at the end without the tail, roll the strip tightly with Row 2 facing up. This gives the flat, spiral face you see in the photo. Pass the tail through all layers at the base several times to lock the coil. The rose is about 1 in (2.5 cm) across.
Cream Rose (make 1)
With cream, ch 23. Work Rows 1–2 as for the large rose. (22 sc per row) Roll and secure the same way. It’s about 0.8 in (2.0 cm) across.
Small Red Rose (make 1)
With deep red, ch 15. Work Rows 1–2 as before. (14 sc per row) Roll and secure. It’s about 0.6 in (1.5 cm) across.
Leaf (make 3)
With dark green, ch 6.
Rnd 1: Working in the chain, starting in the 2nd ch from hook: sc, hdc, dc, hdc. In the last ch, work (sc, ch 2, sc) for the tip. Rotate and work along the other side of the chain: hdc, dc, hdc, sc. Sl st to the first sc. (12 sts + ch-2 tip)
Fasten off, leaving a 6 in (15.2 cm) tail. The foundation chain forms a center vein, and the leaf is about 0.9 in (2.3 cm) long.
Border (Edging Round)
The edging is one round of sc worked around the entire letter. It hides the row ends and stair-steps, and it softens the outer corners.
Border gauge: Work 1 sc in each stitch top, each chain loop and each sc row end. Sc rows are only slightly shorter than sc stitches are wide, so 1 sc per row end lies flat in cotton.
Corner rules:
- Outer corners (8): 3 sc in the corner stitch.
- Inner corners (4): corner sc2tog.
With RS facing, join sage green with a sl st in the first foundation ch at the bottom-left corner, then ch 1. Work counterclockwise:
- Bottom edge (15 foundation loops): 3 sc in first ch, sc in next 13 ch, 3 sc in last ch. (19 sc)
- Bottom arm end (rows 1–5): 1 sc in each row end. (5 sc)
- Top of bottom arm (9 exposed sts of Row 5): 3 sc in the outer corner st, sc in the next 7 sts, then a corner sc2tog over the last st and the Row 6 end. (11 sts)
- Lower gap (rows 7–8): sc in the Row 7 end, then a corner sc2tog over the Row 8 end and the first chain loop of the middle arm. (2 sts)
- Underside of middle arm (6 chain loops, 1 already used): sc in the next 4 loops, 3 sc in the last loop. (7 sc)
- Middle arm end (rows 9–13): 1 sc in each row end. (5 sc)
- Top of middle arm (6 exposed sts of Row 13): 3 sc in the outer corner st, sc in the next 4 sts, then a corner sc2tog over the last st and the Row 14 end. (8 sts)
- Upper gap (rows 15–16): sc in the Row 15 end, then a corner sc2tog over the Row 16 end and the first chain loop of the top arm. (2 sts)
- Underside of top arm (9 chain loops, 1 already used): sc in the next 7 loops, 3 sc in the last loop. (10 sc)
- Top arm end (rows 17–21): 1 sc in each row end. (5 sc)
- Top edge (15 sts of Row 21): 3 sc in the first st, sc in the next 13 sts, 3 sc in the last st. (19 sc)
- Left side (rows 21–1): 1 sc in each row end. (21 sc)
Sl st to the first sc. Fasten off and weave in the ends.
Total: 19 + 5 + 11 + 2 + 7 + 5 + 8 + 2 + 10 + 5 + 19 + 21 = 114 sts.
Why the math works: Every exposed stitch, chain loop and row end is used exactly once. The full-width rows each give 15 (13 + 1 + 1), the exposed Row 5 stitches give 9 (1 + 7 + 1), and the exposed Row 13 stitches give 6 (1 + 4 + 1). The arm chains give 6 and 9, and the left side has 21 row ends. Each outer corner adds 2 extra stitches. Each inner sc2tog uses 2 locations for 1 stitch. This keeps the outer corners rounded and the inner corners flat, and adds about 0.2 in (0.5 cm) per side. That takes the letter from 3 in × 3.5 in (7.6 cm × 8.9 cm) to 3.4 in × 3.9 in (8.6 cm × 9.9 cm).
Final Blocking
- Lightly mist the letter until it’s damp, not soaked.
- Pin it flat on the board at 3.4 in (8.6 cm) wide × 3.9 in (9.9 cm) tall.
- Put one pin in each outer corner, and ease each corner into a gentle curve instead of a sharp point.
- Check that both gaps are open and even, about 0.5 in (1.3 cm) plus the edging.
- Let it dry completely before you add the appliqués.
- Mist and flatten the leaves separately. Don’t wet the roses; they keep their coil better dry.
Assembly
- Leaves: Arrange the 3 leaves at the lower-left corner where the spine meets the bottom arm. Place one pointing up and out at the upper left, one pointing left, and one pointing down to the right. Sew them down at the base only, so the tips stay free.
- Large red rose: Center it over the leaf bases, overlapping the spine and the top of the bottom arm. Sew through the coil base with small stitches hidden between the spiral layers.
- Cream rose: Sew it just below and slightly left of the large rose, touching it.
- Small red rose: Sew it to the right of the cream rose, on the bottom arm.
- Hardware: Open the jump ring sideways with the pliers. Pass it through the top edging at the center of the spine, add the split ring, and close the jump ring fully.
Final Quality-Control Checklist
- The letter measures 3.4 in (8.6 cm) × 3.9 in (9.9 cm).
- The row counts are 15 / 6 / 12 / 6 / 15, as written.
- The edging has 114 sts, with no puckers at the inner corners.
- All 8 outer corners are softly rounded.
- The roses are tightly coiled with no loose layers.
- The leaf tips are free and pointing outward.
- The jump ring is closed with no gap.
- All tails are woven in on the back.
Troubleshooting
- The middle or top arm is on the wrong side: Row 8 or Row 16 didn’t end at the inner spine edge. Check your row count; each of those rows must be an even-numbered row.
- The inner corners pucker: Use the corner sc2tog as written instead of 2 separate sc.
- The edging ruffles along the left side: Your row gauge is shorter than given. Go down a hook size for the edging only.
- The rose looks flat and open: Roll it more tightly and add one more pass of the tail through the base.
- The letter curls: Block it again, pin it more firmly and let it dry fully.
Care
Spot clean with a damp cloth and mild soap. Lay flat to dry, and keep the metal hardware dry to prevent tarnish.

Final Notes
Here is the measurement chain from start to finish. Gauge is 10 sc × 12 rows = 2 in (5.1 cm). The 15-stitch, 21-row letter measures 3 in × 3.5 in (7.6 cm × 8.9 cm). The 114-stitch edging brings it to 3.4 in × 3.9 in (8.6 cm × 9.9 cm). The rolled roses finish at 1 in (2.5 cm), 0.8 in (2.0 cm) and 0.6 in (1.5 cm). If each checkpoint matches, the finished keychain will match too.
Happy crocheting!