

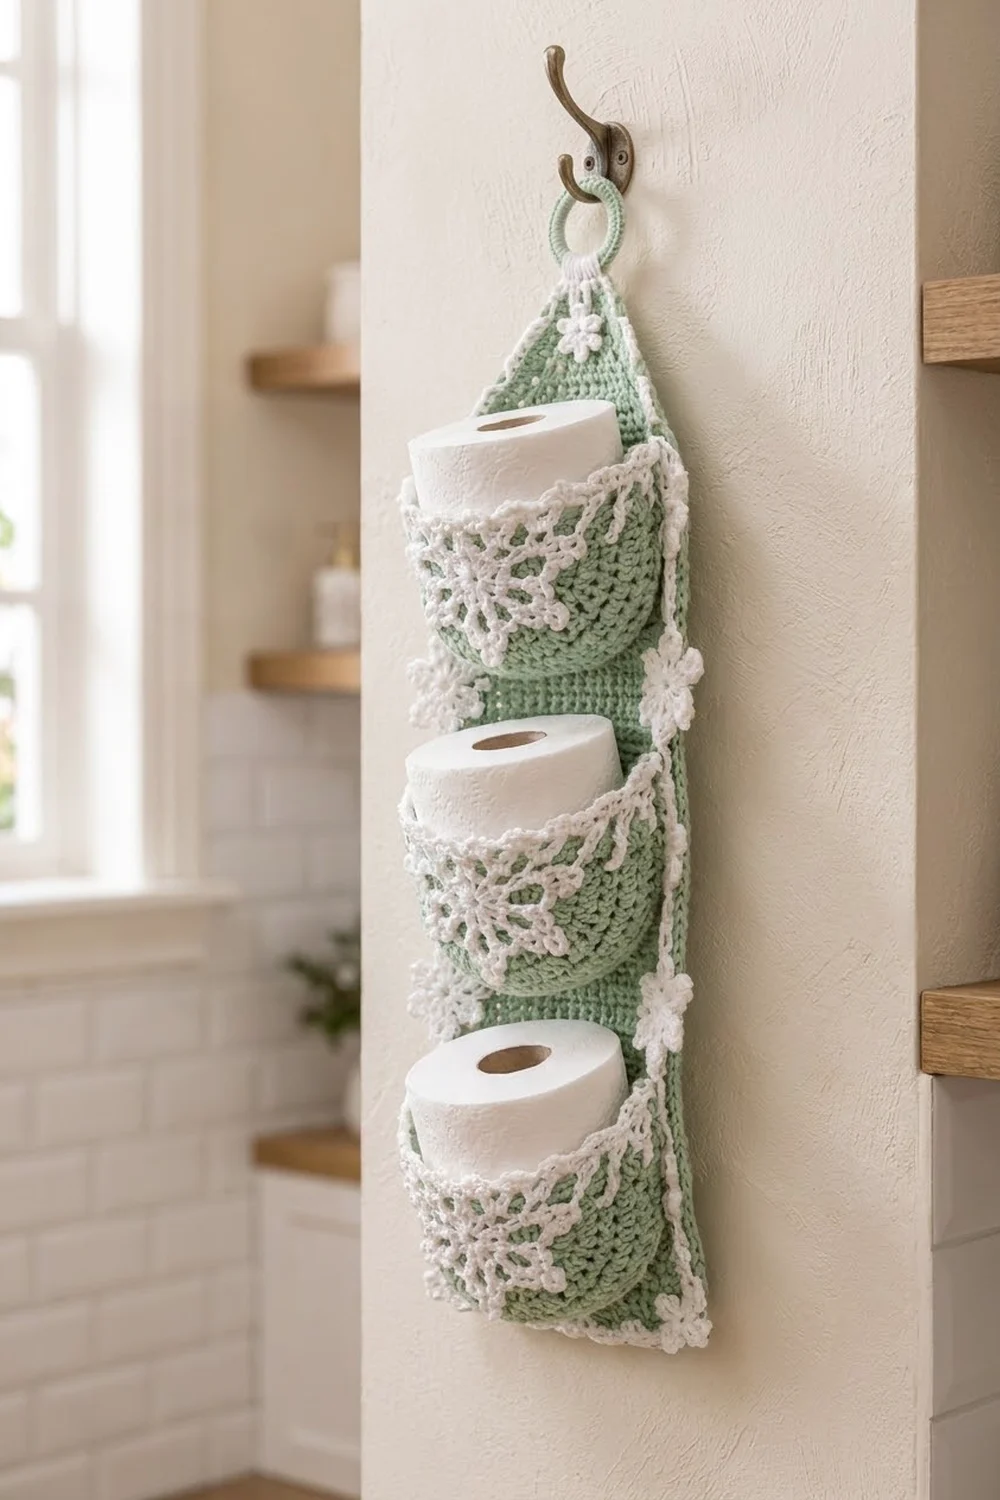
This hanging toilet paper holder brings a soft winter touch to the bathroom. It has a sage green back panel with a pointed top and three deep half-circle pockets. Each pocket holds one standard roll and is decorated with a crisp white snowflake.
It uses just two colors. Sage green is the main fabric. White is used for every trim, snowflake, small flower, and the covered hanging ring. The style is cozy cottage Christmas: festive, but quiet enough to leave up all winter.
The pattern uses US crochet terms. The finished holder is about 7.25 in (18.4 cm) wide and 24.3 in (61.7 cm) tall. With the ring, it is about 26.3 in (66.8 cm) tall.
Construction is simple. You crochet one back panel in rows, three half-circle pockets, three snowflakes, eight small flowers, and one covered ring. Then you sew the pockets to the panel, work a white picot border around it, and add the flowers and the ring.
Finished Size and Construction
- Finished size: 7.25 in (18.4 cm) x 24.3 in (61.7 cm), plus a 2 in (5.1 cm) ring
- Skill level: Intermediate
- Terminology: US
- Yarn weight: Worsted (#4) cotton
- Hook: 5 mm (H-8)
- Number of pieces: 16 (1 panel, 3 pockets, 3 snowflakes, 8 flowers, 1 ring)
- Layout: 3 pockets stacked vertically on one panel, 4 flowers along each side
- Pocket size: 9 in (22.9 cm) across the top, 4.5 in (11.4 cm) deep before trim
- Panel size before border: 6.25 in (15.9 cm) x 23.3 in (59.2 cm)
- Border depth: about 0.5 in (1.3 cm)
Materials
Use a smooth worsted cotton or cotton blend. Cotton keeps its shape and holds the pockets firm when they’re full. Acrylic also works, but the pockets will be softer.
- Sage green: about 150 g, approximately 255 m
- White: about 80 g, approximately 136 m
These amounts include a margin of roughly 15–20%.
Tools:
– 5 mm (H-8) crochet hook
– 2 in (5.1 cm) plastic or metal ring
– Tapestry needle
– 6–10 locking stitch markers
– Rustproof pins
– Measuring tape and scissors
– Blocking mat and spray bottle
Abbreviations (US Terms)
- ch – chain
- sl st – slip stitch
- sc – single crochet
- hdc – half double crochet
- dc – double crochet
- sc2tog – single crochet 2 together
- sc3tog – single crochet 3 together
- sk – skip
- st(s) – stitch(es)
- sp – space
- RS – right side
Picot: ch 3, sl st in the 3rd ch from the hook.
Shell: 5 dc in the same stitch.
Gauge and Checkpoints
- Single crochet (panel and border): 16 sc x 18 rows = 4 in (10.2 cm)
- Double crochet (pockets): 16 dc x 8 rows = 4 in (10.2 cm)
Test one pocket first. It’s quick and checks your dc gauge.
– After Row 5, the radius should be 2.5 in (6.4 cm).
– After Row 9, the radius should be 4.5 in (11.4 cm).
Check the panel at two stages.
– After Row 1, it should be 6.25 in (15.9 cm) wide.
– After Row 81, it should be 18 in (45.7 cm) tall.
If your piece is too big, use a smaller hook. If it’s too small, use a larger hook. Never change the stitch counts, because all of the sewing and border math depends on them.

Back Panel
With sage green, ch 26.
Row 1 (RS): Sc in 2nd ch from hook and in each ch across, turn. (25 sc)
Rows 2–81: Ch 1, sc in each st across, turn. (25 sc)
Checkpoint: 6.25 in (15.9 cm) x 18 in (45.7 cm).
Point shaping:
Row 82: Ch 1, sc2tog, sc to last 2 sts, sc2tog, turn. (23 sc)
Row 83: Ch 1, sc in each st across, turn. (23 sc)
Rows 84–103: Repeat Rows 82–83 ten times. Each decrease row ends with this count:
– Row 84: 21
– Row 86: 19
– Row 88: 17
– Row 90: 15
– Row 92: 13
– Row 94: 11
– Row 96: 9
– Row 98: 7
– Row 100: 5
– Row 102: 3
Each plain row keeps the count of the row before it.
Row 104: Ch 1, sc3tog, turn. (1 sc)
Row 105: Ch 1, sc in the st. (1 sc)
Fasten off. The point is about 5.3 in (13.5 cm) tall, and the whole panel measures 6.25 in (15.9 cm) x 23.3 in (59.2 cm).
On both side edges, place markers at the ends of these rows:
– Row 23: 5.1 in (13.0 cm)
– Row 50: 11.1 in (28.2 cm)
– Row 77: 17.1 in (43.4 cm)
The markers show where the top corners of each pocket go.
Pockets (Make 3)
Each pocket is a flat half circle worked in rows out from the center.
With sage green, make a magic ring.
Row 1: Ch 3 (counts as dc throughout), 5 dc in ring, turn. (6 dc)
Row 2: Ch 3, dc in same st, 2 dc in each remaining st, turn. (12 dc)
Row 3: Ch 3, 2 dc in next st, dc in next st, 2 dc in next st 5 times, turn. (18 dc)
Row 4: Ch 3, dc in next st, 2 dc in next st, dc in next 2 sts, 2 dc in next st 5 times, turn. (24 dc)
Rows 5–9: Keep the same pattern. In each row, add one more plain dc before every increase. Row totals:
– Row 5: 30 dc
– Row 6: 36 dc
– Row 7: 42 dc
– Row 8: 48 dc
– Row 9: 54 dc
Fasten off. The pocket is 9 in (22.9 cm) across and 4.5 in (11.4 cm) deep.
Top trim: With RS facing, join white at one corner of the straight edge.
Trim Row 1: Ch 1. Work 2 sc in each of the 9 row ends, 1 sc in the center of the ring, then 2 sc in each of the 9 row ends on the other side. Turn. 18 + 1 + 18 = 37 sc.
Trim Row 2: Ch 1, sc in first st, sk 2, shell in next st, sk 2, sc in next st 6 times. (6 shells + 7 sc = 37 sts)
Fasten off. The trim adds about 0.5 in (1.3 cm) of height.
Snowflakes (Make 3)
With white, make a magic ring.
Rnd 1: Ch 1, 12 sc in ring, sl st to first sc. (12 sc)
Rnd 2: Ch 1, sc in first st, ch 4, sk 1, sc in next st, ch 4, sk 1 5 times, sl st to first sc. (6 sc, 6 ch-4 sps)
Rnd 3: Sl st into first ch-4 sp. In each ch-4 sp, work (sc, hdc, dc, picot, dc, hdc, sc). Sl st to first sc. (6 petals)
Rnd 4: Sl st in next hdc, in next dc, and into the first picot. Then work (sc in picot, ch 6, sl st in 3rd ch from hook, [ch 3, sl st in same ch] twice, sl st in next 3 ch, sc in same picot), ch 4 6 times. Sl st to first sc. (6 arms, each with a three-lobed tip)
Fasten off, leaving a 12 in (30.5 cm) tail. The snowflake measures about 3.5 in (8.9 cm) from arm tip to arm tip.
Small Flowers (Make 8)
With white, make a magic ring.
Rnd 1: Ch 1, 5 sc in ring, sl st to first sc. (5 sc)
Rnd 2: Ch 3, 2 dc in same st, ch 3, sl st in same st, sl st in next st 5 times. (5 petals)
Fasten off, leaving an 8 in (20.3 cm) tail. Each flower is about 1.25 in (3.2 cm) across.
Covered Ring
With white, join with a sl st around the ring. Work about 40 sc tightly around it until the ring is fully covered. Sl st to first sc. Fasten off, leaving a 10 in (25.4 cm) tail.
Make All Pieces
| Piece | Qty | Color |
|---|---|---|
| Back panel | 1 | Sage green |
| Pocket with trim | 3 | Sage green + white |
| Snowflake | 3 | White |
| Small flower | 8 | White |
| Covered ring | 1 | White |
Layout (front view, top to bottom):
         [RING]
           /\
          /  \
   (F)  | P3 |  (F)   top corners at Row 77
   (F)  |    |  (F)
   (F)  | P2 |  (F)   top corners at Row 50
   (F)  |    |  (F)
        | P1 |        top corners at Row 23
        |____|
P = pocket with a centered snowflake. F = small flower.
Joining
Snowflakes first. Center a snowflake on the front of each pocket, with its top arm tucked just under the shell trim. Tack down all 6 arm tips and the center.
Pockets next. Sew the pockets on with sage green yarn and a whipstitch.
- Lay the panel RS up. Pin the top corners of Pocket 1 at the Row 23 markers, 1 stitch in from each side edge. This leaves the row ends free for the border.
- The pocket edge is 9 in (22.9 cm) long, but the space between the pins is only 5.75 in (14.6 cm). The extra 3.25 in (8.3 cm) bulges forward, and that bulge is what makes room for a roll.
- Pin the center of the curved edge 4.5 in (11.4 cm) below the corners, in the middle of the panel.
- Pin one more point halfway along each side of the curve. You now have 5 pins.
- Whipstitch along the curve. Each stitch goes through one Row 9 dc and the panel stitch directly below it. Spread the extra fullness evenly between the pins.
- Repeat with Pocket 2 at Row 50 and Pocket 3 at Row 77.
Keep your tension firm but relaxed. If the panel puckers, take the seam out and sew it again with longer stitches.
Size checkpoint: The panel should still be 6.25 in (15.9 cm) wide at every pocket. Each pocket should stand about 2.5 in (6.4 cm) away from the panel at its center.
Border
Border gauge: 16 sc x 18 rnds = 4 in (10.2 cm) in white.
With RS facing, join white in the first foundation st at the bottom right corner.
Rnd 1: Work around the panel in this order:
– 3 sc in the corner st
– 23 sc across the bottom
– 3 sc in the other corner st
– 72 sc up the side, across 81 row ends (skip every 9th row end)
– 24 sc evenly along the slant
– 3 sc in the tip st
– 24 sc evenly down the other slant
– 72 sc down the other side
Sl st to first sc.
Total: 23 + 72 + 72 + 24 + 24 + (3 corner groups x 3) = 224 sc. The corner groups are counted separately from the side counts.
Rnd 2: Ch 1. Sc in each st, but work 3 sc in the center sc of each corner group. Sl st to first sc. Count: 224 worked 1 per st + 6 added = 230 sc.
Rnd 3: Ch 1, sc in next st, picot, sc in next st 115 times, sl st to first sc. (230 sc, 115 picots)
Fasten off.
Why the math works:
– At 4 sc per inch, 72 sc covers the 18 in (45.7 cm) side exactly.
– 72 sc over 81 rows matches the 16:18 gauge ratio, so the edge won’t ruffle or pull in.
– 23 sc plus the corners fits the 6.25 in (15.9 cm) bottom.
– 230 is even, so the 2-stitch picot repeat fits with nothing left over.
Finishing:
– Sew the ring to the tip of the point, overlapping it by 0.25 in (0.6 cm).
– Sew 4 flowers along each side: at the pocket corners and between the pockets. Let each one overlap the border by about half its width.
Final Blocking
- Mist the holder until it is evenly damp.
- Lay it RS up on the blocking mat.
- Pin it to 7.25 in (18.4 cm) x 24.3 in (61.7 cm).
- Open the picots and shells with your fingertips, and pin the snowflake arms flat.
- Fill each pocket loosely with a rolled towel so it dries rounded.
- Let it dry completely, usually 12–24 hours.
Final Quality-Control Checklist
- The panel is 25 sc wide, and the point ends in 1 stitch
- Each pocket has 54 dc in Row 9 and 37 trim stitches
- The pocket corners sit at Rows 23, 50, and 77 on both sides
- The border has 230 sc and 115 picots
- All snowflakes are centered and tacked down at all 6 tips
- 8 flowers are attached, 4 on each side
- The ring holds the weight of 3 full rolls
- All ends are woven in at least 1.5 in (3.8 cm)
Troubleshooting
- Pocket cups: The rows are too short. Use a larger hook.
- Pocket ruffles: Your tension is too loose. Use a smaller hook.
- Roll won’t fit: Sew with less ease near the bottom of the curve so more fullness stays at the opening.
- Border sides wave: Skip a row end every 8 rows instead of every 9.
- Border sides pull in: Skip a row end every 10 rows instead of every 9.
- Point leans to one side: Check that every decrease row has a decrease at both ends.
- Snowflake curls: Pin it flat and block it before sewing it on.
Care
Hand wash in cool water with mild soap and press the water out with a towel. Dry flat, and don’t hang it while it’s wet.
Final Notes
Each measurement builds on the last:
– 25 stitches give the 6.25 in (15.9 cm) width.
– 81 rows give 18 in (45.7 cm), and the point adds 5.3 in (13.5 cm).
– Each 54-stitch pocket spans 9 in (22.9 cm), and the extra width over the panel makes room for a roll.
– The 230-stitch border adds 0.5 in (1.3 cm) on every edge, for a finished size of 7.25 in (18.4 cm) x 24.3 in (61.7 cm).
Check each stage as you go, and the holder will hang straight and hold all three rolls.
Happy crocheting!