

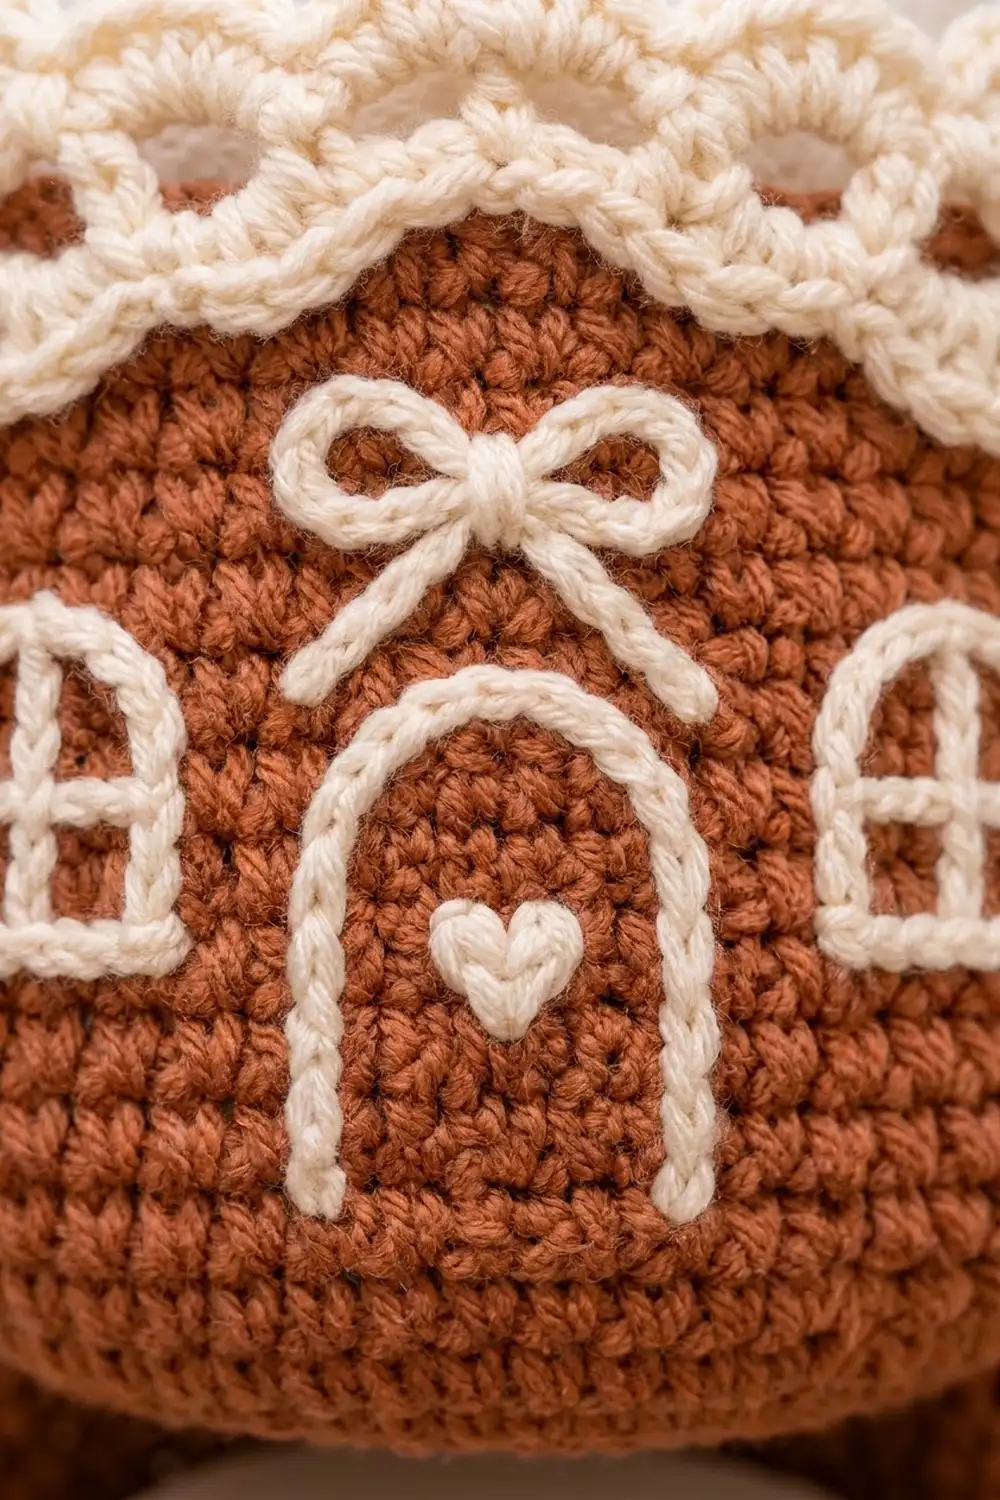
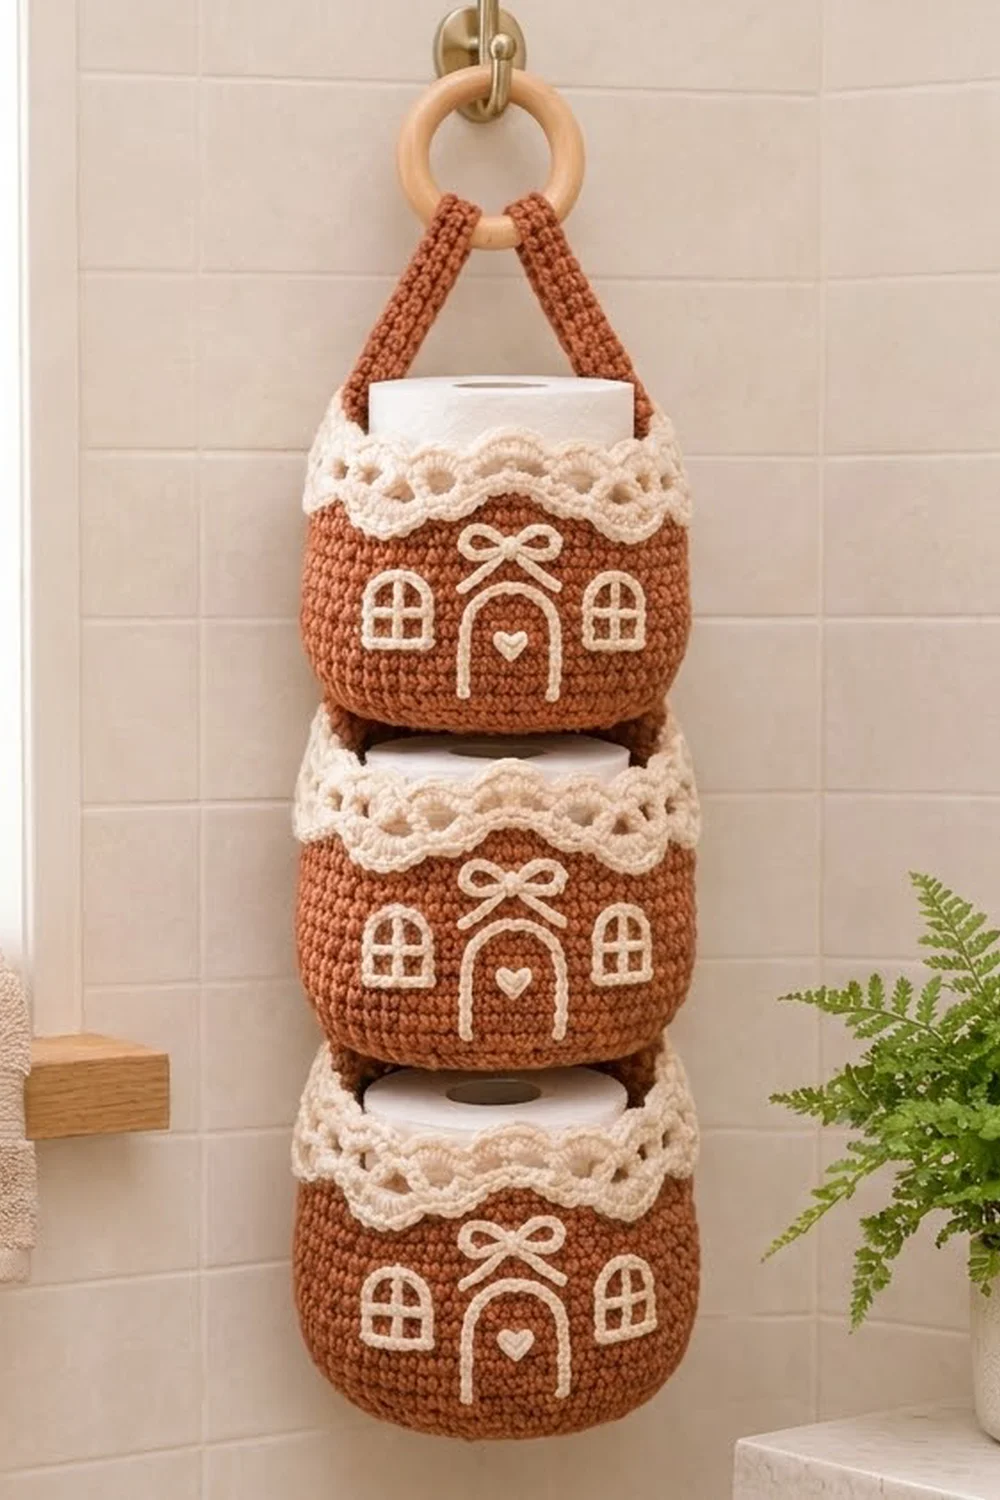
This hanging holder stores three spare toilet rolls in a column of gingerbread-house pockets. Each pocket is a deep cinnamon-brown cup with a cream “icing” edge of open loops and soft scallops. On the front, a cream door, two windows and a little bow turn the cup into a gingerbread cottage.
The colors are warm rust brown and creamy white. The style is cozy and festive without being loud, so it can stay up all winter. All terms are US crochet terms.
The finished holder measures about 4.9 in (12.4 cm) wide and 18.75 in (47.6 cm) long from the top of the strap loop to the bottom of the lowest pocket, not counting the ring. Each pocket is 4.25 in (10.8 cm) tall including its border.
To construct it, you work each pocket from the base up in joined rounds of single crochet, then add the cottage details with surface slip stitch. A flat back spine holds the three pockets in a column, and a strap through a wooden ring hangs the holder. You work the cream scalloped border on each pocket last.
Finished Size and Construction
- Finished size: 4.9 in (12.4 cm) wide × 18.75 in (47.6 cm) long, excluding the ring
- Skill level: Easy-intermediate
- Terminology: US
- Yarn weight: Worsted (#4)
- Hook: 4.5 mm (US 7)
- Number of pieces: 5 crocheted pieces: 3 pockets, 1 back spine and 1 hanging strap
- Layout: 1 column × 3 pockets, with a 0.5 in (1.3 cm) gap between pockets
- Pocket size: 4.9 in (12.4 cm) diameter × 4.25 in (10.8 cm) tall
- Pocket size before border: 4.9 in (12.4 cm) diameter × 3.0 in (7.6 cm) tall
- Border depth: 1.25 in (3.2 cm)
Materials
Use a smooth worsted-weight cotton or cotton blend. Cotton keeps its shape when loaded with a roll, and it shows the stitch details clearly. Avoid fuzzy yarns, because they blur the door and window lines.
- Rust brown: 120 g, about 216 m (236 yd)
- Cream: 40 g, about 72 m (79 yd)
The quantities assume about 180 m per 100 g and include a margin of roughly 25% for swatching and sewing.
Tools:
– 4.5 mm (US 7) crochet hook
– Wooden ring, 3 in (7.6 cm) diameter
– Tapestry needle
– 4 locking stitch markers
– Scissors and a measuring tape
– Pins
Abbreviations (US Terms)
- ch: chain
- sl st: slip stitch
- sc: single crochet
- hdc: half double crochet
- dc: double crochet
- inc: 2 sc in the same stitch
- BLO: back loop only
- st(s): stitch(es)
- sp: space
- rnd: round
- MR: magic ring
- rep: repeat
Special stitches
- Surface slip stitch: Hold the yarn behind the fabric. Insert the hook from front to back through a gap between stitches and pull up a loop. Insert the hook through the next gap, pull up a loop and draw it through the loop on the hook. This makes a raised chain line on the front of the fabric.
- Scallop: Work (sc, hdc, 3 dc, hdc, sc) in the same ch-5 space. One scallop is 7 stitches.
Gauge and Checkpoints
Gauge: 14 sc × 16 rnds = 4 in (10.2 cm) in sc worked in rounds.
Make one full pocket before starting the others and check it at each stage:
- After Rnd 9: The base measures 4.9 in (12.4 cm) across and lies flat.
- After Rnd 21: The wall is 3.0 in (7.6 cm) tall, measured from the base ridge, and the circumference is 15.4 in (39.1 cm).
- Roll test: A standard roll, about 4.5 in (11.4 cm) wide and 4 in (10.2 cm) tall, slides in with light contact.
If the pocket is too big: Go down one hook size. A loose pocket lets the roll sag and makes the gingerbread details look stretched.
If the pocket is too small: Go up one hook size. Don’t add stitches, because the border repeat depends on exactly 54 stitches.
Pocket (Make 3)
Every round is joined with a sl st to the first sc. The ch 1 at the start of each round does not count as a stitch. Joined rounds keep the start of each round in a straight line, and that line becomes the center back. Mark it.
Number the 54 stitches of the wall 1 to 54, starting at center back. The center front falls between sts 27 and 28.
Base (Rust Brown)
Rnd 1: MR, ch 1, 6 sc in ring, sl st to first sc. (6)
Rnd 2: Ch 1, inc in each st around. (12)
Rnd 3: Ch 1, (sc, inc) 6 times. (18)
Rnd 4: Ch 1, (2 sc, inc) 6 times. (24)
Rnd 5: Ch 1, sc, inc, (3 sc, inc) 5 times, 2 sc. (30)
Rnd 6: Ch 1, (4 sc, inc) 6 times. (36)
Rnd 7: Ch 1, 2 sc, inc, (5 sc, inc) 5 times, 3 sc. (42)
Rnd 8: Ch 1, (6 sc, inc) 6 times. (48)
Rnd 9: Ch 1, 3 sc, inc, (7 sc, inc) 5 times, 4 sc. (54)
The increases are staggered on Rnds 5, 7 and 9 so the base stays round instead of turning into a hexagon. Checkpoint: the base should be 4.9 in (12.4 cm) across.
Wall (Rust Brown)
Rnd 10 (turning round): Ch 1, sc in BLO of each st around. (54)
The unused front loops form a crisp ridge, so the wall rises straight up from the base.
Rnds 11–21: Ch 1, sc in each st around. (54)
Fasten off, leaving a short tail. The wall is 12 rounds tall (Rnds 10–21), which is 3.0 in (7.6 cm) at gauge.
Cottage Details (Cream, Surface Slip Stitch)
Work all the details on the front of the pocket, with the center-back join facing away from you. Work loosely so the fabric doesn’t pucker.
Door: The door is 6 sts wide (sts 25–30) and 8 rounds tall (Rnds 11–18). That makes it 1.7 in (4.3 cm) wide and 2.0 in (5.1 cm) tall.
1. Start at the bottom of Rnd 11 just left of st 25 and surface sl st straight up through Rnd 17.
2. Curve across Rnd 18 over sts 26–29 to form the arch.
3. Come down the right side of st 30 to Rnd 11.
Heart: Use the tapestry needle and a single strand of cream. Work a small satin-stitch heart about 2 sts wide, centered in the door across Rnds 13–14.
Windows: Each window is 3 sts wide and 5 rounds tall (Rnds 13–17), which is 0.9 in (2.3 cm) × 1.25 in (3.2 cm). Place the left window over sts 19–21 and the right window over sts 34–36. Each window sits 7.5 sts from center front, so the front is symmetrical.
1. Outline each window with a squared bottom and a rounded top on Rnd 17.
2. Add one vertical line through the center stitch.
3. Add one horizontal line across Rnd 15.
Bow: Use the tapestry needle. Work two lazy-daisy loops centered above the door on Rnds 19–21. Add two short straight-stitch tails angled down toward the door. The bow is 1.0 in (2.5 cm) wide.
Weave in all ends on the wrong side.
Back Spine (Make 1, Rust Brown)
Row 1: Ch 6, sc in 2nd ch from hook and in each ch across, turn. (5)
Rows 2–48: Ch 1, sc in each st across, turn. (5)
Fasten off and leave a 40 in (101.6 cm) tail for sewing. The spine is 1.4 in (3.6 cm) wide and 12 in (30.5 cm) long, because 48 rows at 4 rows per inch equals 12 in.
Hanging Strap (Make 1, Rust Brown)
Row 1: Ch 6, sc in 2nd ch from hook and in each ch across, turn. (5)
Rows 2–56: Ch 1, sc in each st across, turn. (5)
Fasten off and leave a long tail at each end. You can join new yarn at Row 1 to make the second tail. The strap is 1.4 in (3.6 cm) wide and 14 in (35.6 cm) long.
Make All Pieces
Rust brown: 3 pockets, 1 spine and 1 strap.
Cream: cottage details on all 3 pockets now, and borders after joining.
Layout, top to bottom:
        [ wooden ring ]
         /         \
     [ strap ]   [ strap ]
     [   POCKET 1 (top)   ]
          0.5 in gap
     [   POCKET 2         ]
          0.5 in gap
     [   POCKET 3 (bottom)]
     (spine runs down the back)
Joining
Method: Whipstitch the spine to the backs of the pockets, matching each spine row-end to one pocket round. The spine has 4 rows per inch and the pockets have 4 rounds per inch, so the 1:1 match keeps both pieces flat.
Lay the pockets face down with the center-back joins up. Center the spine over the joins. Row 1 is at the top, level with Rnd 21 of Pocket 1.
| Spine rows | Attach to | Notes |
|---|---|---|
| 1–12 | Pocket 1, Rnds 21 down to 10 | Sew both long edges |
| 13–14 | — | 0.5 in (1.3 cm) gap |
| 15–19 | — | Left free behind Pocket 2’s future border |
| 20–31 | Pocket 2, Rnds 21 down to 10 | Sew both long edges |
| 32–33 | — | 0.5 in (1.3 cm) gap |
| 34–38 | — | Left free behind Pocket 3’s future border |
| 39–48 | Pocket 3, Rnds 21 down to 12 | Pocket 3’s last 2 rnds hang free |
Check the row count: 12 + 2 + 5 + 12 + 2 + 5 + 10 = 48 rows. ✓
Tension: Pull each whipstitch snug enough to close the gap but not so tight that it dents the pocket wall. Use pins to hold each section before sewing it.
Strap:
1. Pass the strap through the ring and fold it in half.
2. Overlap each end 1 in (2.5 cm) onto Pocket 1, covering Rnds 18–21.
3. Center the left end between sts 13 and 14 and the right end between sts 40 and 41. These points are the sides of the pocket.
4. Whipstitch around all four edges of each overlap.
The strap ends sit directly below Rnd 21 so they don’t get in the way of the border.
Size checkpoint: From the base of Pocket 1 to the top of Pocket 2’s wall (Rnd 21) should measure 1.75 in (4.4 cm). That is the 0.5 in (1.3 cm) gap plus 1.25 in (3.2 cm) of room for the border.
Border (Cream, Each Pocket)
Border gauge: Rnd 22 adds 0.25 in (0.6 cm). Rnds 23–24 add 1.0 in (2.5 cm). The total border depth is 1.25 in (3.2 cm).
Work the border on each pocket after joining. The spine is sewn only to the wall, never into the Rnd 21 stitches, so all 54 top stitches are still free. Joining adds no extra stitches.
Rnd 22: Join cream in st 1 at center back, ch 1, sc in each st around, sl st to first sc. (54: 27 front, 27 back)
Rnd 23: Ch 1, sc in first st, *ch 5, skip 2 sts, sc in next st; rep from * around, ending with ch 5, skip 2 sts, sl st to first sc. (18 sc + 18 ch-5 sps: 9 loops front, 9 back)
Rnd 24: Sl st into first ch-5 sp, ch 1, scallop in each ch-5 sp around, sl st to first sc. (18 scallops = 126 sts: 63 front, 63 back)
Fasten off and weave in ends.
Why the math works: Each loop in Rnd 23 uses exactly 3 stitches (1 sc plus 2 skipped), and 54 ÷ 3 = 18 repeats with nothing left over. Because 18 is even, the front and back each get 9 scallops. The ch-5 loops are longer than the 2 stitches they skip, so the edge opens into the round “windows” you see in the photo. Putting 7 stitches into each loop lets the scallops flare slightly outward without ruffling.
Final Blocking
- Put a toilet roll in each pocket. The rolls act as blocking forms.
- Lightly mist all the cream borders and the brown walls.
- Use your fingers to shape each scallop into an even arch and open each ch-5 loop.
- Smooth the door, window and bow lines so they lie flat.
- Hang the holder by the ring and let it dry completely, so it settles straight.
- Measure: the holder should be 18.75 in (47.6 cm) long and each pocket 4.9 in (12.4 cm) wide.
Final Quality-Control Checklist
- [ ] Each base lies flat and measures 4.9 in (12.4 cm) across.
- [ ] Each wall is 3.0 in (7.6 cm) tall with a crisp ridge at the base.
- [ ] The door is centered between sts 27 and 28, and the windows are evenly spaced.
- [ ] Each border has exactly 18 scallops, 9 on the front and 9 on the back.
- [ ] The gaps between pockets measure 0.5 in (1.3 cm).
- [ ] The strap ends sit level, so the holder hangs straight.
- [ ] All ends are woven in and secure.
Troubleshooting
Base ruffles: Your tension is too loose for the increases. Go down a hook size for the base only.
Base cups before Rnd 10: Your stitches are too tight. Loosen up or go up a hook size for the base.
Rnd 23 doesn’t come out even: Recount Rnd 22. It must be exactly 54 stitches.
Surface lines pucker: Rework them with a looser pull, or use a hook one size larger for the slip stitches.
Holder hangs crooked: Re-sew one strap end so both ends sit at the same round.
Roll is too loose: Work the wall with a hook one size smaller.
Care
Hand wash in cool water, roll in a towel to remove excess water, and dry flat or hanging. Don’t tumble dry, because heat can shrink the cotton and flatten the scallops.
Final Notes
Every measurement depends on the one before it. Getting gauge gives a 54-stitch base that measures 4.9 in (12.4 cm) across. Twelve wall rounds give a 3.0 in (7.6 cm) wall, and the 1.25 in (3.2 cm) border brings each pocket to 4.25 in (10.8 cm). Three pockets plus two 0.5 in (1.3 cm) gaps make a 13.75 in (34.9 cm) stack. The strap adds about 5 in (12.7 cm), for a finished length of 18.75 in (47.6 cm). Check your measurements at each step and the holder will come out right. Happy crocheting!