

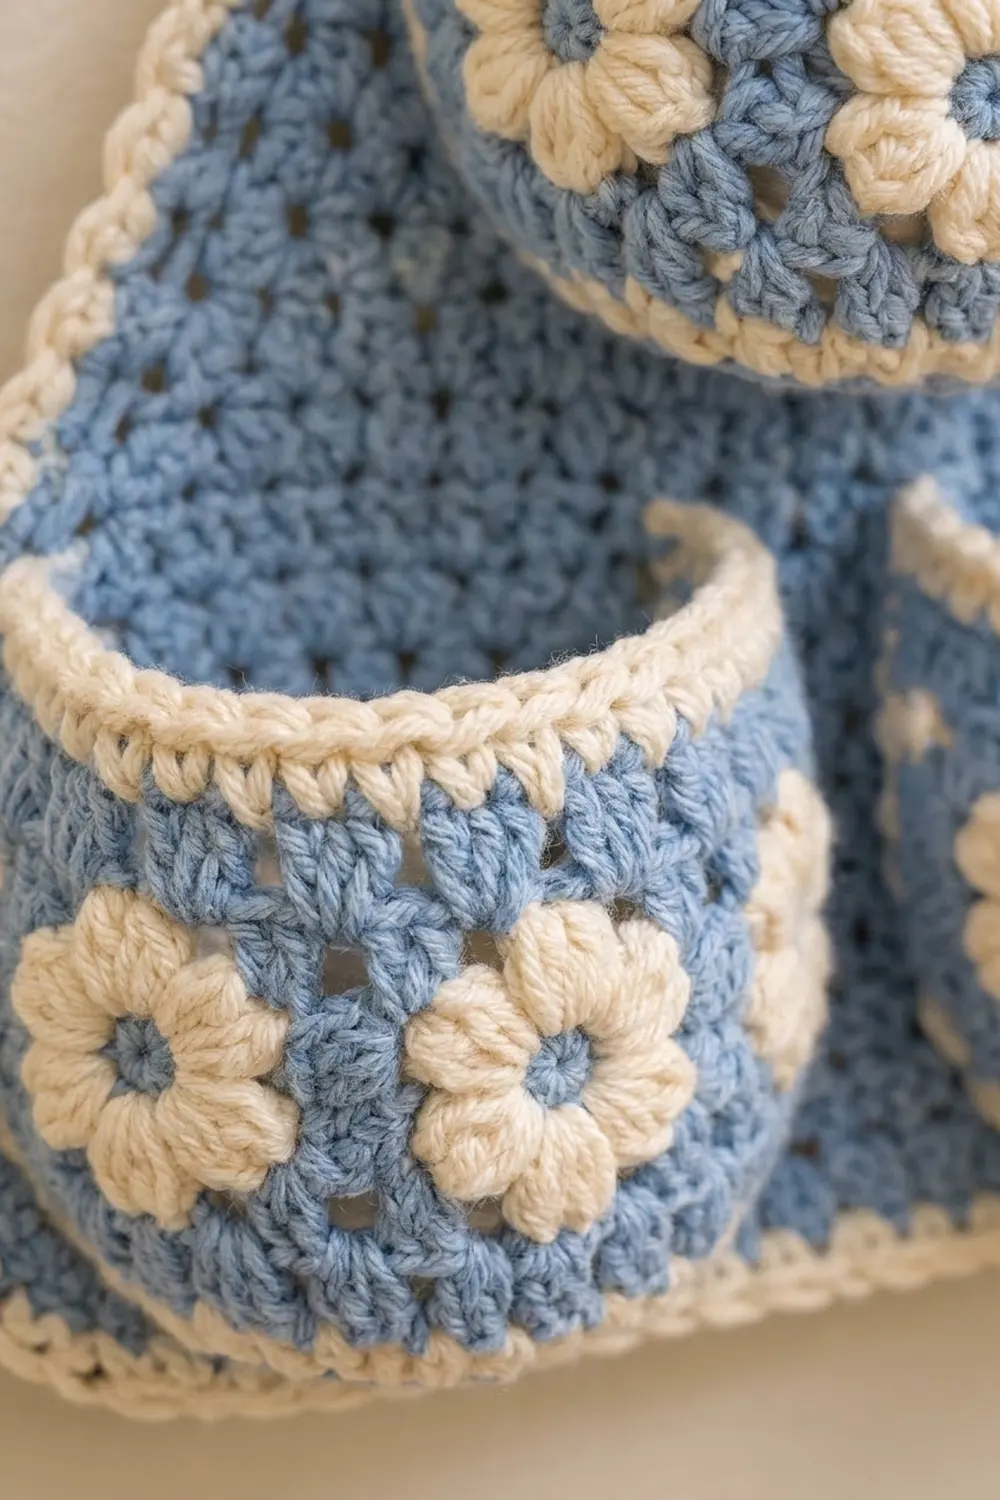
The Bluebell Trio is a wall-hanging toilet paper holder that keeps three rolls in reach. It has a dusty-blue granny triangle back panel and three rounded pockets trimmed with cream flowers. It hangs from a wooden ring, so you can hang it on a towel hook, a door hook or a peg rail.
Only two colors are used: a soft light blue for the main fabric and cream for the flower petals, the pocket rims and the twisted outer edge. The result looks cottage-style and fits well in a light, plant-filled bathroom.
This pattern uses US crochet terms. The finished panel measures about 20.75 in (52.7 cm) per side and 18 in (45.7 cm) tall. With the tab and a 3 in (7.6 cm) ring, the total hanging length is about 20.5 in (52.1 cm).
How it’s made: you work the back panel as a granny triangle in the round and add a three-round border. Each pocket is a ring of five small flower squares with an hdc base disc and a cream rim. You sew the pockets to the panel and add a tab to hold the ring.
Finished Size and Construction
- Finished panel: 20.75 in (52.7 cm) per side × 18 in (45.7 cm) tall
- Skill level: Intermediate
- Terminology: US
- Yarn weight: Worsted (#4), cotton or cotton blend
- Hook: 4.5 mm (US 7)
- Number of pieces: 1 panel, 3 pockets (each made of 5 motifs + 1 base), 1 tab
- Layout: 1 pocket centered at the top, 2 pockets side by side at the bottom
- Motif size: 3.75 in (9.5 cm) square
- Pocket size: about 7.5 in (19.1 cm) wide when flattened against the panel, 4.4 in (11.2 cm) tall
- Panel before border: 19 in (48.3 cm) per side, 16.5 in (41.9 cm) tall
- Border depth: 0.5 in (1.3 cm)
Materials
Choose a smooth cotton or cotton blend. Cotton holds the pocket shape and doesn’t stretch much when the pockets are full.
- Color A, dusty light blue: 300 g, about 510 m
- Color B, cream: 120 g, about 204 m
These amounts are based on a yarn with about 170 m per 100 g. They include a margin for gauge differences and tails.
Tools:
– 4.5 mm (US 7) crochet hook
– Tapestry needle
– Stitch markers
– Wooden ring, 3 in (7.6 cm) outside diameter
– Rust-proof pins, blocking mat and spray bottle
– Measuring tape
Abbreviations (US Terms)
- ch – chain
- sl st – slip stitch
- sc – single crochet
- hdc – half double crochet
- dc – double crochet
- sp – space
- MR – magic ring
- rnd(s) – round(s)
- rev sc – reverse single crochet (crab stitch): work sc from left to right (right to left if you’re left-handed), which makes a twisted, rope-like edge
- puff – [yarn over, insert hook in the stitch, pull up a loop] 3 times in the same stitch (7 loops on hook), yarn over and draw through all 7 loops, ch 1 to close
Gauge and Checkpoints
- 16 sc = 4 in (10.2 cm)
- 16 hdc × 12 rows = 4 in (10.2 cm)
- Granny triangle Rnds 1–4 = 4 in (10.2 cm) per side
Make one flower motif first. It should measure 3.75 in (9.5 cm) square after Rnd 5.
Checkpoints:
– Motif after Rnd 2: 1.75 in (4.4 cm) across
– Motif after Rnd 4: 3.25 in (8.3 cm) square
– Panel: Rnd 4 = 4 in (10.2 cm), Rnd 10 = 10 in (25.4 cm), Rnd 15 = 15 in (38.1 cm), Rnd 19 = 19 in (48.3 cm) per side
– Base disc after Rnd 10: about 6 in (15.2 cm) across
Too big? Go down 0.5 mm. Too small? Go up 0.5 mm. Pocket fit matters more than panel size, so match motif gauge first.
Back Panel (Color A)
Each side of the panel gains one cluster per round. On Rnd n, each side has n clusters and (n − 1) ch-1 spaces. The round has 9n dc in total.
Rnd 1: MR, ch 3 (counts as dc), 2 dc in ring, ch 2, [3 dc, ch 2] twice in ring, sl st to top of ch 3. (9 dc, 3 ch-2 corners)
Rnd 2: Sl st into next 2 dc and the corner sp. Ch 3, (2 dc, ch 2, 3 dc) in the same sp, ch 1. [(3 dc, ch 2, 3 dc) in the next corner sp, ch 1] twice, sl st to top of ch 3. (18 dc, 3 ch-1 sps)*
Rnd 3: Sl st to the corner sp. Ch 3, (2 dc, ch 2, 3 dc) in the same sp, ch 1. [3 dc in the next ch-1 sp, ch 1] across the side, (3 dc, ch 2, 3 dc) in the corner sp, ch 1. Repeat from * around and join. (27 dc, 6 ch-1 sps)*
Rnds 4–19: Repeat Rnd 3, working 3 dc in every ch-1 sp along each side.
- Rnd 4: 36 dc, 9 ch-1 sps
- Rnd 10: 90 dc, 27 ch-1 sps
- Rnd 15: 135 dc, 42 ch-1 sps
- Rnd 19: 171 dc, 54 ch-1 sps. Each side has 19 clusters, which is 57 dc and 18 ch-1 sps.
Fasten off. The panel should measure 19 in (48.3 cm) per side.
Flower Motif (Make 15)
Rnd 1 (A): MR, ch 1, 8 sc in ring, sl st to the first sc. (8 sc) Fasten off.
Rnd 2 (B): Join B in any sc. [Puff in the next sc, ch 2] 8 times, then sl st to the top of the first puff. (8 puffs, 8 ch-2 sps) Fasten off.
Rnd 3 (A): Join A in any ch-2 sp. Ch 3, (2 dc, ch 2, 3 dc) in the same sp, then 3 dc in the next sp. [(3 dc, ch 2, 3 dc) in the next sp, 3 dc in the next sp] 3 times, sl st to the top of ch 3. (36 dc: 9 per side between corners)*
Rnd 4 (A): Sl st to the corner sp. Ch 3, (2 dc, ch 2, 3 dc) in the same sp. [3 dc in the gap between the next two 3-dc groups] twice, (3 dc, ch 2, 3 dc) in the corner. Repeat from * around, ending with the 2 gap clusters, and join. (48 dc: 12 per side)*
Rnd 5 (A): Ch 1, sc in each dc, 3 sc in each corner sp, then join. (60 sc) Each side has 14 stitches between corner centers. Each side counts 16 stitches including its 2 corner stitches.
Fasten off. Check that the motif is 3.75 in (9.5 cm) square.
Pocket Assembly (Make 3)
Motif Ring
- Lay out 5 motifs in a row: M1, M2, M3, M4, M5.
- Use A and whipstitch through the outer loops, matching stitch to stitch. Each seam joins 16 stitches to 16 stitches, corner to corner.
- Join M5 to M1 to close the ring. You now have 5 seams.
The ring’s circumference is 18.75 in (47.6 cm). Its top and bottom edges each have 5 × 16 = 80 stitches. No stitches are added at the seams.
Base Disc (A)
Ch 2 does not count as a stitch. Join every round with a sl st to the first hdc.
- Rnd 1: MR, ch 2, 8 hdc in ring. (8)
- Rnd 2: 2 hdc in each st. (16)
- Rnd 3: [hdc, 2 hdc in next] around. (24)
- Rnd 4: [hdc in next 2, 2 hdc in next] around. (32)
- Rnds 5–10: Keep adding 1 more plain hdc between increases each round. (Rnd 5: 40, Rnd 10: 80)
At Rnd 5 the disc should be about 3 in (7.6 cm) across. At Rnd 10 it should be about 6 in (15.2 cm) across.
Base Joining Round (B)
Hold the base disc against the bottom edge of the ring with wrong sides together. Join B at a seam. Ch 1, then sc through one ring stitch and one base stitch together, all the way around. (80 sc)
This makes the cream ridge at the bottom of the pocket.
Rim (B)
- Rnd 1: Join B at the top edge, ch 1, sc in each st. (80 sc)
- Rnd 2: Ch 1, rev sc in each st. (80)
Fasten off. The pocket should be about 4.4 in (11.2 cm) tall.
Tab (A)
- Ch 8. Sc in the 2nd ch from the hook and in each remaining ch. (7 sc)
- Ch 1, turn, sc in each st. Repeat until the tab measures 6 in (15.2 cm) long.
The tab is about 1.5 in (3.8 cm) wide.
Make All Pieces
| Piece | Qty | Colors |
|---|---|---|
| Back panel | 1 | A, border B |
| Flower motifs | 15 | A center and body, B petals |
| Base discs | 3 | A |
| Pocket joins and rims | 3 | B |
| Tab | 1 | A |
           ( ring )
            [tab]
             /\
            /  \
           /    \
          / [P1] \
         /        \
        / [P2][P3] \
       /____________\
Each pocket ring: [M1][M2][M3][M4][M5]. M2, M3 and M4 face forward, and M5 + M1 form the flat back wall.
Border (Color B)
Border gauge: 16 sc = 4 in (10.2 cm). Before the border, each side has 57 dc + 18 ch-1 sps = 75 working stitches over 19 in (48.3 cm). That is about 3.95 stitches per inch, which matches sc gauge.
Rnd 1: Join B in any corner sp. Ch 1, then 3 sc in the corner sp. Work 1 sc in each dc and 1 sc in each ch-1 sp along the side (75 sc), then 3 sc in the next corner. Continue around and join.
– Each side has 77 sts between corner centers.
– Total: 3 × 77 + 3 corners = 234.
Rnd 2: Ch 1, sc in each st, with 3 sc in each center corner stitch.
– Each side has 79 sts between corner centers.
– Total: 3 × 79 + 3 = 240.
Rnd 3: Ch 1, rev sc in each st around. (240) Fasten off.
Why the math works: Working 1 sc per dc and per ch-1 sp keeps the border at the panel’s own stitch density. The 3-sc corners add the 2 stitches per corner that each round needs to stay flat. The border adds 0.5 in (1.3 cm) of depth on every edge. That makes each side 20.75 in (52.7 cm) and the panel 18 in (45.7 cm) tall.
Joining
Use A and a whipstitch for all joins. Match stitch to stitch and keep the tension snug but not puckered.
Pockets: Flatten the back wall of each pocket (M5 + M1) into a 7.5 in × 4.4 in (19.1 cm × 11.2 cm) rectangle. Sew all four of its edges to the panel:
– 32 rim stitches (2 × 16) along the top
– 32 base-join stitches along the bottom
– The two vertical seams, M4/M5 and M1/M2, along the sides
The three front motifs then curve outward.
Placement:
– Bottom pockets (P2 and P3): Place the base edge 0.75 in (1.9 cm) above the bottom edge of the panel. The two pockets meet at the center line. Their outer top corners just reach the border.
– Top pocket (P1): Center it with its base edge 5.5 in (14.0 cm) above the bottom edge. Its rim sits about 10 in (25.4 cm) up.
Tab: Fold the tab through the ring. Sew both ends to the back of the panel at the top point, overlapping them by 1.5 in (3.8 cm). About 2 in (5.1 cm) of the tab shows above the point.
Size checkpoint: With everything sewn on, the panel should still measure 20.75 in (52.7 cm) per side.
Final Blocking
- Spray the panel lightly until it’s damp.
- Pin it to 20.75 in (52.7 cm) per side. Pin the two bottom corners into a gentle curve rather than a sharp point.
- Stuff each pocket with a towel so it holds its rounded shape.
- Don’t press the puff petals flat.
- Let everything dry completely before you unpin.
Final Quality-Control Checklist
- [ ] The panel border has 240 stitches and lies flat.
- [ ] All 15 motifs measure 3.75 in (9.5 cm).
- [ ] Each pocket edge has 80 stitches at the top and bottom.
- [ ] Each pocket’s back wall is sewn on all four sides.
- [ ] The pockets sit level and centered.
- [ ] The tab is secure and the ring hangs straight.
- [ ] All tails are woven in.
Troubleshooting
- Panel cups: Your ch-1 spaces are too tight, so loosen your chains. Panel ruffles: Go down a hook size.
- Motifs vary in size: Re-check Rnd 4. Each gap needs exactly 3 dc.
- Roll doesn’t fit: Your motifs are under 3.75 in (9.5 cm). Remake them with a larger hook.
- Pocket sags forward: Re-sew the rim’s back section more tightly.
- Base ruffles: Your hdc rows are too short. Go up 0.5 mm for the disc only.
- Tab stretches: Work it with a hook 0.5 mm smaller.
Care
Hand wash in cool water and lay flat in shape to dry. Don’t hang it to dry while it’s wet.

Final Notes
Here is how the measurements build on each other:
– Each motif is 16 stitches per side, so 5 motifs give an 80-stitch pocket edge.
– The base disc grows to 80 stitches to match it.
– The panel reaches 75 working stitches per side at Rnd 19, then 240 border stitches.
– The finished triangle is 20.75 in (52.7 cm) per side.
If you hit each checkpoint, the pockets will fit the panel and the rolls will fit the pockets.
Happy crocheting!