

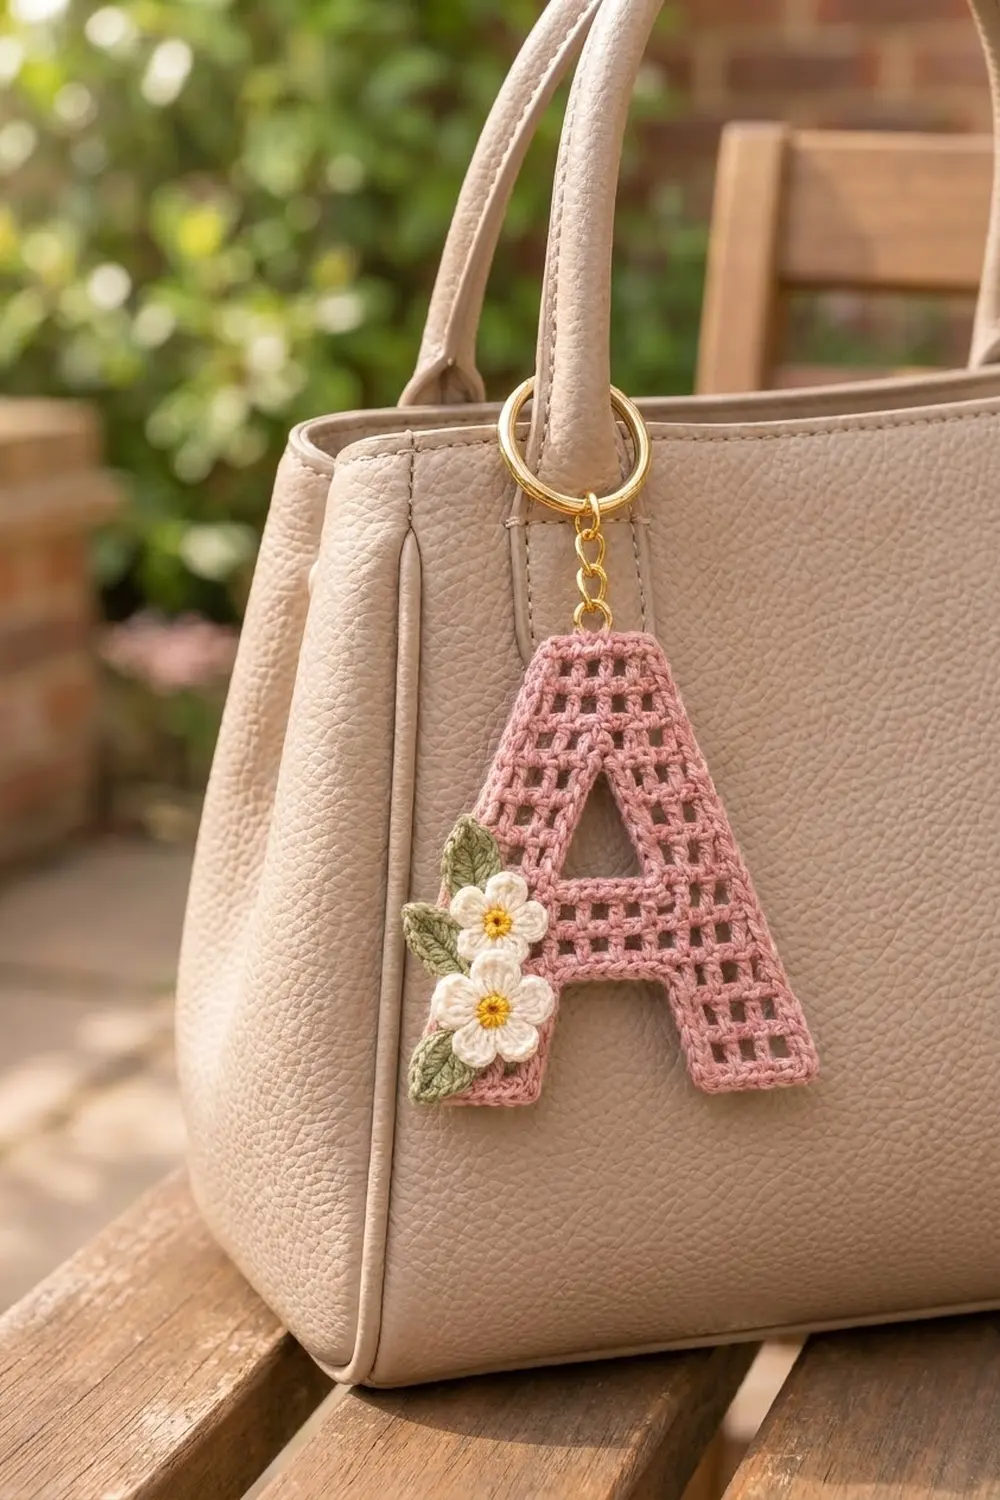
This little keychain is a capital letter A worked in open filet mesh. A crisp single crochet outline frames the letter, and a small cluster of flowers sits on the lower left leg. It is a quick, personal gift and a handy way to tell your bag or keys apart.
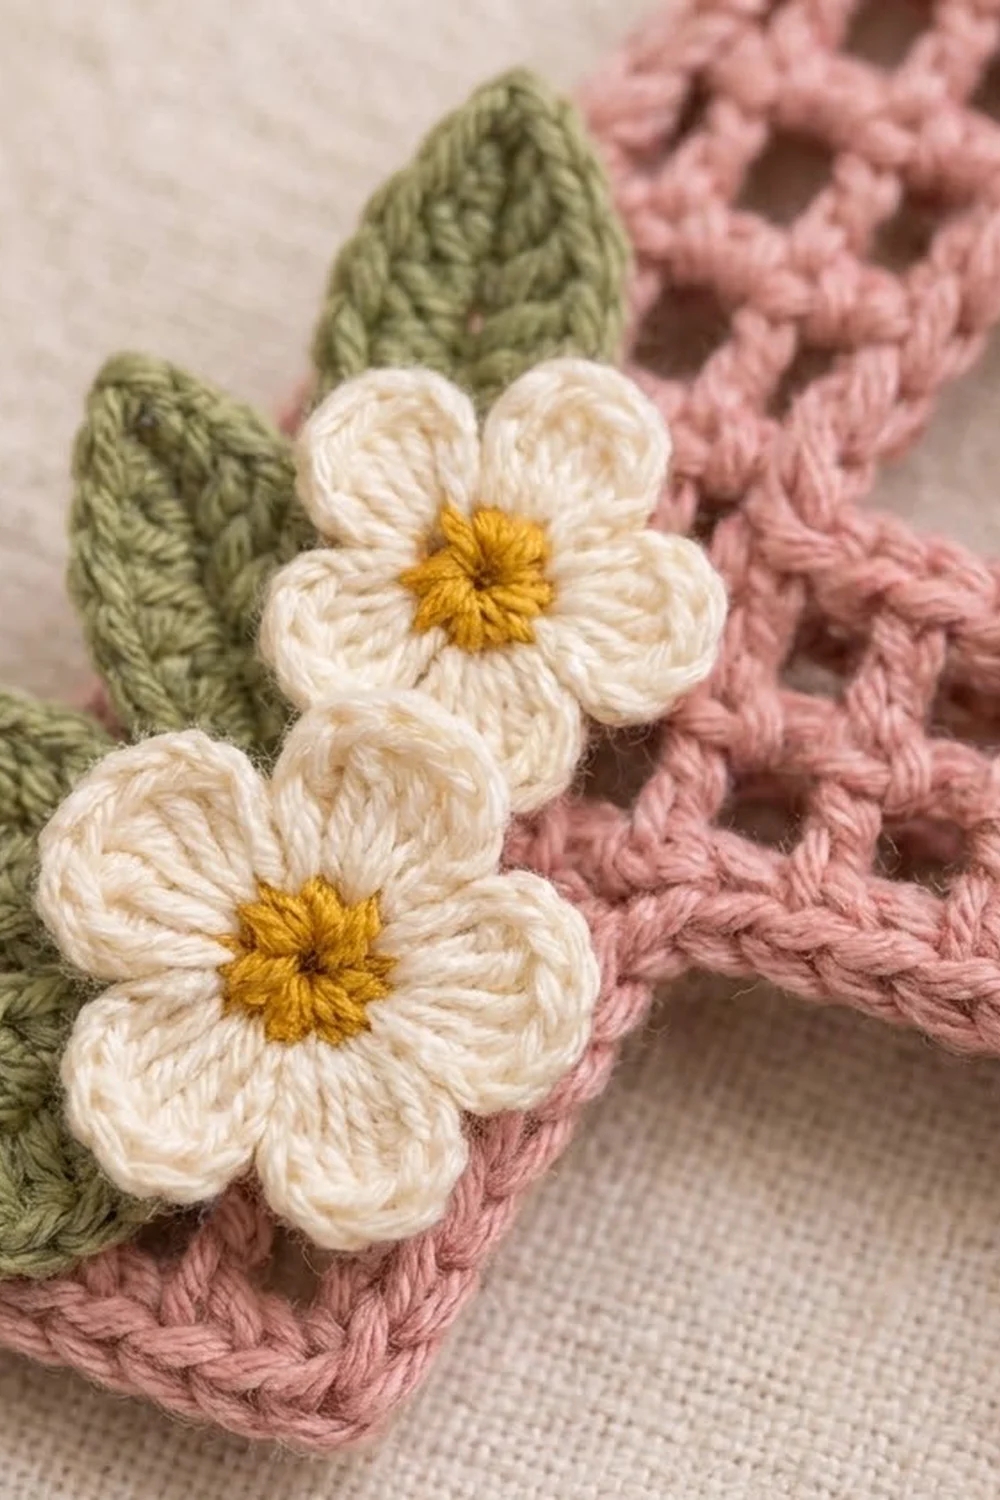
The letter is worked in dusty pink. Two cream five-petal flowers with mustard-yellow centers sit stacked along the left leg, with three sage-green leaves tucked behind them. A gold split ring finishes the soft, cottage-garden look.
This pattern uses US crochet terms. The finished letter measures about 3.5 in (8.9 cm) wide at the base and 3.8 in (9.7 cm) tall, not counting the key ring.
The letter is worked flat from the bottom up in dc mesh. You make each leg separately and join them with a chain bridge that becomes the crossbar. Next, you work the two sides of the triangular opening separately and join them again to finish the peak. One round of sc outlines the letter, and a short sc round edges the opening. The flowers and leaves are made separately and sewn on.
Finished Size and Construction
- Finished size: 3.5 in (8.9 cm) wide at base × 3.8 in (9.7 cm) tall
- Skill level: Intermediate (filet shaping)
- Terminology: US
- Yarn weight: Fingering (#1 super fine) cotton
- Hook: 2.25 mm (US B-1)
- Number of pieces: 1 letter, plus 2 flowers and 3 leaves sewn on as appliqués
- Layout: One single letter, appliqués clustered on the lower left leg
- Mesh size before border: 3.3 in (8.4 cm) wide × 3.6 in (9.1 cm) tall
- Border depth: 0.1 in (0.3 cm) per edge, 1 round of sc
Materials
Use a smooth, mercerized fingering-weight cotton. Cotton gives the clearest mesh and holds its shape on a keychain. Avoid fuzzy or very stretchy fibers.
- Dusty pink (MC): 8 g / 27 m
- Cream (A): 3 g / 10 m
- Mustard yellow (B): 1 g / 3 m
- Sage green (C): 2 g / 7 m
Tools:
- 2.25 mm (US B-1) hook
- Tapestry needle
- Sharp sewing needle and cream thread (optional, for tacking appliqués)
- 1 in (2.5 cm) gold split key ring
- 0.3 in (0.8 cm) gold jump ring and two flat-nose pliers
- Blocking mat, rust-proof pins, spray bottle
- Optional: fabric stiffener or light starch
All yarn quantities include a margin for a gauge test and weaving in ends.
Abbreviations (US Terms)
- ch – chain
- sl st – slip stitch
- sc – single crochet
- hdc – half double crochet
- dc – double crochet
- dtr – double treble crochet
- tch – turning chain
- sp – space
- MR – magic ring
- st(s) – stitch(es)
Special stitches
- Block: dc, ch 1, skip 1 st, dc. Neighboring blocks share their dc. A row of N blocks has N + 1 dc and N ch-1 sps, or 2N + 1 sts.
- Start-dec (decrease 1 block at the start of a row): Turn, sl st in first ch-1 sp and in next dc, then ch 3 (counts as dc).
- End-dec (decrease 1 block at the end of a row): Work across until 1 block remains. Leave the last ch-1 sp and tch unworked, then turn.
- End-inc (increase 1 block at the end of a row): After the last dc, ch 1, then work dtr in the same st as that last dc.
Gauge and Checkpoints
Gauge: 10 blocks × 10 rows = 3 in (7.6 cm) in dc mesh. One block is 0.3 in (0.8 cm) square.
Make Leg B (rows 1–4) first and use it as your gauge test.
Checkpoints:
- Leg after row 1: 1.2 in (3.0 cm) wide
- Leg after row 4: 0.9 in (2.3 cm) wide at the top, 1.2 in (3.0 cm) tall
- After row 6: 2.7 in (6.9 cm) wide, 1.8 in (4.6 cm) tall
- After row 9: 2.1 in (5.3 cm) wide across row 9
- After row 12: 3.3 in (8.4 cm) wide at the base, 3.6 in (9.1 cm) tall
- After border: 3.5 in (8.9 cm) × 3.8 in (9.7 cm)
If your leg is too big, go down 0.25 mm in hook size. If it is too small, go up 0.25 mm. If the blocks are rectangles instead of squares, adjust how high you pull up your dc loops rather than changing hooks.
Letter Pattern
Leg B (Right Leg)
With MC, ch 12.
Row 1: Dc in 6th ch from hook (the skipped chs count as dc, ch 1 and a base ch). Ch 1, skip next ch, dc in next ch. Repeat from * 2 more times. (4 blocks, 9 sts)
Row 2: Ch 3 (counts as dc), turn. Ch 1, skip ch-1 sp, dc in next dc. Repeat from * across, working the last dc in the 4th ch of the beginning ch. (4 blocks, 9 sts)
Row 3: Start-dec, then ch 1, skip ch-1 sp, dc in next dc. Repeat from * across, working the last dc in top of tch. (3 blocks, 7 sts)
The decreased side is the outer edge of the leg.
Row 4: Ch 3, turn. Work 3 blocks across, with the last dc in top of tch. (3 blocks, 7 sts)
Row 4 ends at the outer edge. Do not fasten off. Set Leg B aside with the live loop on a stitch marker.
Leg A (Left Leg)
Work exactly as Leg B, rows 1–4. Fasten off.
Lay Leg A to the left of Leg B with its decreased edge facing outward to the left. Flip it over if needed; dc mesh looks the same on both sides. Leave a gap of 3 blocks, 0.9 in (2.3 cm), between the legs.
Crossbar
Row 5 (joining row): Return Leg B’s loop to your hook. Ch 3, turn. Work 3 blocks across Leg B, ending in top of tch at its inner edge.
Ch 5 for the bridge, keeping it untwisted. Dc in top of tch at the inner edge of Leg A. Work 3 blocks across Leg A, ending at its outer edge.
Row 5 count: 7 (Leg B) + 5 (bridge chs) + 7 (Leg A) = 19 sts (9 blocks)
Row 6: Ch 3, turn. Work 3 blocks across Leg A.
Over the bridge: Ch 1, skip 1 ch, dc in next ch. Repeat from * once more. Then ch 1, skip the last ch, and dc in the next dc. This makes 3 blocks over the bridge.
Work 3 blocks across Leg B, with the last dc in top of tch. (9 blocks, 19 sts)
Fasten off. The 3-block gap between the legs, topped by the row 5 bridge, forms the open space under the crossbar.
Triangular Opening
Turn the work so row 6 is at the top.
Side A, Row 7: Count dc from the left edge of row 6, counting the tch as the 1st dc. Join MC with a sl st in the 4th dc. Ch 3 (counts as dc), then work 3 blocks to the left edge. (3 blocks, 7 sts)
Side A, Row 8: Start-dec, then ch 1, skip ch-1 sp, dc in next dc. Ch 1, skip ch-1 sp, dc in top of tch. End-inc. (3 blocks, 7 sts; shifted 1 block inward)
Fasten off.
Side B, Row 7: Count dc from the right edge of row 6. Join MC in the 4th dc, ch 3, then work 3 blocks to the right edge. (3 blocks, 7 sts)
Side B, Row 8: Work as for Side A, row 8. (3 blocks, 7 sts) Fasten off.
The 2 center dc of row 6 stay unworked. The opening is 3 blocks wide in row 7 and 1 block wide in row 8.
Peak
Row 9: Join MC with a sl st in top of tch at the outer edge of Side B. Ch 3. Work 3 blocks, ending in the dtr at the inner edge.
Ch 1, then dc in the dtr at the inner edge of Side A. Work 3 blocks across Side A, ending in top of tch.
Row 9 count: 7 + 1 + 7 = 15 sts (7 blocks)
Row 10: Start-dec, work across, end-dec. (5 blocks, 11 sts)
Row 11: Start-dec, work across, end-dec. (3 blocks, 7 sts)
Row 12: Ch 3, turn. Work 3 blocks across. (3 blocks, 7 sts)
Do not fasten off.
Checkpoint: The letter should be 3.3 in (8.4 cm) wide at the base and 3.6 in (9.1 cm) tall.
Flowers (Make 2)
Rnd 1: With B, MR, 5 sc in ring. Join with a sl st to the first sc. (5 sts) Fasten off.
Rnd 2: Join A in any sc. In each sc around, work (sl st, ch 2, 3 dc, ch 2, sl st). (5 petals) Fasten off, leaving a 10 in (25.4 cm) tail.
Each flower measures 0.9 in (2.3 cm) across.
Leaves (Make 3)
With C, ch 7.
Side 1: Sl st in 2nd ch from hook, then sc in next ch, hdc in next ch, dc in next ch, hdc in next ch, sc in last ch. (6 sts)
Tip: Ch 2, sl st in 2nd ch from hook.
Side 2: Working along the opposite side of the foundation ch, sc in first ch, hdc in next ch, dc in next ch, hdc in next ch, sc in next ch, sl st in last ch. (6 sts)
Fasten off, leaving a tail. Each leaf measures about 1 in (2.5 cm) × 0.4 in (1.0 cm).
Border
Border gauge:
- 1 sc in each st along the top and foundation edges
- 2 sc around each dc row-end
- 1 sc in the exposed ch-1 sp at each step ledge
- 3 sc in each outer corner st
The counts below list corners separately where stated.
Rnd 1 (MC): Continue from row 12. Turn, ch 1.
- Top: 3 sc in the first st, sc in the next 5 sts, 3 sc in the last st. (11 sc)
- Left outer edge, going down:
- 4 sc over rows 12–11
- 1 sc in the ledge ch-sp
- 2 sc over row 10
- 1 sc in the ledge ch-sp
- 4 sc over rows 9–8
- 1 sc in the ledge ch-sp
- 10 sc over rows 7–3
- 1 sc in the ledge ch-sp
- 4 sc over rows 2–1
- Total: 28 sc
- Leg A base: Working in the free loops of the foundation ch, 3 sc in the corner ch, sc in the next 7 chs, 3 sc in the last ch. (13 sc)
- Leg gap:
- 10 sc up Leg A over rows 1–5
- 5 sc along the underside of the bridge
- 10 sc down Leg B
- Total: 25 sc
- Leg B base: Same as Leg A base. (13 sc)
- Right outer edge, going up: Mirror the left edge. (28 sc)
Join with a sl st to the first sc.
Rnd 1 total: 11 + 28 + 13 + 25 + 13 + 28 = 118 sc
Fasten off.
Opening edging (MC): Join MC at the base of the opening.
- 5 sc across the unworked row 6 sts
- Up the left side: 1 sc per row-end over rows 7, 8 and 9, plus 1 sc at the ledge (4 sc)
- 1 sc in the row 9 ch-1 sp at the top
- Down the right side: 4 sc, mirroring the left side
Join with a sl st. (14 sc) Fasten off.
Why the math works: A dc row is about the height of 2 sc, so 2 sc per row-end lies flat. Each 2-st block along the top or base gets 2 sc. One sc at each ledge smooths the stepped edges into clean slants. The 3-st corners turn without cupping. The single round adds 0.1 in (0.3 cm) per edge, which brings 3.3 × 3.6 in (8.4 × 9.1 cm) to 3.5 × 3.8 in (8.9 × 9.7 cm).
Assembly
- Pin the lower flower so its center sits about 0.9 in (2.3 cm) above the base of Leg A, overlapping the outer edge slightly.
- Pin the second flower directly above it, with the petals just touching.
- Tuck one leaf above the upper flower, one at the left between the flowers, and one below the lower flower.
- Whipstitch the leaves at their stem ends.
- Tack each flower around its center and at each petal tip.
- Open the jump ring sideways with pliers. Pass it through the center ch-1 sp of row 12 and the key ring, then close it fully.
Final Blocking
- Weave in all ends through the sc border.
- Mist the letter with water until it is damp.
- Pin it to the mat at 3.5 in (8.9 cm) × 3.8 in (9.7 cm). Place pins at each corner, both peak corners and both gap corners.
- Straighten the mesh rows using the mat’s grid.
- Pin the opening into a neat triangle.
- Optional: apply light starch for a firmer keychain.
- Let it dry completely before unpinning.
Final Quality-Control Checklist
- Rows 5–6 have 19 sts each.
- Row 9 has 15 sts.
- Row 12 has 7 sts.
- Border round 1 has 118 sc.
- The opening edging has 14 sc.
- Blocks are square and the windows are open.
- Both outer edges slant evenly.
- Flowers are firmly tacked, with no stitching visible from the front.
- The jump ring is fully closed.
Troubleshooting
- Blocks look tall and narrow: Pull your dc loops up less, or go down a hook size.
- Bridge is twisted: Rip back to the end of Leg B and chain again with the bridge lying flat.
- Border ruffles: Use 2 sc per row-end, not 3.
- Border cups: Make sure every outer corner has 3 sc.
- End-inc looks loose: Snug the first loops of the dtr before finishing it.
- Opening closes up: Pin it open while blocking.
- Flowers droop: Add tacking stitches at the petal tips.
Care
Hand wash in cool water, press out the water in a towel, and reshape it flat to dry. Starch again if you want extra stiffness.
Final Notes
The size of the finished keychain comes down to one measurement: a 0.3 in (0.8 cm) block. That makes a 1.2 in (3.0 cm) leg, a 2.7 in (6.9 cm) crossbar row, a 3.3 × 3.6 in (8.4 × 9.1 cm) letter, and a 3.5 × 3.8 in (8.9 × 9.7 cm) finished keychain. Check your gauge on Leg B and the rest will follow.
Happy crocheting!