

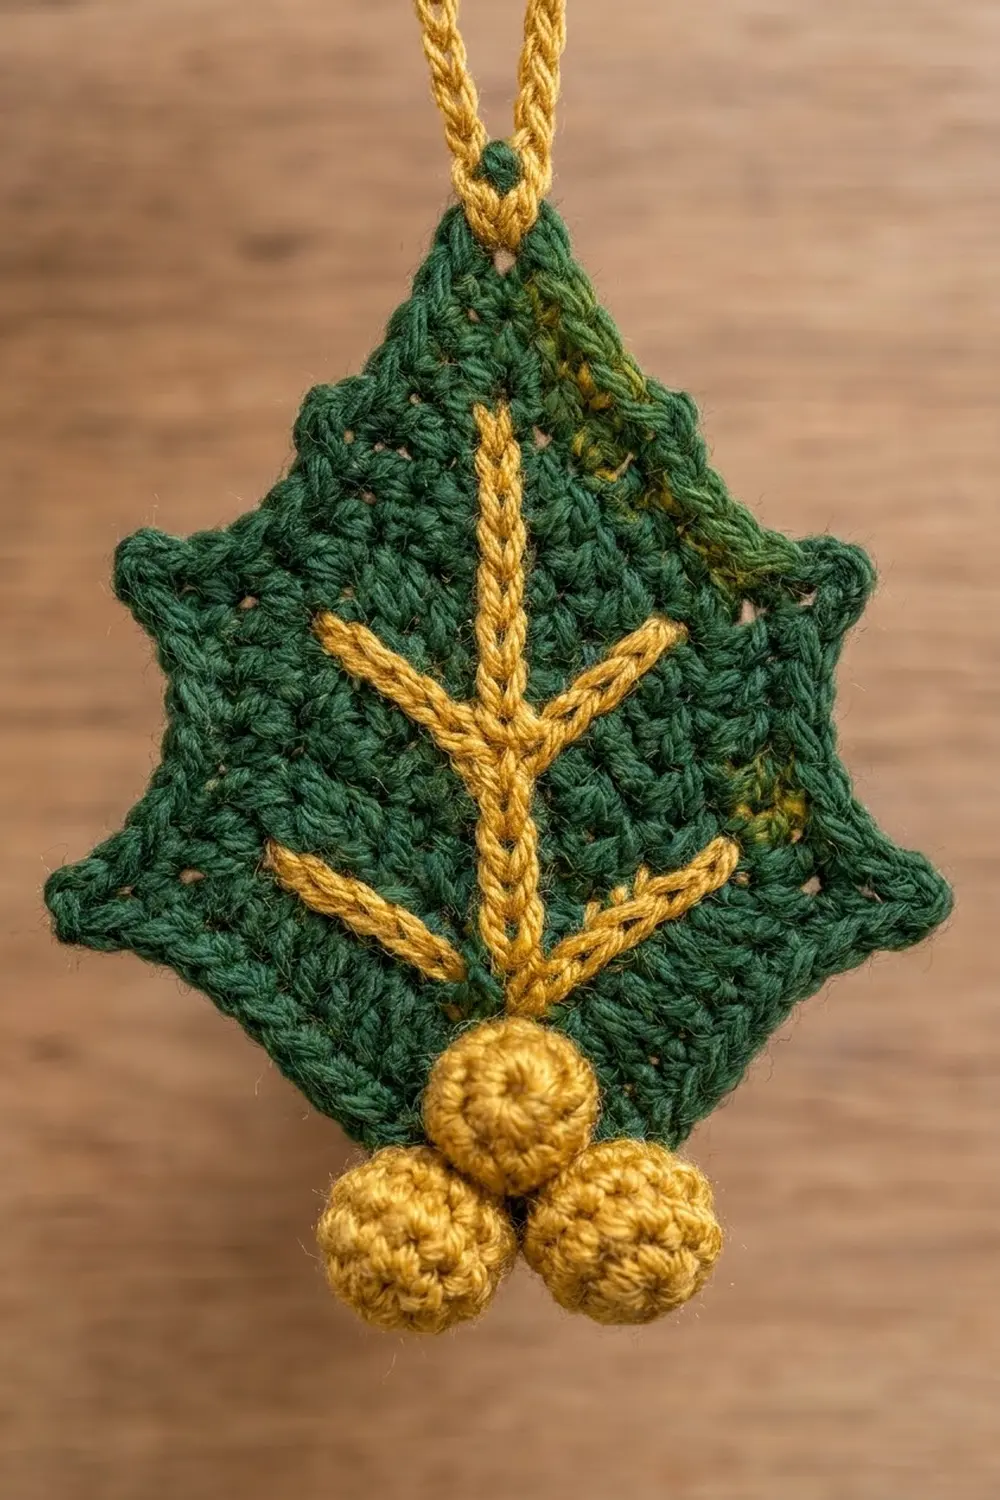
This holly leaf is a small, sharp-edged motif in deep forest green. A raised golden vein runs up its center, and three round gold berries sit at its base. A golden hanging loop at the top tip turns it straight into a tree ornament, and it also works as a gift tag or package topper.
The look is classic and a little elegant. Seven pointed tips give the leaf its holly silhouette: one at the top and three down each side. The gold vein and its four pairs of upward-angled branches are added last in surface slip stitch, so they sit on top of the green fabric like embroidery.
The pattern uses US crochet terms. The finished leaf is about 3.75 in (9.5 cm) wide and 4 in (10.2 cm) tall from point to point. With the berries it is about 4.5 in (11.4 cm) tall, and the loop adds about 2.4 in (6.1 cm).
Construction is simple. First you work the leaf body in single crochet rows, increasing and then decreasing to form an elongated hexagon. Two edging rounds follow, and the second one shapes the seven points. Then you add the gold vein in surface slip stitch, make three stuffed berries and sew them on, and finish with the hanging loop.
Finished Size and Construction
- Finished size: 3.75 in (9.5 cm) wide x 4 in (10.2 cm) tall, point to point; 4.5 in (11.4 cm) tall with berries
- Skill level: Easy-intermediate
- Terminology: US crochet terms
- Yarn weight: DK (light worsted, #3) cotton or cotton blend
- Hook: 3.5 mm (E-4); 3.0 mm optional for the berries
- Number of pieces: 1 leaf plus 3 berries, sewn into one finished motif (no joining of motifs)
- Layout: Single vertical leaf, with the berries at the bottom tip and the loop at the top tip
- Leaf body (before edging): 2.9 in (7.4 cm) wide x 3.2 in (8.1 cm) tall
- Size before the point round: 3.3 in (8.4 cm) x 3.6 in (9.1 cm)
- Border depth: about 0.4 in (1.0 cm) per side, measured to the point tips
Materials
Choose a smooth, tightly plied DK cotton. It gives crisp points and keeps the surface stitches clearly defined. Fuzzy yarns blur the vein and soften the tips.
- Forest green (main color, A): 5 g, about 12 m
- Golden yellow (contrast color, B): 4 g, about 10 m
These quantities include a margin for checking your gauge and for tails.
Tools:
- 3.5 mm (E-4) crochet hook
- 3.0 mm (C-2 or D-3) hook (optional, for firmer berries)
- Tapestry needle
- Small pinch of fiberfill or gold yarn scraps, for stuffing
- Stitch marker
- Rust-proof pins and a blocking mat or folded towel
- Spray bottle with water
Abbreviations (US Terms)
- ch: chain
- sl st: slip stitch
- sc: single crochet
- hdc: half double crochet
- dc: double crochet
- sc2tog: single crochet 2 together
- sc3tog: single crochet 3 together
- MR: magic ring
- st(s): stitch(es)
- pt: point (see below)
Special stitch – Point (pt): Ch 3, sl st in 2nd ch from hook, sc in next ch. This makes a short, firm spike. Points are not counted as stitches.
Surface slip stitch: Hold the yarn behind the work. Insert the hook from front to back through the fabric, yarn over, and pull a loop up through the fabric and through the loop on the hook.
Gauge and Checkpoints
Gauge: 18 sc and 20 rows = 4 in (10.2 cm) with a 3.5 mm hook.
The leaf itself is your test piece. Work Rows 1–6, then measure before you continue. Check these measurements as you go:
- After Row 6: 13 sts measure 2.9 in (7.4 cm) wide, and the piece is 1.2 in (3.0 cm) tall.
- After Row 10: the piece is 2 in (5.1 cm) tall.
- After Row 16: the body is 2.9 in (7.4 cm) wide x 3.2 in (8.1 cm) tall.
- After Edging Round 1: 3.3 in (8.4 cm) x 3.6 in (9.1 cm).
- After Edging Round 2: 3.75 in (9.5 cm) x 4 in (10.2 cm), point to point.
A difference of up to 0.1 in (0.3 cm) is fine. If Row 6 is wider than 3 in (7.6 cm), go down half a hook size. If it is narrower than 2.8 in (7.1 cm), go up half a hook size. Width matters more than row height, because blocking evens out the height.
Leaf Body
Use A and the 3.5 mm hook. You work in rows from the bottom tip upward. The ch 1 at the start of each row does not count as a stitch.
Row 1: Ch 2, 3 sc in 2nd ch from hook. (3 sts)
Row 2: Ch 1, turn. 2 sc in first st, sc in next st, 2 sc in last st. (5 sts)
Row 3: Ch 1, turn. 2 sc in first st, sc in next 3 sts, 2 sc in last st. (7 sts)
Row 4: Ch 1, turn. 2 sc in first st, sc in next 5 sts, 2 sc in last st. (9 sts)
Row 5: Ch 1, turn. 2 sc in first st, sc in next 7 sts, 2 sc in last st. (11 sts)
Row 6: Ch 1, turn. 2 sc in first st, sc in next 9 sts, 2 sc in last st. (13 sts)
Checkpoint: the piece should be 2.9 in (7.4 cm) wide.
Rows 7–10: Ch 1, turn. Sc in each st across. (13 sts each row)
This straight section is the widest part of the leaf.
Row 11: Ch 1, turn. Sc2tog, sc in next 9 sts, sc2tog. (11 sts)
Row 12: Ch 1, turn. Sc2tog, sc in next 7 sts, sc2tog. (9 sts)
Row 13: Ch 1, turn. Sc2tog, sc in next 5 sts, sc2tog. (7 sts)
Row 14: Ch 1, turn. Sc2tog, sc in next 3 sts, sc2tog. (5 sts)
Row 15: Ch 1, turn. Sc2tog, sc in next st, sc2tog. (3 sts)
Row 16: Ch 1, turn. Sc3tog. (1 st)
Do not fasten off. Every row has an odd number of stitches, so the center stitches line up into one straight column. The gold vein follows that column later.
Border
The border has two rounds. Round 1 evens out the edge and sets the stitch counts. Round 2 shapes the holly points.
Border gauge: On the sides, work 1 sc per row-end. The 16 rows measure 3.2 in (8.1 cm), so 16 sc per side matches the body’s 5 rows per inch. Work the stitches on the slanted sections loosely so the edge doesn’t pull in.
Edging Round 1 (Trim Round)
Keep using A, and do not turn.
- Ch 1, then work 3 sc in the sc3tog of Row 16 (top tip).
- Work 16 sc down the first side, 1 in each row-end from Row 16 to Row 1.
- Work 3 sc in the free loop of the foundation ch (bottom tip).
- Work 16 sc up the second side, 1 in each row-end from Row 1 to Row 16.
- Join with a sl st to the first sc.
Count: 3 (top tip) + 16 (side) + 3 (bottom tip) + 16 (side) = 38 sc.
The tip stitches are counted separately from the 16 stitches on each side, so no stitch is counted twice. Place a marker in the center sc of the top tip.
Edging Round 2 (Point Round)
Sl st into the first sc of the top tip.
Top tip: Ch 2 (does not count as a st), hdc in same st, (dc, pt, dc) in marked center st, hdc in next st.
First side (16 sts, working downward): [Sc in next st, hdc in next st, (dc, pt, dc) in next st, hdc in next st, sc in next st] 3 times, sl st in next st.
Bottom tip: Sc in each of next 3 sts.
Second side (16 sts, working upward): Sl st in next st, [sc in next st, hdc in next st, (dc, pt, dc) in next st, hdc in next st, sc in next st] 3 times.
Join with a sl st to the first hdc. Fasten off and weave in the ends.
Count: 38 sts worked into + 7 extra sts (1 extra in each of the 7 point stitches) = 45 sts, plus 7 points.
Why the math works:
- Each side has 3 units of 5 stitches (15) plus 1 sl st valley (1), for 16 stitches. That matches Round 1 exactly.
- Each point sits in the center stitch of its unit. On the first side, the points fall at the row-ends of Rows 14, 9 and 4, which gives an upper, a middle and a lower point. The second side mirrors them.
- Each side produces 1 + (3 x 6) = 19 sts, so the round total is 4 + 19 + 3 + 19 = 45.
Checkpoint: the leaf should be 3.75 in (9.5 cm) wide x 4 in (10.2 cm) tall, point to point.
Gold Vein
Use B and the 3.5 mm hook, and work with the right side facing you.
Center vein: Draw up a loop of B at the center sc of the bottom tip from Round 1. Work 1 surface sl st into the center stitch of each row, from Row 1 to Row 16, and stop at the base of the top point. (16 surface sl sts) Fasten off and pull the tail to the back.
Branches: Work 4 pairs of branches. Each branch starts at the vein and travels diagonally upward. With each surface sl st, move up 1 row and out 1 stitch.
- Pair 1: start at Row 3; work 3 surface sl sts on each side (Rows 4–6).
- Pair 2: start at Row 6; work 3 surface sl sts on each side (Rows 7–9).
- Pair 3: start at Row 9; work 3 surface sl sts on each side (Rows 10–12).
- Pair 4: start at Row 12; work 2 surface sl sts on each side (Rows 13–14).
Total: 16 + 2 x (3 + 3 + 3 + 2) = 38 surface sl sts.
Keep the stitches relaxed. Each surface sl st should be as tall as one row, or the leaf will pucker. Fasten off each branch separately and weave the ends in behind the green.
Berries (Make 3)
Use B and the 3.0 mm hook, or the 3.5 mm hook if you crochet tightly. Work in continuous rounds.
Rnd 1: 6 sc in MR. (6 sts)
Rnd 2: 2 sc in each st around. (12 sts)
Rnd 3: Sc in each st around. (12 sts)
Rnd 4: Sc2tog 6 times. (6 sts)
Stuff the berry firmly. Fasten off, leaving a 6 in (15.2 cm) tail. Weave the tail through the front loops of the last 6 sts and pull it closed. Each berry is about 0.6 in (1.5 cm) across.
Attaching: Arrange the berries in a triangle over the bottom tip. Place one berry centered over Rows 2–3, on the base of the vein. Place the other two side by side just below it, overlapping the bottom edge. Sew each berry to the leaf and to its neighbors, then hide the ends inside the berries.
Checkpoint: the ornament should be 4.5 in (11.4 cm) tall, including the berries.
Hanging Loop
With B, draw up a loop at the tip of the top point (the sl st of the pt). Ch 24, then sl st in the same tip to close the loop. For a firmer cord, sl st back into each of the 24 ch. Fasten off and weave in the end.
The loop stands about 2.4 in (6.1 cm) tall, so the total hanging length is about 6.9 in (17.5 cm).
Final Blocking
- Spray the leaf lightly until it is damp. Keep the berries as dry as you can.
- Lay the leaf right side up on a mat or a folded towel.
- Pin the top point and the bottom tip 4 in (10.2 cm) apart.
- Pin the two middle side points 3.75 in (9.5 cm) apart.
- Pin each remaining point outward, with the pin through the tip of the pt.
- Smooth the vein so the branches lie in even, matching V shapes.
- Let the leaf dry completely, then unpin it and fluff the berries round.
Final Quality-Control Checklist
- The body has 16 rows, and Rows 6–10 each have 13 sts.
- Edging Round 1 has 38 sc: 3 + 16 + 3 + 16.
- Edging Round 2 has 45 sts plus 7 points.
- The points are the same height on both sides.
- The center vein runs straight from the bottom tip to the top point.
- The 4 branch pairs are symmetrical and angle upward.
- The 3 berries are firmly stuffed and securely sewn in a triangle.
- The loop is centered on the top point.
- After blocking, the leaf measures 3.75 in (9.5 cm) x 4 in (10.2 cm).
- All ends are woven in on the wrong side.
Troubleshooting
The leaf cups: The Round 1 stitches on the slanted sections are too tight. Rework them more loosely, or block the leaf firmly.
The points are floppy: Pull the sl st in each pt snug, or use a firmer cotton. A light spray of starch also helps.
The vein puckers the leaf: The surface stitches are too short. Pull them out and rework them with taller loops.
The vein wanders off center: Count across Row 6. The center is stitch 7 of 13.
The berries look flat: Add more stuffing before you close them, or use a smaller hook.
Care
Hand wash in cool water with mild soap, roll in a towel to remove water, and reshape to dry flat. Store the leaf flat or hanging so the points don’t get crushed.
Final Notes
The measurement chain is short and easy to check:
- Row 6: 2.9 in (7.4 cm) wide.
- Finished body: 2.9 x 3.2 in (7.4 x 8.1 cm).
- After Edging Round 1: 3.3 x 3.6 in (8.4 x 9.1 cm).
- After Edging Round 2: 3.75 x 4 in (9.5 x 10.2 cm), point to point.
- With berries: 4.5 in (11.4 cm) tall.
- With the loop: 6.9 in (17.5 cm) total hanging length.
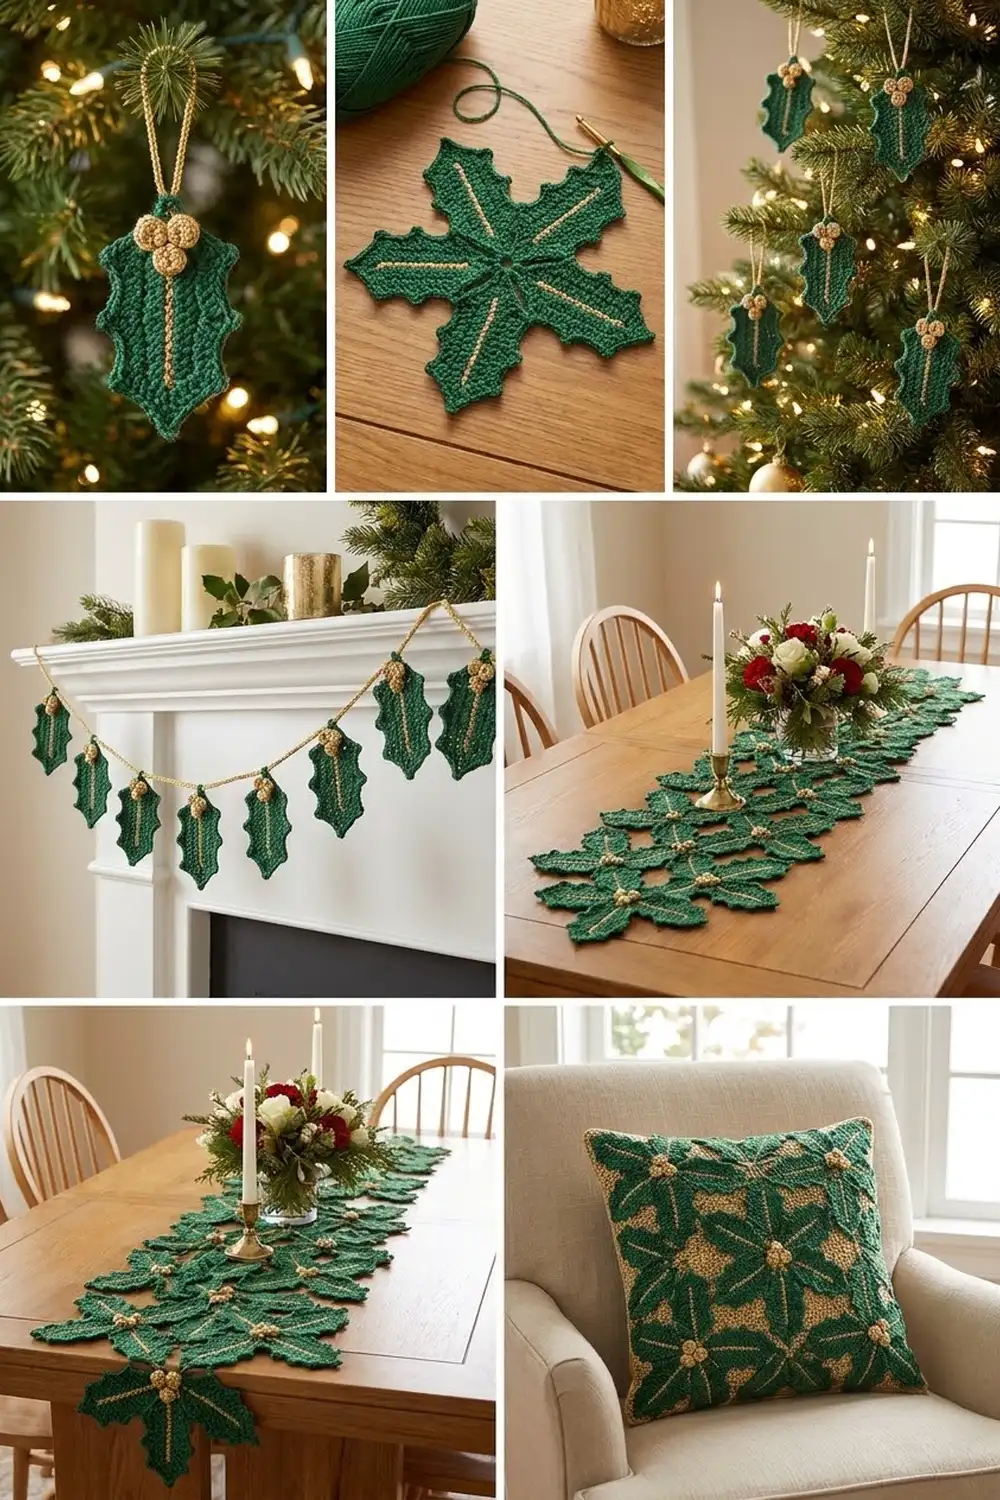
If each checkpoint matches, your leaf will block into a crisp, balanced holly ornament.
Happy crocheting!