

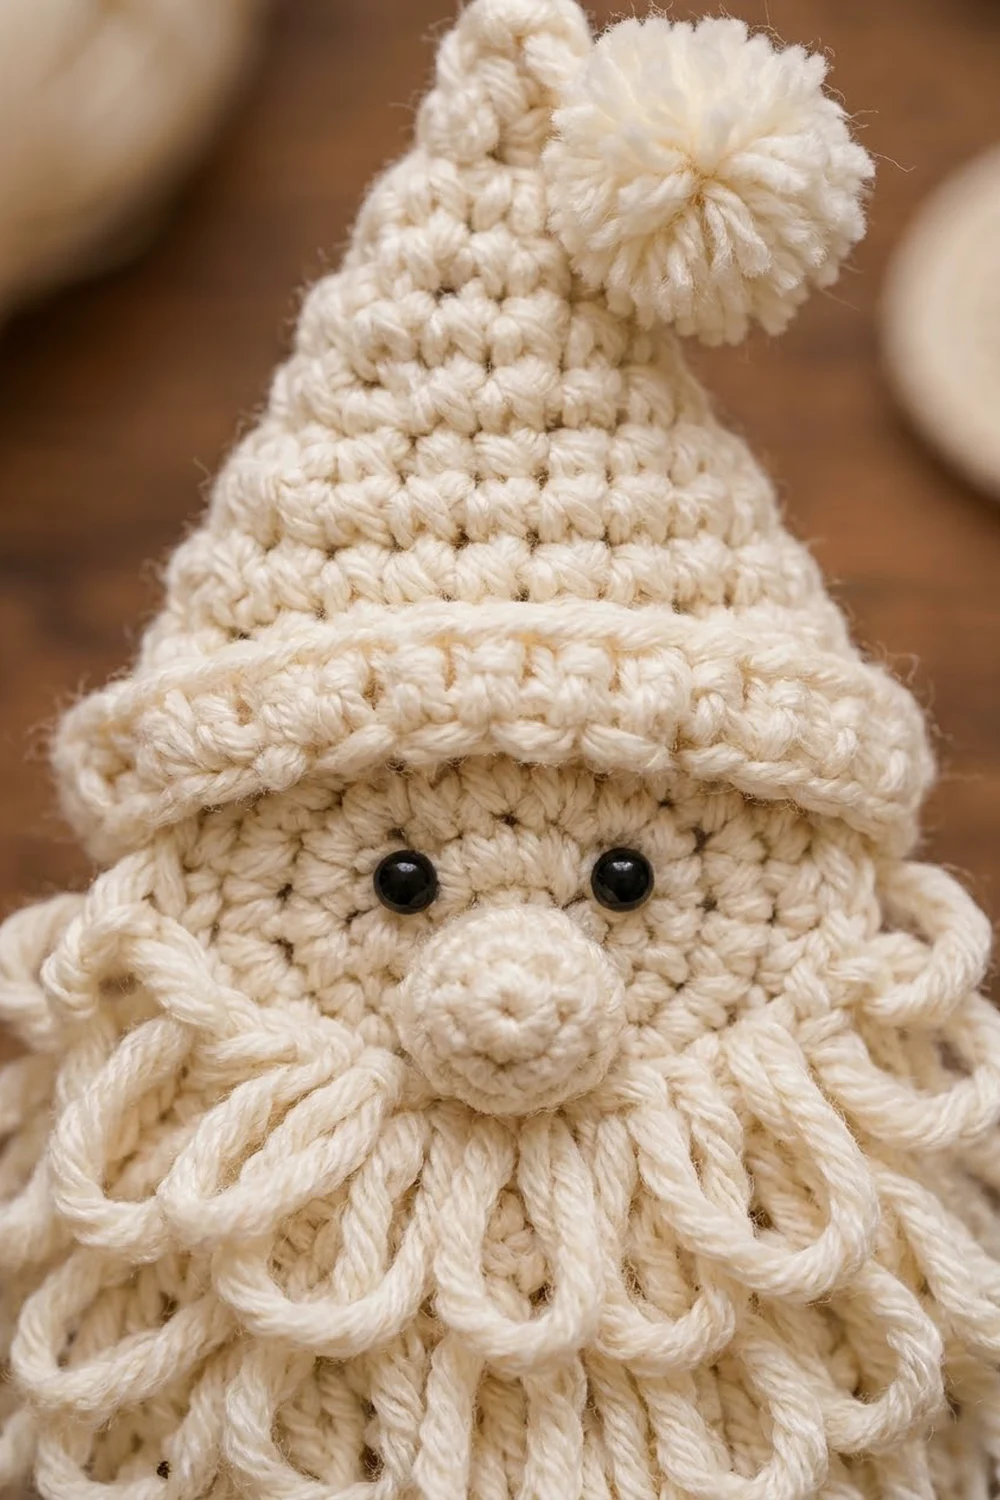
The Snowdrift Santa is a soft, all-cream Christmas ornament with a pointed hat, a fluffy pompom and a full beard made of layered chain loops. The single color gives it a calm Scandinavian look, and two small black eyes give it a face.
The ornament is worked in one cream or ivory worsted-weight yarn. The beard loops add a lot of texture, so a plain color works well. It looks good on a tree, on a gift package or tied to a wreath.
The finished ornament is 4 in (10.2 cm) wide and 7.5 in (19.1 cm) tall, plus a 2 in (5.1 cm) hanging loop. This pattern uses US crochet terms.
You make six small components and sew them into one ornament:
- a flat hat triangle with a rolled brim
- a round face
- a stuffed nose
- a flat beard backing with eight tiers of chain loops
- a yarn pompom
- a slip-stitch hanging loop
Finished Size and Construction
- Finished size: 4 in (10.2 cm) wide × 7.5 in (19.1 cm) tall, plus a 2 in (5.1 cm) hanging loop
- Skill level: Easy / advanced beginner
- Terminology: US crochet terms
- Yarn weight: Worsted (#4), cotton or cotton blend
- Hook: 4.0 mm (G-6)
- Number of pieces: 1 finished ornament, built from 6 components sewn together
- Layout: hat at the top, face tucked under the brim, beard sewn over the lower face
- Hat size before border: 3.6 in (9.1 cm) wide × 2.4 in (6.1 cm) tall
- Hat size after border: 4 in (10.2 cm) wide × 2.8 in (7.1 cm) tall
- Border depth: 0.2 in (0.5 cm) on each edge
- Face: 2 in (5.1 cm) across
- Beard backing: 3.6 in (9.1 cm) wide × 3.6 in (9.1 cm) tall
Materials
Yarn advice: Use a smooth, mercerized or combed cotton in worsted weight. Cotton gives clear stitches, and the chain loops keep their shape. Fuzzy acrylic will blur the loops.
- Cream / ivory: 30 g, about 51 m (56 yd)
- Black safety eyes, 6 mm: 2 (or black embroidery floss for a child-safe version)
Tools:
- 4.0 mm (G-6) crochet hook
- Tapestry needle
- 4 stitch markers
- Scissors
- Pinch of fiberfill
- 1 in (2.5 cm) pompom maker, or a cardboard strip 1 in (2.5 cm) wide
- Rust-proof pins and a blocking mat
The yarn amount includes about a 30% margin for your gauge test and the hanging loop.
Abbreviations (US Terms)
- ch – chain
- sl st – slip stitch
- sc – single crochet
- sc2tog – single crochet 2 together (decrease)
- inc – 2 sc in the same stitch
- dec – invisible decrease (sc2tog through front loops only)
- FLO – front loop only
- rsc – reverse single crochet (crab stitch)
- MR – magic ring
- RS / WS – right side / wrong side
- st(s) – stitch(es)
Special stitch – Loop tier: With RS facing, sl st into the first free loop of a marked line. Then ch the stated number, sc in the next free loop, and repeat across. A line of n free loops makes n − 1 chain loops.
Why FLO on WS rows: On a WS row, the front loop is on the WS. Working in the front loop only leaves the back loops free on the RS. Those free loops form a ridge line, and the beard loops are worked into it.
Gauge and Checkpoints
Gauge: 18 sc and 20 rows = 4 in (10.2 cm) in sc rows. This works out to 4.5 sts and 5 rows per inch. Each row is 0.2 in (0.5 cm) tall.
Make the face first and use it as your test piece. It should measure 2 in (5.1 cm) across.
Checkpoints:
- Face after Rnd 5: 2 in (5.1 cm) across
- Hat after Row 12: 3.6 in (9.1 cm) wide at the base, 2.4 in (6.1 cm) tall
- Hat after border: 4 in (10.2 cm) × 2.8 in (7.1 cm)
- Beard backing after Row 18: 3.6 in (9.1 cm) × 3.6 in (9.1 cm)
- Beard with loops: 4 in (10.2 cm) at its widest point
Adjusting:
- Face too big: go down to a 3.5 mm hook.
- Face too small: go up to a 4.5 mm hook.
- Rows taller than 0.2 in (0.5 cm): keep the hook, but pull each sc snug before you start the next one.
Pattern
Face (make 1)
- Rnd 1: 6 sc in MR. (6)
- Rnd 2: inc in each st. (12)
- Rnd 3: sc 1, inc × 6. (18)
- Rnd 4: sc 2, inc × 6. (24)
- Rnd 5: sc 3, inc × 6. (30)
Sl st to the next st and fasten off. Leave a 12 in (30.5 cm) tail.
Eyes: Fit the safety eyes between Rnds 2 and 3, slightly above the center, with 3 sts between them. Lock the backs before you go on.
Checkpoint: 2 in (5.1 cm) across, lying flat.
Nose (make 1)
- Rnd 1: 6 sc in MR. (6)
- Rnd 2: inc × 6. (12)
- Rnd 3: sc in each st. (12)
- Rnd 4: dec × 6. (6)
Add a tiny pinch of fiberfill. Fasten off and leave a 10 in (25.4 cm) tail. Weave the tail through the 6 front loops and pull closed.
The nose should be about 0.6 in (1.5 cm) across.
Hat (make 1)
The hat is worked bottom-up in rows.
- Row 1 (RS): ch 17, sc in the 2nd ch from the hook and in each ch across. (16)
- Rows 2–3: ch 1, turn, sc across. (16)
- Row 4 (WS): ch 1, turn, sc FLO across. (16) This leaves a ridge on the RS at the top of the brim.
- Row 5: ch 1, turn, sc2tog, sc 12, sc2tog. (14)
- Row 6: ch 1, turn, sc across. (14)
- Row 7: ch 1, turn, sc2tog, sc 10, sc2tog. (12)
- Row 8: ch 1, turn, sc2tog, sc 8, sc2tog. (10)
- Row 9: ch 1, turn, sc2tog, sc 6, sc2tog. (8)
- Row 10: ch 1, turn, sc2tog, sc 4, sc2tog. (6)
- Row 11: ch 1, turn, sc2tog, sc 2, sc2tog. (4)
- Row 12: ch 1, turn, sc2tog × 2. (2)
Fasten off.
Rows 1–4 form the brim band, 0.8 in (2.0 cm) deep. Checkpoint: 3.6 in (9.1 cm) wide × 2.4 in (6.1 cm) tall. The border comes later.
Beard Backing (make 1)
The backing is worked top-down. All even (WS) rows from Row 2 to Row 16 are worked in FLO. Each of these rows leaves a free-loop line on the RS for a loop tier.
- Row 1 (RS): ch 15, sc in the 2nd ch from the hook and in each ch across. (14)
- Row 2 (WS, FLO): ch 1, turn, 2 sc in the first st, sc 12, 2 sc in the last st. (16)
- Row 3: ch 1, turn, sc across. (16)
- Row 4 (FLO): sc across. (16)
- Row 5: sc across. (16)
- Row 6 (FLO): sc across. (16)
- Row 7: sc2tog, sc 12, sc2tog. (14)
- Row 8 (FLO): sc across. (14)
- Row 9: sc2tog, sc 10, sc2tog. (12)
- Row 10 (FLO): sc across. (12)
- Row 11: sc2tog, sc 8, sc2tog. (10)
- Row 12 (FLO): sc across. (10)
- Row 13: sc2tog, sc 6, sc2tog. (8)
- Row 14 (FLO): sc across. (8)
- Row 15: sc2tog, sc 4, sc2tog. (6)
- Row 16 (FLO): sc across. (6)
- Row 17: sc2tog, sc 2, sc2tog. (4)
- Row 18: sc2tog × 2. (2)
Begin every row from Row 3 on with ch 1, turn. Fasten off and leave a 16 in (40.6 cm) tail.
Checkpoint: 3.6 in (9.1 cm) wide at Rows 2–6 and 3.6 in (9.1 cm) tall, tapering to a rounded point.
Beard Loop Tiers
Each free-loop line sits at the top of the row before the FLO row. So it has the same number of free loops as that earlier row has stitches.
Work the tiers from the bottom (Tier 8) up to the top (Tier 1). Fold each finished tier downward, out of the way. Fasten off after each tier and weave in the ends on the WS.
| Tier | Line made by | Free loops | Chain length | Loops |
|---|---|---|---|---|
| 8 | Row 16 | 6 | ch 9 | 5 |
| 7 | Row 14 | 8 | ch 9 | 7 |
| 6 | Row 12 | 10 | ch 7 | 9 |
| 5 | Row 10 | 12 | ch 7 | 11 |
| 4 | Row 8 | 14 | ch 7 | 13 |
| 3 | Row 6 | 16 | ch 7 | 15 |
| 2 | Row 4 | 16 | ch 7 | 15 |
| 1 | Row 2 | 14 | ch 7 | 13 |
Total: 96 free loops and 88 chain loops.
- ch 7 loops hang about 0.7 in (1.8 cm). The tiers are 0.4 in (1.0 cm) apart, so each tier overlaps the one below.
- ch 9 loops hang about 0.9 in (2.3 cm). Tier 8 sits 0.6 in (1.5 cm) above the backing tip, so its loops hang 0.3 in (0.8 cm) below the point.
- The edge loops of each tier stick out about 0.2 in (0.5 cm) on each side. This brings the beard to 4 in (10.2 cm) wide.
Pompom (make 1)
Wrap the yarn 60 times around a 1 in (2.5 cm) pompom maker or cardboard strip. Tie the center tightly and cut the loops. Trim it to a round 1 in (2.5 cm) ball, and keep the tie ends for sewing.
Hanging Loop (make 1)
Ch 22. Sl st into the back bump of each ch. (22)
This makes a firm cord 4.4 in (11.2 cm) long. Folded in half, it forms a 2 in (5.1 cm) loop, with a little length left over for sewing.
Border
The border goes around the hat only. It neatens the hat’s edges and rolls the brim forward.
Border gauge: same as the main gauge, 4.5 sc per inch. One sc worked into a row end lies flat because a row (0.2 in / 0.5 cm) is about as tall as a sc is wide (0.22 in / 0.6 cm).
Rnd 1: With the RS facing, join the yarn in the first foundation ch of the hat. Work:
- 3 sc in the first ch (corner group)
- sc in the next 14 ch
- 3 sc in the last ch (corner group)
- 12 sc up the side, 1 in each row end
- 2 sc in each of the 2 sts of Row 12 (4 tip sts)
- 12 sc down the other side, 1 in each row end
Sl st to the first sc. (48)
Counts per side:
- Bottom edge: 20 sts. This includes both 3-sc corner groups (3 + 14 + 3).
- Each side: 12 sts. This does not include corner sts.
- Tip: 4 sts.
- Total: 20 + 12 + 4 + 12 = 48.
Rnd 2: ch 1. Working left to right, rsc in each of the 20 bottom-edge sts only. (20 rsc)
Fasten off and leave a 16 in (40.6 cm) tail.
Why the math works:
- The 16 foundation chs take one sc each, and the extra 2 sts in each corner turn the corners flat: 16 + 4 = 20.
- The 12 rows take one sc each, so each side has 12 sts and does not ruffle.
- The rsc twists the bottom edge into the rolled brim band.
- The border adds 0.2 in (0.5 cm) to each edge. The hat goes from 3.6 in (9.1 cm) to 4 in (10.2 cm) wide, and from 2.4 in (6.1 cm) to 2.8 in (7.1 cm) tall.
Assembly
- Lay the hat RS up. Slide the top 0.4 in (1.0 cm) (2 rounds) of the face under the brim, centered. Sew the back of the brim to the face.
- Lay the beard backing RS up over the lower face, so its Row 1 edge sits 0.8 in (2.0 cm) above the bottom of the face. Whip-stitch the Row 1 edge to the face. Then tack the face edge to the back of the beard.
- About 0.8 in (2.0 cm) of face should now show between the brim and the beard.
- Sew the nose centered just below the eyes. Its lower edge should overlap the top of the beard by about 0.1 in (0.3 cm).
- Sew the pompom to the hat tip, tilted slightly to the right.
- Fold the hanging loop in half and sew both ends to the back of the hat tip.
Size check: 2.8 + 1.6 − 0.8 + 3.6 + 0.3 = 7.5 in (19.1 cm) tall and 4 in (10.2 cm) wide.
- 2.8 in (7.1 cm): bordered hat
- 1.6 in (4.1 cm): face showing below the brim
- 0.8 in (2.0 cm): face overlapped by the beard
- 3.6 in (9.1 cm): beard backing
- 0.3 in (0.8 cm): loops hanging below the beard point
Final Blocking
- Mist the whole ornament lightly with water until it is damp, not wet.
- Pin the ornament to 4 in (10.2 cm) wide × 7.5 in (19.1 cm) tall.
- Pin the hat tip straight up, and keep the brim edges level.
- Lift each beard tier with your fingers and let the loops fall straight down.
- Fluff the pompom, and keep it away from the pins.
- Let it dry completely, about 6 hours, before you unpin it.
Final Quality-Control Checklist
- Face measures 2 in (5.1 cm), and the eye backs are locked.
- Hat has 16 sts at the base, a visible ridge after Row 4, and 2 sts at the tip.
- Hat border Rnd 1 has 48 sts, and Rnd 2 has 20 rsc.
- Beard backing has 18 rows, with 2 sts at the point.
- All 8 tiers are done, with 88 loops in total.
- Ornament measures 4 in (10.2 cm) × 7.5 in (19.1 cm).
- Hanging loop is 2 in (5.1 cm) and securely stitched.
- All ends are woven in on the WS.
Troubleshooting
- The hat sides ripple. You worked more than one sc per row end. Redo the border with exactly 12 sc per side.
- The beard loops twist. Chain more loosely, or block with a little more water.
- The free-loop lines are on the wrong side. You worked FLO on RS rows. FLO belongs only on WS rows.
- The beard is narrower than 4 in (10.2 cm). Check that Row 2 has 16 sts.
- The face is lopsided. Stagger the increases, or block it flat before you sew.
- The pompom is shedding. Retie the center tighter, and trim it less.
Care
Hand wash in cool water, press out the water in a towel, and dry flat, fluffing the loops. Store flat in tissue paper so the beard loops keep their shape.

Final Notes
Here is the full measurement chain:
- Gauge: 18 sc × 20 rows = 4 in (10.2 cm)
- Face: 2 in (5.1 cm)
- Hat: 3.6 in (9.1 cm) before the border, 4 in (10.2 cm) × 2.8 in (7.1 cm) after it
- Beard backing: 3.6 in (9.1 cm) square, then 4 in (10.2 cm) wide with its loops
- Finished ornament: 4 in (10.2 cm) × 7.5 in (19.1 cm)
If each checkpoint matches, the finished Santa will too.
Happy crocheting!