

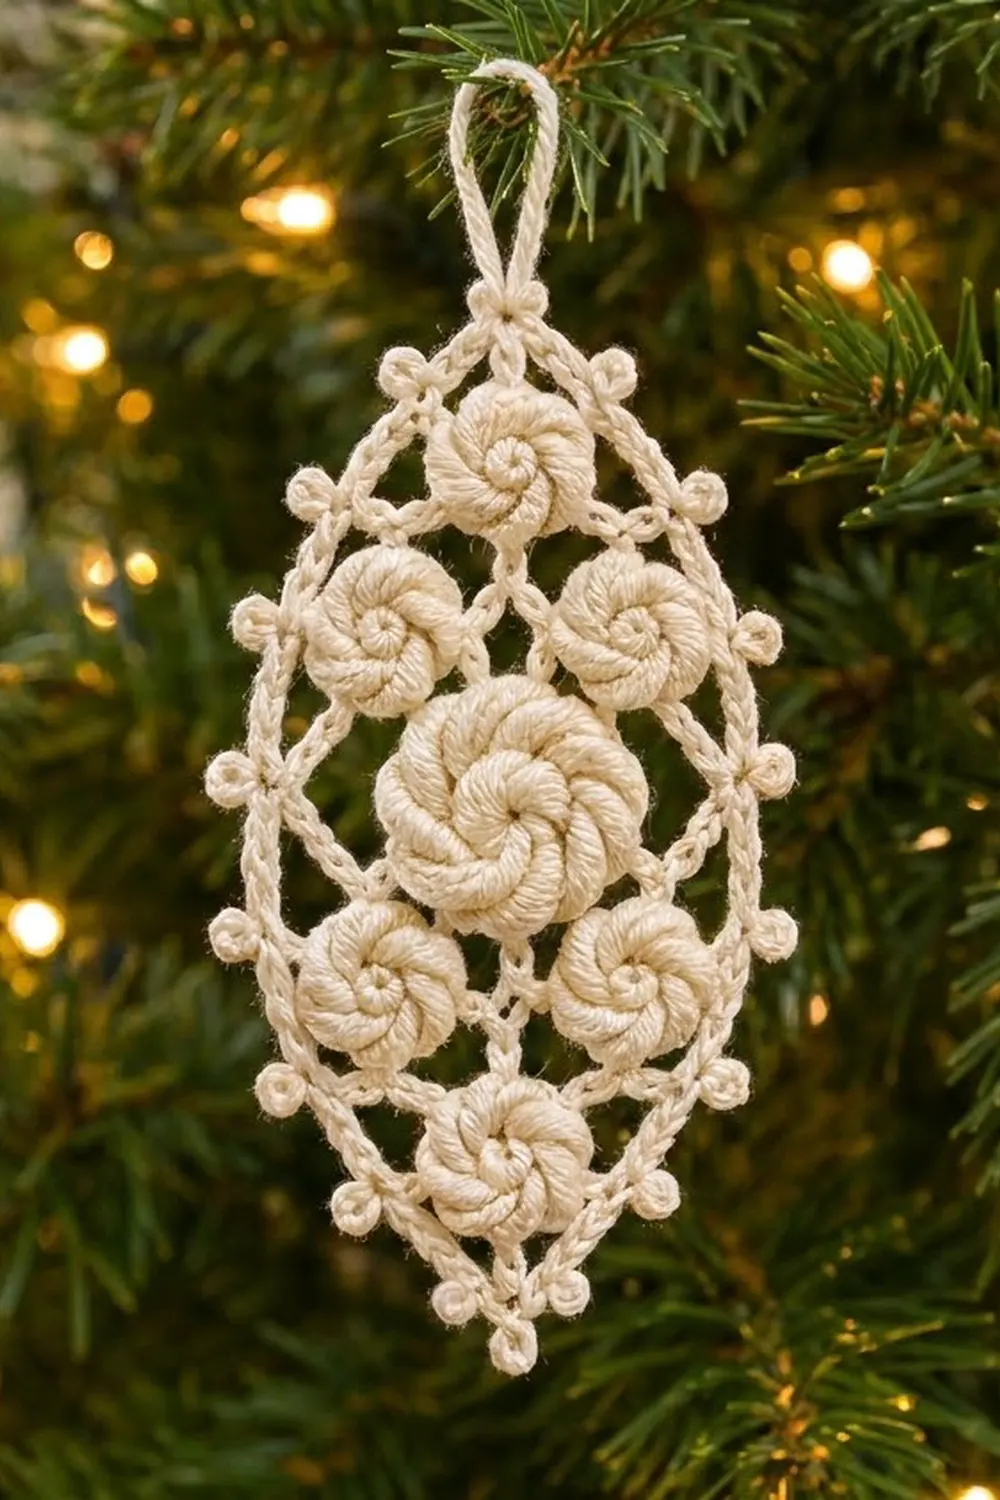
This lacy ornament is shaped like a pointed oval. Seven spiral rosettes sit inside a fine chain frame, and a ring of picots runs around the edge. It looks like Irish crochet lace and suits a tree, a gift tag, or a window.
The sample is made in one color, ivory cotton thread, so all you see is the texture: raised spiral ridges in the rosettes, open chain lace between them, and small round picots on the edge. This pattern uses US crochet terms.
The finished ornament is 3 in (7.6 cm) wide and 4.5 in (11.4 cm) tall. With the 1 in (2.5 cm) hanging loop, it is 5.5 in (14.0 cm) tall.
Construction is simple to follow. You make a large center rosette first. Then you make six small rosettes and join them to the center and to each other as you work their last round. After that, a two-round border goes around everything to add the chain frame, the picots, the two points, and the hanging loop.
Finished Size and Construction
- Finished size: 3 in x 4.5 in (7.6 cm x 11.4 cm), plus a 1 in (2.5 cm) loop
- Skill level: Intermediate
- Terminology: US crochet terms
- Yarn weight: Size 3 crochet cotton thread (fine lace weight)
- Hook: 2.0 mm (US 4 steel)
- Number of pieces: 1 ornament (7 rosettes joined as you go, then bordered)
- Layout: large rosette in the center; small rosettes at top, upper left, upper right, lower left, lower right, and bottom
- Large rosette: 1.5 in (3.8 cm) across, including its loop round
- Small rosette: 1 in (2.5 cm) across, including its loop round
- Size before border: 2.75 in x 3.75 in (7.0 cm x 9.5 cm)
- Border depth: 1/8 in (0.3 cm) along the sides and 3/8 in (1.0 cm) at each point
Materials
Use mercerized size 3 cotton thread. Its smooth sheen makes the spiral ridges stand out, and it holds its shape after blocking. Choose a warm ivory or cream. Pure white also works but gives a cooler look.
- Ivory size 3 cotton: 10 g, about 30 m (33 yd), padding cord included
These amounts include a safety margin of about 20 percent. One ornament uses about 8 g. To make a set of matching ornaments, buy enough thread for all of them from one dye lot.
Tools:
– 2.0 mm (US 4 steel) crochet hook
– Tapestry needle with a small eye
– Sharp scissors
– Blocking board or foam mat
– Rustproof pins
– Spray starch or a diluted fabric stiffener
– Ruler or tape measure
Abbreviations (US Terms)
- ch – chain
- sl st – slip stitch
- sc – single crochet
- BLO – back loop only
- sk – skip
- sp – space
- st(s) – stitch(es)
- PC – padding cord
- inc – 2 sc in the same st
Special technique – Padding cord (PC): Cut 4 strands of thread, each 12 in (30.5 cm) long, and hold them together as one cord. Lay the cord along the top of the stitches you are working into, and work every sc over it so the cord is hidden inside. This padding raises each round into a rounded ridge.
Special stitch – Picot: Ch 3, then sl st into the 3rd ch from the hook. Picots are not counted in stitch totals.
Gauge and Checkpoints
Before you start the full ornament, make one small rosette as a test (Rnds 1–4). Gauge matters more than usual in this pattern, because each rosette’s size sets where the joined loops land.
- Checkpoint 1: A small rosette after Rnd 3 measures 0.75 in (1.9 cm) across.
- Checkpoint 2: A small rosette after Rnd 4 measures 1 in (2.5 cm) across, tip of one loop to tip of the opposite loop.
- Checkpoint 3: The large rosette after Rnd 5 measures 1.25 in (3.2 cm), and after Rnd 6 it measures 1.5 in (3.8 cm).
- Checkpoint 4: The joined cluster of seven rosettes, pinned flat, measures 2.75 in x 3.75 in (7.0 cm x 9.5 cm).
- Checkpoint 5: The bordered ornament measures 10 sc per 1 in (2.5 cm) along the edge and 3 in x 4.5 in (7.6 cm x 11.4 cm) overall.
If the test rosette is too big, go down to a 1.75 mm hook or pull the padding cord a little snugger. If it is too small, go up to a 2.25 mm hook. Change only the hook size, never the stitch counts, so the loop counts stay the same.
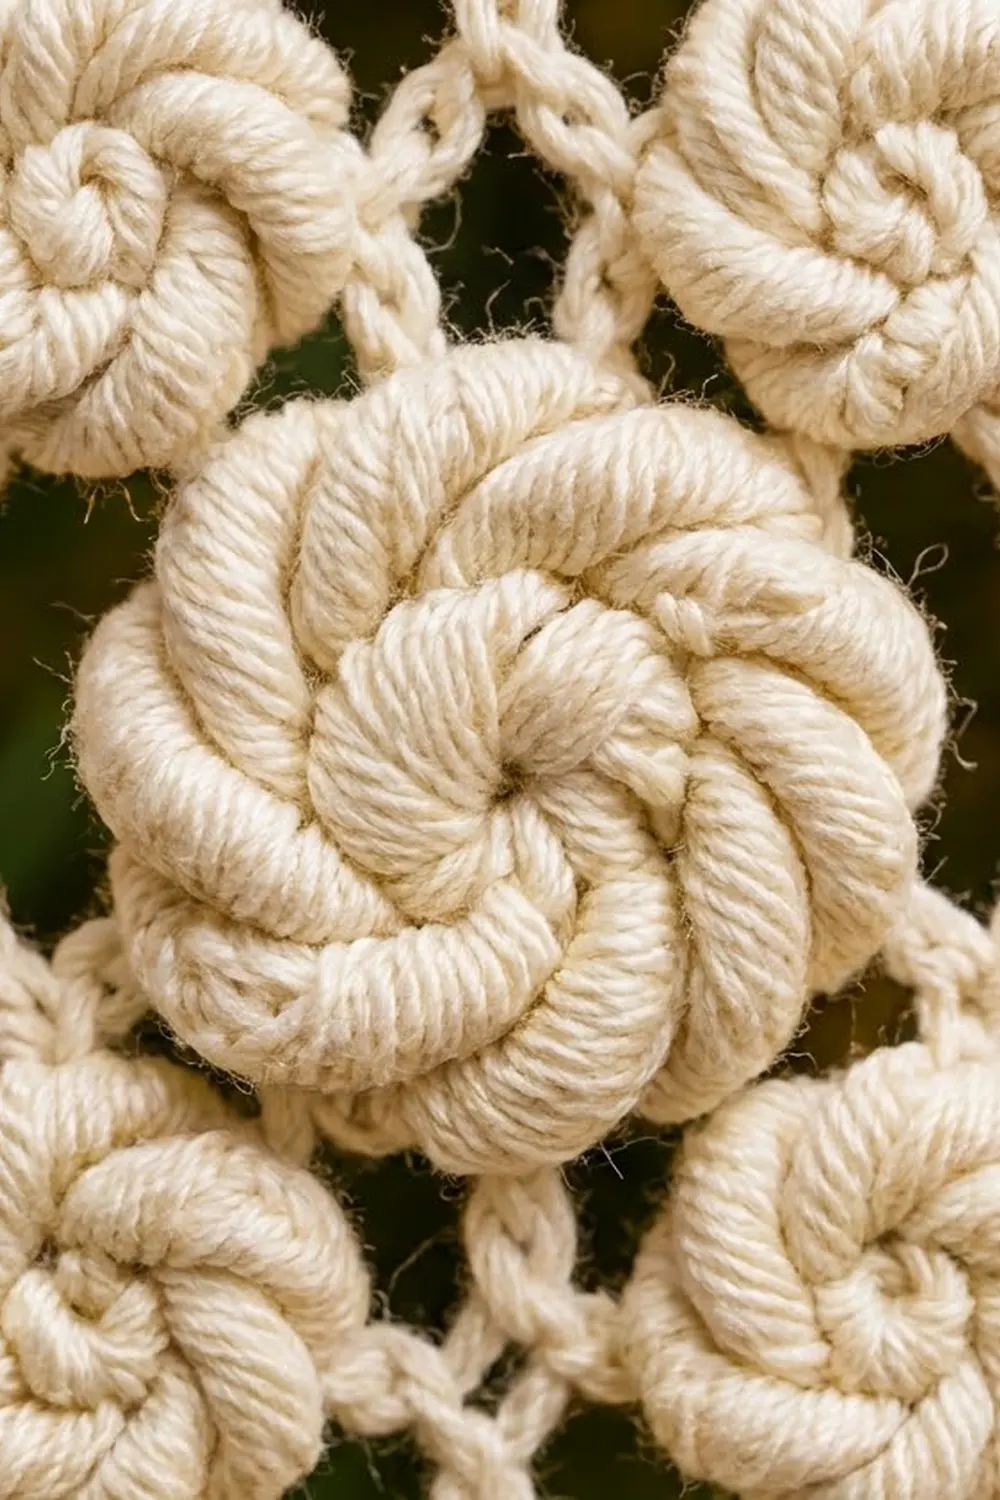
Large Center Rosette
Work all of the PC rounds in a continuous spiral and do not join them. Put a removable marker in the first st of each round.
Rnd 1: Make an adjustable ring. Ch 1 and hold the PC along the ring. Work 8 sc into the ring, over the PC as well. Pull the ring closed. (8 sts)
Rnd 2: Working in BLO and over the PC, inc in each st around. (16 sts)
Rnd 3: Working in BLO and over the PC, sc in next st, inc in next st 8 times. (24 sts)
Rnd 4: Working in BLO and over the PC, sc in next 2 sts, inc in next st 8 times. (32 sts)
Rnd 5: Working in BLO and over the PC, sc in next 3 sts, inc in next st 8 times. (40 sts)
The unused front loops make the spiral ridges. In each round the increase lands one stitch later than in the round before, so the 8 increase lines curve and give the swirl.
Pull the PC so the rosette cups a little, then cut it flush. Sl st in the next st.
Rnd 6 (loop round): Ch 1, sc in next st, ch 5, sk 4 sts 8 times. Join with a sl st to the first sc. (8 sc and 8 ch-5 loops; 48 sts including chains)
Each repeat uses exactly 5 sts of Rnd 5 (1 sc + 4 skipped), and 8 x 5 = 40. Fasten off.
Hold the rosette upright. Name its loops by compass direction: N (top), NE, E, SE, S, SW, W, NW. The NE, NW, SE, and SW loops will hold the four diagonal rosettes. N and S hold the top and bottom rosettes. E and W stay free for the border.
Small Rosettes (Make 6, Joining as You Go)
Work Rnds 1–3 the same way as Rnds 1–3 of the large rosette, in BLO over the PC. At the end of Rnd 3 you have 24 sts. Cut the PC flush and sl st in the next st.
Rnd 4, unjoined loop: Sc in next st, ch 4, sk 2 sts. (8 sc and 8 ch-4 loops when finished; 40 sts including chains)
Rnd 4, joined loop: Sc in next st, ch 2, sl st into the named loop of the neighboring rosette, ch 2, sk 2 sts.
A joined loop still counts as one of the 8 loops. Each repeat uses 3 sts (1 sc + 2 skipped), and 8 x 3 = 24. Before you start Rnd 4, turn the rosette so the loops you need to join fall in the right places. Join with a sl st to the first sc and fasten off.
Make and join the rosettes in this order:
- Top (T): T’s S loop joins the center’s N loop.
- Upper right (UR): UR’s NW loop joins T’s SE loop. UR’s SW loop joins the center’s NE loop.
- Upper left (UL): UL’s NE loop joins T’s SW loop. UL’s SE loop joins the center’s NW loop.
- Lower right (LR): LR’s NW loop joins the center’s SE loop.
- Bottom (B): B’s N loop joins the center’s S loop. B’s NE loop joins LR’s SW loop.
- Lower left (LL): LL’s NE loop joins the center’s SW loop. LL’s SE loop joins B’s NW loop.
Because the top rosette touches both upper rosettes, it sits higher than they do, and the same is true at the bottom. This is what gives the cluster its tall oval shape.
Size checkpoint: Pin the cluster flat. It should measure 2.75 in x 3.75 in (7.0 cm x 9.5 cm).
Border
Border gauge: 10 sc per 1 in (2.5 cm) along the edge in Rnd 2, with picots included.
Outer loops. Going clockwise from the top, the border works into these free loops:
- T: N, NE, E
- UR: N, NE, E, SE
- Center: E
- LR: NE, E, SE, S
- B: E, SE, S, SW, W
- LL: S, SW, W, NW
- Center: W
- UL: SW, W, NW, N
- T: W, NW
Totals: T 5, UR 4, center E 1, LR 4, B 5, LL 4, center W 1, UL 4, for 28 loops. The other free loops (S and W on UR, N and W on LR, N and E on LL, S and E on UL) face inward. Leave them open as part of the lace.
Rnd 1 (chain frame): Join the thread with a sc in T’s N loop. Working clockwise, sc in each outer loop. Between two loops of the same rosette, ch 3. Between loops of different rosettes, ch 6. That means ch 6 at T to UR, UR to center E, center E to LR, LR to B, B to LL, LL to center W, center W to UL, and UL to T. End with a sl st to the first sc.
Count: 28 sc + 20 ch-3 sps (60 ch) + 8 ch-6 sps (48 ch) = 136 sts.
Per side: The tips are T’s N loop and B’s S loop. Each side between the tips has 13 sc, 10 ch-3 sps, and 4 ch-6 sps, which is 13 + 30 + 24 = 67 sts. Two sides plus 2 tip sc gives 67 x 2 + 2 = 136.
Rnd 2 (picot edge and loop): Sl st into the top tip sc.
- Ch 1, then in the tip sc work (sc, ch 18, sc).
- Down the right side: sc in each sc. In each ch-3 sp, work (sc, picot, sc). In each ch-6 sp, work (3 sc, picot, 3 sc).
- In the bottom tip sc, work (sc, picot, sc).
- Up the left side, repeat the right-side sequence.
- Join with a sl st to the first sc.
Count per side: 13 + (10 x 2) + (4 x 6) = 57 sc and 14 picots. Total: 57 x 2 + 2 (top tip) + 2 (bottom tip) = 118 sc, 29 picots, and 1 ch-18 loop.
Hanging loop: Sl st into the ch-18 loop. Ch 1 and work 28 sc into the loop. Sl st into the next sc of Rnd 2 and fasten off.
Why the math works: Each ch-6 sp gets 6 sc, one for each chain, so the long bridges lie flat. Each ch-3 sp gets 2 sc plus a picot, and the picot fills the third chain’s width, so the short spans don’t ruffle. The tips get an extra sc and a picot, which pulls them into points. That is why the border is 3/8 in (1.0 cm) deep at the points but only 1/8 in (0.3 cm) at the sides. It adds 2 x 1/8 in to the width, so 2.75 in becomes 3 in (7.6 cm). It adds 2 x 3/8 in to the height, so 3.75 in becomes 4.5 in (11.4 cm).
Final Blocking
- Weave in all the ends along the backs of the rosettes. Trim them close.
- Soak the ornament in cool water for 5 minutes, then press it gently in a towel.
- Pin it face up on the board to 3 in x 4.5 in (7.6 cm x 11.4 cm).
- Pin the top and bottom tips first, then the widest point on each side at the center E and W bridges.
- Pin every picot outward so each one stands as a round bead.
- Press each rosette’s center down lightly with a fingertip so the spiral sits evenly.
- Spray with starch or brush on diluted stiffener. Let it dry completely, at least 6 hours.
- Unpin the ornament and shape the hanging loop by hand.
Final Quality-Control Checklist
- Seven rosettes: one large in the center and six small around it
- Spiral ridges on every rosette turn the same way
- No padding cord shows at the end of any rosette
- Large rosette: 8 loops. Each small rosette: 8 loops.
- 10 joins in total, every one a tidy sl st
- Rnd 1 has 136 sts
- Rnd 2 has 118 sc and 29 picots
- Ornament measures 3 in x 4.5 in (7.6 cm x 11.4 cm), and the loop is 1 in (2.5 cm)
- Both points are sharp, and the shape is the same on both sides
Troubleshooting
Rosette cups or curls: Your padding cord is pulled too tight. Loosen it before you cut it, then block the rosette flat.
Rosette ruffles: The thread is too loose over the cord. Go down a hook size.
Spiral looks flat: You probably worked through both loops by mistake. Rework the round in BLO.
Joins twist the cluster: One loop was joined in the wrong position. Undo that sl st and count the compass positions again.
Border waves: Check that you are working exactly 6 sc in each ch-6 sp.
Border pulls in: Your chains are too tight. Work Rnd 1’s chains with a looser hand.
Points are blunt: Pin the tips harder while blocking and let them dry fully.
Care
Hand wash in cool water with mild soap, press dry in a towel, and re-block with starch. Store it flat in tissue paper between seasons.
Final Notes
Each measurement depends on the one before it. The small rosette is 0.75 in (1.9 cm), or 1 in (2.5 cm) with its loops. The large rosette is 1.25 in (3.2 cm), or 1.5 in (3.8 cm) with its loops. Joined, the cluster is 2.75 in x 3.75 in (7.0 cm x 9.5 cm). Rnd 1 has 136 sts and Rnd 2 has 118 sc and 29 picots. The finished ornament is 3 in x 4.5 in (7.6 cm x 11.4 cm), or 5.5 in (14.0 cm) tall with the loop. If you hit each checkpoint, the last pinning will go smoothly.
Happy crocheting!